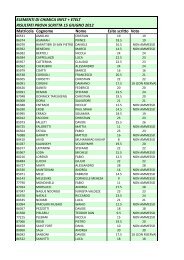
Pioneer 3™ Pioneer 2™ H8- Series Operations Manual
Pioneer 3™ Pioneer 2™ H8- Series Operations Manual
Pioneer 3™ Pioneer 2™ H8- Series Operations Manual

You also want an ePaper? Increase the reach of your titles
YUMPU automatically turns print PDFs into web optimized ePapers that Google loves.
Quick Start<br />
A Successful Connection<br />
ARIA prints out lots of diagnostic text as it negotiates a connection with the robot. If<br />
successful, the client requests various AROS servers to start their activities, including sonar<br />
polling, position integration, and<br />
so on. The microcontroller<br />
sounds an audible connection<br />
cue, and you should hear the<br />
robot’s sonar ping with a<br />
distinctive and repetitive<br />
clicking. In addition, the<br />
motors-associated STATUS LED<br />
on the User Control Panel should<br />
light continuously (was flashing<br />
slowly while awaiting<br />
connection). Note that the<br />
ARIA demo automatically<br />
engages your robot’s motors<br />
though a special client<br />
command. Normally, the<br />
motors are disengaged when<br />
first connecting.<br />
The amber SERIAL port<br />
indicator LEDs on the robot’s<br />
User Control Panel should blink<br />
to indicate ARIA-client to AROSserver<br />
communications, too.<br />
OPERATING THE ARIA<br />
DEMONSTRATION CLIENT<br />
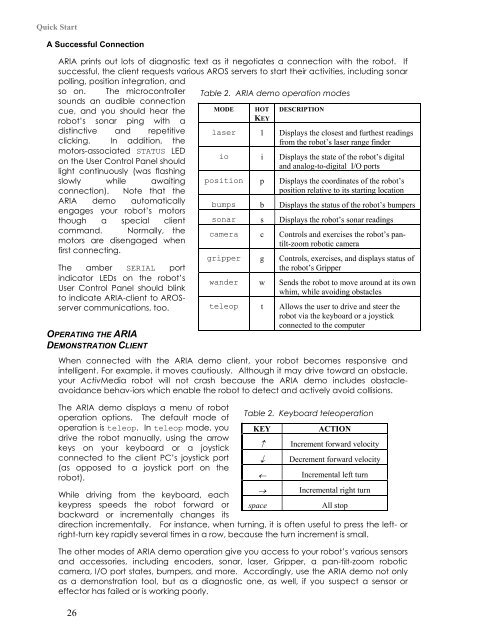
Table 2. ARIA demo operation modes<br />
MODE HOT<br />
KEY<br />
DESCRIPTION<br />
laser l Displays the closest and furthest readings<br />
from the robot’s laser range finder<br />
io i Displays the state of the robot’s digital<br />
and analog-to-digital I/O ports<br />
position p Displays the coordinates of the robot’s<br />
position relative to its starting location<br />
bumps b Displays the status of the robot’s bumpers<br />
sonar s Displays the robot’s sonar readings<br />
camera c Controls and exercises the robot’s pantilt-zoom<br />
robotic camera<br />
gripper g Controls, exercises, and displays status of<br />
the robot’s Gripper<br />
wander w Sends the robot to move around at its own<br />
whim, while avoiding obstacles<br />
teleop t Allows the user to drive and steer the<br />
robot via the keyboard or a joystick<br />
connected to the computer<br />
When connected with the ARIA demo client, your robot becomes responsive and<br />
intelligent. For example, it moves cautiously. Although it may drive toward an obstacle,<br />
your ActivMedia robot will not crash because the ARIA demo includes obstacleavoidance<br />
behav-iors which enable the robot to detect and actively avoid collisions.<br />
The ARIA demo displays a menu of robot<br />
operation options. The default mode of<br />
operation is teleop. In teleop mode, you<br />
drive the robot manually, using the arrow<br />
keys on your keyboard or a joystick<br />
connected to the client PC’s joystick port<br />
(as opposed to a joystick port on the<br />
robot).<br />
Table 2. Keyboard teleoperation<br />
KEY ACTION<br />
↑ Increment forward velocity<br />
↓ Decrement forward velocity<br />
← Incremental left turn<br />
While driving from the keyboard, each<br />
→ Incremental right turn<br />
keypress speeds the robot forward or<br />
backward or incrementally changes its<br />
space All stop<br />
direction incrementally. For instance, when turning, it is often useful to press the left- or<br />
right-turn key rapidly several times in a row, because the turn increment is small.<br />
The other modes of ARIA demo operation give you access to your robot’s various sensors<br />
and accessories, including encoders, sonar, laser, Gripper, a pan-tilt-zoom robotic<br />
camera, I/O port states, bumpers, and more. Accordingly, use the ARIA demo not only<br />
as a demonstration tool, but as a diagnostic one, as well, if you suspect a sensor or<br />
effector has failed or is working poorly.<br />
26