Proxis Stock Manager User's Guide - Proxis Software
Proxis Stock Manager User's Guide - Proxis Software
Proxis Stock Manager User's Guide - Proxis Software

You also want an ePaper? Increase the reach of your titles
YUMPU automatically turns print PDFs into web optimized ePapers that Google loves.
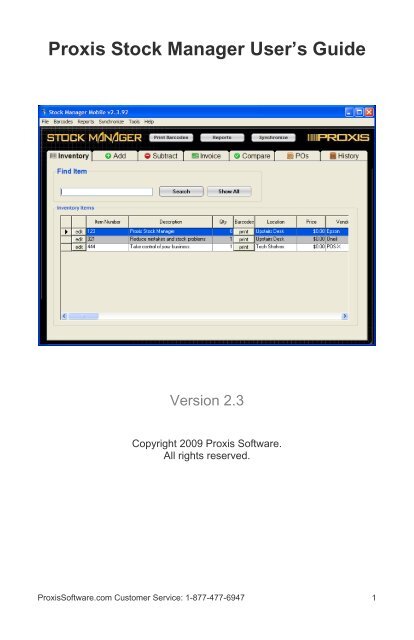
<strong>Proxis</strong> <strong>Stock</strong> <strong>Manager</strong> User’s <strong>Guide</strong><br />
Version 2.3<br />
Copyright 2009 <strong>Proxis</strong> <strong>Software</strong>.<br />
All rights reserved.<br />
<strong>Proxis</strong><strong>Software</strong>.com Customer Service: 1-877-477-6947 1
<strong>Proxis</strong> <strong>Stock</strong> <strong>Manager</strong> User’s <strong>Guide</strong><br />
<strong>Stock</strong> <strong>Manager</strong> Version 2.3<br />
<strong>Proxis</strong> <strong>Software</strong><br />
Telephone: 1-877-477-6947<br />
Fax: 1-360-738-3495<br />
http://www.proxissoftware.com<br />
support@proxissoftware.com<br />
This document and the software described by this document are sold<br />
and distributed by <strong>Proxis</strong> <strong>Software</strong>. All rights reserved. Use of the<br />
software described herein may only be done in accordance with the<br />
License Agreement provided with the software. Information in this<br />
document is subject to change without notice.<br />
Windows is the registered trademark of Microsoft Corporation. All other<br />
trademarks are the property of their respective owners.<br />
PROXIS SOFTWARE WILL NOT BE LIABLE FOR (A) ANY BUG,<br />
ERROR, OMISSION, DEFECT, DEFICIENCY, OR NONCONFORMITY<br />
IN STOCK MANAGER OR THIS DOCUMENTATION; (B) IMPLIED<br />
MERCHANTIBILITY OF FITNESS FOR A PARTICULAR PURPOSE; (C)<br />
IMPLIED WARRANTY RELATING TO COURSE OF DEALING, OR<br />
USAGE OF TRADE OR ANY OTHER IMPLIED WARRANTY<br />
WHATSOEVER; (D) CLAIM OF INFRINGEMENT; (E) CLAIM IN TORT,<br />
WHETHER OR NOT ARISING IN WHOLE OR PART FROM PROXIS<br />
SOFTWARE’S FAULT, NEGLIGENCE, STRICT LIABILITY, OR<br />
PRODUCT LIABILITY, OR (F) CLAIM FOR ANY DIRECT, INDIRECT,<br />
INCIDENTAL, SPECIAL, OR CONSEQUENTIAL DAMAGES, OR LOSS<br />
OF DATA, REVENUE, LICENSEES GOODWILL, OR USE. IN NO CASE<br />
SHALL PROXIS SOFTWARE LIABILITY EXCEED THE PRICE THAT<br />
LICENSEE PAID FOR STOCK MANAGER.<br />
<strong>Proxis</strong><strong>Software</strong>.com Customer Service: 1-877-477-6947 2
<strong>Proxis</strong> <strong>Stock</strong> <strong>Manager</strong> User’s <strong>Guide</strong><br />
Table of Contents<br />
1 Introduction ................................................................................6<br />
1.1 What is <strong>Stock</strong> <strong>Manager</strong>?..............................................................6<br />
1.2 <strong>Stock</strong> <strong>Manager</strong> Features and Benefits.........................................7<br />
1.3 Installation ....................................................................................8<br />
1.3.1 Operating System Compatibility .............................................8<br />
1.3.2 Registration and Activation .....................................................9<br />
1.4 Hardware Setup .........................................................................10<br />
1.4.1 Keyboard Wedge Barcode Scanner Setup...........................10<br />
1.4.2 Cipher Lab 8000 Series Mobile Barcode Scanner Setup .....10<br />
1.4.3 Palm Barcode Scanner Setup ..............................................11<br />
1.4.4 Windows CE Barcode Scanner Setup ..................................12<br />
1.4.5 Barcode Printer Setup...........................................................14<br />
1.4.6 Keychain Scanner Setup ......................................................16<br />
2 Getting Started .........................................................................17<br />
2.1 Preferences and Settings...........................................................17<br />
2.1.1 General Options Tab.............................................................18<br />
2.1.2 Scanner Settings Tab ...........................................................19<br />
2.1.3 Barcode Settings Tab ...........................................................20<br />
2.1.4 Tax Rates Tab ......................................................................22<br />
2.1.5 Company Info Tab ................................................................22<br />
2.2 Customizing Column Labels and Tabs ......................................24<br />
2.3 Managing Users .........................................................................25<br />
2.4 Managing Customers .................................................................26<br />
2.5 Managing Vendors .....................................................................27<br />
3 Working with Inventory ...........................................................28<br />
3.1 Main Inventory Screen ...............................................................29<br />
3.1.1 Adding and Editing Items - General Tab...............................31<br />
3.1.2 Adding and Editing Items - Prices Tab .................................33<br />
3.1.3 Adding and Editing Items – Location Tab.............................34<br />
3.1.4 Adding and Editing Items – Limits Tab .................................37<br />
3.1.5 Adding and Editing Items – Kits Tab.....................................38<br />
3.1.6 Adding and Editing Items – Serial Number Tab ...................40<br />
3.2 Add Screen ................................................................................42<br />
3.2.1 Importing from a Keychain Scanner .....................................43<br />
3.2.2 Setting the Current User .......................................................44<br />
3.2.3 Setting a Location When Adding Items.................................45<br />
3.3 Subtract Screen .........................................................................46<br />
<strong>Proxis</strong><strong>Software</strong>.com Customer Service: 1-877-477-6947 3
3.3.1 Setting a Location When Subtracting Items..........................47<br />
3.3.2 Subtracting Items in a Kit......................................................48<br />
3.4 Invoice Screen ...........................................................................49<br />
3.5 Compare Screen – Physical Inventory Count............................52<br />
3.6 PO Screen..................................................................................53<br />
3.7 History Screen............................................................................56<br />
4 Barcode Label Printing............................................................57<br />
4.1 Barcode Label Part Numbers.....................................................58<br />
4.2 Printing Using the Barcode Label Queue...................................58<br />
4.3 Individual Item Barcode Label Printing ......................................60<br />
4.4 Mobile Barcode Label Printing ...................................................61<br />
5 Inventory Reporting .................................................................62<br />
5.1 Full Inventory Reporting.............................................................63<br />
5.2 Low Inventory Reporting ............................................................63<br />
5.3 Comparison of Physical Inventory Reporting.............................64<br />
5.3.1 Items Scanned Compared to <strong>Stock</strong> <strong>Manager</strong> Levels ...........65<br />
5.3.2 Items Scanned but Not in <strong>Stock</strong> <strong>Manager</strong> ............................65<br />
5.3.3 Items in <strong>Stock</strong> <strong>Manager</strong> but Not Scanned ............................66<br />
5.4 Item History Reporting ...............................................................66<br />
5.5 User History Reporting...............................................................67<br />
5.6 Invoice History Reports..............................................................67<br />
6 Inventory Tools ........................................................................69<br />
6.1 Administrative Password............................................................69<br />
7 Backing up Data .......................................................................72<br />
8 Importing Data..........................................................................73<br />
9 Exporting Data..........................................................................77<br />
10 Synching with Store <strong>Manager</strong>.................................................78<br />
11 Error Handling ..........................................................................79<br />
12 Using the Cipher Lab 8000 Barcode Scanner .......................80<br />
12.1 Scanner Functions .....................................................................80<br />
12.2 Advanced Scanner Settings.......................................................82<br />
12.3 Add Inventory .............................................................................83<br />
12.4 Remove From Inventory.............................................................85<br />
12.5 Compare Inventory Quantities ...................................................86<br />
12.6 Replace Inventory Quantities.....................................................87<br />
12.7 Lookup Inventory........................................................................88<br />
12.8 Synchronize ...............................................................................89<br />
12.9 Utility...........................................................................................90<br />
12.10 Status .........................................................................................90<br />
<strong>Proxis</strong><strong>Software</strong>.com Customer Service: 1-877-477-6947 4
12.11 Scanner Advanced Settings.......................................................91<br />
13 Using Palm Barcode Scanners...............................................92<br />
13.1 Sending Inventory Data to the Scanner .....................................92<br />
13.2 Scanner Functions .....................................................................94<br />
13.3 Add Inventory .............................................................................95<br />
13.4 Subtract From Inventory.............................................................97<br />
13.5 Compare Inventory Quantities ...................................................99<br />
13.6 Replace Inventory Quantities...................................................100<br />
13.7 Add New Inventory Item...........................................................101<br />
13.8 Lookup Products ......................................................................103<br />
13.9 Edit Inventory Information ........................................................105<br />
13.10 Palm Mobile Barcode Printing..................................................106<br />
13.11 Synchronize the Palm Scanner................................................108<br />
13.12 Data Utility................................................................................109<br />
13.13 Palm Device Status..................................................................110<br />
13.14 Calculator Function ..................................................................111<br />
14 Using Windows CE Barcode Scanners................................112<br />
14.1 Device Compatibility.................................................................113<br />
14.2 Sending Inventory Data to the Scanner ...................................114<br />
14.3 Scanner Functions ...................................................................115<br />
14.4 Add To Inventory......................................................................116<br />
14.5 Subtract From Inventory...........................................................118<br />
14.6 Add New Inventory Item...........................................................120<br />
14.7 Compare Inventory Quantities .................................................122<br />
14.8 Edit Inventory Information ........................................................123<br />
14.9 Lookup Products ......................................................................125<br />
14.10 Calculator Function ..................................................................127<br />
14.11 Mobile Printer Setup.................................................................128<br />
14.12 Data Utility................................................................................130<br />
14.13 Scanner Database Status ........................................................132<br />
15 Appendix and Supplemental Information............................133<br />
15.1 Appendix A: The 8000 Series Alpha Keyboard.......................133<br />
15.2 Appendix B: Device Registration ............................................134<br />
15.3 Appendix C: Installing Palm Files ...........................................136<br />
<strong>Proxis</strong><strong>Software</strong>.com Customer Service: 1-877-477-6947 5
1 Introduction<br />
This user’s guide is designed as a learning tool and technical reference<br />
for use with the <strong>Proxis</strong> <strong>Stock</strong> <strong>Manager</strong> software. If at any time you<br />
require technical support or custom programming please contact our<br />
help desk at 1-877-477-6947.<br />
1.1 What is <strong>Stock</strong> <strong>Manager</strong>?<br />
<strong>Stock</strong> <strong>Manager</strong> is a standard Windows desktop application for tracking<br />
inventory items using barcode labels and a barcode scanner.<br />
Figure 1. <strong>Stock</strong> <strong>Manager</strong> Main Screen<br />
<strong>Stock</strong> <strong>Manager</strong> is a simple but powerful inventory management tool<br />
designed for use with both keyboard wedge barcode scanners as well as<br />
mobile devices like the CIPHERLAB 8000 Series, Janam XP Series,<br />
Aceeca Mezura, the Symbol SPT Series. <strong>Stock</strong> <strong>Manager</strong> will also work<br />
on most Window CE and Windows Mobile barcode scanners.<br />
<strong>Stock</strong> <strong>Manager</strong> is very effective for simple inventory tracking like a<br />
supply closet or CD collection, but is also designed for more complex<br />
inventory functions such as doing physical inventories with a mobile<br />
barcode scanner, printing barcode labels with a mobile barcode printer,<br />
keeping track of serialized items, creating invoices, creating purchase<br />
orders, and keeping track of inventory stored in separate locations.<br />
<strong>Proxis</strong><strong>Software</strong>.com Customer Service: 1-877-477-6947 6
1.2 <strong>Stock</strong> <strong>Manager</strong> Features and Benefits<br />
<strong>Stock</strong> <strong>Manager</strong>’s features provide the following benefits:<br />
• Improved Inventory Turns<br />
• Improved Cash Flow<br />
• Increased Security<br />
• Reduced Cost of Physical Inventory Process<br />
• Improves Inventory Retrieval Times<br />
Features include:<br />
• Barcode Printing with Mobile Printer Support<br />
• Barcode Scanning<br />
• Physical Inventory Comparison Reporting<br />
• Basic Invoicing<br />
• Automatic Purchase Orders<br />
• Low Inventory Reporting<br />
• Inventory Valuation<br />
• Data Export (CSV – comma separated value) File<br />
• Data Backup<br />
• Mobile Barcode Scanner Integration for remote management<br />
• Keychain Scanner Support<br />
The mobile barcode scanner programs offer the same functionality<br />
on a small and portable platform:<br />
• Price Lookup<br />
• Location Lookup<br />
• Receive Items<br />
• Enter New Items<br />
• Edit Item Information<br />
• Physical Inventory Scanning (support for a full range of barcode<br />
scanning devices)<br />
• Item Calculator (Cost and Price Palm and Windows CE Only)<br />
• Barcode label printing (Palm and Windows CE only)<br />
<strong>Stock</strong> <strong>Manager</strong> Mobile options:<br />
• Integrates with choice of Palm, Windows CE, OPN2001<br />
Keychain Scanner or the Cipher Lab 8001.<br />
• Provides mobile label printing on Epson, Zebra and Datamax-<br />
Oneil mobile barcode printers.<br />
<strong>Proxis</strong><strong>Software</strong>.com Customer Service: 1-877-477-6947 7
1.3 Installation<br />
To install <strong>Stock</strong> <strong>Manager</strong>, double click the Setup<strong>Stock</strong><strong>Manager</strong>.exe icon<br />
and follow the installation steps. The application is installed to the<br />
c:\<strong>Proxis</strong> <strong>Software</strong>\<strong>Stock</strong> <strong>Manager</strong> folder by default.<br />
After installation, the <strong>Stock</strong> <strong>Manager</strong> application can be purchased and<br />
registered to unlock the demo mode. Demo mode is limited to 10<br />
inventory items. Please call us to locate an authorized reseller.<br />
The <strong>Stock</strong> <strong>Manager</strong> installer will automatically create a shortcut to the<br />
program on the desktop and in the Windows Start Menu.<br />
Figure 2. <strong>Stock</strong> <strong>Manager</strong> Welcome Screen<br />
1.3.1 Operating System Compatibility<br />
<strong>Stock</strong> <strong>Manager</strong> is compatible with the following operating systems:<br />
• Windows 2000<br />
• Windows XP<br />
• Windows Vista 32<br />
• Windows 7<br />
<strong>Proxis</strong><strong>Software</strong>.com Customer Service: 1-877-477-6947 8
1.3.2 Registration and Activation<br />
To register and activate the full version of <strong>Stock</strong> <strong>Manager</strong>:<br />
1. Copy down the Registration Number found in the Product<br />
Registration screen.<br />
2. Purchase a software license from a <strong>Proxis</strong> reseller. Please<br />
contact us for a list of authorized resellers.<br />
3. The <strong>Proxis</strong> reseller will issue an activation code based on the<br />
registration number.<br />
4. Mobile device licenses must also be purchased for using <strong>Stock</strong><br />
<strong>Manager</strong> Mobile barcode scanning software.<br />
Figure 3. Product Registration Screen<br />
<strong>Stock</strong> <strong>Manager</strong> is registered per machine and can be used in a<br />
networked, multiuser environment. It is recommended that the<br />
number of networked users is limited to 5-10. For more users please<br />
contact us.<br />
<strong>Proxis</strong><strong>Software</strong>.com Customer Service: 1-877-477-6947 9
1.4 Hardware Setup<br />
<strong>Stock</strong> <strong>Manager</strong> works with a variety of different hardware combinations.<br />
Most commonly, <strong>Stock</strong> <strong>Manager</strong> is loaded on a computer with a tethered<br />
keyboard wedge scanner and barcode printer attached.<br />
A mobile barcode scanner can also be used to perform physical<br />
inventory and to lookup pricing when the user is away from the main<br />
computer.<br />
1.4.1 Keyboard Wedge Barcode Scanner Setup<br />
1. Plug the scanner into the computer per the connection type.<br />
1.4.2 Cipher Lab 8000 Series Mobile Barcode Scanner Setup<br />
1. Plug the Power Supply into a wall outlet.<br />
2. Plug the USB Cable into an available USB port.<br />
3. Plug both Power Supply and USB cable into the Cradle.<br />
4. Windows will prompt for a driver location.<br />
5. Insert the supplied driver disc.<br />
6. Select the drive letter associated with the driver disc.<br />
7. The system will automatically assign a COM port for the device.<br />
Figure 4. USB Cradle Driver Location with associated COM port<br />
(COM3)<br />
<strong>Proxis</strong><strong>Software</strong>.com Customer Service: 1-877-477-6947 10
Figure 5. Device Settings<br />
1.4.3 Palm Barcode Scanner Setup<br />
1. Plug the Power Supply into a wall outlet.<br />
2. Plug the USB cable into an available USB port.<br />
3. Plug both Power Supply and USB cable into the Cradle.<br />
4. Install the Palm Desktop <strong>Software</strong> from one of the following<br />
locations: the <strong>Stock</strong> <strong>Manager</strong> CD, Palm Website, <strong>Proxis</strong> Website<br />
or <strong>Proxis</strong> Reseller Website.<br />
5. Setup Palm Hot Sync to sync with a scanner device.<br />
6. Synchronize the Palm device to create a User ID.<br />
7. Purchase and Register the <strong>Stock</strong> <strong>Manager</strong> application in Mobile<br />
mode.<br />
8. Install <strong>Stock</strong> <strong>Manager</strong> Palm software by clicking Synchronize<br />
then Install Device <strong>Software</strong>. Refer to Figure 6.<br />
9. Follow the installation prompts. Hot Sync will be shut down and<br />
restarted. If a message appears asking to allow this, click Yes.<br />
<strong>Proxis</strong><strong>Software</strong>.com Customer Service: 1-877-477-6947 11
Figure 6. Install Mobile <strong>Software</strong> from <strong>Stock</strong> <strong>Manager</strong><br />
1.4.4 Windows CE Barcode Scanner Setup<br />
1. Plug the Power Supply into a wall outlet.<br />
2. Plug the USB cable into an available USB port.<br />
3. Plug both Power Supply and USB cable into the Cradle.<br />
4. Install the Microsoft Active Synch software from one of the<br />
following locations: the <strong>Stock</strong> <strong>Manager</strong> CD, Microsoft Website,<br />
<strong>Proxis</strong> Website or <strong>Proxis</strong> Reseller Website.<br />
5. Setup Active Sync to sync with the scanner device.<br />
6. The Windows CE device will synchronize with the computer.<br />
7. Purchase and Register the <strong>Stock</strong> <strong>Manager</strong> application in Mobile<br />
mode.<br />
8. Install <strong>Stock</strong> <strong>Manager</strong> Windows CE software by clicking<br />
Synchronize > Install Mobile <strong>Software</strong>. Refer to figure 6.<br />
9. Ensure that Windows CE is select then click OK.<br />
10. Follow the installation prompts.<br />
<strong>Proxis</strong><strong>Software</strong>.com Customer Service: 1-877-477-6947 12
Figure 7. Microsoft ActiveSync<br />
To activate the <strong>Stock</strong> <strong>Manager</strong> Mobile software:<br />
1. Scan the barcode on the plastic card received with the purchase<br />
of the mobile scanner and mobile software license.<br />
Figure 124a. Splash Screen<br />
<strong>Proxis</strong><strong>Software</strong>.com Customer Service: 1-877-477-6947 13
Figure 124b. Scan or Enter the Activation Code<br />
The <strong>Stock</strong> <strong>Manager</strong> Mobile Device License is a plastic card with a<br />
barcoded activation code. The code is scanned to activate the mobile<br />
device software.<br />
Figure 124a. <strong>Stock</strong> <strong>Manager</strong> Mobile Device License<br />
1.4.5 Barcode Printer Setup<br />
Please refer to the barcode printer’s setup instructions. The barcode<br />
printer must be plugged in with its drivers loaded before <strong>Stock</strong> <strong>Manager</strong><br />
will work with it.<br />
Compatible Desktop Barcode Label Printers:<br />
• Zebra - all models<br />
• Cognitive – all models<br />
• Epson – TM L90<br />
<strong>Proxis</strong><strong>Software</strong>.com Customer Service: 1-877-477-6947 14
• Brother – barcode printer models<br />
• Standard Laser Printers – with Avery labels<br />
Most barcode label printers will work with <strong>Stock</strong> <strong>Manager</strong>. Please<br />
contact us for specific label design.<br />
For assistance, contact the <strong>Proxis</strong> Help Desk at 1-877-477-6947.<br />
<strong>Proxis</strong><strong>Software</strong>.com Customer Service: 1-877-477-6947 15
1.4.6 Keychain Scanner Setup<br />
A keychain scanner is an inexpensive barcode scanner similar in size to<br />
a key fob. The scanner has no user interface but will store thousands of<br />
scans. The scanner can be used with <strong>Stock</strong> <strong>Manager</strong> to add inventory,<br />
subtract inventory, create invoices, perform physical inventory<br />
comparisons, and create purchase orders.<br />
Figure 8. Installing the Keychain Scanner<br />
To install the keychain scanner:<br />
1. Plug the USB Cable into an available USB port.<br />
2. Windows will install a driver automatically (OPN2001 only).<br />
3. The system will automatically assign a COM port for the device.<br />
4. Browse to the Device <strong>Manager</strong> from the Windows Control Panel.<br />
5. Make note in the Device <strong>Manager</strong> of the COM port assigned to<br />
the device. This will be needed later when syncing the device.<br />
<strong>Proxis</strong><strong>Software</strong>.com Customer Service: 1-877-477-6947 16
2 Getting Started<br />
Getting started is easy: Double click the desktop icon and start scanning.<br />
Figure 9. <strong>Stock</strong> <strong>Manager</strong> Desktop Icon<br />
If the inventory items do not have barcodes enter them in by hand. Later<br />
in this manual we’ll explain how to print barcode labels for these items.<br />
2.1 Preferences and Settings<br />
The Settings and Preferences screen provides the ability to modify<br />
application settings including:<br />
• What barcode printer will be used.<br />
• The barcode label format.<br />
• What reports printer to use.<br />
• Choosing a Mobile Barcode Scanner.<br />
• Selecting a Database Location (for networked multi-user<br />
applications).<br />
Figure 10. General Options Tab<br />
<strong>Proxis</strong><strong>Software</strong>.com Customer Service: 1-877-477-6947 17
2.1.1 General Options Tab<br />
Max History Record Size:<br />
This setting specifies the number of history records shown on the History<br />
tab.<br />
Show Product Editor on Item Found:<br />
Open the product editor screen when scanning items from the Inventory<br />
tab.<br />
Enable Partial Search:<br />
Look up items by search terms that might not be an exact match.<br />
Save User on Exit:<br />
Maintains the same user when exiting the application.<br />
Re-Enter User for Each transaction:<br />
Forces the user to enter their user name after every scan.<br />
Enable Store <strong>Manager</strong> Integration:<br />
Use <strong>Stock</strong> manager as a conduit between <strong>Proxis</strong> Store <strong>Manager</strong> POS<br />
software and a mobile barcode scanner. This feature is useful for<br />
uploading product information from the Store <strong>Manager</strong> database to a<br />
mobile barcode scanner to add, subtract or update item information.<br />
Inventory Database Location:<br />
This function allows a large number of users to simultaneously access<br />
the same database for inventory control. It is advised that the shared<br />
database is placed in a network shared directory for multi-user<br />
applications. Please consult our help desk for more information on<br />
setting up <strong>Stock</strong> <strong>Manager</strong> in a multi-user environment. <strong>Stock</strong> <strong>Manager</strong><br />
will use the default inventory database in the installation folder if this field<br />
is left blank.<br />
Default Report Printer:<br />
From the list of available printers, select the printer that will be used for<br />
printing reports.<br />
A default report printer must be selected to preview reports. If no printer<br />
is installed please contact tech support for assistance installing a standalone<br />
pdf printer driver.<br />
Change Password:<br />
Click this button to modify the administrator password. The original<br />
admin password set during the setup wizard must be entered first.<br />
Please contact us if you have lost this password.<br />
<strong>Proxis</strong><strong>Software</strong>.com Customer Service: 1-877-477-6947 18
Figure 11. Scanner Settings<br />
2.1.2 Scanner Settings Tab<br />
Use the Scanner Settings tab in Figure 11. to integrate the mobile<br />
barcode scanner. Some scanners will display extended communications<br />
properties when selected.<br />
Mobile Scanner:<br />
From the Mobile Scanner list, select the barcode scanner to be used.<br />
• Cipher Lab 8000 - All Cipher Lab 8000 series and compatible<br />
scanners.<br />
• Palm Scanner – The Janam XP20 and XP30 series and the<br />
Aceeca IDVERIFI.<br />
• Windows CE Scanner – Motorolla, Honeywell, Datalogic, and<br />
Unitech mobile Windows based barcode scanners. <strong>Stock</strong><br />
<strong>Manager</strong> will also work with most Windows CE or Windows<br />
Mobile PDA without barcode scanner support.<br />
Comm Port Settings:<br />
For use with the 8000 Series barcode scanner only. Select the correct<br />
communications port that the scanner’s cradle is connected to. Refer to<br />
the hardware installation instructions (section 1.4) for further information.<br />
<strong>Proxis</strong><strong>Software</strong>.com Customer Service: 1-877-477-6947 19
Figure 12. Barcode Settings<br />
2.1.3 Barcode Settings Tab<br />
Barcode Settings sets the barcode printing options for <strong>Stock</strong> <strong>Manager</strong>.<br />
Default Barcode Label:<br />
Select from the list of label templates available. If the desired label<br />
format isn’t found in this list, the <strong>Proxis</strong> help desk can design a custom<br />
label format. Barcode label templates are created with Crystal Reports<br />
8.5.<br />
Default Barcode Printer:<br />
From the list of available printers, select the printer to be used for<br />
barcode printing. The selected printer should correspond to the selected<br />
barcode label format. Label formats have been developed for the<br />
following printers:<br />
1. Avery labels can be used with most laser and inkjet printers.<br />
2. All Zebra printers.<br />
3. Epson TM L90.<br />
4. All Cognitive Printers.<br />
Print Barcodes When Adding/Receiving Items<br />
Enabling this option will automatically print a barcode to the default<br />
printer when an item’s quantity is increased (using the Add tab and<br />
<strong>Proxis</strong><strong>Software</strong>.com Customer Service: 1-877-477-6947 20
during Mobile Scanner synchronization). Any new items received on a<br />
mobile scanner will automatically have a barcode printed to the default<br />
barcode printer.<br />
Queue Barcodes:<br />
The Queue Barcodes feature will create a print job of barcodes to be<br />
printed. This feature is useful for printing barcodes on Avery labels<br />
sheets. Please refer to section 3.1 for label printing instructions.<br />
Figure 13. Adding barcodes to the print queue<br />
Figure 14. Managing the Barcode Printing Queue<br />
<strong>Proxis</strong><strong>Software</strong>.com Customer Service: 1-877-477-6947 21
Figure 15. Tax Rates<br />
2.1.4 Tax Rates Tab<br />
Two tax rates can be used when creating Invoices in <strong>Stock</strong> <strong>Manager</strong>.<br />
Tax 2 can also be a Flat Rate tax.<br />
To enable Tax 1 Rates for Invoicing:<br />
1. Enter the tax rate the Tax Rate field.<br />
2. Modify the Display Text if needed.<br />
3. Check the Enable Tax 1 checkbox.<br />
4. Repeat for Tax 2 if needed.<br />
2.1.5 Company Info Tab<br />
The Company Information setting are used to display company name,<br />
street address and contact information on Invoices and Purchase<br />
Orders.<br />
<strong>Proxis</strong><strong>Software</strong>.com Customer Service: 1-877-477-6947 22
Figure 16. Company Information Tab<br />
<strong>Proxis</strong><strong>Software</strong>.com Customer Service: 1-877-477-6947 23
2.2 Customizing Column Labels and Tabs<br />
<strong>Stock</strong> <strong>Manager</strong> can be customized to fit individual and unique business<br />
situations by changing the names of tabs and data columns.<br />
Figure 17. Customize Text Tab<br />
The Customize Text screen is found under the File menu (File ><br />
Customize Text) and is used to modify the text shown on both the main<br />
screen’s tabs as well as the columns in the data field. For example the<br />
Add tab could be renamed Receiving and the Subtract tab might be<br />
labeled Shipping. A data column could be renamed from Vendor to<br />
Building.<br />
Customizations will also appear on <strong>Stock</strong> <strong>Manager</strong> reports, however they<br />
will only appear on the mobile barcode scanner application when using a<br />
Windows CE type scanner.<br />
<strong>Proxis</strong><strong>Software</strong>.com Customer Service: 1-877-477-6947 24
2.3 Managing Users<br />
The Users setting assigns a user to each scan. This is used to<br />
determine who scanned each item over a particular time frame.<br />
Figure 18. Customize Text Tab<br />
To add a new user:<br />
1. Click on New.<br />
2. Enter the user’s name in the Username field.<br />
3. Click on Save.<br />
Users are selected from each scanning tab. The Preferences and<br />
Settings can be changed to prompt for a user after every scan. Users<br />
can be deleted from the list of available users; however their history<br />
information will remain in the database.<br />
<strong>Proxis</strong><strong>Software</strong>.com Customer Service: 1-877-477-6947 25
2.4 Managing Customers<br />
This form manages customer information for use by the Invoice function<br />
to print invoices and adjust inventory quantities.<br />
Figure 19. Customer Information Management<br />
To enter a new customer:<br />
1. Click on the New button.<br />
2. Enter the customer’s information.<br />
3. Click on the Save button.<br />
To edit a customer’s information:<br />
1. Select a customer or enter their name in the Search Text field.<br />
2. The Search Field will limit the number of customers in the Select<br />
Customer list to help find the right customer quickly.<br />
3. Modify the customer’s information.<br />
4. Click on Save.<br />
<strong>Proxis</strong><strong>Software</strong>.com Customer Service: 1-877-477-6947 26
2.5 Managing Vendors<br />
Vendor information is used by the Purchase Order function to add the<br />
vendor’s name and address to the Purchase Order automatically. The<br />
Vendor Management form can be used to add new vendors, edit existing<br />
vendors and delete unused vendors for use with the purchase order tab.<br />
Figure 20. Vendor Information Management<br />
To enter a new customer:<br />
1. Click on the New button.<br />
2. Enter the customer’s information.<br />
3. Click on the Save button.<br />
To edit a customer’s information:<br />
1. Select a customer or enter their name in the Search Text field.<br />
2. The Search Field will limit the number of customers in the Select<br />
Customer list to help find the right customer quickly.<br />
3. Modify the customer’s information by typing over their existing<br />
information.<br />
4. Click on Save.<br />
<strong>Proxis</strong><strong>Software</strong>.com Customer Service: 1-877-477-6947 27
3 Working with Inventory<br />
<strong>Stock</strong> <strong>Manager</strong> manages inventory items from a main inventory screen.<br />
Use the tabs on this screen to access commonly performed inventory<br />
functions.<br />
The main inventory screen is comprised of 7 tabbed function screens:<br />
• Inventory<br />
• Add<br />
• Subtract<br />
• Invoice<br />
• Compare<br />
• Purchase Order<br />
• History<br />
Click on the tab to perform the function it describes. The Add tab will<br />
add inventory item quantities; the Subtract tab reduces inventory<br />
quantities; the Invoice tab generates invoices for customers; the<br />
Compare tab will compare inventory item quantities with the values<br />
scanned during a physical inventory; the PO’s tab generates purchase<br />
orders; the History tab shows a chronological history of operations<br />
performed on the inventory.<br />
Each function that modifies inventory levels (Add and Subtract) includes<br />
a history grid to display recent scans and undo those scans if necessary.<br />
<strong>Proxis</strong><strong>Software</strong>.com Customer Service: 1-877-477-6947 28
3.1 Main Inventory Screen<br />
The Inventory tab displays the entire list of inventory items in its grid.<br />
This screen provides a search function for finding items in the main<br />
inventory grid.<br />
There are also 7 functional tabs:<br />
• Inventory – lists all items in the inventory<br />
• Add – increase an item’s quantity<br />
• Subtract - decrease an item’s quantity<br />
• Invoice – sell items to customers<br />
• Compare – perform physical inventories<br />
• PO’s – create purchase order automatically<br />
• History – view a history of recent inventory transactions<br />
The labels of these tabs can be customized from the File > Customize<br />
Text menu.<br />
Function<br />
Tab<br />
Scanning<br />
Box<br />
Inventory<br />
Grid Barcode<br />
Printing<br />
Edit Item<br />
Information<br />
Figure 21. Main Inventory Screen<br />
On most tabs, scanning an item not found in inventory will result in a<br />
prompt to add it.<br />
The inventory grid has buttons for editing items and printing barcodes for<br />
specific items. Double clicking an item or clicking the item’s Edit button<br />
will open the editor screen.<br />
<strong>Proxis</strong><strong>Software</strong>.com Customer Service: 1-877-477-6947 29
Right clicking on an item will open a menu of typical actions that can be<br />
taken on an item such as: Edit, add quantity, subtract quantity and print<br />
barcodes. Refer to Figure 22.<br />
Figure 22. Right clicking on an item<br />
<strong>Proxis</strong><strong>Software</strong>.com Customer Service: 1-877-477-6947 30
3.1.1 Adding and Editing Items - General Tab<br />
After scanning or clicking an item, the Add Inventory Item or Edit<br />
Inventory Item screen will appear. This screen provides access to add<br />
inventory, modify item information and print barcode labels.<br />
Figure 23. Add Item Screen General Tab<br />
The General Tab contains standard item information such as:<br />
• Item Number<br />
• Description<br />
• Default Location<br />
• Qty (quantity in stock)<br />
• Vendor<br />
• Notes<br />
• Track serial number for the item<br />
• Show that the item is a kit with sub-items.<br />
Item Number:<br />
This is the item’s barcode or stock keeping unit. This field is required.<br />
Description:<br />
The name of the item or product the barcode is assigned to.<br />
<strong>Proxis</strong><strong>Software</strong>.com Customer Service: 1-877-477-6947 31
Default Location:<br />
The default location is set during the initial start up wizard and is<br />
automatically entered in this field. This value can be changed. While<br />
other locations can be added for an item, the new value becomes the<br />
item’s default location. Refer to section 3.1.3 for more information on<br />
working with multiple locations.<br />
Qty:<br />
Enter the starting quantity, if known, for an item. Set this value to 0<br />
(zero) if using serial numbers.<br />
Serial Numbers:<br />
When this feature is used the Add, Subtract, Invoice and PO tabs will<br />
prompt for a serial number when the item is scanned.<br />
When turning on the serial number feature make sure to enter 0 (zero)<br />
for item quantity and use the Add tab to increase starting quantities.<br />
Kits:<br />
Check this box to indicate that the item is a kit. A kit item will have subitems<br />
that accompany it. Please refer to section 3.1.5 for more<br />
information on working with items in a kit.<br />
The OK button at the bottom of the screen saves all entries and exits to<br />
the main screen.<br />
The editor screen has a Delete button that removes the item and all<br />
associated item reporting from the inventory grid.<br />
To un-delete an item, simply scan or enter its item number from any tab.<br />
This will prompt the user to re-enable the item with its item information<br />
intact.<br />
<strong>Proxis</strong><strong>Software</strong>.com Customer Service: 1-877-477-6947 32
3.1.2 Adding and Editing Items - Prices Tab<br />
Figure 24. Prices Tab<br />
Item Pricing:<br />
The Prices tab shows the three pricing levels that can be set for items:<br />
• Cost – the amount that was paid for an item.<br />
• Price – what the item will sell for. Also called retail price.<br />
• MSRP – the manufacturers suggested retail price.<br />
Tax Rate:<br />
Two tax rates can be applied to every item. Tax rates are typically only<br />
used with the Invoicing function. These tax rates are defined in the<br />
Preferences and Settings. Tax 1 is a percentage tax. Tax 2 can be a<br />
percentage rate or a flat (or fixed) amount.<br />
A typical use of Tax 2 is for taxes like GST, VAT, or adding a specific<br />
shipping charge for an item.<br />
<strong>Proxis</strong><strong>Software</strong>.com Customer Service: 1-877-477-6947 33
3.1.3 Adding and Editing Items – Location Tab<br />
The Location feature tracks an item’s quantity at separate locations.<br />
When adding and subtracting inventory or generating invoices and<br />
purchase orders, <strong>Stock</strong> <strong>Manager</strong> will check to see if there are multiple<br />
locations to pull from. If there are and the “Prompt for Location” setting is<br />
selected, then, <strong>Stock</strong> <strong>Manager</strong> will prompt the user to choose the<br />
location from which inventory is coming from or going to.<br />
The location tab is used to show how many items are at each location,<br />
set the preference for prompting location, add a new location, set a<br />
location as a default, transfer inventory from one location to another, and<br />
remove locations.<br />
Figure 25. Location Tab<br />
To add a new location for an item:<br />
1. Click the Add Location button.<br />
2. Enter the new location name.<br />
3. Transfer inventory into the new location if needed.<br />
Setting a default location:<br />
1. Click on the location to be the default.<br />
2. Click on the Set as Default button.<br />
<strong>Proxis</strong><strong>Software</strong>.com Customer Service: 1-877-477-6947 34
To transfer Inventory from one location to another:<br />
1. Select the location to transfer from.<br />
2. Click on the Transfer button.<br />
3. On the Transfer Inventory form, enter the quantity to transfer.<br />
4. On the Transfer Inventory form, select the location to transfer to.<br />
5. Click Transfer.<br />
To remove a location:<br />
1. Select the location to delete.<br />
2. Click on Remove.<br />
3. Click OK to permanently delete a location.<br />
4. A prompt to transfer inventory will appear if there is inventory<br />
showing at that location.<br />
Figure 26. Transferring Inventory<br />
When scanning items in and out a prompt will appear if the “Prompt for<br />
Location” setting is enabled. This prompt allows the user to either scan a<br />
location or select the location from a list.<br />
The default location will be used if the location isn’t changed.<br />
<strong>Proxis</strong><strong>Software</strong>.com Customer Service: 1-877-477-6947 35
The items location will be chosen when the user scans an item in or out<br />
of inventory using the Add, Subtract, Inventory, or PO functions.<br />
Figure 27. Entering the Location when scanning items out<br />
Figure 28. Entering the location while receiving<br />
<strong>Proxis</strong><strong>Software</strong>.com Customer Service: 1-877-477-6947 36
3.1.4 Adding and Editing Items – Limits Tab<br />
Figure 29. Reorder Tab<br />
The Reorder point field sets the re-order point for an item. The Low<br />
Inventory report will show all items that have reached their Reorder Point<br />
thresholds and need reordering.<br />
These values are also important for the Purchase Order feature in <strong>Stock</strong><br />
<strong>Manager</strong>. On the PO tab there is a button that’s labeled Reorder. When<br />
this button is clicked for a particular vendor or for All Vendors, <strong>Stock</strong><br />
<strong>Manager</strong> adds items that have gone below their reorder point and adds<br />
enough quantity to the purchase order to bring the item’s stock level to<br />
the “Reorder up to” amount.<br />
<strong>Proxis</strong><strong>Software</strong>.com Customer Service: 1-877-477-6947 37
3.1.5 Adding and Editing Items – Kits Tab<br />
Enabling an item to be a kit allows other inventory items to be associated<br />
with it as sub-items. The Subtract preferences on the bottom of the form<br />
will determine whether a component of the kit will have its inventory<br />
quantity reduced when the kit is built or when it is shipped.<br />
The Kit checkbox must be selected on the General tab to enable the kit<br />
features for a particular item.<br />
Figure 30. Managing a Kit<br />
To add a component to a kit:<br />
1. Scan or enter the barcode in the Item Number field.<br />
2. Enter the quantity of components for the kit.<br />
3. Check the “Add this item to PO” when reordering checkbox if<br />
desired.<br />
4. Click Save.<br />
To edit a component in a kit:<br />
1. Select the component from the list.<br />
2. Click on Edit.<br />
3. Modify the barcode or quantity.<br />
<strong>Proxis</strong><strong>Software</strong>.com Customer Service: 1-877-477-6947 38
To remove a component in a kit:<br />
1. Select the component.<br />
2. Click Remove.<br />
To select the subtraction method for the components when the kit<br />
is removed from inventory:<br />
1. Click on “Building the kit” to subtract component parts when<br />
adding a kit inventory quantity to inventory.<br />
2. Click on “Selling/Shipping the kit” to subtract component parts<br />
from inventory when selling or shipping the parent kit.<br />
Note: Kits can be subcomponents of larger kits.<br />
<strong>Proxis</strong><strong>Software</strong>.com Customer Service: 1-877-477-6947 39
3.1.6 Adding and Editing Items – Serial Number Tab<br />
To track serial numbers for a particular item first select “Track Serial<br />
Numbers for this item” on the General Tab.<br />
The “Enter serial number” prompt will pop up when adding or removing<br />
items that have serial number tracking enabled.<br />
Figure 31. Enter serial number<br />
Figure 32. Serial Number Tab<br />
<strong>Proxis</strong><strong>Software</strong>.com Customer Service: 1-877-477-6947 40
Serial numbers are tracked when scanning items in and out of inventory.<br />
The Date Added shows the date and time a serialized item was added.<br />
The Date Removed fields show when it was scanned out of the system.<br />
To view the item’s serial number history:<br />
1. Double click on the Serial Number row on the grid on the Serial<br />
Numbers tab.<br />
2. The View History button will also open the Serial Number History<br />
form for a highlighted serial number.<br />
Figure 33. Serial Number History<br />
Figure 33. shows the Serial Number History form. The form lists the<br />
item’s description, serial number, last added date, last removed date, the<br />
last user to scan the serial number and the item’s notes. The Serial<br />
Number History form shows a list of transactions, both in and out, for that<br />
particular serial number.<br />
<strong>Proxis</strong><strong>Software</strong>.com Customer Service: 1-877-477-6947 41
3.2 Add Screen<br />
The Add tab adds/receives the quantity specified (in the Quantity field)<br />
for the scanned item, increasing the stock quantity. The History of<br />
Additions grid shows a historical list of scans.<br />
Figure 34. Add Screen<br />
The Clear button will reset the Enter Item Number field and set the<br />
Quantity field to 1 (one). The Quantity field must be changed before an<br />
item is scanned.<br />
To Receive a Large Number of a Certain Item:<br />
1. In the Quantity field, enter the number of items to add.<br />
2. Scan one of the items in the lot.<br />
3. The scan will appear in the History of Additions grid.<br />
To Undo a Scan (Caution clicking the undo button is not reversible):<br />
1. Locate the scan to be deleted in the History of Additions grid.<br />
2. Click the Undo button for that scan.<br />
3. The quantity addition will be undone and the quantity increase<br />
reversed.<br />
<strong>Proxis</strong><strong>Software</strong>.com Customer Service: 1-877-477-6947 42
3.2.1 Importing from a Keychain Scanner<br />
A Keychain Scanner is a small barcode scanner called the Opticon OPN-<br />
2001. This scanner has two buttons one for scanning barcodes and the<br />
other for deleting the last scanned barcode.<br />
Keychain scanner data can be imported to the Add, the Subtract,<br />
Invoice, Compare and PO’s tabs. All of the data on the scanner will<br />
import into a single tab function. <strong>Stock</strong> <strong>Manager</strong> then clears all data from<br />
the scanner if the Clear Data After Import option is checked.<br />
If an item on the scanner is not found in the inventory database, a<br />
prompt will appear asking the user to add the item.<br />
Figure 35. Keychain Scanner Import<br />
To add inventory quantities using a keychain scanner:<br />
1. Scan each item you wish to add. All items must be scanned.<br />
There is no function for entering a quantity number.<br />
2. Connect the scanner to the USB port. Note what Com port has<br />
been assigned to the scanner. This setting will be saved.<br />
3. Click on the Import from Keychain Scanner button.<br />
4. Select the Scanner Port from the drop down box.<br />
5. Click the Add button to import data.<br />
<strong>Proxis</strong><strong>Software</strong>.com Customer Service: 1-877-477-6947 43
3.2.2 Setting the Current User<br />
The Current User field is used to track who is working with <strong>Stock</strong><br />
<strong>Manager</strong> at a given time. The Current user is typically set and changed<br />
after a shift. A setting is available to prompt for a user after every scan.<br />
Figure 36. User Management<br />
To Add and Select and new user:<br />
1. Click the New button.<br />
2. Enter their name in the Username field.<br />
3. Click on Select.<br />
To select a previously added user:<br />
1. Select the user from the Select User drop down box.<br />
2. Click on the Select button.<br />
<strong>Proxis</strong><strong>Software</strong>.com Customer Service: 1-877-477-6947 44
3.2.3 Setting a Location When Adding Items<br />
To set a location for an item when adding it the Prompt for Location<br />
setting must be selected on the Location tab in the Edit Item screen.<br />
When using multiple locations for an item a prompt will appear that lists<br />
each location and how many items should be at that location.<br />
Locations can either be scanned into the location field or selected from<br />
the list.<br />
Figure 37. Entering the location while receiving<br />
To set a new location to add to:<br />
1. Scan the item to add.<br />
2. Scan the item’s location or enter it with the keyboard. The<br />
Choose Location form opens with the default location<br />
highlighted.<br />
<strong>Proxis</strong><strong>Software</strong>.com Customer Service: 1-877-477-6947 45
3.3 Subtract Screen<br />
The Subtract tab subtracts/ships the quantity specified (in the Quantity<br />
field) for the scanned item, decreasing the stock quantity. The History of<br />
Subtractions grid shows a historical list of previous scans.<br />
Figure 38. Subtract Screen<br />
The Clear button will reset the Enter Item Number field and set the<br />
Quantity field to 1 (one). The Quantity field must be changed before an<br />
item is scanned.<br />
To Ship/Subtract a Large Number of a Certain Item:<br />
1. In the Quantity field, enter the number of items to subtract.<br />
2. Scan the item.<br />
3. The scan will appear in the History of Subtractions grid.<br />
To Undo a Scan (Caution clicking the undo button is not reversible):<br />
1. Locate the scan to be deleted in the History of Subtractions grid.<br />
2. Click the Undo button for that scan.<br />
3. The quantity subtraction will be undone and the quantity<br />
decrease reversed.<br />
<strong>Proxis</strong><strong>Software</strong>.com Customer Service: 1-877-477-6947 46
3.3.1 Setting a Location When Subtracting Items<br />
If the Prompt for Location setting has been selected for the item being<br />
subtracted, a Choose Location form will open prompting for a location to<br />
subtract from. The Location can be left to the default location, scanned<br />
into the location field or selected from the list.<br />
Figure 39. Entering the Location when scanning items out.<br />
To select the item’s default location to remove from:<br />
1. Click the Select button. The form opens with the default location<br />
selected.<br />
To set a new location to subtract from:<br />
1. Scan the item to subtract.<br />
2. Scan the item’s location or enter it with the keyboard. The<br />
Choose Location form opens with the default location<br />
highlighted.<br />
<strong>Proxis</strong><strong>Software</strong>.com Customer Service: 1-877-477-6947 47
3.3.2 Subtracting Items in a Kit<br />
When scanning kits out of inventory there is an option to reduce<br />
component quantities when the kit is removed from inventory through the<br />
Subtract tab or the Invoice tab.<br />
To subtract component quantities when selling or shipping a kit:<br />
1. Open the item editor by double clicking an item<br />
2. Ensure the item is enabled as a kit.<br />
3. Click on the Kits tab.<br />
4. Select Selling/shipping the kit as the preferred time to reduce the<br />
component items’ inventory quantities.<br />
Figure 40. Subtracting Kits<br />
To subtract component quantities when building a kit:<br />
1. Open the item editor, ensuring the item is enabled as a kit.<br />
2. Click on the Kits tab.<br />
3. Select Building the kit as the preferred time to reduce the<br />
component items’ inventory quantities.<br />
If “Building the kit” is selected, <strong>Stock</strong> <strong>Manager</strong> will subtract a kit’s<br />
components out of inventory when the kit is added to inventory.<br />
<strong>Proxis</strong><strong>Software</strong>.com Customer Service: 1-877-477-6947 48
3.4 Invoice Screen<br />
The Invoice function is a simple way to scan items out of inventory and<br />
print a simple receipt/invoice to give to customers for payment. Taxes<br />
are applied according to the default rates, but can be excluded for a<br />
particular invoice.<br />
Invoices can be created and saved for later. Selecting an invoice from<br />
the Select Invoice drop down opens pending invoices.<br />
The invoicing function is customizable by <strong>Proxis</strong> programmers. Please<br />
call us for customization requests 1-877-477-6947.<br />
Figure 41. Invoice Screen<br />
The Invoice tab in <strong>Stock</strong> <strong>Manager</strong> provides an Add to Invoice field where<br />
an item number barcode can be scanned or typed to add items to an<br />
invoice. Use the Select Customer area for creating a new invoice and<br />
assigning a customer to it. Use the User area for setting the current<br />
user.<br />
Using the buttons on the invoice form invoices can be deleted, have<br />
taxes applied to them and can also be generated by importing barcode<br />
scans from a keychain scanner.<br />
<strong>Proxis</strong><strong>Software</strong>.com Customer Service: 1-877-477-6947 49
The Submit button will show the invoice to be printed and subsequently<br />
reduces inventory by the quantities of items on the invoice.<br />
To create a new invoice:<br />
1. Click on the New button.<br />
2. Either select a customer from the drop down box, search for an<br />
existing customer or click on the New button to create a new<br />
customer.<br />
3. Click Select to select the current customer for the new invoice.<br />
Figure 42. Customer Management<br />
Figure 43. Entering Customer Information<br />
<strong>Proxis</strong><strong>Software</strong>.com Customer Service: 1-877-477-6947 50
To print an invoice:<br />
1. Click on the Submit button.<br />
2. The invoice will open in print preview mode.<br />
3. Click the Printer icon at the top of the screen (see Figure 45) to<br />
print to the report printer designated in preferences and settings.<br />
4. After closing the Invoice a prompt will as whether to adjust<br />
inventory quantities for the items on the invoice.<br />
Figure 44. Pre-viewing an Invoice<br />
Invoices can also be exported to pdf or a number of other popular<br />
formats.<br />
To Export to PDF:<br />
1. Click Submit to view the invoice in print preview mode.<br />
2. Click on the envelope icon shown in Figure 45.<br />
3. Click OK.<br />
4. Select a location and filename to save the invoice pdf.<br />
5. Click Save.<br />
Figure 45. Exporting an Invoice<br />
<strong>Proxis</strong><strong>Software</strong>.com Customer Service: 1-877-477-6947 51
3.5 Compare Screen – Physical Inventory Count<br />
The Compare tab is used to conduct a physical inventory comparison.<br />
This function provides reporting to compare the actual stock scanned<br />
during a physical inventory count against item quantities listed in the<br />
<strong>Stock</strong> <strong>Manager</strong> database. Comparison scanning from mobile barcode<br />
scanners may also be “staged” in this area from multiple devices before<br />
the comparison reports are run.<br />
Figure 46. Compare Screen<br />
The Comparison Session must have scanned items listed in the<br />
Comparison Session grid to enable the comparison reports. These<br />
scans can come from a wireless barcode scanner or imported from a<br />
mobile Palm, Windows CE or Cipher Lab barcode scanner.<br />
After running comparison reports for physical inventory counts, click the<br />
Update <strong>Stock</strong> Values to update the <strong>Stock</strong> <strong>Manager</strong> to the current<br />
physical count.<br />
To start a new physical count, click the Start a New Session button. Be<br />
aware that starting a new session will delete all comparison scans.<br />
The Remove button will remove a scan from the Comparison Session<br />
grid.<br />
<strong>Proxis</strong><strong>Software</strong>.com Customer Service: 1-877-477-6947 52
3.6 PO Screen<br />
The Purchase Order function in stock manager allows for easy reordering<br />
of items and streamlines inventory management by using an<br />
item’s Reorder Point and Order Up To quantity.<br />
<strong>Stock</strong> manager can also re-order components to kits when a kit is added<br />
to a purchase order.<br />
Figure 47. PO Screen<br />
To create purchase orders for all items that have fallen below their<br />
inventory Reorder Points:<br />
1. Select All Vendors from the Select Vendor drop down.<br />
2. Click on the Reorder button.<br />
3. All items that have fallen below their reorder point are added to<br />
the PO.<br />
To print a purchase order:<br />
1. Add items to a purchase order.<br />
2. Click the Print button.<br />
3. A printable purchase order will be created for each vendor.<br />
<strong>Proxis</strong><strong>Software</strong>.com Customer Service: 1-877-477-6947 53
To save a purchase order for receiving later:<br />
1. Click the Submit button.<br />
2. The PO may be recalled at a later date.<br />
To Recall a previous PO:<br />
1. Click the Recall button.<br />
2. Select a Purchase order from the list.<br />
Figure 48. Select Purchase Orders<br />
To receive all items on a recalled purchase order:<br />
1. Click the Receive button on the bottom right hand corner of the<br />
PO form.<br />
2. Click Yes on the prompt.<br />
3. <strong>Stock</strong> <strong>Manager</strong> will automatically adjust inventory quantities for<br />
the items received.<br />
Figure 49. Receiving a Purchase Order<br />
<strong>Proxis</strong><strong>Software</strong>.com Customer Service: 1-877-477-6947 54
To receive only certain items on a recalled purchase order:<br />
1. Click the Receive button to the left of the Item.<br />
2. Enter the amount to be received<br />
3. Click OK.<br />
4. Click Save to keep the PO available for receiving the rest of the<br />
items.<br />
Figure 50. A sample purchase order<br />
Please contact <strong>Proxis</strong> <strong>Software</strong> for custom barcode programming,<br />
modifications and report design – 1-877-477-6947.<br />
<strong>Proxis</strong><strong>Software</strong>.com Customer Service: 1-877-477-6947 55
3.7 History Screen<br />
The History tab will show a list of previous quantity changes, product<br />
additions and product deletions. This list is ordered by a Time Stamp<br />
showing when the action occurred. This list is limited to the Max History<br />
Record Size setting found in the Preferences and Setting screen.<br />
Figure 51. History Screen<br />
The History Screen is searchable by Item Number, Vendor, or<br />
Description. The History Grid can be ordered by any field by clicking on<br />
the column header for that field.<br />
The Undo button on the left side of each row will reverse the action<br />
shown in the Method column.<br />
Be careful! Clicking the Undo button is not reversible.<br />
A detailed History Report is available from the Reports menu. The<br />
History report displays a list of transactions for a specific date range.<br />
<strong>Proxis</strong><strong>Software</strong>.com Customer Service: 1-877-477-6947 56
4 Barcode Label Printing<br />
Figure 52. Common Barcode Printers<br />
<strong>Stock</strong> <strong>Manager</strong> prints barcode labels using common barcode and laser<br />
printers. There are a number of predefined label formats to choose from<br />
including sheets of Avery-style mailing labels. Label templates are<br />
created in Crystal Reports 8.5 and can be modified by our programmers<br />
free of charge. Please call 1-877-477-6947 for assistance.<br />
Before printing barcodes, ensure that a barcode printer is connected and<br />
its drivers installed. Also ensure that a Default Label Format and a<br />
Default Label Printer have been selected in the Preferences and Settings<br />
section.<br />
Figure 53. Barcode Label Settings<br />
<strong>Proxis</strong><strong>Software</strong>.com Customer Service: 1-877-477-6947 57
4.1 Barcode Label Part Numbers<br />
A number of different label types and sizes can be used when printing<br />
labels from <strong>Stock</strong> <strong>Manager</strong>. Here is a list of some popular label with their<br />
part numbers:<br />
Cognitive Labels:<br />
Direct Thermal 2.25” x 1”, Part Number: 03-02-1519<br />
Zebra Labels:<br />
Direct Thermal 1.25” x 1”, Part Number: 10010038<br />
Direct Thermal 2.25” x 1.25”, Part Number: 800262-125<br />
Epson Labels:<br />
Direct Thermal 2.2”x1”, Part Number: 111197200<br />
Barcode label formats can be customized for free by our staff. Please<br />
contact us for label formatting.<br />
4.2 Printing Using the Barcode Label Queue<br />
The Barcode Label Queue is simply a way to create a barcode print job<br />
by selecting items to print and then executing the print job so all barcode<br />
labels print at once. Queuing labels makes barcode label print jobs<br />
quicker and more efficient.<br />
Warning: the Barcode Label Queue will be erased when exiting the<br />
application. The queue is only saved while <strong>Stock</strong> <strong>Manager</strong> is running.<br />
Selecting Items for the Queue:<br />
1. Ensure that Queue Barcodes is checked in the Barcode Settings<br />
tab in Preferences and Settings.<br />
2. Click on the print button for the desired item from the Inventory<br />
tab.<br />
3. A prompt will appear asking how many barcodes should be<br />
printed for the item. It will default to the current quantity in stock.<br />
4. Click OK to add the quantity to print to the queue.<br />
<strong>Proxis</strong><strong>Software</strong>.com Customer Service: 1-877-477-6947 58
Figure 54. Adding barcodes to the print queue<br />
To Send a Label Queue to the Barcode Printer:<br />
1. Click on the Print Barcodes button from the Main Screen.<br />
2. The Barcode Queue will display.<br />
3. Click on Print Queue to print labels for the items in the Queue.<br />
To Print A Barcode Label for Every Item:<br />
1. Click on the Print All Items button. This function will use the<br />
current inventory quantities. For example, if there are 54 widgets<br />
with Item Number 123, <strong>Stock</strong> <strong>Manager</strong> will print 54 labels for this<br />
item.<br />
Figure 55. Printing Labels from the Queue<br />
<strong>Proxis</strong><strong>Software</strong>.com Customer Service: 1-877-477-6947 59
The Print Random Barcode tab is a function designed to print barcodes<br />
that may not be in the inventory such as shelf labels, user names, rack<br />
labels, and anything that might need to be encoded.<br />
To Print a User Defined Barcode:<br />
1. Click on Print Barcodes and select the Print User-Defined<br />
Barcode tab.<br />
2. Scan or type the Barcode data into the Barcode Data field.<br />
3. Enter a Quantity of labels to print.<br />
4. Click Print. A label will print to the default label printer.<br />
Figure 56. Printing User-Defined Barcodes<br />
4.3 Individual Item Barcode Label Printing<br />
With the Queue Barcodes feature turned off barcodes are printed straight<br />
from the Inventory Tab and from the Print Barcodes button on the main<br />
screen.<br />
There are three methods for printing barcodes for individual items:<br />
• From the Main Screen’s Print Barcodes button. With Queuing<br />
turned off this will print a barcode for every item in inventory.<br />
• From the Main Screen Inventory tab’s Barcodes column.<br />
• When synchronizing inventory values with a mobile device.<br />
<strong>Proxis</strong><strong>Software</strong>.com Customer Service: 1-877-477-6947 60
On the Main Inventory screen, clicking the Print button for any inventory<br />
item will generate the prompt shown in Figure 56. Enter the number of<br />
labels to print and click OK to print them to the default barcode printer.<br />
Figure 57. Printing Labels for Individual Items<br />
4.4 Mobile Barcode Label Printing<br />
Barcode Label printing is also available using a mobile barcode scanner<br />
and a mobile barcode printer. Both Bluetooth and cabled serial<br />
connections are supported.<br />
The following printers are supported:<br />
1. Epson Mobilink TM-P6<br />
2. Zebra QL220, RW220 and MZ220 series printers<br />
3. Datamax-Oneil OC2<br />
4. Most Epson Compatible Mobile Printers<br />
The following 2”x1” Label <strong>Stock</strong> is supported:<br />
1. Epson – BSC009313A<br />
2. Zebra - LD-R7BL5B<br />
3. Datamax-Oneil - 740525-911<br />
Please refer to Section 12.11 for more information on setting up Mobile<br />
Barcode Label Printing.<br />
<strong>Proxis</strong><strong>Software</strong>.com Customer Service: 1-877-477-6947 61
5 Inventory Reporting<br />
<strong>Stock</strong> <strong>Manager</strong> includes 6 basic inventory reports:<br />
• Full Inventory Report<br />
• Low Inventory Report<br />
• Three Physical Comparison Reports<br />
• History Report<br />
Figure 58. Selecting an Inventory Report<br />
Comparison reports are available once comparison scans are entered<br />
into the Compare Grid from either the Keyboard Wedge scanner or from<br />
a Wireless Barcode Scanner.<br />
All reports can be printed to the Default Report Printer. Make sure the<br />
Default Report Printer in the Preferences and Settings Screen has been<br />
selected before printing a report.<br />
<strong>Proxis</strong><strong>Software</strong>.com Customer Service: 1-877-477-6947 62
5.1 Full Inventory Reporting<br />
The Full Inventory Report shows all information for every item. This<br />
report also lists the Total Inventory Value at the bottom of the report.<br />
Figure 59. Full Inventory Report<br />
5.2 Low Inventory Reporting<br />
The Low Inventory Report lists items whose Low Inventory threshold has<br />
been reached. This report is helpful for reordering and increasing<br />
inventory turns.<br />
Figure 60. Low Inventory Report<br />
<strong>Proxis</strong><strong>Software</strong>.com Customer Service: 1-877-477-6947 63
5.3 Comparison of Physical Inventory Reporting<br />
There are three Comparison reports. These reports are used when<br />
conducting a Physical Inventory to determine the accuracy of inventory<br />
values listed in the database as compared to the actual physical<br />
inventory values.<br />
A typical Comparison session involves one or more mobile barcode<br />
scanners scanning and recording current quantities for every item in the<br />
inventory.<br />
Figure 61. Selecting a Comparison Report<br />
<strong>Proxis</strong><strong>Software</strong>.com Customer Service: 1-877-477-6947 64
5.3.1 Items Scanned Compared to <strong>Stock</strong> <strong>Manager</strong> Levels<br />
The Comparison report shows the difference between the quantities<br />
scanned and the values held in the inventory database.<br />
Figure 62. Inventory Comparison Report<br />
5.3.2 Items Scanned but Not in <strong>Stock</strong> <strong>Manager</strong><br />
The Items Scanned but Not In Inventory Report shows the items present<br />
in the physical inventory but missing from the <strong>Stock</strong> <strong>Manager</strong> database.<br />
Figure 63. Items Not Found Report<br />
<strong>Proxis</strong><strong>Software</strong>.com Customer Service: 1-877-477-6947 65
5.3.3 Items in <strong>Stock</strong> <strong>Manager</strong> but Not Scanned<br />
This report shows all the items existing in the <strong>Stock</strong> <strong>Manager</strong> database<br />
but not scanned during the Physical Inventory process.<br />
Figure 64. Items Not Scanned Report<br />
5.4 Item History Reporting<br />
The history report displays all inventory activity for a specific date range.<br />
Figure 65. Selecting a Date Range<br />
All inventory functions are recorded in a history list and can be viewed for<br />
a date range or a single day.<br />
<strong>Proxis</strong><strong>Software</strong>.com Customer Service: 1-877-477-6947 66
5.5 User History Reporting<br />
Figure 66. Selecting a Date Range<br />
5.6 Invoice History Reports<br />
Reports can be generated for past invoices by user or by customer.<br />
Figure 67. Select an Invoice report by User.<br />
<strong>Proxis</strong><strong>Software</strong>.com Customer Service: 1-877-477-6947 67
The invoice report shows all of the invoices run by a user for a given date<br />
range and a grand total of the invoice price.<br />
Figure 68. User Invoice Report<br />
The Invoice Report by customer is similar to the User Invoice Report<br />
except that the Invoices and totals are grouped by customer.<br />
Please contact <strong>Proxis</strong> <strong>Software</strong> for custom modifications to any report.<br />
<strong>Proxis</strong><strong>Software</strong>.com Customer Service: 1-877-477-6947 68
6 Inventory Tools<br />
The Inventory tools menu option offers functions such as Manage Users,<br />
Manage Customers, and Manage Vendors. These functions are<br />
explained in detail in the Getting Started section.<br />
Four other functions will clear data from the database and are protected<br />
by an Administrative password. These functions will delete data and are<br />
not reversible.<br />
Figure 69. Inventory Tools<br />
6.1 Administrative Password<br />
The Admin Password helps protect data from being deleted accidentally.<br />
This password is set initially in the <strong>Stock</strong> <strong>Manager</strong> Setup Wizard. The<br />
password can also be changed from the login prompt in Figure 70.<br />
Figure 70. Administrative Password Protection<br />
<strong>Proxis</strong><strong>Software</strong>.com Customer Service: 1-877-477-6947 69
Figure 71. Delete Confirmation<br />
To Zero Inventory Quantities:<br />
1. Click on Tools > Zero Quantities<br />
2. Enter the Administrative Password<br />
3. Click Ok<br />
4. Click Yes when the Delete Confirmation prompt appears.<br />
To Clear Users:<br />
1. Click on Tools > Clear Users<br />
2. Enter the Administrative Password<br />
3. Click Ok<br />
4. Click Yes when the Delete Confirmation prompt appears.<br />
To Clear the History:<br />
1. Click on Tools > Clear History<br />
2. Enter the Administrative Password<br />
3. Click Ok<br />
4. Click Yes when the Delete Confirmation prompt appears.<br />
To Clear Closed Invoices:<br />
1. Click on Tools > Clear Closed Invoices<br />
2. Enter the Administrative Password<br />
3. Click Ok<br />
4. Click Yes when the Delete Confirmation prompt appears.<br />
<strong>Proxis</strong><strong>Software</strong>.com Customer Service: 1-877-477-6947 70
Figure 72. Changing the Administrative Password<br />
To Change the Administrative Password:<br />
1. Click on File > Preferences and Settings<br />
2. Click on Change Password on the General Options tab.<br />
3. Enter the old password. Leave this field blank if nothing was<br />
entered during the Setup Wizard.<br />
4. Enter the new password.<br />
5. Retype the new password for confirmation.<br />
6. Click OK.<br />
<strong>Proxis</strong><strong>Software</strong>.com Customer Service: 1-877-477-6947 71
7 Backing up Data<br />
Frequent Inventory Database backups are recommended when using<br />
<strong>Stock</strong> <strong>Manager</strong>. The Backup Inventory screen simply saves a copy of<br />
the Inventory database to a different location.<br />
Figure 73. Selecting a Backup Location<br />
It is important to back up the database periodically. It is also important to<br />
back up the database to a different location ie separate computer, jump<br />
drive or external hard drive.<br />
When using <strong>Stock</strong> <strong>Manager</strong> in a networked configuration, with a single<br />
database and numerous clients connected to that database, it is<br />
important to back up the database when client computers are not using it<br />
otherwise data might be lost.<br />
To restore a backup:<br />
1. Copy the backup file to the inventory database location. The<br />
inventory database location is typically: C:\<strong>Proxis</strong><br />
<strong>Software</strong>\<strong>Stock</strong> <strong>Manager</strong>.<br />
2. Rename the backup file to “Inventory”.<br />
3. Open <strong>Stock</strong> <strong>Manager</strong> normally.<br />
Please call the <strong>Proxis</strong> help desk at 1-877-477-6947 if a problem is<br />
encountered restoring the database from a backup.<br />
<strong>Proxis</strong><strong>Software</strong>.com Customer Service: 1-877-477-6947 72
8 Importing Data<br />
<strong>Stock</strong> <strong>Manager</strong> can import a Comma Separated Value (CSV) text file of<br />
item or product information into the inventory database. This type of file<br />
is sometimes called a flat file or comma delimited data file.<br />
The file is typically a standard text file with a .csv or .txt extension and<br />
must have a specific format to import properly.<br />
Figure 74. Import Inventory<br />
File Format:<br />
• Each column must be separated by a comma<br />
• The first line must exactly match the field name in the inventory<br />
table where the data will be imported. See Figure 76 for a list of<br />
valid field names.<br />
<strong>Proxis</strong><strong>Software</strong>.com Customer Service: 1-877-477-6947 73
• Each line after the first must contain a value for each of the field<br />
names specified in the first line, and the values must appear in<br />
the same order.<br />
• Text information in the file must be enclosed in double-quotes (“),<br />
single-quotes (‘) or nothing.<br />
• The field Item_Number is required, and cannot contain any<br />
double-quotes (“).<br />
To see an example of a valid import file, export the inventory using the<br />
Export to File function. Click Reports > Export to File > Full File. Open<br />
the file it creates in Notepad or Wordpad, and use this as an example for<br />
creating your own import file.<br />
To import an inventory file:<br />
Figure 74a. Importing the CSV file<br />
1. Open the import window: File->Import Inventory<br />
2. Click Browse, then locate and click the (.CSV) file to import.<br />
<strong>Proxis</strong><strong>Software</strong>.com Customer Service: 1-877-477-6947 74
3. Choose your text delimiter. This is the character that encloses<br />
the text information in the import file. Valid choices are singlequote<br />
(‘), double-quote (“) or nothing.<br />
4. Choose whether to replace all the items in the inventory with the<br />
items in your file, or merge the import file with the existing items.<br />
Items are matched by Item_number. WARNING: Replacing your<br />
existing inventory will permanently delete all the items in the<br />
database. This cannot be reversed!<br />
5. Click Check File. This verifies that field names were included at<br />
the top of the file. It also checks that all of those fields are valid<br />
field names, and that the Item_Number field is present.<br />
6. (Optional) Click Test File. This will simulate an import without<br />
making any modifications to the inventory database. The result<br />
of the output is shown on a grid on the import window. Verify<br />
that everything was imported correctly before clicking import and<br />
altering the database.<br />
7. Click Import. Depending on the number of items in the CSV file,<br />
this can take several minutes. A window will appear to show the<br />
progress of the import. When the import is completed, a<br />
summary will display with the results of the import.<br />
Figure 75. Sample CSV File<br />
<strong>Proxis</strong><strong>Software</strong>.com Customer Service: 1-877-477-6947 75
Field Names for Inventory Import:<br />
Item_number Unique identifier for the item, usually the barcode<br />
Qty The quantity in inventory<br />
Description Description of the item<br />
Vendor_code Name of the vendor for this item<br />
Current_cost The cost of the item<br />
Standard_price The sell price of the item<br />
List_Price The list price of the item<br />
The item's location (Aisle 6, Shelf 3C, Warehouse 2,<br />
Location etc)<br />
The minimum amount you want to have in stock (the<br />
Min<br />
reorder point)<br />
Max The max qty you want to have in stock (reorder up to)<br />
Notes Notes for this item<br />
Tax_rate1 Set to 1 to enable Tax1 for this item, 0 to disable<br />
Tax_rate2 Set to 1 to enable Tax2 for this item, 0 to disable<br />
Figure 76. Import Text File Specification<br />
<strong>Proxis</strong><strong>Software</strong>.com Customer Service: 1-877-477-6947 76
9 Exporting Data<br />
Exporting the contents of the <strong>Stock</strong> <strong>Manager</strong> database to an external<br />
application is simple. The Export CSV File screen will export the entire<br />
<strong>Stock</strong> <strong>Manager</strong> database as a comma separated file (CSV) to the<br />
location specified when clicking the Select button.<br />
Figure 77. Selecting an Export Location<br />
There is also the option to export a file containing a specific Item Number<br />
and Quantity only. This can be handy for updating inventory quantities in<br />
other applications.<br />
<strong>Proxis</strong><strong>Software</strong>.com Customer Service: 1-877-477-6947 77
10 Synching with Store <strong>Manager</strong><br />
<strong>Stock</strong> <strong>Manager</strong> will act as a conduit from <strong>Proxis</strong> Store <strong>Manager</strong> to a<br />
mobile barcode scanner. <strong>Stock</strong> <strong>Manager</strong> will send items to the mobile<br />
device where they can be scanned for price lookup, label printing,<br />
location changes, receiving items, and shipping items.<br />
Figure 78. Sync with Store <strong>Manager</strong><br />
Note: Store <strong>Manager</strong> is typically installed to the following directory:<br />
C:\WinPOS40\posdata\products.mdb. If <strong>Stock</strong> <strong>Manager</strong> does not find<br />
the Store <strong>Manager</strong> database in this directory, on the local computer, a<br />
prompt will appear for its location.<br />
<strong>Proxis</strong><strong>Software</strong>.com Customer Service: 1-877-477-6947 78
11 Error Handling<br />
If <strong>Stock</strong> <strong>Manager</strong> encounters errors it will display a brief message<br />
indicating that there was an error. <strong>Stock</strong> <strong>Manager</strong> also records the error<br />
in a file named ErrorLog.txt that will be created in the c:\<strong>Proxis</strong><br />
<strong>Software</strong>\<strong>Stock</strong> <strong>Manager</strong>\ folder.<br />
Typical errors might include:<br />
1. Network connection failure (multi-user mode).<br />
2. Drive connection failure.<br />
3. File missing errors.<br />
4. Security and Permission Issues.<br />
If an error occurs please contact us at 1-877-477-6947.<br />
<strong>Proxis</strong><strong>Software</strong>.com Customer Service: 1-877-477-6947 79
12 Using the Cipher Lab 8000 Barcode Scanner<br />
<strong>Proxis</strong> <strong>Stock</strong> <strong>Manager</strong> is typically preloaded as the default application on<br />
the scanner. To turn on the scanner, hold down the power button for one<br />
second. <strong>Stock</strong> <strong>Manager</strong> will then initialize.<br />
12.1 Scanner Functions<br />
<strong>Stock</strong> <strong>Manager</strong> has the following scanner functions:<br />
1. Add To Inventory<br />
2. Subtract/Remove From Inventory<br />
3. Compare Inventory<br />
4. Replace Inventory<br />
5. Lookup Item Information<br />
6. Synchronize the Device<br />
7. File Clearing Utility<br />
8. Device Memory Status<br />
9. Scanner Settings<br />
To access a function, press the corresponding number on the keypad.<br />
<strong>Proxis</strong><strong>Software</strong>.com Customer Service: 1-877-477-6947 80
Add Inventory<br />
Look up Inventory<br />
Replace Inventory Qty<br />
Clear Memory<br />
== Main Menu ==<br />
1 Add Inventory<br />
2 Remove Inv<br />
3 Compare Inv<br />
4 Replace Inv<br />
5 Lookup Inv<br />
6 Synchronize<br />
Figure 79. Scanner Main Menu<br />
Remove Inventory<br />
Compare Inventory<br />
Synchronize Data<br />
Memory Status<br />
• The Blue button functions as the Enter key for most scanner<br />
functions.<br />
• The Up and Down arrows are used on the scanner’s main<br />
screen to scroll through the menu.<br />
• The Up and Down arrows are used in scanning screens to scroll<br />
through the records of scanned data.<br />
The Battery Level Indicator in the lower right hand side of the screen<br />
shows the current charge of the battery.<br />
Scroll Indicators<br />
Battery Level<br />
Indicator<br />
<strong>Proxis</strong><strong>Software</strong>.com Customer Service: 1-877-477-6947 81
12.2 Advanced Scanner Settings<br />
The 8000 Series Barcode Scanner has an Advanced Settings screen<br />
that controls functions such as:<br />
• Loading New Versions of the scanner application.<br />
• Changing the scanner “beep” settings.<br />
• Initializing the scanner memory.<br />
• Running diagnostic tests.<br />
To Enter the Advanced Setting mode:<br />
1. Ensure the scanner is powered off.<br />
2. Hold the 7 and 9 buttons down while powering the scanner on.<br />
3. The 7 and 9 buttons must be pressed and held while the power<br />
button is activated to enter the advanced screen.<br />
For more information on the 8000 Series Advanced settings please<br />
contact the <strong>Proxis</strong> help desk at 1-877-477-6947.<br />
<strong>Proxis</strong><strong>Software</strong>.com Customer Service: 1-877-477-6947 82
12.3 Add Inventory<br />
The Add Inventory function is used to increase the stock quantities of<br />
inventory items by scanning their barcodes or manually entering an item<br />
number. If the item isn’t found in the scanner database, a prompt will<br />
ask if it should be added to the database.<br />
Escape to Main<br />
Menu<br />
Previous Record<br />
Add Inventory<br />
Item Number:<br />
0912309993<br />
Qty: 1<br />
Rec: 1/1<br />
Figure 80. Add To Inventory<br />
To add a single quantity to an existing item:<br />
1. Scan each item (scanner will beep).<br />
2. The stock quantity will be increased by one for each item<br />
scanned.<br />
Scanner Activator<br />
Enter Button<br />
Backspace<br />
Next Record<br />
Alpha/Numeric<br />
Keypad<br />
<strong>Proxis</strong><strong>Software</strong>.com Customer Service: 1-877-477-6947 83
To add a large quantity to an existing item:<br />
1. Scan the item for which the quantity will be added.<br />
2. The scanner will beep and advance to the next record.<br />
3. Press the Up Arrow key to return to the previous record.<br />
4. Press the Blue key.<br />
5. Enter in the quantity to be added.<br />
6. Press the Blue key again.<br />
To manually key in an item without a barcode:<br />
1. Key in the number with the keypad. (Refer to Appendix A for<br />
instructions on using the Alpha keypad).<br />
2. Press the Blue button.<br />
3. Enter the quantity to be added.<br />
4. Press the Blue button.<br />
5. The scanner will beep confirming a quantity increase for the<br />
designated item.<br />
If an item scanned is not in the scanner’s inventory list, a prompt will<br />
appear asking the user whether to add the item to the Master DB (aka<br />
Item List). This action adds the item but does not set any of its<br />
properties such as description, cost, price, etc.<br />
Add Master Item<br />
Add this Item<br />
To the Master DB?<br />
[1] for Yes<br />
[0] for No<br />
Figure 81. Add New Items<br />
After adding an item to the Item List, use function 5 – Lookup Inventory –<br />
from the Main Menu to modify the item’s properties.<br />
When finished, press the ESC button to exit to the Main Menu.<br />
<strong>Proxis</strong><strong>Software</strong>.com Customer Service: 1-877-477-6947 84
12.4 Remove From Inventory<br />
Use the Remove from Inventory function to remove items from inventory.<br />
This function won’t remove the item completely; it simply subtracts the<br />
item’s quantity in the inventory database. The default quantity is 1 (one).<br />
If the item is not found in the scanner’s item list, a prompt will ask<br />
whether it should be added to the inventory list.<br />
Remove Inventory<br />
Item Number:<br />
Qty: 1<br />
Rec: 1/1<br />
Figure 82. Subtract From Inventory<br />
This function works just like the Add to Inventory function in section 12.3<br />
To subtract a single unit from inventory:<br />
1. Scan each barcode for items you wish to deduct from inventory<br />
(scanner will beep).<br />
2. The stock quantity will be decreased by one for each item<br />
scanned.<br />
To subtract a large quantity from an existing item:<br />
1. Scan the item for which the quantity will be subtracted.<br />
2. The scanner will beep and advance to the next record.<br />
3. Press the Up Arrow key to return to the previous record.<br />
4. Press the Blue key.<br />
5. Enter in the quantity to be subtracted.<br />
6. Press the Blue key again.<br />
To manually key in an item without a barcode:<br />
1. Key in the number with the keypad. (Refer to Appendix A for<br />
instructions on using the Alpha keypad).<br />
2. Press the Blue button.<br />
3. Enter the quantity to be subtracted.<br />
4. Press the Blue button.<br />
When finished, press the ESC button to exit to the Main Menu.<br />
<strong>Proxis</strong><strong>Software</strong>.com Customer Service: 1-877-477-6947 85
12.5 Compare Inventory Quantities<br />
Use this function to scan physical inventory and compare the scanned<br />
information to the item quantity levels in the <strong>Stock</strong> <strong>Manager</strong> inventory<br />
database.<br />
Compare Inventory<br />
Item Number:<br />
Qty: 1<br />
Rec: 1/1<br />
Figure 83. Compare Inventory Quantities<br />
This function works like Add Inventory and Remove Inventory. Please<br />
refer to section 12.3 for scanning instructions.<br />
Scan each item or scan one and then change that item’s quantity. After<br />
synchronizing, the scanned data is sent to the desktop for comparison.<br />
When finished, press the ESC button to exit to the Main Menu.<br />
<strong>Proxis</strong><strong>Software</strong>.com Customer Service: 1-877-477-6947 86
12.6 Replace Inventory Quantities<br />
Replace Inventory<br />
Item Number:<br />
Qty: 1<br />
Rec: 1/1<br />
Figure 84. Replace Inventory Quantities<br />
This function is similar to the Add Inventory and Remove Inventory<br />
functions. Please refer to section 12.3 for scanning instructions.<br />
After synchronizing, the inventory values in <strong>Stock</strong> <strong>Manager</strong> will be<br />
replaced by the quantities assigned to each item using the Replace<br />
Inventory function.<br />
When finished, press the ESC button to exit to the Main Menu.<br />
<strong>Proxis</strong><strong>Software</strong>.com Customer Service: 1-877-477-6947 87
12.7 Lookup Inventory<br />
This function allows the user to perform lookup and editing tasks for<br />
inventory information with the mobile barcode scanner. Lookup times<br />
should be less than one second, even with thousands of items.<br />
Lookup Inventory<br />
Please<br />
Scan an<br />
Item<br />
Esc to Exit<br />
Figure 85. Lookup Items<br />
Edit description, price, cost, list price, quantity, location and vendor for<br />
each item in the Item List. Changes and additions are sent back to <strong>Stock</strong><br />
<strong>Manager</strong>.<br />
To change the value of an item:<br />
1. Scan the item.<br />
2. Use the Up and Down arrows to scroll to the field to be changed.<br />
3. Enter the item information using the keypad.<br />
4. Press the Blue button to save your changes.<br />
Be sure to press the Blue button prior to exiting. Changes are not<br />
saved unless a Blue button is pressed. Make sure to turn off the Alpha<br />
Keyboard function before exiting.<br />
Refer to Appendix A for instructions on using the Alpha keypad.<br />
When finished, press the ESC button to exit to the Main Menu.<br />
<strong>Proxis</strong><strong>Software</strong>.com Customer Service: 1-877-477-6947 88
12.8 Synchronize<br />
The Synchronize function is used to send scanned data to the <strong>Stock</strong><br />
<strong>Manager</strong> database. This function will also transfer inventory levels and<br />
item information to the device.<br />
Synchronize<br />
Place in Cradle<br />
Press Blue Key<br />
Esc to Cancel<br />
Figure 86. Synchronize the Device<br />
To synchronize the device:<br />
1. Make sure the cradle has power and is connected to the<br />
computer’s USB port.<br />
2. Place the scanner in the cradle.<br />
3. From the Main Menu, Press 6.<br />
4. Press the Blue button.<br />
5. Click the Synchronize option on the <strong>Stock</strong> <strong>Manager</strong> desktop<br />
application.<br />
6. Click Ok when prompted.<br />
If synchronization does not occur immediately, click the Abort button on<br />
the desktop and perform steps 5 and 6 again.<br />
When finished, press the ESC button to exit to the Main Menu.<br />
<strong>Proxis</strong><strong>Software</strong>.com Customer Service: 1-877-477-6947 89
12.9 Utility<br />
The Utility function allows the user to delete the scanned data from one<br />
or all of the data tables on the barcode scanner.<br />
Add Inventory<br />
1. Clr Add Inv.<br />
2. Clr Sub Inv.<br />
3. Clr Compare<br />
4. Clr Replace<br />
5. Clr Add New<br />
6. Clr Lookup<br />
7. Clear All<br />
Figure 87. Clear Data Utility<br />
Caution: The Clear Data functions are not reversible. These functions<br />
will erase all collected information.<br />
When finished, press the ESC button to exit to the Main Menu.<br />
12.10 Status<br />
The Status screen displays the amount of memory each function is using<br />
and the amount of memory left on the device.<br />
= Statistics =<br />
Add Inv 1<br />
Sub Inv 0<br />
Cmp Inv 902<br />
Rep Inv 0<br />
AddNwInv 4<br />
Look Inv 902<br />
Free Mem 190976<br />
Figure 88. Memory Status<br />
Typically, a 2MB scanner will scan over 15,000 items before running out<br />
of memory.<br />
When finished, press the ESC button to exit to the Main Menu.<br />
<strong>Proxis</strong><strong>Software</strong>.com Customer Service: 1-877-477-6947 90
12.11 Scanner Advanced Settings<br />
The Scanner Table configures the 8000 Series barcode scanner for<br />
specific scanner settings. Support for ISBN barcodes can be turned on<br />
or off. Lead digits can be enabled or disabled. The scanner can even be<br />
restricted to only scan a certain barcode type.<br />
Scanner Table<br />
1: 9B C9 00 3F 80<br />
2: 21 54 80 00 9C<br />
3: BF 10 C0 01 C0<br />
4: 01 C0 01 C0 01<br />
5: 66 03 03<br />
Press Esc Exit<br />
Figure 89. Scanner Table<br />
Please call your vendor or the <strong>Proxis</strong> tech support department for<br />
assistance when configuring Advanced scanner settings.<br />
When finished, press the ESC button to exit to the Main Menu and save<br />
any changes.<br />
<strong>Proxis</strong><strong>Software</strong>.com Customer Service: 1-877-477-6947 91
13 Using Palm Barcode Scanners<br />
Figure 90. A Palm Barcode Scanner<br />
<strong>Stock</strong> <strong>Manager</strong><br />
Icon<br />
<strong>Stock</strong> <strong>Manager</strong> Palm offers a mobile inventory management application<br />
for standard Symbol Palm barcode scanners like the Janam XP series<br />
and the Aceeca IDVERIFI.<br />
13.1 Sending Inventory Data to the Scanner<br />
To load inventory items onto the device:<br />
1. Place Scanner in synch cradle.<br />
2. Start the <strong>Stock</strong> <strong>Manager</strong> program on the PC.<br />
3. Ensure that the Palm device is set as the default scanner in the<br />
preference menu.<br />
4. Click Synchronize in the menu bar of <strong>Stock</strong> <strong>Manager</strong> Desktop.<br />
5. Press the synchronize button on the cradle.<br />
<strong>Proxis</strong><strong>Software</strong>.com Customer Service: 1-877-477-6947 92
Figure 91. Device Synchronization<br />
When synchronizing information with the Palm pilot, the current user is<br />
associated with the scans from the device.<br />
To set the current user when synchronizing:<br />
1. Click on Change User in the upper right hand corner of any tab.<br />
2. Select the correct user.<br />
3. Synchronize the device.<br />
4. The current user will be associated with all of the scans on the<br />
device.<br />
<strong>Proxis</strong><strong>Software</strong>.com Customer Service: 1-877-477-6947 93
13.2 Scanner Functions<br />
The Palm version has the following basic scanner functions:<br />
1. Add To Inventory<br />
2. Subtract/Remove From Inventory<br />
3. Compare Inventory<br />
4. Replace Inventory<br />
5. Lookup Item Information<br />
6. Edit Item Information<br />
7. File Clearing Utility<br />
The Palm version also features more advanced user input screens and<br />
increased memory.<br />
Main Menu:<br />
To access a function, tap on the corresponding icon on the touch screen.<br />
Increase Inventory<br />
Quantities<br />
Replace Inventory<br />
Quantities<br />
Add New Items<br />
Item Calculator<br />
Figure 92. Scanner Main Menu<br />
Remove Inventory<br />
Quantities<br />
Compare Physical<br />
Inventory<br />
<strong>Proxis</strong><strong>Software</strong>.com Customer Service: 1-877-477-6947 94
13.3 Add Inventory<br />
The Add Inventory function offers the ability to increase stock quantities<br />
by scanning their barcodes or manually entering a number.<br />
Figure 93. Add To Inventory<br />
To increase inventory quantities by a single unit:<br />
1. Scan each item (scanner will beep).<br />
2. The stock quantity is increased by one for each item scanned.<br />
3. The barcode scan is entered into the list.<br />
To increase an item by a number larger than one:<br />
1. Enter the total quantity in the Quantity field.<br />
2. Scan the item.<br />
3. The scanner will beep confirming a quantity increase for the<br />
designated item.<br />
4. The scan is entered into the list.<br />
To manually key in an item without a barcode:<br />
1. Tap the Barcode field.<br />
<strong>Proxis</strong><strong>Software</strong>.com Customer Service: 1-877-477-6947 95
2. Tap the numbers or letters that make up the barcode number.<br />
3. Tap on the Done button.<br />
4. Tap the Enter button.<br />
Figure 94. Adding a New Item to Inventory<br />
If an item’s barcode is not found in the current database, the scanner will<br />
prompt to add it. If the item is not added to the product database, the<br />
quantity increase will be ignored.<br />
To exit to the Main Menu, press the Return button.<br />
<strong>Proxis</strong><strong>Software</strong>.com Customer Service: 1-877-477-6947 96
13.4 Subtract From Inventory<br />
Use the Subtract Inventory function to remove items from inventory. This<br />
function will not remove the whole item; it simply deducts an item’s<br />
quantity from your inventory records.<br />
Figure 95. Subtract From Inventory<br />
To decrease inventory quantities by a single unit:<br />
1. Scan each item (scanner will beep).<br />
2. The stock quantity is decreased by one for each item scanned.<br />
3. The scan is entered into the list.<br />
To decrease an item by a number larger than one:<br />
1. Enter the quantity in the Quantity field.<br />
2. Scan the item’s barcode.<br />
3. The scanner will beep confirming a quantity decrease for the<br />
scanned item.<br />
4. The scan is entered into the list.<br />
<strong>Proxis</strong><strong>Software</strong>.com Customer Service: 1-877-477-6947 97
To manually key in an item without a barcode:<br />
1. Tap the Barcode field.<br />
2. Tap the numbers or letters that make up the barcode number.<br />
3. Tap on the Done button.<br />
4. Tap the Enter button.<br />
To exit to the Main Menu, press the Return button.<br />
<strong>Proxis</strong><strong>Software</strong>.com Customer Service: 1-877-477-6947 98
13.5 Compare Inventory Quantities<br />
Use this function to scan physical inventory and then compare the<br />
scanned information to item quantity levels in the <strong>Stock</strong> <strong>Manager</strong><br />
inventory database.<br />
Figure 96. Compare Inventory Quantities<br />
This function works like the Add To Inventory and Subtract from<br />
Inventory functions. Please refer to section 13.4 for scanning<br />
instructions.<br />
Scan each item or scan one and then change that item’s quantity. After<br />
synchronizing, the scanned data is sent to the desktop for comparison.<br />
Refer to section 3.5 for Comparison Report options.<br />
To exit to the Main Menu, press the Return button.<br />
<strong>Proxis</strong><strong>Software</strong>.com Customer Service: 1-877-477-6947 99
13.6 Replace Inventory Quantities<br />
Figure 97. Replace Inventory Quantities<br />
This function is similar to the Add To Inventory and Subtract Inventory<br />
functions. Please refer to section 13.4 for scanning instructions.<br />
After synchronizing, the inventory values in <strong>Stock</strong> <strong>Manager</strong> will be<br />
replaced by the quantities from the Replace Inventory function.<br />
To exit to the Main Menu, press the Return button.<br />
<strong>Proxis</strong><strong>Software</strong>.com Customer Service: 1-877-477-6947 100
13.7 Add New Inventory Item<br />
The Add New Inventory function will add new items (items not currently<br />
existing) in the <strong>Stock</strong> <strong>Manager</strong> database.<br />
Figure 98. Add New Inventory Items<br />
To add a new item:<br />
1. Press the New Item button on the Scanner’s main screen.<br />
2. Scan or key in the barcode number. The scanner will check to<br />
see if it is already in the system.<br />
3. Key in information using the keypad<br />
4. Press Save to add the new item.<br />
To exit without saving:<br />
1. Press the Return button.<br />
<strong>Proxis</strong><strong>Software</strong>.com Customer Service: 1-877-477-6947 101
The Palm soft Keypad provides an easy method for entering and editing<br />
product information. Access the soft keypad by tapping inside each field.<br />
Numeric fields will show the number keypad and text fields will show the<br />
text keypad.<br />
Figure 99. Palm Soft Numeric and Text Keypads<br />
<strong>Proxis</strong><strong>Software</strong>.com Customer Service: 1-877-477-6947 102
13.8 Lookup Products<br />
This function performs a lookup on item information with your <strong>Stock</strong><br />
<strong>Manager</strong> barcode scanner. Lookup times should be less than one<br />
second, even with thousands of items.<br />
Figure 100. Lookup Inventory Items<br />
Lookup Quantity and Location:<br />
1. Scan or enter the item’s barcode.<br />
2. If found, the item will be highlighted in the Item List.<br />
<strong>Proxis</strong><strong>Software</strong>.com Customer Service: 1-877-477-6947 103
Lookup All Item Information:<br />
1. Ensure the Show On Find box is checked (see example in Figure<br />
100.).<br />
2. Scan or enter the item’s barcode.<br />
Figure 101. Show Scanned Item Information<br />
To exit to the Main Menu, press the Return button.<br />
<strong>Proxis</strong><strong>Software</strong>.com Customer Service: 1-877-477-6947 104
13.9 Edit Inventory Information<br />
Scan an item to edit any of the following fields: Description, Quantity,<br />
Cost, Price, MSRP or List Price, Location and Vendor. Changes are<br />
automatically sent from the Barcode Scanner to <strong>Stock</strong> <strong>Manager</strong> during<br />
the synchronization process.<br />
Figure 102. Lookup Inventory Quantities<br />
Figure 103. Lookup Inventory Quantities<br />
<strong>Proxis</strong><strong>Software</strong>.com Customer Service: 1-877-477-6947 105
13.10 Palm Mobile Barcode Printing<br />
The Printer Setup screen is used to set up a Mobile printer for printing<br />
barcodes via a serial cable connection.<br />
Figure 104. Mobile Printing Setup<br />
To set up a mobile label printer to print barcodes:<br />
1. Ensure that the label printer is connected to the scanner.<br />
2. Select the printer from the Select Printer list.<br />
3. Select the Port assigned to the printer. Serial cabled printers<br />
usually use Com Port 1. Bluetooth printers are not supported on<br />
the Palm version but are supported on the Window CE version.<br />
4. Select a default Print Quantity.<br />
• One Barcode<br />
• Scanned Quantity - will print the number of items based on the<br />
Qty field.<br />
• Total Quantity - will print barcodes for the total number of<br />
items in inventory.<br />
5. Select the Auto Print on Add Qty. This will automatically send a<br />
label print command when adding inventory quantities from the<br />
Add screen.<br />
6. Select any additional information to print on the barcode label.<br />
• Barcode Text – prints the barcode number under the barcode.<br />
• Description – prints the item description above the barcode.<br />
• Price – prints the item price to the right of description.<br />
The following printers are supported:<br />
1. Epson Mobilink TM-P6<br />
2. Zebra QL220, RW220 and MZ220 series printers<br />
3. Datamax-Oneil OC2<br />
<strong>Proxis</strong><strong>Software</strong>.com Customer Service: 1-877-477-6947 106
4. Most Epson Compatibles<br />
The following 2”x1” Label <strong>Stock</strong> is supported:<br />
1. Epson - BSC009313A<br />
2. Zebra - LD-R7BL5B<br />
3. Datamax-Oneil - 740525-911<br />
<strong>Proxis</strong><strong>Software</strong>.com Customer Service: 1-877-477-6947 107
13.11 Synchronize the Palm Scanner<br />
The Synchronize function is used to send scanned data to the <strong>Stock</strong><br />
<strong>Manager</strong> database. This function will also transfer the inventory levels<br />
and item information to the device.<br />
Figure 105. Synchronize the Device<br />
To synchronize the device:<br />
1. Make sure the cradle has power and is connected to the<br />
computer’s USB or serial port.<br />
2. Place the scanner in the cradle.<br />
3. Press the Synchronize button.<br />
4. Press the Synchronize button on the <strong>Stock</strong> <strong>Manager</strong> desktop<br />
application.<br />
<strong>Proxis</strong><strong>Software</strong>.com Customer Service: 1-877-477-6947 108
13.12 Data Utility<br />
The Utility function allows deletion of scanned data from one or all of the<br />
data tables on the barcode scanner.<br />
Figure 106. Main Menu Drop Down<br />
Figure 107. Clear Data Utility<br />
Caution: The Clear Data functions are not reversible. These functions<br />
will erase all collected information.<br />
To exit to the Main Menu, press the Return button.<br />
<strong>Proxis</strong><strong>Software</strong>.com Customer Service: 1-877-477-6947 109
13.13 Palm Device Status<br />
The Status screen displays the number of records each function is using.<br />
Typically, an 8MB scanner will scan well over 20,000 items before<br />
running out of memory.<br />
To exit to the Main Menu, press the Return button.<br />
Figure 108. Clear Data Utility<br />
<strong>Proxis</strong><strong>Software</strong>.com Customer Service: 1-877-477-6947 110
13.14 Calculator Function<br />
The Item Calculator tallies both the Total Price and Total Cost for items<br />
scanned from this screen. Items must be entered into the product<br />
database and must have either a Price or a Cost respectively to add the<br />
item to the running total.<br />
The Item Calculator does not add sales tax or perform any point-of-sale<br />
functions.<br />
To exit to the Main Menu, press the Return button.<br />
Figure 109. Item Calculator<br />
<strong>Proxis</strong><strong>Software</strong>.com Customer Service: 1-877-477-6947 111
14 Using Windows CE Barcode Scanners<br />
<strong>Stock</strong> <strong>Manager</strong> Mobile version will work on a number of standard<br />
Windows Mobile and Windows CE wireless barcode scanning devices<br />
(also termed Mobile Scanners or Mobile Computers).<br />
Figure 110. <strong>Stock</strong> <strong>Manager</strong> CE<br />
Windows Mobile is based on a Windows CE platform but has a different<br />
look, is designed for mobile phones and wireless devices, and usually<br />
comes with additional applications like Word and Excel. <strong>Stock</strong> <strong>Manager</strong><br />
is compatible with Windows CE 5.0 and Windows Mobile 5 and 6.<br />
<strong>Proxis</strong><strong>Software</strong>.com Customer Service: 1-877-477-6947 112
14.1 Device Compatibility<br />
Supported Windows Mobile and Windows CE devices by manufacturer<br />
include but are not limited to:<br />
Honeywell:<br />
• Dolphin 7000 Series<br />
• Dolphin 9000 Series<br />
Motorola:<br />
• MC3000 Pro<br />
• MC55<br />
• MC70<br />
• MC9000 Series<br />
Janam:<br />
• XM60<br />
• XM65<br />
• XG100<br />
Unitech:<br />
• All unitech Windows CE based scanners<br />
Datalogic:<br />
• Falcon series<br />
• Pegasso series<br />
• Memor (by request)<br />
• Skorpio (by request)<br />
Please contact our Customer Service desk for additional assistance at 1-<br />
877-477-6747.<br />
<strong>Proxis</strong><strong>Software</strong>.com Customer Service: 1-877-477-6947 113
14.2 Sending Inventory Data to the Scanner<br />
To load inventory items onto the device:<br />
1. Place Scanner in synch cradle.<br />
2. Exit <strong>Stock</strong> <strong>Manager</strong> on the device.<br />
3. Start the <strong>Stock</strong> <strong>Manager</strong> program on the PC.<br />
4. Ensure that the scanning device is set as the default scanner in<br />
the preference menu.<br />
5. Click Synchronize in the menu bar of <strong>Stock</strong> <strong>Manager</strong> Desktop.<br />
6. Click Start to import data from the scanner.<br />
Figure 111. Device Synchronization<br />
When synchronizing information with the Windows CE barcode scanner,<br />
the current user is associated with the scans from the device.<br />
To set the current user when synchronizing:<br />
1. Click on Change User in the upper right hand corner of any tab.<br />
2. Select the correct user.<br />
3. Synchronize the device.<br />
The current user will be associated with all of the scans on the device.<br />
<strong>Proxis</strong><strong>Software</strong>.com Customer Service: 1-877-477-6947 114
14.3 Scanner Functions<br />
The Windows CE version has the following basic scanner functions:<br />
1. Add To Inventory<br />
2. Subtract/Remove From Inventory<br />
3. Compare Inventory<br />
4. Edit Item Information<br />
5. Lookup Item Information<br />
6. Calculate Prices<br />
7. Setup Mobile Printers<br />
Main Menu:<br />
To access a function, tap on the corresponding icon on the touch screen.<br />
Increase Inventory<br />
Quantities<br />
Add New Items<br />
Edit Item Information<br />
Item Calculator<br />
Figure 112. Scanner Main Menu<br />
Remove Inventory<br />
Quantities<br />
Compare Physical<br />
Inventory<br />
Lookup Items<br />
Setup Mobile<br />
Barcode Printer<br />
<strong>Proxis</strong><strong>Software</strong>.com Customer Service: 1-877-477-6947 115
14.4 Add To Inventory<br />
The Add Inventory function will increase stock quantities. Simply scan<br />
barcodes or manually enter the item number. Default quantity is one.<br />
Figure 113. Add To Inventory<br />
To increase inventory quantities by a single unit:<br />
1. Scan each item (scanner will beep).<br />
2. The stock quantity is increased by one for each item scanned.<br />
3. The scan is entered into the list.<br />
To increase an item by a number larger than one:<br />
1. Enter the total quantity in the Quantity field.<br />
2. Scan the item.<br />
3. The scanner will beep confirming a quantity increase for the<br />
designated item.<br />
4. The scan is entered into the list.<br />
To manually key in an item without a barcode:<br />
1. Tap the Barcode field.<br />
2. Tap the numbers or letters that make up the barcode number.<br />
3. Tap on the Done button.<br />
4. Tap the Enter button.<br />
<strong>Proxis</strong><strong>Software</strong>.com Customer Service: 1-877-477-6947 116
Figure 114. Adding a New Item to Inventory<br />
If an item’s barcode is not found in the current database, the scanner will<br />
prompt to add it. If the item is not added to the product database, the<br />
quantity increase will be ignored.<br />
To print a barcode of the last item scanned:<br />
1. Ensure that the mobile printer is connected or via a serial cable<br />
or the Bluetooth connection manager.<br />
2. Ensure that the Printer Settings are set up for the mobile printer.<br />
3. Tap on the item to print.<br />
4. Tap on the Print button.<br />
The Mobile Printer Settings can be set to automatically print a barcode<br />
when the inventory quantity is increased.<br />
To exit to the Main Menu, press the Close button.<br />
<strong>Proxis</strong><strong>Software</strong>.com Customer Service: 1-877-477-6947 117
14.5 Subtract From Inventory<br />
Use the Subtract Inventory function to remove items from inventory. This<br />
function will not remove the whole item; it simply deducts an item’s<br />
quantity from your inventory records.<br />
Figure 115. Subtract From Inventory<br />
To decrease inventory quantities by a single unit:<br />
1. Scan each item (scanner will beep).<br />
2. The stock quantity is decreased by one for each item scanned.<br />
3. The scan is entered into the list.<br />
To decrease an item by a number larger than one:<br />
1. Enter the quantity in the Quantity field.<br />
2. Scan the item’s barcode.<br />
3. The scanner will beep confirming a quantity decrease for the<br />
scanned item.<br />
4. The scan is entered into the list.<br />
To manually key in an item without a barcode:<br />
1. Tap the Barcode field.<br />
2. Tap the numbers or letters that make up the barcode number.<br />
3. Tap on the Done button.<br />
4. Tap the Enter button.<br />
<strong>Proxis</strong><strong>Software</strong>.com Customer Service: 1-877-477-6947 118
To print a barcode of the last item scanned:<br />
1. Ensure that the mobile printer is connected or via a serial cable<br />
or the Bluetooth connection manager.<br />
2. Ensure that the Printer Settings are set up for the mobile printer.<br />
3. Tap on the item to print.<br />
4. Tap on the Print button.<br />
To exit to the Main Menu, press the Close button.<br />
<strong>Proxis</strong><strong>Software</strong>.com Customer Service: 1-877-477-6947 119
14.6 Add New Inventory Item<br />
The Add New Inventory function will add new items (items not currently<br />
existing) in the <strong>Stock</strong> <strong>Manager</strong> database.<br />
Figure 116. Add New Inventory Items<br />
To add a new item:<br />
1. Press the New Item button on the scanner’s main screen.<br />
2. Scan or key in the barcode number. The scanner will check to<br />
see if it is already in the system.<br />
3. Key in information using the keypad<br />
4. Press Save to add the new item.<br />
To exit without saving:<br />
2. Press the Close button.<br />
<strong>Proxis</strong><strong>Software</strong>.com Customer Service: 1-877-477-6947 120
The Windows CE software Keypad provides an easy method for entering<br />
and editing product information. Access the soft keypad by tapping the<br />
keyboard icon at the bottom of the screen.<br />
Figure 117. <strong>Software</strong> Keypads<br />
<strong>Proxis</strong><strong>Software</strong>.com Customer Service: 1-877-477-6947 121
14.7 Compare Inventory Quantities<br />
Use this function to scan physical inventory then compare the scanned<br />
information to item quantity levels in the <strong>Stock</strong> <strong>Manager</strong> inventory<br />
database.<br />
Figure 118. Compare Inventory Quantities<br />
This function works like the Add Inventory and Subtract Inventory<br />
functions. Please refer to section 8.4 for scanning instructions.<br />
Scan each item or enter a Compare quantity before scanning the item for<br />
entering multiple items at a time. After synchronizing, the scanned data<br />
is sent to the desktop for comparison. Refer to section 4.5 for<br />
Comparison Report options.<br />
To exit to the Main Menu, press the Close button.<br />
<strong>Proxis</strong><strong>Software</strong>.com Customer Service: 1-877-477-6947 122
14.8 Edit Inventory Information<br />
Scan an item to edit any of the following fields: Description, Quantity,<br />
Cost, Price, MSRP or List Price, Location and Vendor. Changes are<br />
automatically sent from the Barcode Scanner to <strong>Stock</strong> <strong>Manager</strong> during<br />
the synchronization process.<br />
Figure 119. Lookup Inventory Quantities<br />
Tap on the item in the list to open the Edit screen.<br />
<strong>Proxis</strong><strong>Software</strong>.com Customer Service: 1-877-477-6947 123
Figure 120. Lookup Inventory Quantities<br />
Change any of the items features in the Edit Item screen. Barcodes can<br />
be printed for an item by pressing the Print button.<br />
<strong>Proxis</strong><strong>Software</strong>.com Customer Service: 1-877-477-6947 124
14.9 Lookup Products<br />
This function performs a lookup on item information with your <strong>Stock</strong><br />
<strong>Manager</strong> barcode scanner. Lookup times should be less than one<br />
second, even with thousands of items.<br />
Figure 121. Lookup Inventory Items<br />
Lookup Quantity and Location:<br />
1. Scan or enter the item’s barcode.<br />
2. If found, the item will be highlighted in the Item List.<br />
3. Check the Show On Find checkbox to open the Item Information<br />
screen automatically after a scan.<br />
<strong>Proxis</strong><strong>Software</strong>.com Customer Service: 1-877-477-6947 125
Lookup All Item Information:<br />
1. Ensure the Show On Find box is checked (see example in Figure<br />
121).<br />
2. Scan or enter the item’s barcode.<br />
Figure 122. Show Scanned Item Information<br />
To exit to the Main Menu, press the Close button.<br />
<strong>Proxis</strong><strong>Software</strong>.com Customer Service: 1-877-477-6947 126
14.10 Calculator Function<br />
The Item Calculator tallies both the Total Price and Total Cost for items<br />
scanned from this screen. Items must be entered into the product<br />
database and must have either a Price or a Cost entered to add the item<br />
to the running total.<br />
The Item Calculator does not add sales tax or perform any point-of-sale<br />
functions.<br />
To exit to the Main Menu, press the Close button.<br />
Figure 123. Item Calculator<br />
<strong>Proxis</strong><strong>Software</strong>.com Customer Service: 1-877-477-6947 127
14.11 Mobile Printer Setup<br />
The Printer Setup screen is used to set up a Mobile printer for printing<br />
barcodes via a Bluetooth or serial cable connection.<br />
Supported Mobile Printers:<br />
• Epson Mobilink Label Version<br />
• Oneil MF2Te<br />
• Oneil OC2<br />
• Zebra QL220<br />
• Zebra RW220<br />
Figure 124. Mobile Printer Setup<br />
To set up a mobile label printer to print barcodes:<br />
1. Ensure that the label printer is connected to the scanner. If<br />
Bluetooth is used the printer must be assigned a serial port<br />
through the device’s Bluetooth manager.<br />
2. Select the printer from the Select Printer list.<br />
3. Select the Port assigned to the printer. Serial cabled printers<br />
usually use Com Port 1. Bluetooth printer ports are typically<br />
assigned manually in the device Bluetooth configuration<br />
manager. Bluetooth connections will typically use Com 7.<br />
4. Select a default Print Quantity. Choose from:<br />
• One Barcode<br />
• Scanned Quantity will print the number of items based on the<br />
Qty field.<br />
<strong>Proxis</strong><strong>Software</strong>.com Customer Service: 1-877-477-6947 128
• Total Quantity will print barcodes for the total number of items<br />
in inventory.<br />
5. Select the Auto Print on Add Qty. This will automatically send a<br />
label print command when adding inventory quantities from the<br />
Add screen.<br />
6. Select any additional information to print on the barcode label.<br />
• Barcode Text – prints the barcode number under the barcode.<br />
• Description – prints the item description above the barcode.<br />
• Price – prints the item price to the right of description.<br />
The following printers are supported:<br />
• Epson Mobilink TM-P6<br />
• Zebra QL220, RW220 and MZ220 series printers<br />
• Datamax-Oneil OC2<br />
• Most Epson Compatibles.<br />
The following 2”x1” Label <strong>Stock</strong> is supported:<br />
• Epson - BSC009313A<br />
• Zebra - LD-R7BL5B<br />
• Datamax-Oneil - 740525-911<br />
<strong>Proxis</strong><strong>Software</strong>.com Customer Service: 1-877-477-6947 129
14.12 Data Utility<br />
The Utility function allows deletion of scanned data from one or all of the<br />
data tables on the barcode scanner.<br />
Figure 125. Clear Data Utility<br />
<strong>Proxis</strong><strong>Software</strong>.com Customer Service: 1-877-477-6947 130
Figure 126. Clear Data Utility<br />
Caution: The Clear Data functions are not reversible. These functions<br />
will erase all collected information.<br />
To exit to the Main Menu, press the Close button.<br />
<strong>Proxis</strong><strong>Software</strong>.com Customer Service: 1-877-477-6947 131
14.13 Scanner Database Status<br />
The Status screen displays the number of records each function is using.<br />
To exit to the Main Menu, press the Close button.<br />
Figure 127. Database Status<br />
<strong>Proxis</strong><strong>Software</strong>.com Customer Service: 1-877-477-6947 132
15 Appendix and Supplemental Information<br />
15.1 Appendix A: The 8000 Series Alpha Keyboard<br />
The Alpha Keyboard feature on the 8000 Series barcode scanner allows<br />
the user to key in letters using the numeric keypad. The Alpha Keyboard<br />
works much like a standard cell phone’s texting function.<br />
To enter an Upper case letter using the keypad:<br />
1. Press the “ALPHA” key.<br />
a. An “A” will appear above the battery indicator.<br />
2. Press the key that has the desired letter.<br />
a. Example1: for the letter “A” press the 2 key once.<br />
b. Example2: for the letter “B” press the 2 key twice.<br />
To enter a Lower case letter:<br />
1. Press the “ALPHA” key twice<br />
a. A small “a” will appear above the battery indicator.<br />
2. Press the key that has the desired letter.<br />
a. Example1: for the letter “a” press the 2 key once.<br />
b. Example2: for the letter “b” press the 2 key twice.<br />
Pressing the “ALPHA” key three times will bring up the function<br />
characters. This mode is indicated by a “F” above the battery indicator.<br />
The function characters set is an extension that is rarely used.<br />
To return to numeric input, press the “ALPHA” key until the letter function<br />
indicator (“A”, “a” or “F”) disappears.<br />
<strong>Proxis</strong><strong>Software</strong>.com Customer Service: 1-877-477-6947 133
15.2 Appendix B: Device Registration<br />
The 8000 Series barcode scanner has a simple registration screen.<br />
Scanners are typically activated before being shipped. Please contact a<br />
<strong>Proxis</strong> <strong>Stock</strong> <strong>Manager</strong> reseller to purchase and register a mobile barcode<br />
scanner.<br />
= Register =<br />
Serial No:<br />
EF4002050<br />
Enter Code:<br />
Figure 128. 8000 Series Registration Screen<br />
Palm and Windows CE devices will come with a Mobile Device License<br />
card. This card will have a barcode that is scanned to unlock the demo<br />
mode on the device.<br />
Figure 129. Splash Screen<br />
<strong>Proxis</strong><strong>Software</strong>.com Customer Service: 1-877-477-6947 134
Figure 130. Scan or Enter the Activation Code<br />
The <strong>Stock</strong> <strong>Manager</strong> Mobile Device License is a plastic card with a<br />
barcoded activation code. The code is scanned to activate the mobile<br />
device software.<br />
Figure 131. <strong>Stock</strong> <strong>Manager</strong> Mobile Device License<br />
<strong>Proxis</strong><strong>Software</strong>.com Customer Service: 1-877-477-6947 135
Check<br />
this box<br />
15.3 Appendix C: Installing Palm Files<br />
Palm files are installed to the device via the Palm HotSync <strong>Manager</strong>.<br />
The HotSync <strong>Manager</strong> is part of the Palm Desktop. The Palm Desktop<br />
software must be installed and configured prior to installing the device<br />
software. The latest Palm Desktop software can be found at<br />
www.palm.com.<br />
The HotSync manager will appear in the system tray when installed<br />
properly.<br />
Figure 132. HotSync Icon in System Tray<br />
Right click on the HotSync <strong>Manager</strong> Icon to configure the HotSync<br />
<strong>Manager</strong>. The HotSync <strong>Manager</strong> must be correctly set up and<br />
synchronizing with your device to install program files.<br />
To Install Palm Program Files:<br />
1. Browse to the C:\WinPOS40\Palm Support Files\ directory.<br />
2. Double click the Install_Palm_Files.exe application.<br />
3. If the prompt in Figure 133 is displayed, follow the first time<br />
installation directions below.<br />
4. Wait a few moments for the HotSync <strong>Manager</strong> to restart.<br />
5. Press the hot synch button on the cradle.<br />
Figure 133. First Installation Prompt<br />
Hot Sync <strong>Manager</strong> Icon<br />
<strong>Proxis</strong><strong>Software</strong>.com Customer Service: 1-877-477-6947 136
First Time Installation:<br />
1. Check the box on the prompt shown in Figure 133.<br />
2. Click Yes.<br />
3. Click Cancel on the prompt in Figure 134.<br />
4. Restart the installation process.<br />
Figure 134. Select Palm User Name<br />
Figure 135. HotSync Status<br />
<strong>Proxis</strong><strong>Software</strong>.com Customer Service: 1-877-477-6947 137