How To Apply Login/Register functionality to your ... - WebAssist
How To Apply Login/Register functionality to your ... - WebAssist
How To Apply Login/Register functionality to your ... - WebAssist

Create successful ePaper yourself
Turn your PDF publications into a flip-book with our unique Google optimized e-Paper software.
<strong>How</strong> <strong>To</strong> <strong>Apply</strong> <strong>Login</strong>/<strong>Register</strong> <strong>functionality</strong> <strong>to</strong> <strong>your</strong><br />
Checkout Process<br />
It’s very common for an online s<strong>to</strong>re <strong>to</strong> require a user be logged in before<br />
making a purchase. Here are a few benefits <strong>to</strong> implementing this on <strong>your</strong><br />
site.<br />
• Tracking repeat cus<strong>to</strong>mers<br />
• Provide member/upgrade discounts<br />
• Provide Order His<strong>to</strong>ry and Download Center pages<br />
Note: This <strong>How</strong> <strong>To</strong> begins with eCart and SecurityAssist <strong>functionality</strong> already<br />
implemented. For information on creating the eCart checkout <strong>functionality</strong>,<br />
or the SecurityAssist user registration and login <strong>functionality</strong>, please see the<br />
following Getting Started Guides.<br />
• eCart Getting Started Guide<br />
• SecurityAssist Getting Started Guide<br />
What Do You Need <strong>to</strong> Start?<br />
• Dreamweaver 8, CS3, or CS4<br />
• eCart<br />
Checkout <strong>functionality</strong> already created<br />
• SecurityAssist and Cookies <strong>To</strong>olkit<br />
<strong>Register</strong>, log in and log out <strong>functionality</strong> already created<br />
Create the URL variable for <strong>Login</strong> redirect<br />
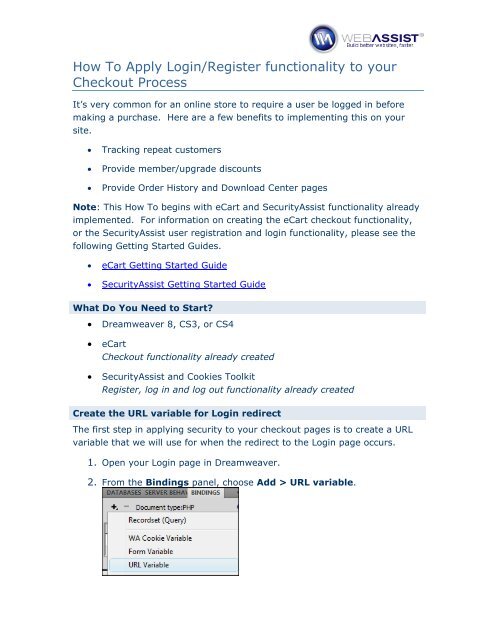
The first step in applying security <strong>to</strong> <strong>your</strong> checkout pages is <strong>to</strong> create a URL<br />
variable that we will use for when the redirect <strong>to</strong> the <strong>Login</strong> page occurs.<br />
1. Open <strong>your</strong> <strong>Login</strong> page in Dreamweaver.<br />
2. From the Bindings panel, choose Add > URL variable.
3. In the URL Variable Name field, enter checkout.<br />
4. Click OK.<br />
This will allow us <strong>to</strong> specify content <strong>to</strong> display on the <strong>Login</strong> page, only<br />
when arriving from one of the checkout pages. This is a very common<br />
practice, <strong>to</strong> alert <strong>your</strong> cus<strong>to</strong>mers <strong>to</strong> why they are being asked <strong>to</strong> login.<br />
Specify the Access Pages Rule<br />
Next, using the SecurityAssist Access Pages Manager, we will specify the rule<br />
that redirects users who are not logged in <strong>to</strong> the <strong>Login</strong> page.<br />
5. From the Modify menu, choose Security > Access Pages Manager.<br />
6. In the Access Pages Manager, select all the pages related <strong>to</strong> the<br />
checkout process.<br />
You want <strong>to</strong> select all pages (except the cart page) <strong>to</strong> prevent visi<strong>to</strong>rs<br />
from accessing those pages without having logged in.<br />
Hold down Ctrl on <strong>your</strong> keyboard <strong>to</strong> select multiple pages at a time.<br />
7. From the Grant access if menu, choose Logged in <strong>to</strong> users.<br />
‘Users’ may be different depending on <strong>your</strong> database configuration.<br />
8. Choose the If access denied, go <strong>to</strong> field browse icon.<br />
9. Choose the <strong>Login</strong> page.<br />
10. Click OK.<br />
11. Place <strong>your</strong> cursor at the end of the path <strong>to</strong> <strong>your</strong> <strong>Login</strong> page.<br />
12. Type ?checkout=1.<br />
13. Click OK <strong>to</strong> apply these changes.<br />
Note: With this setting applied <strong>to</strong> <strong>your</strong> checkout pages, if a visi<strong>to</strong>r is not<br />
logged in and attempts <strong>to</strong> access one of these pages, they will be redirected<br />
<strong>to</strong> the <strong>Login</strong> page while including the URL variable we created in the URL.<br />
Page 2 of 4
Create the Access rule<br />
Now that we’ve created the redirect <strong>to</strong> the login page, we need <strong>to</strong> create the<br />
access rule that will be used for visi<strong>to</strong>rs who access this page from the<br />
checkout page.<br />
1. From the Modify menu, choose Security > Access Rules Manager.<br />
2. Click the Add icon.<br />
3. In the name field enter checkout rule.<br />
4. Click the Conditions Add icon.<br />
5. In the value field, enter checkout.<br />
This refers <strong>to</strong> the URL variable we created earlier.<br />
6. From the Criteria menu, choose =.<br />
7. Enter 1 in the Compare <strong>to</strong> field.<br />
8. Click OK.<br />
This rule will activate whenever the <strong>Login</strong> page is accessed via the<br />
redirect (/users_<strong>Login</strong>.php?checkout=1) we created earlier.<br />
Page 3 of 4
<strong>Apply</strong> conditional text<br />
This final step will allow you <strong>to</strong> specify some conditional text <strong>to</strong> appear on the<br />
<strong>Login</strong> page when a visi<strong>to</strong>r has arrived there via the checkout page.<br />
1. Open the <strong>Login</strong> page in Dreamweaver.<br />
2. Place <strong>your</strong> cursor on <strong>your</strong> page where you wish this conditional text <strong>to</strong><br />
appear.<br />
3. Enter the text you wish <strong>to</strong> appear.<br />
For example, “Before proceeding, please log in.”<br />
4. Highlight the text you just entered.<br />
5. From the Server Behaviors panel, choose Add > SecurityAssist ><br />
Show Region.<br />
6. From the Rule menu choose, checkout rule.<br />
7. Click OK.<br />
You could also use this <strong>to</strong> display different content when the <strong>Login</strong><br />
page is not accessed from the checkout page. In this case, you<br />
would choose not checkout rule from the Rule menu.<br />
You have now applied a login redirect <strong>to</strong> <strong>your</strong> checkout pages allowing<br />
you <strong>to</strong> ensure that users are logged in before making purchases on <strong>your</strong><br />
site.<br />
Page 4 of 4