K-6 Activities - Dudley Observatory
K-6 Activities - Dudley Observatory
K-6 Activities - Dudley Observatory

You also want an ePaper? Increase the reach of your titles
YUMPU automatically turns print PDFs into web optimized ePapers that Google loves.
Materials<br />
• 1 large 9-foot diameter white circle<br />
cut from butcher paper<br />
• 12” x 18” light blue construction<br />
paper (one per child)<br />
• 12” x 18” dark blue tissue paper<br />
(one per child)<br />
• spray bottle with diluted bleach<br />
• newspapers to cover desk, floor,<br />
and/or outside area<br />
• glue sticks<br />
• Post-its<br />
• pencils<br />
• tag board cut-out of a crescent<br />
moon and a sun<br />
Sky<br />
?<br />
Ground<br />
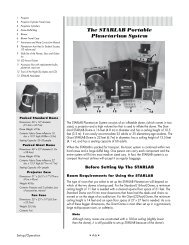
K–6 <strong>Activities</strong> • B–10 •<br />
Horizon Lesson for Primary Grades<br />
Purpose of Lesson<br />
The purpose of this activity is to clear up misconceptions young children have about<br />
the horizon and the sky. They will often draw pictures like the one shown. This activity<br />
is designed for classroom teachers who have limited access to STARLAB and/or for<br />
planetarium directors to give to classroom teachers in preparation for a planetarium<br />
visit.<br />
Objectives<br />
1. Students will demonstrate by modeling that the sky around us comes all the way<br />
down to the ground.<br />
2. Students will be able to describe the horizon — that place very far away where<br />
we see the sky and ground touch.<br />
3. Students will demonstrate by modeling that the sun, moon and stars seem to go<br />
above the horizon and sink below the horizon.<br />
4. Using a pointer, students will identify the horizon and cardinal directions in<br />
STARLAB and on the paper circle.<br />
Note<br />
Weather permitting, this activity could be done outdoors.<br />
Procedure<br />
Students will make sky cards out of 2 layers of paper. Spray diluted bleach onto navy<br />
blue tissue paper. (The bleach will make spots that look like stars, so use a spray, not<br />
a stream type spray bottle.) Glue tissue paper onto blue construction paper with glue<br />
sticks. (Glue only edges of paper.)<br />
Ask: “Where should this large circle be to represent the ground?” After deciding<br />
it goes on the floor, ask, “Where does your light blue sky card go?”<br />
Most will hold it up in the air.<br />
Ask: “What is in between?” (Air) Discuss possibilities, but come to the conclusion<br />
that the sky is air and the air comes all the way to the ground. Have<br />
the students place their sky card so that it touches the edge of the ground<br />
paper. Discuss that this point is called the horizon.<br />
Ask: “What do we do about all the gaps?” (Because the children are not yet<br />
sitting close together.) Tighten the circle so that the sky cards are touching<br />
with ground underneath. Redefine horizon.<br />
Ask: “How do we know where to put the sun? Where does it rise and set?”<br />
Identify north, south, east and west and label the ground paper with magic<br />
marker. Talk about where the sun comes up in the morning and where it sets.<br />
Have a child lift and carry the sun to show it rising in the east and setting in<br />
the west.<br />
Turn the sky papers around and talk about the night sky. Repeat the process with the<br />
moon and identify the horizon.<br />
Ask: “Does the moon only appear at night? Can we ever see it in the daytime?”<br />
Of course!