L33-L38 Nios II Interrupts without LQuiz - Courses
L33-L38 Nios II Interrupts without LQuiz - Courses
L33-L38 Nios II Interrupts without LQuiz - Courses

Create successful ePaper yourself
Turn your PDF publications into a flip-book with our unique Google optimized e-Paper software.
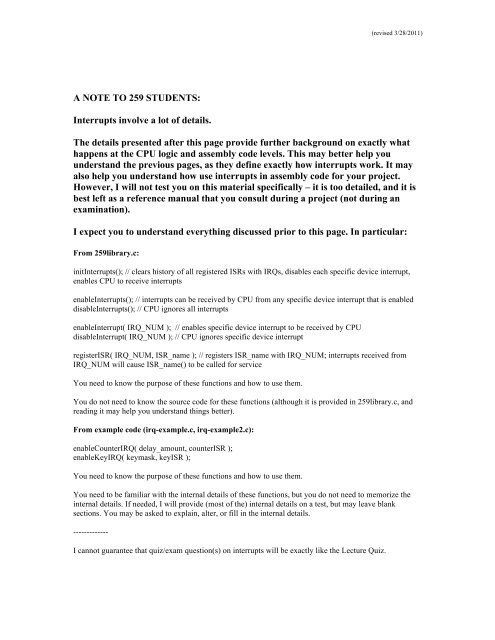
A NOTE TO 259 STUDENTS:<br />
<strong>Interrupts</strong> involve a lot of details.<br />
(revised 3/28/2011)<br />
The details presented after this page provide further background on exactly what<br />
happens at the CPU logic and assembly code levels. This may better help you<br />
understand the previous pages, as they define exactly how interrupts work. It may<br />
also help you understand how use interrupts in assembly code for your project.<br />
However, I will not test you on this material specifically – it is too detailed, and it is<br />
best left as a reference manual that you consult during a project (not during an<br />
examination).<br />
I expect you to understand everything discussed prior to this page. In particular:<br />
From 259library.c:<br />
init<strong>Interrupts</strong>(); // clears history of all registered ISRs with IRQs, disables each specific device interrupt,<br />
enables CPU to receive interrupts<br />
enable<strong>Interrupts</strong>(); // interrupts can be received by CPU from any specific device interrupt that is enabled<br />
disable<strong>Interrupts</strong>(); // CPU ignores all interrupts<br />
enableInterrupt( IRQ_NUM ); // enables specific device interrupt to be received by CPU<br />
disableInterrupt( IRQ_NUM ); // CPU ignores specific device interrupt<br />
registerISR( IRQ_NUM, ISR_name ); // registers ISR_name with IRQ_NUM; interrupts received from<br />
IRQ_NUM will cause ISR_name() to be called for service<br />
You need to know the purpose of these functions and how to use them.<br />
You do not need to know the source code for these functions (although it is provided in 259library.c, and<br />
reading it may help you understand things better).<br />
From example code (irq-example.c, irq-example2.c):<br />
enableCounterIRQ( delay_amount, counterISR );<br />
enableKeyIRQ( keymask, keyISR );<br />
You need to know the purpose of these functions and how to use them.<br />
You need to be familiar with the internal details of these functions, but you do not need to memorize the<br />
internal details. If needed, I will provide (most of the) internal details on a test, but may leave blank<br />
sections. You may be asked to explain, alter, or fill in the internal details.<br />
-------------<br />
I cannot guarantee that quiz/exam question(s) on interrupts will be exactly like the Lecture Quiz.
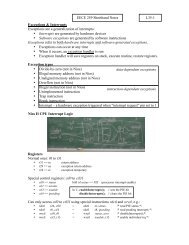
<strong>Nios</strong> <strong>II</strong> CPU Interrupt Details<br />
(revised 3/28/2011)<br />
The <strong>Nios</strong> <strong>II</strong> CPU actually has 32 interrupt pins. These can be wired up in many ways in a<br />
computer system; the precise wiring assignment used for the UBC DE1 Media computer<br />
was already given earlier. These hardware interrupt request pins are inputs to the CPU,<br />
and appear internally in the CPU as irq0, irq1, …, irq31 as shown in Figure 4.<br />
A 32-bit CPU register called ienable is used to mask interrupts. This value is ANDed<br />
with the set of 32 interrupt input pins. Therefore, individual interrupts with the<br />
corresponding ienable bit set to 0 are ignored and not be seen by the CPU. Setting<br />
ienable bits to 1 allows the CPU to receive interrupts from the corresponding device.<br />
The current status of all interrupts is stored in another 32-bit CPU register called ipending.<br />
Reading this register allows a program to determine which specific interrupt has occurred.<br />
For bit N in ipending to be set, the corresponding Nth bit in ienable must be 1, and the<br />
corresponding irqN pin must also be set to 1.<br />
After ipending, a wide OR gate combines all of the 32 ipending bits. This generates a<br />
single (combined) interrupt-request which is sent to the CPU. If any bit in ipending is a 1,<br />
then an interrupt-request will be sent to the CPU.<br />
Finally, the CPU can choose to ignore the interrupt-request bit using single AND gate.<br />
This bit, called the PIE bit, is located in bit position 0 of another 32-bit CPU register<br />
called status. All interrupts (and exceptions) can be masked or disabled if this bit is a 0. If<br />
the PIE bit is a 1, and the interrupt-request signal is a 1, then a CPU interrupt is produced.<br />
Individual bits in the ienable<br />
register are modified by:<br />
disableInterrupt( irq_num );<br />
enableInterrupt( irq_num );<br />
All bits in the ienable reg.<br />
are cleared by:<br />
init<strong>Interrupts</strong>();<br />
The PIE bit can be modified by:<br />
disable<strong>Interrupts</strong>();<br />
enable<strong>Interrupts</strong>();<br />
init<strong>Interrupts</strong>();<br />
L35-1<br />
Figure 4. Hardware interrupt structure inside the <strong>Nios</strong> <strong>II</strong> CPU (from Fig 3-2 in [1])
Special <strong>Nios</strong> <strong>II</strong> Registers<br />
(revised 3/28/2011)<br />
You already know about the 32 general-purpose registers, r0 to r31 listed in Figure 5.<br />
Notice the special names given to some registers, in particular:<br />
• r24 or et, exception temporary – do not use this register in your main program!<br />
• r29 or ea, exception return address<br />
Figure 5. General-purpose <strong>Nios</strong> <strong>II</strong> registers (from Table 3-5 in [1]).<br />
In addition, there are up to 32 special control registers, ctl0 to ctl31, listed in Figure 6.<br />
These registers have names corresponding to their specialized purpose. We will use:<br />
ctl0 or status ctl3 or ienable<br />
ctl1 or estatus ctl4 or ipending<br />
These are accessed using only the specialized instructions rdctl and wrctl. For example:<br />
• rdctl r24, ctl1 or rdctl et, estatus copy estatus value to r24<br />
• rdctl r8, ctl4 or rdctl r8, ipending copy ipending value to r8<br />
• wrctl ctl0, r0 or wrctl status, r0 copy r0 to status (disables interrupts)<br />
• wrctl ctl3, r13 or wrctl ienable, r13 copy r13 to ienable<br />
Register Name Description<br />
ctl0 status Bit 0 is the PIE (processor interrupt enable) bit<br />
ctl1 estatus Holds a copy of status after exception handler is called<br />
ctl2 bstatus Used by debugger<br />
ctl3 ienable Interrupt enable bits<br />
ctl4 ipending Interrupt pending bits<br />
ctl5 CPUid Unique processor identifier<br />
ctl6 – ctl31 …etc… Some of ctl7 to ctl15 are defined, rest are reserved<br />
Figure 6. Special-purpose <strong>Nios</strong> <strong>II</strong> control registers (from Table 3-6 in [1]).
<strong>Interrupts</strong> and Exceptions<br />
(revised 3/28/2011)<br />
<strong>Interrupts</strong> are generated by hardware devices. However, software can also generate an<br />
interrupt-like event called an exception. Exceptions are a generalization of interrupts:<br />
• Hardware interrupts are generated by devices<br />
• Software exceptions are generated by software instructions<br />
Exceptions refer to both hardware interrupts and software-generated exceptions.<br />
Just like an interrupt, an exception event can occur at any time. When it does occur, the<br />
CPU will momentarily stop running your program, go and run another short program<br />
called an exception handler to completion, and then return to your program. You can<br />
think of an exception handler as a special type of subroutine that is not called directly by<br />
your program – the CPU decides when to call it by examining specific hardware events<br />
that occur in a computer system (interrupts) or in the CPU (software exceptions). It is the<br />
exception handler that decides which hardware interrupt service routine to call.<br />
Exceptions can also be triggered when the processor tries to execute specific instructions.<br />
In the <strong>Nios</strong> <strong>II</strong> CPU, some complicated instructions like integer multiply or integer divide<br />
can be left out of the hardware when the system is generated. If the CPU encounters one<br />
of these unimplemented instructions, it triggers an unimplemented instruction exception.<br />
This allows software to emulate the missing instruction by replacing it with a short<br />
software routine that achieves the same result (eg, it executes a multiply instruction by<br />
emulating it with a software exception because the hardware multiplier was omitted from<br />
the CPU).<br />
<strong>Nios</strong> <strong>II</strong> can also trigger exceptions on data-dependant events with certain instructions.<br />
Common data-dependant exceptions are when an instruction attempts to divide by 0, or<br />
when load or store word or halfword is given an unaligned address which is not a<br />
multiple of 4 or 2, respectively, or when attempting to load or store to a memory address<br />
that does not exist in the computer system. In most of these situations, the <strong>Nios</strong> <strong>II</strong> CPU<br />
can be configured to behave in a variety of ways: it can generate exceptions, or it can<br />
execute the bad instruction but produce an undefined result. An undefined result means<br />
that the CPU result or operation is not reliable or predictable.<br />
Not all exceptions are bad. In complex CPUs, the virtual memory system will often<br />
trigger an exception when you try to access a memory region that was swapped to disk.<br />
The exception forces the operating system to run momentarily, which fetches the data<br />
from disk and places it in memory, and then resumes your program. This activity is<br />
known as demand paging, and it is quite common in full systems (like Windows).
Examples of <strong>Nios</strong> <strong>II</strong> Exceptions and <strong>Interrupts</strong><br />
(revised 3/28/2011)<br />
The <strong>Nios</strong> <strong>II</strong> has many different exception types. Here are a few of the common ones:<br />
• Interrupt exception (highest priority)<br />
• Trap exception<br />
• Illegal instruction exception<br />
• Unimplemented instruction exception<br />
• Break exception<br />
• Misaligned data address exception<br />
• Division error exception (lowest priority)<br />
<strong>Interrupts</strong> are often treated as a hardware exception, while the others are considered<br />
software exceptions because they are usually triggered by specific instructions.<br />
The trap exception is generated whenever the special CPU instruction named trap is<br />
executed. This allows the user program to “call” the operating system. In our case, there<br />
is no operating system, so we do not use this instruction.<br />
The illegal instruction exception is generated whenever the CPU encounters an<br />
instruction (a 32-bit pattern) that is unknown.<br />
The unimplemented instruction exception is generated whenever a legal instruction, such<br />
as integer multiply or divide, is encountered that is not implemented in CPU hardware.<br />
These instructions must be emulated using software.<br />
The break exception is used exclusively by the debugger. There is even a specialized<br />
CPU instruction named break. We do not use this exception or this instruction in our<br />
programs, as it will interfere with debugger operation.<br />
The misaligned data address exception is generated when you use ldw, stw, ldwio, or<br />
stwio with an address that is not a multiple of 4. It is also generated when you use<br />
halfword load and store instructions with an odd address.<br />
The division error exception is generated when a program attempts to divide by zero, or it<br />
attempts to signed division between the largest negative number (-2147483648) and -1,<br />
producing a result that is out of range.<br />
The <strong>Nios</strong> <strong>II</strong> is a flexible CPU. The computer system designer has the choice of omitting<br />
many of these exceptions from the CPU. In the UBC DE1 Media computer, only the<br />
underlined events listed above will generate an exception.
Detailed <strong>Nios</strong> <strong>II</strong> Exception Process<br />
(revised 3/28/2011)<br />
When an exception is triggered, the CPU does the following steps automatically:<br />
1. Copy the contents of status to estatus to save pre-exception state<br />
2. Clear (0) PIE bit of status to ensure further exceptions are now disabled<br />
3. Modify r29 aka ea to hold the return address of the instruction immediately after<br />
the one being interrupted<br />
4. Start running the exception handler program at the predefined address<br />
(0x00000020)<br />
When the exception ends, the exception handler must use the special eret instruction to<br />
automatically and properly end the exception process:<br />
5. Copy estatus back to status to restore the pre-exception state<br />
6. Return to running the regular program at the address stored in ea<br />
Your Program<br />
To use interrupts and exceptions, your program must include the following:<br />
A. An exception handler<br />
B. An interrupt service routine for each interrupt source you enable<br />
C. A setup routine to initialize the entire interrupts subsystem<br />
A) Your exception handler must:<br />
1. Save registers on the stack<br />
2. Determine the cause of the exception according to the priority order<br />
3. For hardware interrupts, adjust the return address in ea by subtracting 4<br />
4. Call the appropriate interrupt service routine or exception service routine<br />
• Loop to call ISR associated for each hardware IRQ in ipending<br />
5. Restore registers from the stack<br />
6. Return to the main program using the instruction eret<br />
B) Your interrupt service routine must:<br />
1. Clear the cause of the exception or interrupt so it will not occur again (eg, tell the<br />
device to stop sending the interrupt)<br />
2. Do the appropriate action for the interrupt (eg, read the character received from<br />
the serial port)<br />
3. Change the state of the system (ie, modify memory to alter behaviour of system)<br />
4. Return to the exception handler using ret<br />
C) Your main program or setup routine must:<br />
1. Place the exception handler in memory at address 0x00000020.<br />
2. Enable the use of the stack<br />
3. Specifically enable device to send interrupts (eg: ps2, timer)<br />
4. Specifically enable CPU to receive interrupts from the device (ienable)<br />
5. Enable CPU interrupts by setting PIE bit to 1 (i.e. set bit 0 in status to a 1)
Countdown Timer Device<br />
(revised 3/28/2011)<br />
The COUNTER device you have used to measure time so far always counts up by 1<br />
every clock cycle, and it uses irq3. There is another device, the TIMER, which allows<br />
you to count down. It is also more complex than the COUNTER device, allowing you<br />
START and STOP the timer – a useful feature.<br />
L36-1<br />
When the countdown TIMER reaches 0, it can generate an interrupt on irq0 and on the<br />
next cycle reload itself with a new starting value. You can set the starting value to any<br />
number you choose. This results in very predictable, periodic interrupts. This is great for<br />
controlling time-sensitive devices <strong>without</strong> polling!<br />
Programming the TIMER is a little bit difficult because it uses a 16-bit interface for 32bit<br />
values as shown in Figure 5. The base address for the timer is ADDR_TIMER. The<br />
names of individual registers such as TIMER_STATUS and TIMER_VALUE_LOW<br />
shown below are all offsets relative to IOBASE.<br />
You can read or write halfwords or words to the individual register addresses, but only<br />
the lower 16 bits have meaning with word accesses. The individual bits of each address<br />
have different meanings and names as follows:<br />
• TO, or bit 0 of TIMER_STATUS, provides a timeout signal which is set to 1 by<br />
the timer when it has reached a count value of 0. The TO bit can be cleared by<br />
writing a 0 to it.<br />
• RUN, or bit 1 of TIMER_STATUS, is set to 1 by the timer whenever it is<br />
currently counting. Writing to TIMER_STATUS does not affect the value of the<br />
RUN bit.<br />
• ITO, or bit 0 of TIMER_CONTROL, enables the device to send interrupts to the<br />
processor whenever TO becomes 1. These will be received by the processor on<br />
irq0. Note: to clear interrupts sent by the timer, write a 0 to the TO bit above.<br />
• CONT, or bit 1 of TIMER_CONTROL, controls whether the timer stops after<br />
counting down to 0 (CONT=0) or continues by reloading (CONT=1).<br />
• START and STOP, or bits 2 and 3 of TIMER_CONTROL, can be used to<br />
commence/suspend the operation of the timer by writing a 1 to the respective bit.<br />
The values written to TIMER_START_LOW and TIMER_START_HIGH allow the<br />
period of the time to be changed. This is the value that is reloaded into the counter after it<br />
tries to count below 0 (when CONT=1). Since the registers are only 16 bits, you must<br />
break up a 32-bit value (such as 100,000 for 2 milliseconds) into the high and low parts<br />
with shift and AND instructions and write them separately.<br />
It is possible to capture a snapshot of the counter value at any time by performing a write<br />
(store instruction) to the TIMER_VALUE_LOW address. After the snapshot, you can<br />
read out the value by reading both TIMER_VALUE_LOW and TIMER_VALUE_HIGH<br />
and building the corresponding 32-bit value with shift and OR instructions.
Figure 5. Countdown timer device registers.<br />
TIMER_STATUS<br />
TIMER_CONTROL<br />
Interrupt Example – Assembly Language using Countdown Timer<br />
(revised 3/28/2011)<br />
TIMER_START_LOW<br />
TIMER_START_HIGH<br />
TIMER_VALUE_LOW<br />
TIMER_VALUE_HIGH<br />
The assembly language example on the next 2 pages shows how to configure and use<br />
timer interrupts every 100ms.<br />
Each interrupt is counted by incrementing the memory location interrupt_counts and<br />
displaying the count on LEDG. The main program continuously copies SWITCH to<br />
LEDR, acting as a wire. Notice the main program and interrupt service routine both<br />
communicate using r8 <strong>without</strong> any problems.
Example: Count every 100ms on LEDG; no communication with main program.<br />
.include "ubc-de1media-macros.s"<br />
/*****************************************************************************<br />
* RESET SECTION<br />
* The <strong>Nios</strong> <strong>II</strong> assembler/linker places this section at address 0x00000000.<br />
* It must be
(revised 3/28/2011)<br />
/*****************************************************************************<br />
* TEXT SECTION<br />
* The <strong>Nios</strong> <strong>II</strong> assembler/linker should put the .text section after the .exceptions.<br />
* You may need to configure the Altera Monitor Program to locate it at address 0x400.<br />
*/<br />
.text<br />
.global _start<br />
_start:<br />
movia r23, IOBASE<br />
movia sp, STACK_END /* make sure stack is initialized */<br />
movia r4, interrupt_counts<br />
stw r0, 0(r4)<br />
movia r4, 100*50000 /* # of timer cycles in 100ms */<br />
call setup_timer_interrupts<br />
call setup_cpu_interrupts<br />
loop: ldwio r8, SWITCH(r23)<br />
stwio r8, LEDR(r23)<br />
br loop<br />
timer_isr:<br />
/* every interval, increment 'interrupt_counts' and display on LEDG */<br />
/* clear source of interrupt by writing 0 to TO bit */<br />
stwio r0, TIMER_STATUS(r23)<br />
/* process the interrupt, change state of system */<br />
movia r9, interrupt_counts<br />
ldw r8, 0(r9)<br />
addi r8, r8, 1<br />
stw r8, 0(r9)<br />
stwio r8, LEDG(r23) /* show count on LEDG */<br />
/* return from ISR */<br />
ret<br />
setup_timer_interrupts:<br />
/* set up timer to send interrupts */<br />
/* parameter r4 holds the # cycles for the timer interval */<br />
/* set the timer period */<br />
andi r2, r4, 0xffff /* extract low halfword */<br />
stwio r2, TIMER_START_LOW(r23)<br />
srli r2, r4, 16 /* extract high halfword */<br />
stwio r2, TIMER_START_HIGH(r23)<br />
/* start timer (bit2), count continuously (bit1), enable irq (bit0) */<br />
movi r2, 0b0111<br />
stwio r2, TIMER_CONTROL(r23)<br />
ret<br />
setup_cpu_interrupts:<br />
/* set up CPU to receive interrupts from timer */<br />
movi r2, 0x01 /* bit0 = irq0 = countdown timer device */<br />
wrctl ienable, r2<br />
movi r2, 1 /* bit0 = PIE */<br />
wrctl status, r2<br />
ret /* first instr. that may be interrupted */<br />
.data<br />
interrupt_counts:<br />
.word 0<br />
.end
Communication between ISR and Regular Program<br />
(revised 3/28/2011)<br />
One of the most difficult things to get correct is the communication between your ISR<br />
and the regular part of your program. There are two basic methods of communicating:<br />
1) By modifying specific registers<br />
2) By modifying memory<br />
Using registers is easiest, but it is really a shortcut and there are still some hidden<br />
difficulties. Using memory is the proper method, and the only way available from C<br />
language. However, it was already discussed earlier and will not be repeated here.<br />
To use registers for communication, you must use assembly language. You must<br />
decide ahead of time which specific register will be dedicated for the communication.<br />
The communicating register must not be saved/restored by the exception handler.<br />
In the second example assembly program (ABS brake controller), the program counts<br />
how many times the wheel spins (KEY3 goes from 0 to 1) by incrementing r22. The ISR<br />
inspects r22 to see if it should apply the brakes (frequent spins) or pulse them (infrequent<br />
spinning indicates a locked wheel). When the ISR exits, it resets r22 to 0. This<br />
communication is safe because all instructions that modify r22 behave atomically (the<br />
modifying instruction either completely executes, or is interrupted before executing).<br />
It is also important that we dedicated r22 to the task, and not a register that sometimes has<br />
another purpose. For example, suppose we chose to use r2 – after all, it is often used by<br />
subroutines to return a value. If the main program contains subroutines, they would also<br />
use r2 to return some value. Usually, the subroutine would return the correct value.<br />
However, sometimes the ISR will interrupt the subroutine just before returning; the ISR<br />
resets r2 to 0, causing the subroutine to return the wrong value.<br />
If you communicate using registers (not memory), it is still necessary to protect critical<br />
sections. In the example below, a shared variable is placed in register r22. The main<br />
program has a problem because it reads r22 in one place (the blt instruction) and then<br />
modifies it in another (the addi or movi instructions). Using separate instructions to read<br />
and modify the register is what causes the problem; protect this by disabling interrupts<br />
before the read, and re-enabling interrupts after the modify.<br />
MainBuggy: blt r22, r8, resetR22<br />
addi r22, r22, 1<br />
br done<br />
resetR22: movi r22, 0<br />
done: ...<br />
Identifying and protecting critical sections correctly is a difficult task. You will spend a<br />
lot of time on this topic next year in your Operating Systems course (eg, EECE 314 / 315).<br />
References<br />
[1] <strong>Nios</strong> <strong>II</strong> Processor Reference Handbook, especially early pages in Chapter 3.<br />
[2] <strong>Nios</strong> <strong>II</strong> Software Developer’s Handbook, especially Chapter 8.<br />
[3] Altera DE1 Media Computer manual<br />
You can download [1] and [2] from http://www.altera.com in the Literature section.<br />
L36-3
Example: ABS Brake Controller – toggle LEDG0 if KEY3 is infrequent.<br />
ISR and main program communicate using register r22.<br />
.include "ubc-de1media-macros.s"<br />
/*****************************************************************************<br />
* RESET SECTION<br />
* The <strong>Nios</strong> <strong>II</strong> assembler/linker places this section at address 0x00000000.<br />
* It must be
movia r4, brake_flag<br />
stw r0, 0(r4) /* initially, turn brake OFF */<br />
movi r22, 0 /* initialize KEY3 counter = 0 */<br />
movia r4, 100*50000 /* # of timer cycles in 100ms */<br />
call setup_timer_interrupts<br />
call setup_cpu_interrupts<br />
loop: stwio r22, LEDR(r23) /* display current KEY3 counter */<br />
ldwio r16, KEY(r23)<br />
andi r16, r16, 8 /* KEY3 */<br />
bne r16, r0, loop /* wait for KEY3 to become 0 */<br />
while0: stwio r22, LEDR(r23) /* display current KEY3 counter */<br />
ldwio r16, KEY(r23)<br />
andi r16, r16, 8 /* KEY3 */<br />
beq r16, r0, while0 /* wait for KEY3 to become 1 */<br />
/* count the 0-to-1 transition */<br />
addi r22, r22, 1<br />
br loop<br />
timer_isr:<br />
/* every 100ms, adjust brake_flag and display it on LEDG */<br />
/* clear source of interrupt by writing 0 to TO bit */<br />
stwio r0, TIMER_STATUS(r23)<br />
/* process the interrupt */<br />
movia r8, brake_flag /* read old brake state */<br />
ldw r9, 0(r8)<br />
(revised 3/28/2011)<br />
movi r8, 5<br />
blt r22, r8, brakePULSE /* if KEY3 pressed < 5 times, pulse brake */<br />
brakeON: movi r9, 0 /* turn brake off (invert turns it ON) */<br />
brakePULSE: xori r9, r9, 1 /* invert state of brake to pulse it */<br />
/* change state of the system */<br />
movia r8, brake_flag /* remember new brake state */<br />
stw r9, 0(r8)<br />
stwio r9, LEDG(r23) /* show current brake signal to LEDG[0] */<br />
mov r22, r0 /* reset KEY3 counter every second */<br />
/* return from ISR */<br />
ret<br />
setup_timer_interrupts:<br />
/* set up timer to send interrupts */<br />
/* parameter r4 holds the # cycles for the timer interval */<br />
/* set the timer period */<br />
andi r2, r4, 0xffff /* extract low halfword */<br />
stwio r2, TIMER_START_LOW(r23)<br />
srli r2, r4, 16 /* extract high halfword */<br />
stwio r2, TIMER_START_HIGH(r23)<br />
/* start timer (bit2), count continuously (bit1), enable irq (bit0) */<br />
movi r2, 0b0111<br />
stwio r2, TIMER_CONTROL(r23)<br />
ret<br />
setup_cpu_interrupts:<br />
/* set up CPU to receive interrupts from timer */<br />
movi r2, 0x01 /* bit0 = irq0 = countdown timer device */<br />
wrctl ienable, r2<br />
movi r2, 1 /* bit0 = PIE */<br />
wrctl status, r2<br />
ret<br />
.data<br />
brake_flag:<br />
.word 0<br />
.end