1792072K Manual - Powermatic
1792072K Manual - Powermatic
1792072K Manual - Powermatic

You also want an ePaper? Increase the reach of your titles
YUMPU automatically turns print PDFs into web optimized ePapers that Google loves.
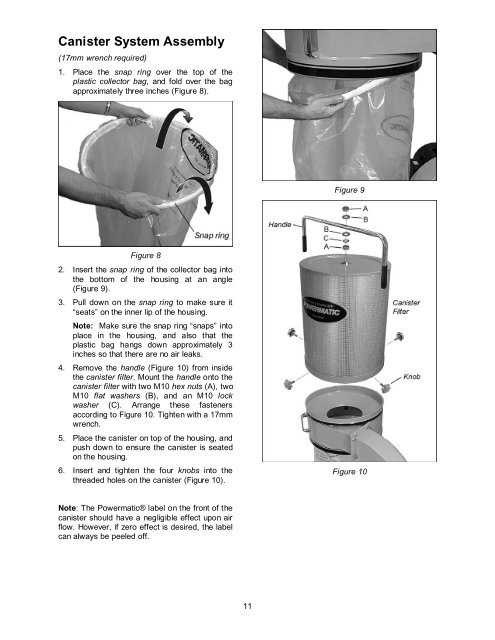
Canister System Assembly<br />
(17mm wrench required)<br />
1. Place the snap ring over the top of the<br />
plastic collector bag, and fold over the bag<br />
approximately three inches (Figure 8).<br />
Figure 8<br />
2. Insert the snap ring of the collector bag into<br />
the bottom of the housing at an angle<br />
(Figure 9).<br />
3. Pull down on the snap ring to make sure it<br />
“seats” on the inner lip of the housing.<br />
Note: Make sure the snap ring “snaps” into<br />
place in the housing, and also that the<br />
plastic bag hangs down approximately 3<br />
inches so that there are no air leaks.<br />
4. Remove the handle (Figure 10) from inside<br />
the canister filter. Mount the handle onto the<br />
canister filter with two M10 hex nuts (A), two<br />
M10 flat washers (B), and an M10 lock<br />
washer (C). Arrange these fasteners<br />
according to Figure 10. Tighten with a 17mm<br />
wrench.<br />
5. Place the canister on top of the housing, and<br />
push down to ensure the canister is seated<br />
on the housing.<br />
6. Insert and tighten the four knobs into the<br />
threaded holes on the canister (Figure 10).<br />
Note: The <strong>Powermatic</strong>® label on the front of the<br />
canister should have a negligible effect upon air<br />
flow. However, if zero effect is desired, the label<br />
can always be peeled off.<br />
11<br />
Figure 9<br />
Figure 10