ENGLISH (pdf) - Feathercraft
ENGLISH (pdf) - Feathercraft
ENGLISH (pdf) - Feathercraft

Create successful ePaper yourself
Turn your PDF publications into a flip-book with our unique Google optimized e-Paper software.
YOUR THE LEGENDARY ADVENTURE PERFORMANCE UNFOLDS OF<br />
Khatsalano<br />
with built-in coaming<br />
<strong>Feathercraft</strong> Products Ltd. 4-1244 Cartwright Street on Granville Island, Vancouver, British Columbia, Canada V6H 3R8<br />
Telephone: (604) 681-8437 Toll Free: 1-888-681-8437 Fax: (604) 681-7282 www.<strong>Feathercraft</strong>.com info@feathercraft.com
Contents<br />
Khatsalano Single Folding Kayak ..........................................Page 2<br />
Specifications ........................................................................Page 3<br />
Khatsalano Frame..................................................................Page 4<br />
Care and Maintenance ..........................................................Page 5<br />
Khatsalano Assembly Instructions.........................................Page 7<br />
Disassembly ..........................................................................Page 29<br />
<strong>Feathercraft</strong> Khatsalano 1
Khatsalano Single Folding Kayak<br />
<strong>Feathercraft</strong> Khatsalano 2
Specifications<br />
Frame: 6061 T6 Anodized Aluminum<br />
Seamless Drawn Round Tubing<br />
Crossribs: 1/2" High Density Polyethylene<br />
Rivets & Spacers: Aluminum or Stainless Steel<br />
Screws & Bolts: Stainless Steel<br />
Protective Coating: Clear Anodized Aluminum Frame<br />
Deck: Polytech<br />
Hull: Duratek<br />
Seat: 1/2" closed cell foam back & bottom,<br />
contoured plastic seat bottom, 3/16"plastic<br />
seat back with inflatable lumbar support,<br />
inside a 420 denier nylon seat cover.<br />
Sponsons: Welded Urethane<br />
Standard Accessories:Neoprene Spray Skirt<br />
Bow and Stern End Float Bags<br />
Adjustable Foot Braces<br />
Repair Kit<br />
Travel-style backpack<br />
Sea Sock<br />
Shockcord Cross-deck Tie Downs<br />
Perimeter Deck Line<br />
Assembly Video and Written Instructions<br />
Khatsalano<br />
Length: 5.4 m (17'10")<br />
Beam: 56 cm (22")<br />
Weight: 20.5 kg (45 lbs)<br />
Depth: 29cm (11.5)<br />
Travel Style Pack Bag Size: 94 x 46 x 24 cm<br />
(37 x 18 x 10")<br />
Assembly time: 35 minutes<br />
Approximate Pay Load: 136 kg (300 lbs)<br />
Khatsalano-S<br />
Length: 5.4 m (17'9")<br />
Beam: 60 cm (23.5")<br />
Weight: 22.25 kg (49 lbs)<br />
Depth: 29cm (11.5”)<br />
Travel Style Pack Bag Size: 94 x 46 x 24 cm<br />
(37 x 18 x 10")<br />
Assembly time: 35 minutes<br />
Approximate Pay Load: 145 kg (319 lbs)<br />
<strong>Feathercraft</strong> Khatsalano 3
Khatsalano Frame<br />
Welded Aluminum keel<br />
(both bow and stern)<br />
Crossribs handcrafted from High Density Polyethylene<br />
Total of five extension bars: keel, chines, gunwales<br />
Stern deck bar/vertical lever<br />
Secure bracing on diagonal truss bars<br />
Adjustable foot braces<br />
Reinforcement bars<br />
<strong>Feathercraft</strong> Khatsalano 4
Care and Maintenance<br />
THE FRAME<br />
The tubular frame is very strong and corrosion resistant. We<br />
recommend that the frame be disassembled after extensive use<br />
(2-3 months). The inside and outside of the tubes should be<br />
washed with fresh water. Try to keep the inserts and extension<br />
bars free of sand and grit.<br />
Included in your repair kit is a small dropper tube of Bo-Shield T-9.<br />
This product is made by Boeing and is an excellent lubricant<br />
and protectant for aluminum.<br />
Aerosal containers of Bo-Shield can be found at marine hardware<br />
stores. We also have available 4 oz bottles of Bo-Shield.<br />
However, please note, that the lid closure is not suitable for<br />
shipping after the bottle has been opened. This container<br />
would be good for your “at home” clean-up. We also have<br />
available Super Lube. This is a teflon lubricant in gel form. This<br />
product is also available from bike shops.<br />
Apply the Bo-Shield lubricant to frame tube inserts, spring buttons<br />
and sliding pieces prior to assembly. If you should leave<br />
your boat assembled for a maximum of two months, this will<br />
assist in preventing tubes seizing.<br />
Other maintenance “musts”:<br />
• every two months completely disassemble the kayak.<br />
• wash the frame completely with fresh water.<br />
• reapply lubricant and/or wipe down tubes with Bo-Shield T-9.<br />
• after paddling, sponge out the inside of the kayak.<br />
Do not allow water to pool along keel bar.<br />
THE SKIN<br />
The Polytech deck and Duratek hull are urethane. Seams are<br />
permanently sealed.<br />
A patch kit is provided for deck, hull or sponson punctures.<br />
One urethane glue will work for repairs to all of these fabrics.<br />
SPONSONS<br />
Due to tight fit of the skin, the sponsons are under considerable<br />
pressure and some seepage of air may occur. It is advisable to<br />
periodically reinflate the sponsons.<br />
<strong>Feathercraft</strong> Khatsalano 5
TO REPAIR/REPLACE SPONSON<br />
The sponsons can be completely removed from the sleeve sewn<br />
to the inside of the skin. Turn the skin inside out. The sponson<br />
chamber is open at bow and stern ends. Tie a long string<br />
through the hole in the tab at each end of sponson. Pull sponson<br />
through the center opening of the chamber (where sponson<br />
hose is attached). To reinstall, pull the cord attached to the new<br />
sponson back through the chamber. Ensure sponson is not<br />
twisted in the chamber. Urethane glue and patches are included<br />
in the repair kit. Duct tape works well on the sponsons.<br />
STORAGE<br />
Once clean and dry, the kayak can be stored assembled or<br />
disassembled in a shaded, dry place. When storing the kayak<br />
disassembled, take extension bars apart.<br />
<strong>Feathercraft</strong> Khatsalano 6
1 SET OUT FRAME PARTS AS ILLUSTRATED.<br />
Bow End<br />
Cockpit Rebar<br />
Stern Cockpit<br />
Calf Plates<br />
Mid Bow<br />
Stern Deck Bar / Vertical Lever<br />
Horizontal lever<br />
with foot track<br />
Cockpit Rim Inserts<br />
Mid Stern<br />
Hatch Rims<br />
Stern End<br />
Bow Cockpit<br />
Skin<br />
Keel Section<br />
(Note: Keel bar is bent)<br />
<strong>Feathercraft</strong> Khatsalano 7
2 BOW SECTION.<br />
• The Bow Rib tubes have a single band of coloured tape<br />
(red, green, yellow, blue and black).<br />
• The Bow Reinforcement Bars have one band of coloured<br />
tape and one band of white tape.<br />
• Fold out bow section. Shockcorded tubes take shape.<br />
Attach second Bow Keel Assembly (with one welded plate<br />
and two tubes attached, one black tape.)<br />
• Attach keel bar with black plastic block and hole for<br />
spring button.<br />
3 ATTACH SMALL #1 CROSSRIB TO BOW SECTION.<br />
• There are six high density polyethylene Crossribs.<br />
Each one is numbered.<br />
• Tilt crossrib above Keel Bar. Pin on small crossrib is inserted<br />
into hole in plastic block on keel tube.<br />
• Attach Gunwale tubes in notched connection on upper<br />
section of crossrib.<br />
<strong>Feathercraft</strong> Khatsalano 8
Block in open position Block in closed position<br />
4 ATTACH MID #2 CROSSRIB TO BOW SECTION.<br />
• Attach keel as in Step 3.<br />
• Attach to gunwales. Turn plastic block to lock into place.<br />
Turn the tube so the two rivet heads face inward,<br />
towards keel.<br />
• Attach to Chines.<br />
• Check that chines are properly aligned with #1 Rib.<br />
5 ATTACH LEFT AND RIGHT BOW END REINFORCEMENT BARS.<br />
(bent, with spring buttons: the right one with green tape<br />
is shockcorded to section with foot track).<br />
• Slide through the two holes in the #2 Crossrib and attach.<br />
<strong>Feathercraft</strong> Khatsalano 9
6 ASSEMBLE STERN SECTION.<br />
• The Stern Rib tubes have two bands of coloured tape (red,<br />
green, yellow, blue).<br />
• The Stern Reinforcement Bars have two bands of coloured<br />
tape and one band of white tape. The white tape of all<br />
Reinforcement Bars is always oriented towards the bow of<br />
the kayak frame.<br />
• Repeat Steps #2,#3,#4, and #5.<br />
7 ROLL OUT SKIN.<br />
• Slide Bow and Stern sections into skin. (<strong>Feathercraft</strong> label<br />
is on the bow end).<br />
• Ensure that the frame is centered in the skin!<br />
Bow Stern<br />
• Attach the two velcro closures on the inside keel of the<br />
hull to keep the frame in place.<br />
<strong>Feathercraft</strong> Khatsalano 10
Keel extension bar<br />
Horizontal lever with foot track<br />
Stern deck bar/<br />
Vertical lever<br />
During additional assembly steps, keep re-checking that the frame<br />
has remained centred in the skin.<br />
8 INSTALL KEEL EXTENSION BAR.<br />
• Wrap velcro closure around tube.<br />
9 EXPAND KEEL EXTENSION BAR.<br />
• Attach Keel bar to bow and stern section Keel bars.<br />
• Lever extension bar using Stern Deck Bar/ Vertical Lever<br />
and Bow Deck Bar/Horizontal Lever.<br />
• Expand until spring button pops up in first hole.<br />
An additional “pusher” block has been installed on the<br />
bow keel bar. If the bow and stern sections need to be<br />
separated further to insert the keel bar, push against this<br />
block using the lever bars.<br />
10 INSTALL RIGHT (BLUE) AND LEFT (YELLOW) CHINE EXTENSION BARS.<br />
• Expand Chine Extension Bars to first hole.<br />
11 EXPAND KEEL EXTENSION BAR TO SECOND POSITION.<br />
• Depress spring button. Lever until spring button pops up<br />
into the third hole.<br />
<strong>Feathercraft</strong> Khatsalano 11
(Please Note: Some steps have been shown with frame only<br />
for illustration purposes.)<br />
12 EXPAND CHINE EXTENSION BARS TO SECOND POSITION.<br />
• Note: There are four holes in the Keel Extension Bar and<br />
three holes in the Chine and Gunwale Extension Bars.<br />
Expand to these positions if the skin slackens after<br />
extended use.<br />
13 INSTALL SEAT SLING AND GUNWALE EXTENSION BARS.<br />
• Stern end of seat sling has narrower stitching. Slide Left and<br />
Right Gunwale Extension Bars through loops in sling.<br />
Attach Gunwale Extension Bars to frame and expand to<br />
first hole. Slide lower flaps of seat sling under Chine Bars.<br />
(Do not attach velcro until #3 and #4 Crossribs are in place).<br />
Expand Gunwales to second position.<br />
• At this point ensure that the entire frame is straight. Look<br />
down the entire kayak. You may have to rotate the bow or<br />
stern end slightly.<br />
<strong>Feathercraft</strong> Khatsalano 12
Calf Plates<br />
14 INSTALL #3 CROSSRIB.<br />
• Place Crossrib directly above the keel and chine bars<br />
(forward of the seat sling) and push down.<br />
• Tilt the Crossrib back towards the Stern and engage the two<br />
Gunwale bars.<br />
• Straighten the crossrib and slide forward until it is near the<br />
spring buttons that protrude from the keel and chine<br />
extension bars.<br />
• Rotate the keel and chine extension bars until the screws<br />
that protrude from the crossrib align with the holes in the<br />
black plastic blocks.<br />
Note: (The lever bar can be used to help rotate tubes.<br />
Insert pin into hole used when you extended the frame.<br />
Rotate to align.)<br />
• Rotate the two gunwale extension bars until the black blocks<br />
attached to them face towards the middle of the cockpit.<br />
• Depress one of the gunwale spring buttons and slide the<br />
crossrib over it. Do the same with the chine and keel bars<br />
and then the other gunwale and chine bars.<br />
CALF PLATES<br />
• Install the plastic plate supports by wrapping Velcro<br />
around Crossrib #3.<br />
<strong>Feathercraft</strong> Khatsalano 13
15 INSTALL #4 CROSSRIB.<br />
• Position the #4 crossrib aft of the seat sling and complete<br />
like #3.<br />
• Complete seat sling by securing ”velcro sandwich” around<br />
chine bars.<br />
16 INSTALL BOW REINFORCEMENT BAR/<br />
HORIZONTAL LEVER.<br />
• Attach to Left Bow End Reinforcement Bar.<br />
• Slide footbraces onto track.<br />
<strong>Feathercraft</strong> Khatsalano 14
17 INSTALL BOW COCKPIT REINFORCEMENT BARS.<br />
• Slide the two bars from the cockpit through the large holes<br />
in the #3 Crossrib. Attach to the bow reinforcement bars.<br />
18 INSTALL STERN COCKPIT REINFORCEMENT BARS.<br />
• Slide the two bars from the cockpit through the large holes<br />
in the #4 crossrib. Attach to stern end reinforcement bars.<br />
<strong>Feathercraft</strong> Khatsalano 15
Rim Insert<br />
Slide into pocket on underside<br />
of coaming rim<br />
Stern<br />
19 CONNECT THE COCKPIT REINFORCEMENT BARS.<br />
• Slide the sleeve on the stern bars over the bow bars until<br />
the spring buttons pop up in the first holes.<br />
• (The technique shown works best.)<br />
20 INSTALL RIM INSERTS.<br />
• Webbing strap wraps around gunwale<br />
and thigh brace.<br />
Gunwale Bar<br />
Thigh Brace<br />
pull tightly<br />
<strong>Feathercraft</strong> Khatsalano 16
21 ATTACH WEB LOOPS TO #4 CROSSRIB.<br />
• On the inside of the deck behind the #4 crossrib are pieces<br />
of webbing. Install over crosspiece and then back through<br />
the slot in the crosspiece. Secure to ladderlock buckle.<br />
22 INSTALL STERN DECK BAR/VERTICAL LEVER.<br />
• Put the stern deck bar through the center of the large #4<br />
crossrib: end with black block pointing toward the stern.<br />
Bring deck bar back through hole in top of #4 Crossrib.<br />
Line up bar, and insert stern end into hole drilled into the<br />
top of the #5 crossrib. Rotate deck bar to lock into place.<br />
• Cinch web loops (#21) to hold firmly in place.<br />
<strong>Feathercraft</strong> Khatsalano 17
23 ATTACH HATCH RIMS.<br />
Place the small plastic bow hatch rim over the opening on<br />
the bow deck, with the small end towards the bow. Roll<br />
the fabric over the rim. Repeat with the larger stern hatch.<br />
Note: Remove hatch rim when rolling up skin.<br />
<strong>Feathercraft</strong> Khatsalano 18
24 INSTALL SEAT.<br />
• Loop webbing at top of seat over #4 crossrib and connect<br />
to buckle.<br />
• Loop webbing at front of seat around the side of #3 crossrib<br />
and connect to ladderlock buckle.<br />
• Note: webbing goes above chine bar.<br />
• Note: this seat has special side straps that enable it to be<br />
used as a beach chair<br />
<strong>Feathercraft</strong> Khatsalano 19
25 INFLATE SPONSONS.<br />
FOR KHATSALANO-S<br />
• Turn the top of the valve to open. When inflating sponsons,<br />
alternate sides to ensure the frame and skin remain centered.<br />
The air pressure from the sponsons can shift the frame<br />
within the skin. Keep blowing until the skin is nice and<br />
tight. Twist top cap to close. Tuck sponson tubes and<br />
valves out of the cockpit area. Avoid stepping on the hose<br />
and valve, and try to keep the valve free of sand.<br />
FOR KHATSALANO (REGULAR)<br />
• Smaller diameter sponsons have been installed in the skin.<br />
You can choose to paddle the boat with the sponsons<br />
inflated or not. Inflating the sponsons creates a slightly<br />
rounder chine. Leaving the sponsons deflated will leave the<br />
boat with a hard chine and will be slightly more tender.<br />
<strong>Feathercraft</strong> Khatsalano 20
26 INFLATE FLOTATION BAGS.<br />
• Insert the two end flotation bags through the bow and<br />
stern hatches and inflate. Always use these bags unless the<br />
bow and stern are filled with gear in water-proof bags.<br />
• We recommend that you also insert and inflate the optional<br />
mid bow and main stern flotation bags.<br />
You can’t have too much flotation!<br />
• Secure hatch cover.<br />
<strong>Feathercraft</strong> Khatsalano 21
The <strong>Feathercraft</strong> Sea Sock<br />
Made from high-quality coated nylon, the sea sock is a great<br />
safety item. The top of the sock fits tightly around the cockpit<br />
coaming rim. Contoured to fit along the seatback and bottom,<br />
the “foot” is loose through the cockpit, creating a “pod”. The<br />
paddler then sits in the sock. Legs and feet are not constricted.<br />
The spray skirt fits as usual. In the event of a capsize, water will<br />
only enter the sock, and not the whole boat. It’s also great<br />
for keeping the inside of your kayak clean.<br />
Tips on Usage and Installation<br />
• The shiny side of the fabric faces in towards the<br />
kayak frame.<br />
• When facing the bow of the kayak, the <strong>Feathercraft</strong> label<br />
should be on the right side.<br />
• The center seam on the up-side of the Sea Sock should be<br />
centered on the bow point of the coaming.<br />
• Once the Sea Sock is in place, sit in the sock, and “burp”<br />
it by lifting the edges, releasing trapped air that causes the<br />
sock to billow up.<br />
<strong>Feathercraft</strong> Khatsalano 22
Diagram A<br />
Diagram B<br />
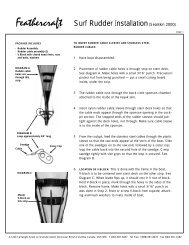
Khatsalano Surf Rudder<br />
The stern end cap is the rudder mount, and is permanently<br />
attached to the stern of the kayak. (Diagram A)<br />
The stainless steel pin extending from the base of the<br />
rudder is inserted through the “key hole” of the stern end<br />
cap/rudder mount.<br />
Rotate rudder head until fin is facing towards the bow.<br />
The stainless steel rudder cables coming through the stern<br />
deck have one sister clip. (Diagram B)<br />
<strong>Feathercraft</strong> Khatsalano 23
Diagram C<br />
Sister Clips (two of<br />
these clips are<br />
mounted on each<br />
side of the rudder)<br />
Join these to the two sister clips attached to each side of<br />
the rudder. (Diagram C)<br />
Attach the bungee cord with the hook to the loop on the<br />
deck to the rear of the cockpit.<br />
The rudder haul cord runs along the deck and is attached<br />
to the clip.<br />
When seated in the kayak, pull the knot on the haul cord<br />
that is farthest from you to raise and lower the rudder fin.<br />
<strong>Feathercraft</strong> Khatsalano 24
A CONNECTING RUDDER CONTROL TO FOOT BRACE<br />
• Red webbing adjusters are connected to the foot brace.<br />
Unscrew thumb-knob on foot brace; stem of knob goes<br />
through grommet. To make the adjuster shorter, fold<br />
webbing over to second grommet. Re-attach knob to foot<br />
brace. Slide brace on to track. Ensure brace can slide easily<br />
on track. (If not, check knob that you re-attached.)<br />
If additional leg extension is required, the brace foot plate<br />
can be reversed.<br />
Grommet<br />
Thumb screw knob<br />
reversing foot plates<br />
Fold over to shorten<br />
<strong>Feathercraft</strong> Khatsalano 25
Slider buckle<br />
Fold webbing to<br />
make a V<br />
Ladder-lock buckle<br />
B CONNECT CABLE ADJUSTER TO STAINLESS STEEL CABLE.<br />
• This is to attach the adjuster if you have installed the<br />
rudder from a kit.<br />
• Slide end of webbing through slider buckle. Thread the<br />
webbing through the loop in the stainless steel rudder<br />
cable. Fold or “pinch” webbing to make a V. Re-thread<br />
webbing through slider buckle.<br />
C CABLE LENGTH ADJUSTMENT<br />
• To shorten cable length, pull on tab of webbing with loop;<br />
to lengthen, lift tab of ladder-lock buckle.<br />
Tab with loop<br />
<strong>Feathercraft</strong> Khatsalano 26
Sea Wing Clip<br />
Available Options<br />
SEA WINGS.<br />
Sea Wings are external air tubes used for self-rescue re-entry.<br />
• The red webbing deck loop corresponds to the clip with<br />
red tab on the Sea Wings.<br />
OPTIONAL FLOAT BAGS.<br />
Mid-Bow Float Bag<br />
Main Stern Float Bag<br />
<strong>Feathercraft</strong> Khatsalano 27
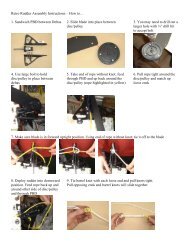
To prevent the skeg sliding backwards, loop the webbing strap<br />
underneath the stern deck strap.<br />
STRAP-ON SKEG FOR KHATSALANO KAYAK<br />
Skeg placement on stern.<br />
(Tapered end towards bow)<br />
<strong>Feathercraft</strong> Khatsalano 28
Disassembly<br />
To disassemble, remove rim inserts and hatch rims.<br />
Then reverse the order of the assembly steps. When taking<br />
down the five extension bars, start with the two gunwale bars<br />
first, then the two chine bars, and finish with the keel extension<br />
bar. To depress the spring buttons, the stainless steel pin on<br />
either of the Lever Bars can be pushed against them. For the<br />
final Keel Extension Bar it is best to set up the Lever system as<br />
in Step #9 to release tension.<br />
Folding the Skin<br />
Pull out the hoses attached to the sponsons and open the<br />
valves. Remove hatch rims. Fold the bow and stern ends<br />
towards the middle of the skin. Fold half of the skin over onto<br />
the other half. Roll up the skin toward the mid point where the<br />
sponson hoses are located. This will ensure that air in the sponsons<br />
is forced out. Close the valves on the sponson hoses and<br />
tie the skin. Roll up tight and snug.<br />
Packing the kayak in the bag<br />
• Put the seat cushion in the bag first, with the cushion<br />
facing down, to give padding for your back.<br />
• Next arrange the white plastic crossribs and hatch rims<br />
over the seat.<br />
• Roll the kayak skin up tightly—fold the ends to the<br />
center of the kayak; fold in half; roll tightly; secure<br />
with webbing ties.<br />
• Put the bow frame parts on one side of the bag, and the<br />
stern parts on the other.<br />
• Place the folded skin between the frame parts.<br />
• All the remaining tube frame parts are then placed over<br />
the bow and stern section bundles.<br />
• Place the flotation bags over the frame parts.<br />
• Spread the sea sock over the frame parts to protect<br />
the tubes.<br />
<strong>Feathercraft</strong> Khatsalano 29
© <strong>Feathercraft</strong> Products Limited 1998<br />
Printed in Canada 9.2007<br />
Recycled paper