ENGLISH (pdf) - Feathercraft
ENGLISH (pdf) - Feathercraft
ENGLISH (pdf) - Feathercraft

You also want an ePaper? Increase the reach of your titles
YUMPU automatically turns print PDFs into web optimized ePapers that Google loves.
jet stream FOLDING<br />
Assembly Instructions<br />
airline<br />
SIT-ON-TOP KAYAKS<br />
by<br />
TM
Contents<br />
1 Kayaking Safety<br />
3 Care and Maintenance<br />
Repairing or Replacing Air Tubes<br />
4 Jet Stream Assembly Instructions<br />
14 Frequently Asked Questions
Kayaking Safety<br />
PLEASE READ CAREFULLY!<br />
Kayaking can be hazardous and can involve the risk of serious<br />
injury or death. Kayakers are responsible for obtaining appropriate<br />
instruction in paddling skills, equipment safety, water<br />
safety, rescue and first aid. It is strongly recommended that<br />
you obtain training in kayaking safety from a qualified and<br />
experienced kayaking instructor.<br />
The various components of <strong>Feathercraft</strong> kayaks are subject<br />
to wear, breakage and failure. This type of damage can lead<br />
to accidents resulting in serious injury or death. It is your<br />
responsibility to maintain your kayak in excellent condition.<br />
Disassemble your kayak completely at least every two<br />
months. Re-lubricate the framework and inspect for signs of<br />
wear or failure. Any worn, damaged or broken parts must be<br />
repaired or replaced. If you have any doubts or concerns<br />
about the condition of your <strong>Feathercraft</strong> kayak, contact your<br />
dealer or <strong>Feathercraft</strong> Products Ltd.<br />
Kayak safety training should include the following topics:<br />
1. Paddling skills. Paddling techniques need to be<br />
practiced in various water conditions. Maneuvering<br />
a kayak through rough seas, currents and tidal<br />
zones is quite different from paddling on flat water.<br />
2. Hypothermia. The greatest danger to a kayaker is<br />
hypothermia or cold water immersion. Protection<br />
against hypothermia involves more than simply<br />
wearing the appropriate protective clothing. It<br />
involves all aspects of kayak safety.<br />
3. Know Your Kayak. Your safety on the water is<br />
dependant on all components of your kayak functioning<br />
perfectly. You must inspect your kayak for<br />
signs of wear or failure before setting off on every<br />
trip, including seams, hatches, spray skirt, rudder<br />
and hull.<br />
4. Spray Skirt and Safety Sock. All <strong>Feathercraft</strong> kayaks<br />
come equipped with a spray skirt and safety sock<br />
(except the Klondike, where the socks are optional,<br />
and the Air Line Sit-on-Top models). These are<br />
important safety items, but you must be fully familiar<br />
with their use before an emergency arises.<br />
airline jet stream 1
5. Personal Flotation Device and Helmet. The wearing<br />
of an approved PFD is highly recommended for all<br />
kayakers, even those who are strong swimmers. A<br />
helmet should be worn for whitewater or surf zone<br />
paddling.<br />
6. Safety Equipment. The safety equipment you will<br />
carry in and on your kayak will vary with the nature<br />
and length of the trip. Kayak trips of any duration<br />
however, require a pump, spare paddle, bouyant<br />
heaving line, flares and whistle as essential items.<br />
Safety equipment will only be of use to you if you<br />
have the knowledge and training to use the equipment<br />
in an emergency.<br />
7. Self-Rescue and Group Rescue. The nature of kayaking<br />
is such that some day you or a member of your<br />
group will capsize. This experience can vary from<br />
a refreshing dip in the ocean to a life-threatening<br />
emergency. How you handle a capsize will depend<br />
entirely on your training and experience.<br />
The kayaking community is blessed with a wealth of material,<br />
including books, manuals, magazines, articles and videos,<br />
and resources including schools, clubs, associations and<br />
training centres dedicated to kayaking safety. As with any<br />
skill, kayaking safety must first be learned and then practiced.<br />
We at <strong>Feathercraft</strong> strongly recommend that you<br />
access resources for kayak safety in your community before<br />
venturing out onto the water.<br />
For more information on kayaking safety, please contact your<br />
local kayak dealer, or your kayak or canoe association. These<br />
websites will get you started.<br />
University of Sea Kayaking<br />
f www.useakayak.org<br />
Trade Association of Paddlesports<br />
f www.gopaddle.org<br />
Sea Kayaker Magazine<br />
f www.seakayakermag.com<br />
airline jet stream 2
Care and Maintenance<br />
Avoid mildew damage —- do not store the skin wet.<br />
When the kayak is taken apart for storage, thoroughly clean<br />
all frame tubes with fresh water. Re-apply Bo-Shield T-9 to all<br />
frame parts, making sure to well lubricate the telescoping<br />
sections and the spring buttons. This should be done at least<br />
once a month, possibly more, depending on the salt<br />
concentration in the water you are paddling.<br />
A Note on Disassembly<br />
Always lubricate framework. However, after extended use in<br />
surf and sand, the frame parts may be difficult to disengage.<br />
As shown in the illustration below, open the ”twist–assist“<br />
on the aluminum tubing, and insert screw drivers to twist the<br />
tubes apart. The keel hinge pin can also be substituted for<br />
one of the twisting tools.<br />
twist-assist<br />
Repairing or Replacing<br />
Air Tubes<br />
Aqua Seal is used to repair holes or punctures of either the<br />
air tubes or the hull. Follow the preparation instructions as<br />
outlined on the Aqua Seal containers. Use the popsicle stick<br />
to mix and apply the Aqua Seal. Secure the patched area<br />
with duct tape. Applying weight to a patched area is also<br />
helpful (i.e. bag of sand). To make a quick repair with duct<br />
tape, first swab the area with rubbing alcohol or Cotol 240<br />
Accelerator.<br />
To replace the chine or gunwale sponson, tie a long string to<br />
the stern end of the sponson. Pull the sponson through from<br />
the bow end to the velcro opening at the stern. Pull the rest of<br />
the sponson out. At the bow end velcro opening reach in and<br />
push the inflation hose through the small hole in the deck.<br />
You will need a tool to push the ends of the sponson in:<br />
Connect the vertical lever bar with the horizontal lever bar.<br />
Push the SS pin extending from the bar into the hole at the<br />
end of the sponson. Feed the sponson into the bow end<br />
chamber. Repeat with stern end. (see diagram page 4)<br />
airline jet stream 3
When re-inserting the air tube, check that the air tube does<br />
not get twisted in the chamber. If you should need to replace<br />
an air tube, be sure to request by the color on the nozzle<br />
(Yellow, Red, Green, Blue, or ‘no color’).<br />
airline jet stream 4
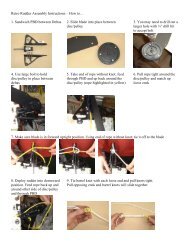
Jet Stream Assembly Instructions<br />
1. Frame parts<br />
Using rubber gloves, liberally lubricate frame inserts<br />
with Bo-Shield T-9.<br />
gunwale<br />
extension bars<br />
Stern Section<br />
keel hinge<br />
with drop skeg<br />
keel hinge<br />
extension bar<br />
Bow Section<br />
gunwale bars<br />
with track<br />
vertical lever<br />
bar / keel<br />
horizontal lever<br />
bar / keel<br />
airline jet stream 5
2. Roll out skin and insert frame halves<br />
Insert frame section stamped “B” into the bow of the skin.<br />
(bow end of skin has logo)<br />
Insert frame section stamped “S” into the stern of the skin.<br />
(stern end of skin has rudder attachment)<br />
Center the keel end pieces.<br />
Ensure the deck air bladders<br />
do not get trapped in or<br />
under the frame work.<br />
airline jet stream 6
3. Install gunwale bars<br />
Follow the color coding – Single band of tape attaches<br />
at bow section. Double band of tape attaches at stern<br />
section. Bars slide through webbing loops.<br />
stern<br />
b<br />
slide foot track<br />
bar forward<br />
4. Extend gunwale bars<br />
Use the vertical and horizontal lever bars to extend the<br />
gunwale bars to the third hole. Ensure the bow and<br />
stern frame ends are centered in the hull.<br />
c<br />
a<br />
airline jet stream 7<br />
bow
5. Install lever bars to bow keel frame section<br />
airline jet stream 8
6. Install keel extension to hinged drop skeg<br />
Set spring button to same hole position<br />
as the gunwales.<br />
airline jet stream 9
7. Complete keel<br />
Lifting the keel section up, attach the hinged keel to the<br />
keel / lever bars. Push keel down. Secure with hinge pin.<br />
Attach velcro closures around keel bar. Attach the haul<br />
cord for the drop skeg to the bungee cord with hook<br />
tied to webbing.<br />
Rocker<br />
Rocker is the curvature of the keel. For normal<br />
paddling some rocker is desired, especially at the<br />
stern end. The kayak will tend to rise over the waves<br />
better with rocker. On the other hand, speed on flat<br />
water may be increased with slightly less rocker.<br />
Too little, or negative rocker will cause the bow to plow.<br />
To increase rocker extend the keel extension bar out<br />
another hole (there are 5 possible positions) and/or<br />
decrease the gunwale extension bars by one hole.<br />
airline jet stream 10
8a. Install foot brace<br />
Slide onto foot track from bow end.<br />
8b. Inflate<br />
Before Inflating make sure the small<br />
webbing straps for bow and stern<br />
cargo compartments are not trapped<br />
under frame work. Loosely attach to buckle<br />
on cargo compartment.<br />
Sequence for inflating:<br />
• Partially inflate bow and stern deck bags.<br />
• Inflate chine air tubes (blue and yellow)<br />
• Inflate gunwale air tubes (red and green)<br />
• Complete by inflating deck bags. Ensure bow deck is<br />
evenly inflated to create a good curve.<br />
attach web from<br />
rudder cables<br />
secure foot brace<br />
inflate with<br />
pump<br />
airline jet stream 11
9. Install seat, deck mesh and thigh straps<br />
Center seat in “well”. Webbing at back of seat wraps<br />
under gunwale tube, then attaches to buckles.<br />
Cinch tightly. Front seat straps attach to buckles<br />
with grey webbing.<br />
“D” ring<br />
front seat straps connect to<br />
grey web<br />
airline jet stream 12
10. Install rudder<br />
Insert the rudder pin through the “key hole”.<br />
Rotate rudder 180°.<br />
Attach rudder cable to clip. White haulcord is<br />
attached to plastic hook beside seat.<br />
Use of rudder and skeg<br />
We recommend the following:<br />
Light to moderate winds rudder only<br />
Heavy following winds or surf rudder and skeg<br />
Turning into heavy winds or surf no rudder<br />
airline jet stream 13
Frequently Asked Questions<br />
The following are general “Frequently Asked Questions”<br />
about <strong>Feathercraft</strong> kayaks.<br />
What is the Warranty ?<br />
All <strong>Feathercraft</strong> Kayaks come with a five year warranty on all<br />
parts and workmanship. Our service and support will continue<br />
well after that, as your <strong>Feathercraft</strong> Kayak is expected to<br />
last 10 to 15 years.<br />
The best advertising available is a happy kayaker paddling<br />
their <strong>Feathercraft</strong>!<br />
Materials and Construction<br />
The Hull<br />
For years we used hypalon. This was the best product available.<br />
Hypalon is a rubber and neoprene laminate that is<br />
extremely rugged and durable. To make a hull of hypalon<br />
fabric various glues and chemical compounds are required<br />
to bond the sections together. It is a toxic, incredibly labour<br />
intensive job. Huge developments have been made in the<br />
fabric industry in recent years. And now other fabric options<br />
have become available.<br />
All fabric hull material begins with a cloth weave of either<br />
polyester or nylon. Then the fabric is coated with either<br />
polyvinyl chloride (PVC vinyl), urethane or hypalon. The best<br />
cloth weave is made of high-tenacity fibers woven in a tight,<br />
balanced weave (i.e. a similar number of threads going both<br />
lengthwise and across the fabric).<br />
Urethane is harder than hypalon rubber and much harder<br />
than PVC, hence having higher abrasion resistance. Urethane<br />
coated fabrics have typically been used as heavy duty truck<br />
and equipment tarps and on inflatable rafts. We found that<br />
these massed produced, single coated fabrics are too stiff to<br />
stretch over our sleek frame works. We had to work with our<br />
supplier to develop the combination of strength and suppleness<br />
that we require. The base fabric is made from high<br />
tenacity nylon fibers, an 840 denier balanced weave. The fabric<br />
is scorched (heated) and dyed. To ensure high adhesion<br />
of the coating to the fabric, a solution coat of thin urethane is<br />
impregnated into the fibers. This is followed by successive<br />
applications of urethane coats. The outer coats are harder<br />
than the inner coats. The fabric is extremely tough, yet supple.<br />
The advantages are obvious: high abrasion resistance,<br />
high UV resistance, resistant to fading, supple, light weight,<br />
weldable. The disadvantage is that this fabric, which is made<br />
in small quantities for <strong>Feathercraft</strong>, is considerably more<br />
expensive than hypalon.<br />
airline jet stream 14
Different Hull Fabrics are Used by Different Manufacturers.<br />
a) PVC This material may seem quite robust because of its<br />
cloth support. However, PVC (vinyl) is soft and abrades relatively<br />
easily. It has very poor UV resistance, and after a few<br />
years becomes quite brittle. Its main advantage is that it is<br />
inexpensive (about one quarter the cost of hypalon and<br />
Duratek). PVC can also be welded.<br />
b) Urethane: This is a very hard and abrasion-resistant material.<br />
It is also considerably lighter than hypalon, and is more<br />
resistant to many toxic chemicals. Previously, we could not use<br />
urethane as a hull fabric because it was incredibly difficult to<br />
bond using traditional glueing methods. But we knew it could<br />
be welded, and that this was the direction we wanted to go.<br />
A special fabric was developed for us to use as a hull fabric.<br />
New equipment has also become available allowing us to create<br />
the complicated shapes and curves of our hulls.<br />
c) Hypalon: This has traditionally been the standard for expedition-style<br />
skin kayaks. Hypalon is basically neoprene (a<br />
synthetic rubber) with additives patented and supplied by<br />
DuPont. These increase UV resistance and allow the material<br />
to be dyed. The best hypalon is still made in Europe. The type<br />
we used for years, came from France. We changed our hull<br />
fabric for two reasons: one, to get away from the toxic chemicals<br />
required to fabricate the hulls; and two, for our sit-in models,<br />
we wanted to weld a skin that would be completely<br />
sealed, water-tight and dry. Hypalon can not be welded.<br />
How tough is the hull?<br />
The hull is extremely durable. With some care, you should<br />
get 10 to 15 years of use. You should treat the craft with the<br />
same respect and care that you would a fiberglass hull. Try<br />
to avoid dragging it over rocks, or crashing it onto coral or<br />
barnacles. But don’t worry, if it is unavoidable, it can take the<br />
abuse. (We just don’t recommend it all the time.) The interesting<br />
thing with a skin hull, if you meet up with a solid object<br />
like a rock or chunk of coral, the fabric “gives”, so the impact<br />
is not as intense. A fibreglass hull would just “crunch”.<br />
Can I repair the hull?<br />
Patching the hull is similar to patching a bicycle tire. Aqua<br />
Seal can be used to fill small cosmetic nicks. To make a quick<br />
fix with duct tape, or one of the “Quick Patches”, first clean<br />
the area with rubbing alcohol or Cotol. Patching instructions<br />
are detailed on the adhesive in the repair kit.<br />
The Deck<br />
The deck fabric is polyester with a light coating of urethane<br />
on the underside. Allow the skin to dry completely before<br />
rolling up for storage.<br />
The Frame<br />
The frame is made from 6061-T6, and 6063-T832 anodized<br />
magnesium/aluminum alloy, and is the strongest, yet lightest<br />
in weight. This same alloy is used extensively in the aircraft<br />
industry. We have had surprisingly few repairs, considering<br />
airline jet stream 15
the number of boats that we have sold. Tour operators tell us<br />
that they have far fewer repairs than with wood-frame<br />
kayaks. One of the many beauties of a folding kayak is that<br />
should a piece break or get lost, that single piece can be<br />
repaired or replaced.<br />
The alloys that we use are very corrosion-resistant, and are<br />
used extensively in the marine industry. The clear anodized<br />
coating protects the aluminum from pitting. However, regular<br />
maintenance and lubrication are required to ensure that<br />
the sliding frame members do not seize together.<br />
Framework Care & Maintenance:<br />
1. Disassemble your kayak every two months.<br />
2. Rinse the frame thoroughly with fresh water to<br />
wash off the sea salt and make assembling the<br />
frame much easier.<br />
3. Lubricate joins, tubes, extension bars, and spring<br />
buttons with Bo-Shield T-9.<br />
4. Let the skin dry completely on the frame before<br />
storing the kayak in its pack.<br />
Repairs<br />
A Standard Repair Kit is included with each kayak and contains:<br />
1. written assembly instructions<br />
2. Aqua Seal repair adhesive and Cotol accelerator<br />
3. 1 oz dropper bottle of Bo-Shield T-9<br />
4. sandpaper<br />
5. 2 Quick Patches<br />
6. patch fabric for deck, hull, sponsons, pack-bag<br />
Preparation for glueing a patch to the Urethane hull :<br />
1. Round the corners of your patch.<br />
2. Ensure area is clean and dry.<br />
3. Roughen smooth surfaces. Swab the area with<br />
Cotol.<br />
4. For a two hour cure time, combine one part Cotol to<br />
three parts Aqua Seal.<br />
airline jet stream 16
5. As the adhesive itself is slippery, secure patched<br />
area with duct tape, and/or apply weight to the<br />
patch (ie, bag of sand). To apply a patch to the deck,<br />
ensure the fabric is clean and dry.<br />
Sponsons<br />
Sponsons are the air tubes that create your kayak. They are<br />
made from urethane and the seams are welded. Urethane is<br />
an extremely tough, yet light material. Each air tube is in a<br />
separate chamber.<br />
Pre-caution:<br />
If the kayak is not being paddled, but is in the sun during the<br />
heat of the day, release the air from the sponsons. Air in the<br />
sponsons will expand, and could potentially rupture the<br />
sponson.<br />
The sponson can be repaired using the same technique and<br />
repair adhesive as the hull. To remove the sponson, turn the<br />
ends of the kayak skin inside out. The sponson chamber is<br />
accessible at either end. At the bow end of the sponson,<br />
there is a tab with a hole punched. Attach a long piece of<br />
string or rope to the end of the sponson. Disengage the air<br />
hose from the opposite end, and pull the sponson through<br />
the chamber. Once the repair has been made, pull the sponson<br />
back through the chamber with your rope. Be sure the<br />
sponson lies flat and does not get twisted.<br />
airline jet stream 17
<strong>Feathercraft</strong> Products Ltd. 07<br />
4-1244 Cartwright Street on Granville Island,<br />
Sept<br />
Vancouver, British Columbia, Canada V6H 3R8<br />
Telephone: (604) 681-8437 Fax: (604) 681-7282<br />
www.<strong>Feathercraft</strong>.com info@feathercraft.com Updated