Surf Rudder Installation(Sealskin 2000) - Feathercraft
Surf Rudder Installation(Sealskin 2000) - Feathercraft
Surf Rudder Installation(Sealskin 2000) - Feathercraft

You also want an ePaper? Increase the reach of your titles
YUMPU automatically turns print PDFs into web optimized ePapers that Google loves.
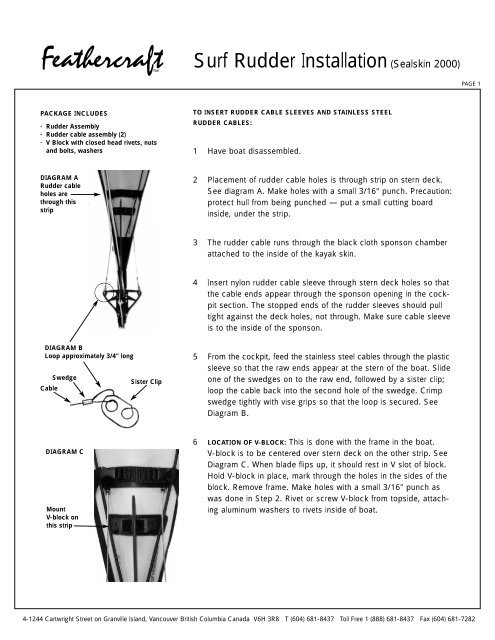
PACKAGE INCLUDES<br />
· <strong>Rudder</strong> Assembly<br />
· <strong>Rudder</strong> cable assembly (2)<br />
· V Block with closed head rivets, nuts<br />
and bolts, washers<br />
DIAGRAM A<br />
<strong>Rudder</strong> cable<br />
holes are<br />
through this<br />
strip<br />
DIAGRAM B<br />
Loop approximately 3/4" long<br />
Swedge<br />
Cable<br />
DIAGRAM C<br />
Mount<br />
V-block on<br />
this strip<br />
Sister Clip<br />
<strong>Surf</strong> <strong>Rudder</strong> <strong>Installation</strong> (<strong>Sealskin</strong> <strong>2000</strong>)<br />
TO INSERT RUDDER CABLE SLEEVES AND STAINLESS STEEL<br />
RUDDER CABLES:<br />
1 Have boat disassembled.<br />
2 Placement of rudder cable holes is through strip on stern deck.<br />
See diagram A. Make holes with a small 3/16" punch. Precaution:<br />
protect hull from being punched — put a small cutting board<br />
inside, under the strip.<br />
3 The rudder cable runs through the black cloth sponson chamber<br />
attached to the inside of the kayak skin.<br />
4 Insert nylon rudder cable sleeve through stern deck holes so that<br />
the cable ends appear through the sponson opening in the cockpit<br />
section. The stopped ends of the rudder sleeves should pull<br />
tight against the deck holes, not through. Make sure cable sleeve<br />
is to the inside of the sponson.<br />
5 From the cockpit, feed the stainless steel cables through the plastic<br />
sleeve so that the raw ends appear at the stern of the boat. Slide<br />
one of the swedges on to the raw end, followed by a sister clip;<br />
loop the cable back into the second hole of the swedge. Crimp<br />
swedge tightly with vise grips so that the loop is secured. See<br />
Diagram B.<br />
6 LOCATION OF V-BLOCK: This is done with the frame in the boat.<br />
V-block is to be centered over stern deck on the other strip. See<br />
Diagram C. When blade flips up, it should rest in V slot of block.<br />
Hold V-block in place, mark through the holes in the sides of the<br />
block. Remove frame. Make holes with a small 3/16" punch as<br />
was done in Step 2. Rivet or screw V-block from topside, attaching<br />
aluminum washers to rivets inside of boat.<br />
4-1244 Cartwright Street on Granville Island, Vancouver British Columbia Canada V6H 3R8 T (604) 681-8437 Toll Free 1 (888) 681-8437 Fax (604) 681-7282<br />
PAGE 1
DIAGRAM D<br />
Grommet<br />
7 ATTACHING SURF RUDDER THROUGH CASTING: The rudder casting is<br />
permanently attached to the stern of the kayak. Insert the rudder<br />
pin through the “key hole”. Rotate rudder 180º. See Diagram D.<br />
Attach rudder cables with sister clips. Run the white haulcord forward<br />
beside the cockpit. Slide bungee cord with hook through<br />
webbing loop beside cockpit, with hook towards stern. Tie knot.<br />
Clip haulcord slightly slack for easier rudder function.<br />
Thumb screw knob<br />
Fold over to shorten<br />
Ladder-lock buckle Tab with loop<br />
Sister Clips (two of these clips are mounted<br />
on each side of the rudder).<br />
8 CONNECTING RUDDER CONTROL TO FOOT BRACE<br />
Red webbing adjusters are connected to the foot brace. Unscrew<br />
thumb-knob on foot brace; stem of knob goes through grommet.<br />
To make the adjuster shorter, fold webbing over to second grommet.<br />
Re-attach knob to foot brace. Slide brace on to track.<br />
Ensure brace can slide easily on track. (If not, check knob that<br />
you re-attached.)<br />
9 CABLE LENGTH ADJUSTMENT<br />
To shorten cable length, pull on tab of webbing with loop; to<br />
lengthen, lift tab of ladder-lock buckle.<br />
4-1244 Cartwright Street on Granville Island, Vancouver British Columbia Canada V6H 3R8 T (604) 681-8437 Toll Free 1 (888) 681-8437 Fax (604) 681-7282<br />
PAGE 2<br />
28125 01.08