Heron Assembly Instructions - Feathercraft
Heron Assembly Instructions - Feathercraft
Heron Assembly Instructions - Feathercraft

You also want an ePaper? Increase the reach of your titles
YUMPU automatically turns print PDFs into web optimized ePapers that Google loves.
The Your Legendary Adventure Performance unfolds of<br />
<strong>Heron</strong><br />
foldInG kAYAks<br />
feathercraft Products ltd. 4-1244 Cartwright street on Granville Island, vancouver, British Columbia, Canada v6H 3r8<br />
toll free: 1-888-681-8437 tel: (604) 681-8437 fax: (604) 681-7282 www.feathercraft.com info@feathercraft.com<br />
TM
Contents<br />
<strong>Heron</strong> Folding Kayak .............................................................Page 2<br />
Specifications ........................................................................Page 3<br />
<strong>Heron</strong> Frame .........................................................................Page 4<br />
Care and Maintenance ..........................................................Page 5<br />
<strong>Heron</strong> <strong>Assembly</strong> <strong>Instructions</strong> ................................................Page 7<br />
The <strong>Feathercraft</strong> Sea Sock .....................................................Page 20<br />
Disassembly ..........................................................................Page 21<br />
<strong>Feathercraft</strong> <strong>Heron</strong> 1
<strong>Heron</strong> Folding Kayak<br />
Comfortable sling seat<br />
Hull reinforced on outside over<br />
keel and chine bars<br />
Built in coaming<br />
removeable air sponsons inside<br />
skin along gunwales<br />
<strong>Feathercraft</strong> <strong>Heron</strong> 2
Specifications<br />
length: 5.4m (17’ 7”)<br />
Beam: 61cm (24”)<br />
Weight: 24.5 kg (54 lbs)<br />
Pack size: 98 x 50 x 31cm (38.5 x 19.5 x 12”)<br />
storage volume: High<br />
frame: 3/4 and 5/8 round aluminum<br />
magnesium alloy tubing with<br />
clear anodized coating<br />
Crossribs: 1/2” High density Polyethylene<br />
skin Material: Welded urethane<br />
seat: 420 denier rip stop nylon cover with<br />
closed cell foam, inflatable seat back and<br />
moulded plastic seat bottom<br />
Accessories: Included with every kayak:<br />
double coated nylon spray skirt<br />
double coated nylon sea sock<br />
Pivot foot Brace<br />
Calf Plates<br />
Medium bow hatch<br />
small and large stern hatch<br />
repair kit<br />
Pack Bag<br />
rudder<br />
<strong>Assembly</strong> instructions<br />
<strong>Feathercraft</strong> <strong>Heron</strong> 3
<strong>Heron</strong> Frame<br />
deck bars are at the top of the frame,<br />
under the deck<br />
keel bars are on the bottom<br />
of the kayak<br />
Gunwale bars are the upper<br />
most along the side<br />
Chine bars are along the side, next up<br />
from the keel<br />
<strong>Feathercraft</strong> <strong>Heron</strong> 4
Care and Maintenance<br />
The Frame<br />
the tubular frame is very strong and corrosion resistant. We<br />
recommend that the frame be disassembled after extensive use<br />
(2 – 3 months). the inside and outside of the tubes should be<br />
washed with fresh water. try to keep the inserts and extension<br />
bars free of sand and grit.<br />
Included in your repair kit is a small dropper tube of Boeshield t-9.<br />
this product is made by Boeing and is an excellent lubricant<br />
and protectant for aluminum.<br />
Aerosal containers of Boeshield can be found at marine hardware<br />
stores. We also have available 4 oz bottles of Boeshield.<br />
However, please note, that the lid closure is not suitable for<br />
shipping after the bottle has been opened. this container<br />
would be good for your “at home” clean-up.<br />
Apply the Boeshield lubricant to frame tube inserts, spring buttons<br />
and sliding pieces prior to assembly. If you should leave<br />
your boat assembled for a maximum of two months, this will<br />
assist in preventing tubes seizing.<br />
other maintenance “musts”:<br />
• every two months completely disassemble the kayak.<br />
• wash the frame completely with fresh water.<br />
• reapply lubricant and/or wipe down tubes with<br />
Boeshield t-9.<br />
• after paddling, sponge out the inside of the kayak.<br />
do not allow water to pool along keel bar.<br />
The Skin<br />
the surfaces of the skin will not rot. they are stable in sunlight<br />
and are very tear-resistant. on the hull, areas likely to be<br />
exposed to abrasion have been reinforced. However, we<br />
recommend care when approaching shore. sharp rocks, and<br />
barnacles can penetrate the skin. Avoid pulling a loaded boat<br />
over rocks whenever possible.<br />
for patching and repairs, a patch kit is included. for quick field<br />
repair, duct tape works very well, and is a good addition to<br />
your repair kit.<br />
<strong>Feathercraft</strong> <strong>Heron</strong> 5
Welded Sealskin<br />
the Polytech deck and duratek hull are urethane. seams are<br />
permanently sealed.<br />
A patch kit is provided for deck, hull or sponson punctures.<br />
the urethane glue will work for repairs to all of these fabrics.<br />
for preparation and application, follow the instructions on the<br />
adhesive container.<br />
Sponsons<br />
due to the tight fit of the skin, the sponsons are under<br />
considerable pressure and some seepage of air may occur.<br />
It is advisable to periodically reinflate the sponsons. After<br />
paddling on hot days, release air from sponsons.<br />
To Repair/Replace Sponson<br />
the sponsons can be completely removed from the sleeve sewn<br />
to the inside of the skin. turn the skin inside out. the sponson<br />
chamber is open at bow and stern ends. tie a long string<br />
through the hole in the tab at the end of sponson. Pull sponson<br />
through the center opening of the chamber (where sponson<br />
hose is attached). to reinstall, pull the cord attached to the<br />
new sponson back through the chamber. ensure sponson is<br />
not twisted in the chamber. repeat with the opposite side.<br />
urethane glue and patches are included in the repair kit. duct<br />
tape works well on the sponsons.<br />
<strong>Feathercraft</strong> <strong>Heron</strong> 6
<strong>Heron</strong> Frame Parts<br />
skin crossribs<br />
seat<br />
calf-plates<br />
(to be attached<br />
to #3 crossrib)<br />
coaming rim inserts<br />
hatch rims<br />
stern deck bar/vertical<br />
lever bar<br />
stern deck bar/horizontal<br />
lever bar<br />
keel extension bar<br />
pivot pedals chine & gunwale<br />
extension bars in<br />
seat sling<br />
cockpit bracing bars<br />
<strong>Feathercraft</strong> <strong>Heron</strong> 7
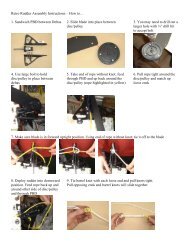
1 SeT ouT FRAMe PARTS AS IlluSTRATeD on THe PRevIouS PAge<br />
• stern and bow frame sections.<br />
stern section has the double<br />
bands of black tape.<br />
Bow deck bars have the single<br />
band of white tape.<br />
Bow section has foot track.<br />
(see next page)<br />
<strong>Feathercraft</strong> <strong>Heron</strong> 8
2 ASSeMBle BoW SeCTIon<br />
• “Shake” out bow section.<br />
shock corded tubes<br />
take shape.<br />
Bow section with<br />
foot track.<br />
• Attach #1 bow crossrib to bow section.<br />
Pin on crossrib goes<br />
into black block.<br />
<strong>Feathercraft</strong> <strong>Heron</strong> 9
• Install #2 crossrib<br />
• Connect deck bar with spring button<br />
and white tape.<br />
• Slide the pivot pedals in place now.<br />
• Loop bungee cord with clips through<br />
#2 crossrib as shown.<br />
3 ASSeMBle STeRn SeCTIon<br />
• Shake out stern section as you<br />
did the bow.<br />
• Attach stern deck bar with double<br />
band of black tape.<br />
• #6 and #5 crossrib are attached the<br />
same as #1 and #2 for the bow.<br />
Bow deck bar attaches<br />
with spring button.<br />
Completed bow section.<br />
twister rotates closed.<br />
<strong>Feathercraft</strong> <strong>Heron</strong> 10
4 unFolD SKIn. InSeRT BoW AnD STeRn FRAMe SeCTIonS.<br />
• Slide bow and stern frame sections into skin.<br />
reach through hatches to pull frame into skin,<br />
and align along the keel. velcro closures are<br />
attached to inside of the skin. Wrap these<br />
around keel bar.<br />
• Insert keel bar, sliding apart to connect bow and<br />
stern keel bars.<br />
stern Bow<br />
<strong>Feathercraft</strong> <strong>Heron</strong> 11
5 exPAnD exTenSIon BARS<br />
a. using the stern deck bars as horizontal and vertical lever<br />
bars, extend the keel extension bar till the spring button<br />
pops up in the first hole.<br />
b. Insert Chine and Gunwale extension bars, keeping them in<br />
the sleeves of the seat sling. double bands of tape indicate<br />
stern end.<br />
c. Attach matching colours to bow and stern frame sections.<br />
expand chine extension bars to the first hole, as you did<br />
with the keel extension bar. expand gunwale extension<br />
bars to the first hole.<br />
d. return to the keel extension bar, and extend further, to<br />
the center hole. Continue to expand each of the chine<br />
and gunwale bars till each one is at the center hole. When<br />
using the lever bars to extend, situate yourself across from<br />
the parts you are working on. each extension bar should<br />
be extended to the same position.<br />
<strong>Feathercraft</strong> <strong>Heron</strong> 12
6 InSTAllIng lARge CRoSSRIBS<br />
a. Insert #3 crossrib to bow.<br />
b. Insert #4 crossrib to stern.<br />
c. Crossribs slide over spring button. screw end fits into<br />
black block.<br />
spring button<br />
d. under deck webbing with buckle loops around<br />
stern crossrib.<br />
Inside of the skin<br />
<strong>Feathercraft</strong> <strong>Heron</strong> 13
7 CoMPleTe STeRn SeCTIon<br />
• Insert the Horizontal lever bar/stern<br />
deck through the stern hatch; connects<br />
to the deck bar attached to stern<br />
frame section.<br />
• Insert Stern deck bar/vertical lever bar<br />
through the hatch. Bar slides through<br />
hole in top of crossrib #4; slide back to<br />
connect to deck bar, then twist to lock.<br />
Hatch<br />
Hatch<br />
stern bar<br />
stern bar<br />
Hatch<br />
Cockpit<br />
<strong>Feathercraft</strong> <strong>Heron</strong> 14
8 InSTAll ReMAInIng BoW DeCK BAR<br />
Insert deck bar through keyhole<br />
rotate deck bar to lock<br />
<strong>Feathercraft</strong> <strong>Heron</strong> 15
stern<br />
9 InSTAll RIM InSeRTS<br />
• Slide into pocket with tab on underside of coaming rim.<br />
rim insert<br />
Gunwale bar<br />
thigh brace<br />
10 InSTAll BRACIng BARS<br />
• Slide oversleeve on thigh brace towards bow. Insert stern<br />
end of tube (a) through hole in large stern crossrib. Insert<br />
bow end (b) through hole in large bow crossrib. slide oversleeve<br />
towards stern till snug and spring button appears.<br />
a b<br />
• Web strap goes around gunwale bar and thigh brace.<br />
<strong>Feathercraft</strong> <strong>Heron</strong> 16
11 InSTAll HATCH RIM AnD CoveRS<br />
• Small and large hatch rims are installed at the stern.<br />
Medium hatch is on the bow. remember to remove<br />
hatch rims when rolling up the skin.<br />
12 InSTAll RuDDeR<br />
<strong>Feathercraft</strong> <strong>Heron</strong> 17
13 InFlATe SPonSonS<br />
• Turn the top of the valve to open. When inflating, alternate<br />
sides to ensure the frame remains centered. the air<br />
pressure from the sponsons can shift the frame within the<br />
skin. keep inflating until skin feels tight, and you can not<br />
orally inflate any more.<br />
CAutIon: If you leave the kayak sitting in the sun,<br />
release air from sponsons.<br />
14 InSTAll SeAT<br />
• Inflate air bladder in the seat back to suit<br />
personal comfort.<br />
15 ATTACH CAlF PlATeS To CRoSSRIB #3<br />
Calf plates<br />
<strong>Feathercraft</strong> <strong>Heron</strong> 18
16 ConneCT PIvoT FooT PeDAl To RuDDeR CABleS<br />
red web strap attaches to tension lock on foot<br />
pedal webbing.<br />
foot pedals fold flat for easy gear loading.<br />
When using the sea sock, no need to use bungee to hold<br />
the pedals in the upright position. the sock keeps them<br />
from falling forward.<br />
Bungee loops around<br />
side of crossrib; clips<br />
to itself<br />
Bungee cord<br />
with clips<br />
<strong>Feathercraft</strong> <strong>Heron</strong> 19
17 THe FeATHeRCRAFT SeA SoCK<br />
• Made from high-quality coated nylon, the sea sock is a<br />
great safety item. the top of the sock fits tightly around<br />
the cockpit coaming rim. Contoured to fit along the<br />
seatback and bottom, the “foot” is loose through the<br />
cockpit, creating a “pod”. the paddler then sits in the<br />
sock. legs and feet are not constricted. the spray skirt fits<br />
as usual. In the event of a capsize, water will only enter<br />
the sock, and not the whole boat.<br />
We can not stress enough the importance of the sea sock.<br />
It is your key safety item in a capsize to prevent flooding<br />
your kayak; it also prevents sand and dirt getting in the<br />
kayak.<br />
Tips on Usage and Installation<br />
• The embroidered <strong>Feathercraft</strong> label indicates the<br />
“right” side of the sock.<br />
• Center the seam on the rim of the sea sock with the<br />
center point on the bow of the coaming.<br />
• Once the Sea Sock is in place, sit in the sock, and “burp”<br />
it by lifting the edges, releasing trapped air that causes the<br />
sock to billow up.<br />
<strong>Feathercraft</strong> <strong>Heron</strong> 20
Disassembly<br />
let the air out of the sponsons. remove rim inserts. remove<br />
deck bars. remove bracing bars and large crossribs. remove<br />
Gunwale and Chine extension bars using the lever bars to<br />
release the spring buttons. release the keel extension Bar last.<br />
follow the rest of the assembly steps in reverse order.<br />
Packing the kayak in the bag<br />
Put the seat cushion in the bag first. Arrange the white plastic<br />
crossribs over the seat. roll the kayak skin up tightly–fold the<br />
ends to the center of the kayak; fold in half; roll tightly; secure<br />
with webbing ties. Place the skin bundle in the middle of the<br />
bag; put the bow and stern frame bundles on either side of<br />
the skin. take chine and gunwale extension bars apart, leaving<br />
one half installed in the seat sling. roll up the loose sections<br />
together in the seat sling. tuck all additional pieces (ie: sea<br />
sock, repair kit) into any available space.<br />
lifting the Kayak<br />
the kayak can be lifted with two people, one at either end; at<br />
either side of the cockpit, holding the frame cockpit area; or<br />
one person, lifting over the shoulders.<br />
Avoid lifting a fully loaded kayak.<br />
Storage<br />
once clean and dry, the kayak can be stored assembled or<br />
disassembled in a shaded, dry place. When storing the kayak<br />
disassembled, take extension bars apart.<br />
<strong>Feathercraft</strong> <strong>Heron</strong> 21
© feathercraft Products limited 2011<br />
Printed in Canada, 5/2011<br />
recycled paper