Kurrent 2.0 (pdf) - Feathercraft
Kurrent 2.0 (pdf) - Feathercraft
Kurrent 2.0 (pdf) - Feathercraft

Create successful ePaper yourself
Turn your PDF publications into a flip-book with our unique Google optimized e-Paper software.
The YOUR Legendary ADVENTURE Performance<br />
UNFOLDS<br />
<strong>Kurrent</strong> <strong>2.0</strong><br />
FOLDING KAYAKS<br />
<strong>Feathercraft</strong> Products Ltd. 4-1244 Cartwright Street on Granville Island, Vancouver, British Columbia, Canada V6H 3R8<br />
Toll Free: 1-888-681-8437 Tel: (604) 681-8437 Fax: (604) 681-7282 www.feathercraft.com info@feathercraft.com<br />
TM
Contents<br />
<strong>Kurrent</strong> <strong>2.0</strong> Folding Kayak .....................................................Page 2<br />
Specifications ........................................................................Page 3<br />
Frame ....................................................................................Page 4<br />
Care and Maintenance ..........................................................Page 5<br />
Assembly Instructions ...........................................................Page 8<br />
The <strong>Feathercraft</strong> Sea Sock .....................................................Page 15<br />
Disassembly ..........................................................................Page 16<br />
<strong>Feathercraft</strong> <strong>Kurrent</strong> <strong>2.0</strong> 1
<strong>Kurrent</strong> <strong>2.0</strong> Folding Kayak<br />
Hull reinforced on outside over<br />
keel and chine bars<br />
Comfortable sling seat<br />
with inflatable back<br />
& bottom<br />
Built in coaming<br />
Removeable air sponsons inside<br />
skin along gunwales<br />
<strong>Feathercraft</strong> <strong>Kurrent</strong> <strong>2.0</strong> 2
Specifications<br />
Length:<br />
Beam:<br />
Weight:<br />
Storage Volume:<br />
Frame:<br />
Crossribs:<br />
Skin Material:<br />
Pack size:<br />
3.98 m (13’1”)<br />
63.5 cm (25”)<br />
.2 kg (1. lbs)<br />
Low<br />
5/8” Round<br />
6061 - T6 Aluminum<br />
Magnesium Tubing with clear<br />
Anodized Coating<br />
Injection Molded Polycarbonate<br />
Welded Urethane<br />
00m 2<br />
Seat: 420 denier rip-stop nylon with inflatable<br />
air back and air bottom<br />
Accessories: Included with every kayak:<br />
Nylon Spray Skirt<br />
Sea Sock<br />
Adjustable Foot Brace Bar<br />
Repair Kit<br />
Pack Bag<br />
Assembly Video<br />
Illustrated Instructions<br />
<strong>Feathercraft</strong> <strong>Kurrent</strong> <strong>2.0</strong> 3
<strong>Kurrent</strong> <strong>2.0</strong> Frame<br />
shockcorded tubing<br />
crossribs are injection<br />
molded polycarbonate<br />
seat sling suspended<br />
from chines & gunwales<br />
foot brace<br />
chines, gunwales and deckbars<br />
through-bolted permanently<br />
to keel plate (same for bow<br />
and stern)<br />
<strong>Feathercraft</strong> <strong>Kurrent</strong> <strong>2.0</strong> 4
Care and Maintenance<br />
The Frame<br />
The tubular frame is very strong and corrosion resistant. Basic<br />
maintenance is required, generally every 2 to 3 months, after<br />
extensive use, or if water has flooded the kayak. Disassemble<br />
the kayak frame. Completely rinse the inside and outside of the<br />
tubes with fresh water. Keep frame inserts and extension bars<br />
free of sand and grit.<br />
Using rubber gloves, coat the frame inserts and sliding sections<br />
with Bo-Shield T-9 (a small bottle is included in the repair kit).<br />
Made by Boeing, this is an excellent lubricant and protectant.<br />
Apply this to the frame prior to assembly to allow tubes to<br />
slide together more easily. This product can usually be found in<br />
marine hardware stores and some bike shops.<br />
Apply the lubricant liberally to all sliding pieces and spring<br />
buttons to prevent parts from seizing, if you plan to leave the<br />
kayak assembled for a couple of months.<br />
After paddling, sponge out water that may have pooled along<br />
the keel.<br />
The Skin<br />
The urethane skin fabric is very UV and abrasion resistant, given<br />
normal use. Do not store outside, unprotected. The fabric can<br />
be affected if continually stored in moist and damp conditions.<br />
Do not store the skin rolled up wet. Care must be taken when<br />
approaching rocks, barnacles or shells. To avoid puncturing the<br />
hull, exit the kayak and lift over any sharp surfaces. Do not pull a<br />
loaded boat over rocks or carry a loaded kayak.<br />
A patch kit is included for repairs. Urethane adhesive is used to<br />
apply any patches or fill nicks. Instructions for patching are on the<br />
adhesive. Duct tape will also work well, and is a good addition to<br />
your repair kit.<br />
<strong>Feathercraft</strong> <strong>Kurrent</strong> . 5
Welded Sealskin<br />
The teh deck and ratek hull are urethane. Seams are<br />
permanently sealed b radi reen wedin.<br />
A patch kit is provided for deck, hull or sponson punctures.<br />
The urethane glue will work for repairs to all of these fabrics.<br />
For preparation and application, follow the instructions on the<br />
adhesive container.<br />
Sponsons<br />
Due to the tight fit of the skin, the sponsons are under<br />
considerable pressure and some seepage of air may occur.<br />
Reinflate as necessary. After paddling on hot days, release air<br />
from sponsons, especially if leaving the kayak beached in full<br />
sun on a hot day.<br />
To Repair/Replace Sponson<br />
The sponsons can be removed from the sleeve sewn to the<br />
inside of the skin. Turn the skin inside out. The sponson<br />
chamber is open at bow and stern ends. Tie a long string<br />
through the hole in the tab at each end of the sponson. Pull<br />
sponson through the center opening of the chamber (where<br />
sponson hose is attached). To reinstall, pull the cord attached<br />
to the sponson back through the chamber. Ensure sponson<br />
is not twisted in the chamber.Inflate slightly to check fit.<br />
Urethane glue and patches are included in the repair kit.<br />
Duct tape will also work for the sponsons.<br />
<strong>Feathercraft</strong> <strong>Kurrent</strong> <strong>2.0</strong> 6
<strong>Kurrent</strong> Frame Parts<br />
Seat<br />
Skin<br />
Rim inserts<br />
w<br />
dek<br />
bar<br />
Stern<br />
ek<br />
ar<br />
Keel Extension<br />
Bar with<br />
Black Tape<br />
Foot Brace<br />
Large<br />
Stern<br />
Crossrib<br />
Chine + Gunwale<br />
Extension Bars<br />
(shown without<br />
seat sling)<br />
Small<br />
w Stern<br />
<strong>Feathercraft</strong> <strong>Kurrent</strong> <strong>2.0</strong> 7<br />
Crossribs –<br />
Stern marked 'S'<br />
Large Bow<br />
Crossrib
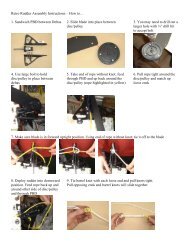
1 SET OUT FRAME PARTS AS ILLUSTRATED<br />
2 SHAKE OUT BOW & STERN FRAME<br />
SECTIONS<br />
• The shockcorded tubing takes<br />
shape.<br />
3 ATTACH SMALL CROSSRIBS TO BOW & STERN SECTIONS<br />
• Pin on small crossrib inserts to hole on black block on keel<br />
tube. Stern rib is marked with an 'S'.<br />
• Chine and gunwale tubes snap-fit onto crossrib. White<br />
spacers are on “cockpit” side of crossrib.<br />
Pin into block<br />
<strong>Feathercraft</strong> <strong>Kurrent</strong> <strong>2.0</strong> 8
4 UNFOLD SKIN<br />
• Insert bow and stern frame.<br />
• Velcro tabs are attached to the inside of the hull along the<br />
keel.<br />
• Have the tabs open. Check that all the rivet heads on the<br />
frame section joins are facing towards the inside of the<br />
kayak. This will avoid unncessary wear at these points.<br />
• Slide bow and stern frame sections into the skin.<br />
• Center the frame along the inside keel strip, pushing the<br />
section to the very ends. Check that the keel tube aligns to<br />
the strip along the inside keel.<br />
5 SLIDE FOOT BRACE BAR ONTO BOW FRAME SECTION<br />
• Web strap loops around gunwale bar.<br />
Insert bow frame section<br />
Foot Brace Bar<br />
<strong>Feathercraft</strong> <strong>Kurrent</strong> <strong>2.0</strong> 9
Stern<br />
6 INSTALL KEEL EXTENSION BAR<br />
• Bow end has one band of black tape; stern end has two<br />
bands of black tape. Connect to frame sections in skin.<br />
sin dek bars as eer bars etend kee etensin bar ti srin bttn<br />
s in irst he<br />
1<br />
2<br />
3<br />
Bow<br />
<strong>Feathercraft</strong> <strong>Kurrent</strong> <strong>2.0</strong> 10
7 INSTALL CHINE AND GUNWALE BARS WITH SEAT SLING<br />
• The seat sling will be suspended from the chine and gunwale bars.<br />
Have the extension bars inserted to the sewn sleeves of the seat<br />
sling. Place the seat sling with the extension bars into the kayak with<br />
the safety label towards the bow.<br />
• Unfold the mid-connectors.<br />
• Begin with the chine bars (the lower tubes). Connect to the stern<br />
frame tubes. (It is usually easier to work on the opposite side of the<br />
kayak from the part you are installing).<br />
• Connect the bow end to the corresponding bow frame section.<br />
• Shockcorded section joins together. Slide oversleeve over join.<br />
• Connect the gunwale bars in the same way.<br />
Bow<br />
Chine<br />
Gunwale<br />
Chine<br />
Gunwale<br />
Keel<br />
Stern<br />
Pull out. Twist oversleeve<br />
until “pocket” appears.<br />
Align straight. Slide over-<br />
1<br />
sleeve to close.<br />
2<br />
3<br />
Oversleeve<br />
Close<br />
Slide seat sling to the<br />
stern while installing<br />
chine & gunwale<br />
extension bars.<br />
<strong>Feathercraft</strong> <strong>Kurrent</strong> <strong>2.0</strong> 11
8 INSTALL LARGE BOW AND STERN CROSSRIBS<br />
• Begin with the bow. There are two black blocks on the<br />
keel bar. The larger block is a “twister”. Open the twister<br />
to allow the pin on the base of the bow crossrib to slide<br />
into the hole in the smaller black block. Angle the crossrib<br />
towards the spacers on the chine and gunwale tubes. Fit<br />
the pin into the small black block on the keel. Position the<br />
rib between the spacers, pushing the rib onto the tube.<br />
The stern rib attaches the same, but with no twister.<br />
Bow crossrib<br />
Stern crossrib<br />
Twister on bow<br />
keel<br />
<strong>Feathercraft</strong> <strong>Kurrent</strong> <strong>2.0</strong> 12
9 INSTALL BOW DECK BAR<br />
• Insert deck bar through keyhole in top of crossrib. Connect<br />
to deck bar of frame sections in skin. Rotate deck bar to<br />
lock in place.<br />
nsta Stern ek ar<br />
nsert thrh rssrib enin<br />
bak t thrh ke he<br />
bak in t in with dek bar<br />
attahed t stern setin.<br />
tate t k sitin.<br />
<strong>Feathercraft</strong> <strong>Kurrent</strong> <strong>2.0</strong> 13
10 CONNECT UNDER-DECK BUCKLE TO BUCKLE ON CROSSRIBS,<br />
BOTH BOW & STERN<br />
11 INSTALL RIM INSERTS<br />
• Slide rim insert into pocket on underside of coaming.<br />
Rim insert<br />
Stern<br />
<strong>Feathercraft</strong> <strong>Kurrent</strong> <strong>2.0</strong> 14
12 INFLATE SPONSONS<br />
• Turn the top of the valve to open. When inflating sponsons,<br />
alternate sides to ensure the frame remains centered. The<br />
air pressure from the sponsons will shift the frame within<br />
the skin. Inflate until the skin is tight. Twist cap to close.<br />
Tuck sponson tubes and valves out of the cockpit area.<br />
Avoid stepping on the hose and valve, and try to keep the<br />
valve free of sand.<br />
13 INSTALL SEAT<br />
• Inflate air bladders in the seat back and bottom to suit<br />
personal comfort. Less air in the bottom is usually better.<br />
<strong>Feathercraft</strong> <strong>Kurrent</strong> <strong>2.0</strong> 15
14 THE FEATHERCRAFT SEA SOCK<br />
• Made from high-quality coated nylon, the sea sock is a<br />
great safety item. The top of the sock fits tightly around<br />
the cockpit coaming rim. Contoured to fit along the<br />
seatback and bottom, the “foot” is loose through the<br />
cockpit, creating a “pod”. The paddler then sits in the<br />
sock. Legs and feet are not constricted. The spray skirt fits<br />
as usual. In the event of a capsize, water will only enter<br />
the sock, and not the whole boat.<br />
We can not stress enough the importance of the Sea Sock.<br />
It is your key safety item in a capsize to prevent flooding<br />
your kayak; it also prevents sand and dirt getting in the<br />
kayak.<br />
Tips on Usage and Installation<br />
• The coloured <strong>Feathercraft</strong> label indicates inside or “right”<br />
side of sock.<br />
• Center the seam on the rim of the sea sock with the<br />
center point on the bow of the coaming.<br />
• Once the Sea Sock is in place, sit in the sock, and “burp”<br />
it by lifting the edges, releasing trapped air that causes the<br />
sock to billow up.<br />
<strong>Feathercraft</strong> <strong>Kurrent</strong> <strong>2.0</strong> 16
15 COCKPIT BRACING BARS<br />
• The web strap with buckle at the cockpit is for the optional<br />
bracing bars.<br />
• Slide oversleeve on thigh brace towards bow. Insert stem<br />
end of tube (a) through the hole in large stern crossrib.<br />
Insert bow end (b) through hole in large bow crossrib.<br />
Slide oversleeve towards stern til snug and spring button<br />
appears.<br />
a<br />
b<br />
• Web strap goes around gunwale bar and thigh brace.<br />
Gunwale bar<br />
Thigh brace<br />
<strong>Feathercraft</strong> <strong>Kurrent</strong> <strong>2.0</strong> 17
16 ATTACHING OPTIONAL SKEG<br />
<strong>Feathercraft</strong> <strong>Kurrent</strong> <strong>2.0</strong> 18
Disassembly<br />
Release air from sponsons. Remove coaming rim inserts.<br />
Remove seat. Remove deck bars. Twist & slide oversleeves<br />
openongunwalebars;disconnectfrombowandsternframe<br />
sections.Twist&slideoversleevesopenonchinebars;disconnect<br />
from bow and stern frame sections. Open Velcro tabs.<br />
se eer bars t reease tensin n keel bar; sh dwn srin<br />
bttn to release. isconnect from bow and stern keel frame<br />
bars. To help loosen the bow and stern frame sections from<br />
within the skin, with the palm of your hand, push along the<br />
outside curve of the skin. Pull the bow and stern frame<br />
sections out of the skin.<br />
Packing the kayak in the bag<br />
Remove the deck shockcords, and use these to hold the bundles<br />
of frame parts together. Lay the seat cushion in the bag to<br />
act as padding when using the pack straps. Next, arrange the<br />
crossribs in the bag. To roll the kayak skin as tight as possible<br />
– lay out flat; pull sponson hoses out to sides with the valves<br />
open. Fold the bow and stern ends into the center of the cockpit.<br />
Fold this in half.<br />
Begin rolling from the open fold side; kneeling on the skin –<br />
roll – kneel – like you would a thermarest pad. Close sponson<br />
valves. Tuck hoses into fold of skin. Secure rolled skin with 2<br />
pieces of shockcord. Place the skin in the center of the bag,<br />
with the bow and stern frame bundles on either side.<br />
Tuck remaining items in bag.<br />
Lifting the Kayak<br />
The kayak can be lifted with two people, one at either end; at<br />
either side of the cockpit, holding the frame cockpit area; or<br />
one person, lifting over the shoulder.<br />
Avoid lifting a fully loaded kayak.<br />
Storage<br />
To store in the bag – ensure the skin has been allowed to<br />
completely dry, and that the frame has been cleaned and lubricated.<br />
To store assembled – protect from elements, under a cover, on<br />
a rack.<br />
Do not store the kayak in a non-breathable storage bag.<br />
<strong>Feathercraft</strong> <strong>Kurrent</strong> <strong>2.0</strong> 19
© <strong>Feathercraft</strong> Products Limited 201<br />
Printed in Canada, 0/201<br />
Recycled paper