Electronic Price Computing Label/Receipt Printing Scale
Electronic Price Computing Label/Receipt Printing Scale
Electronic Price Computing Label/Receipt Printing Scale

You also want an ePaper? Increase the reach of your titles
YUMPU automatically turns print PDFs into web optimized ePapers that Google loves.
6 Programming<br />
existing clerk. All level 3 passwords are implicitly set to Dept. = 0, therefore all level 3 passwords can only be set<br />
to Dept. = 0. Level 2 can be assigned to either a specific department, or to Dept. = 0. Levels 1 and 0 CANNOT<br />
be assigned a Dept. = 0. Any clerk assigned to Dept. = 0 will have access to any and all departments;<br />
however, any clerk with a non-zero department assignment, will only be able to access that department<br />
which they are assigned to. This prevents cross-departmental access when it is desired, and allows the<br />
assignment of department managers and store manager passwords.<br />
To make a Store Manager password, simply assign that clerk to level 2 and Dept = 0. To make a Department<br />
Manager, simply assign that clerk to level 2 and department number = to the department you wish for that<br />
clerk to manage. Employees that are only to use the scale in REG mode must be assigned level 1 and a<br />
department assignment equal to the department that they shall work in. Level 0 is reserved for future use.<br />
Refer to next page for the various password level requirements of the different screens and functions.<br />
Pressing the SAVE key at any point or the ENTER key while the cursor is on the last field will save the current clerk<br />
and move on to the next available clerk number. Press the ESC key to exit Security Control.<br />
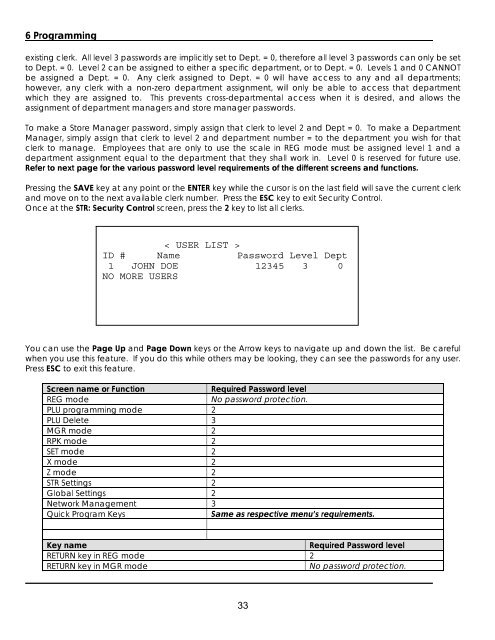
Once at the STR: Security Control screen, press the 2 key to list all clerks.<br />
< USER LIST ><br />
ID # Name Password Level Dept<br />
1 JOHN DOE 12345 3 0<br />
NO MORE USERS<br />
You can use the Page Up and Page Down keys or the Arrow keys to navigate up and down the list. Be careful<br />
when you use this feature. If you do this while others may be looking, they can see the passwords for any user.<br />
Press ESC to exit this feature.<br />
Screen name or Function Required Password level<br />
REG mode No password protection.<br />
PLU programming mode 2<br />
PLU Delete 3<br />
MGR mode 2<br />
RPK mode 2<br />
SET mode 2<br />
X mode 2<br />
Z mode 2<br />
STR Settings 2<br />
Global Settings 2<br />
Network Management 3<br />
Quick Program Keys Same as respective menu’s requirements.<br />
Key name Required Password level<br />
RETURN key in REG mode 2<br />
RETURN key in MGR mode No password protection.<br />
33