Note: Before installing the IR Remote Blaster cable, install the ...
Note: Before installing the IR Remote Blaster cable, install the ...
Note: Before installing the IR Remote Blaster cable, install the ...

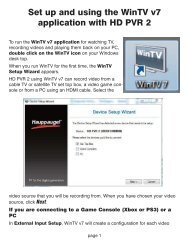
Create successful ePaper yourself
Turn your PDF publications into a flip-book with our unique Google optimized e-Paper software.
<strong>Note</strong>: <strong>Before</strong> <strong><strong>install</strong>ing</strong> <strong>the</strong> <strong>IR</strong> <strong>Remote</strong> <strong>Blaster</strong> <strong>cable</strong>, <strong>install</strong> <strong>the</strong> WinTV board plus driver<br />
and application software from <strong>the</strong> WinTV Installation CD ROM. Make sure that <strong>the</strong><br />
WinTV application works properly when using your mouse or keyboard.<br />
During <strong>the</strong> <strong>install</strong>ation of <strong>the</strong> WinTV software from <strong>the</strong> WinTV Installation CD-ROM, <strong>the</strong> Hauppauge<br />
WinTV <strong>IR</strong> and <strong>IR</strong> <strong>Blaster</strong> Applications will be automatically <strong>install</strong>ed. You will be asked during <strong>the</strong> <strong>IR</strong><br />
software <strong>install</strong>ation to acknowledge a software license.<br />
You can manually <strong>install</strong> <strong>the</strong> Hauppauge WinTV <strong>IR</strong> and <strong>IR</strong> <strong>Blaster</strong> applications from <strong>the</strong> Installation<br />
CD by running irblast.exe from <strong>the</strong> <strong>IR</strong>32 directory of your Hauppauge Installation CD-ROM.<br />
Every time you boot Windows, <strong>the</strong> <strong>IR</strong>32 application should automatically run. You will notice a small <strong>IR</strong><br />
icon in your system device tray. You can reset <strong>the</strong> <strong>IR</strong> application by running Restart<strong>IR</strong> from <strong>the</strong><br />
Hauppauge WinTV folder.<br />
Step 1: Plug <strong>the</strong> <strong>IR</strong> <strong>Remote</strong><strong>Blaster</strong> <strong>cable</strong> into your WinTV board<br />
Plug <strong>the</strong> <strong>IR</strong> Cable Jack at <strong>the</strong> end of <strong>the</strong> <strong>IR</strong> <strong>Remote</strong><strong>Blaster</strong> <strong>cable</strong> into <strong>the</strong> <strong>IR</strong> receiver jack on <strong>the</strong><br />
WinTV card or WinTV-PVR-USB2 box.<br />
<strong>Note</strong>: be sure <strong>the</strong> <strong>IR</strong> Cable jack is well seated in <strong>the</strong> WinTV board. You might need to<br />
wiggle <strong>the</strong> WinTV board and/or <strong>the</strong> <strong>IR</strong> <strong>Remote</strong><strong>Blaster</strong> <strong>cable</strong> to get it firmly seated. If<br />
it is not well seated, <strong>the</strong> WinTV application will not respond to commands from <strong>the</strong><br />
Hauppauge remote control.<br />
Step 2: Position <strong>the</strong> <strong>IR</strong> receiver<br />
Place <strong>the</strong> <strong>IR</strong> Receiver so that <strong>the</strong> infrared light from <strong>the</strong> Hauppauge <strong>Remote</strong> control can reach <strong>the</strong><br />
<strong>IR</strong> Receiver.<br />
Step 3: Check <strong>the</strong> function of Hauppauge <strong>Remote</strong> for WinTV<br />
Point <strong>the</strong> Hauppauge remote at <strong>the</strong> <strong>IR</strong> receiver and click <strong>the</strong> Go button. You should see <strong>the</strong> WinTV<br />
selector pop up. Use <strong>the</strong> up arrow and down arrow on <strong>the</strong> remote to navigate through <strong>the</strong> menu.<br />
Click Go again to close <strong>the</strong> selector.<br />
<strong>Note</strong>: If you click <strong>the</strong> Go button and <strong>the</strong> WinTV selector does not pop up, wiggle <strong>the</strong><br />
WinTV board and/or <strong>the</strong> <strong>IR</strong> <strong>Remote</strong><strong>Blaster</strong> jack to get <strong>the</strong> jack firmly seated. If it is not<br />
well seated, <strong>the</strong> WinTV application will not respond to commands from <strong>the</strong> Hauppauge<br />
remote control. Also, make sure you have <strong>install</strong>ed batteries in <strong>the</strong> Hauppauge remote.<br />
Step 4: Install <strong>the</strong> <strong>IR</strong> transmitter (blaster) at your set top box<br />
<strong>Note</strong>: The next steps (4 through 7) are optional and only required if you want WinTV to<br />
control <strong>the</strong> TV channels on a satellite or <strong>cable</strong> TV set top box through WinTV’s <strong>IR</strong><br />
transmitter (blaster).<br />
Attach <strong>the</strong> end of <strong>the</strong> <strong>IR</strong> transmitter over <strong>the</strong> remote sensor on <strong>the</strong> set top box to be controlled.<br />
Placement of <strong>the</strong> <strong>IR</strong> transmitter is important! The <strong>IR</strong> transmitter only works over a 2 inch distance,<br />
so you need to make sure it is placed over <strong>the</strong> remote sensor in your set top box. Some set top boxes<br />
have <strong>the</strong> position of <strong>the</strong> remote receiver indicated on <strong>the</strong> plastic front of <strong>the</strong> set top box. With o<strong>the</strong>rs, you<br />
might need to look carefully at <strong>the</strong> set top box for what looks like a round or square area underneath <strong>the</strong><br />
plastic front panel. There is double sided tape on <strong>the</strong> back of <strong>the</strong> <strong>IR</strong> transmitter to hold it in place over <strong>the</strong><br />
Page 2<br />
remote sensor in your set top box<br />
Step 5. Connect <strong>the</strong> set top box’s audio/video outputs to <strong>the</strong> WinTV<br />
This is <strong>the</strong> same as connecting a set top box to a TV set: chose ei<strong>the</strong>r composite video, S-Video or TV<br />
tuner as <strong>the</strong> way to connect from <strong>the</strong> set top box to WinTV. Some set top boxes send video via channel 3<br />
or 4, o<strong>the</strong>rs have composite or S-Video outputs.<br />
Chose one method and make <strong>the</strong> necessary<br />
audio/video connections from your set top box to<br />
WinTV.<br />
Step 6: Set your set top box output<br />
in <strong>the</strong> WinTV application<br />
After you make <strong>the</strong> video connection from your<br />
set top box to WinTV in step 5, you need to tell<br />
WinTV where <strong>the</strong> audio/video from your set top<br />
box is coming from. Many set top boxes use a<br />
channel 3 or 4 out via a RF output connector.<br />
O<strong>the</strong>r boxes use S-Video or Composite video for<br />
output. In ei<strong>the</strong>r case, you need to tell WinTV<br />
where <strong>the</strong> video will be coming from.<br />
If your set top box has an RF output (a coax<br />
<strong>cable</strong> going from <strong>the</strong> set top box to <strong>the</strong> TV input<br />
on <strong>the</strong> WinTV board), click Menu / Suite<br />
Manager / Sources. Under Input Sources,<br />
click Analog Source. In Channel, select <strong>the</strong><br />
channel (channel 3 or 4) where <strong>the</strong> video comes<br />
from. Click Add.<br />
If you connect to your set top box via composite<br />
or S-Video, click Menu / Suite<br />
Manager / Sources. Under Input Sources,<br />
click <strong>the</strong> A/V connector which is connected to<br />
your set top box (Composite or S-Video) and<br />
click Save. A channel will be created and given<br />
a Preset number.<br />
Now, close <strong>the</strong> WinTV application.<br />
Step 7: Configure <strong>the</strong> <strong>IR</strong> transmitter to control your set top box<br />
Like universal remote controls, <strong>the</strong> Hauppauge <strong>IR</strong> <strong>Remote</strong><strong>Blaster</strong> has a list of common set top boxes<br />
which it can control. And like universal remote controls, you must test various codes from <strong>the</strong> list to see<br />
which one applies to your specific set top box. Here is how to do this.<br />
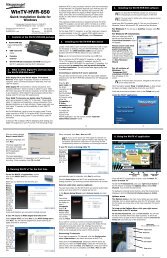
7a. Run <strong>the</strong> <strong>IR</strong> <strong>Blaster</strong> Configuration from Start / Programs / Hauppauge WinTV.<br />
<strong>Note</strong>: if some of <strong>the</strong> controls are greyed out, it means <strong>the</strong> <strong>IR</strong><strong>Remote</strong> <strong>Blaster</strong> hardware is<br />
not found on your WinTV. Make sure <strong>the</strong> <strong>IR</strong> <strong>Remote</strong><strong>Blaster</strong> <strong>cable</strong> is firmly plugged in.<br />
7b. Select your Region. Chose ei<strong>the</strong>r Europe or North America. There is a special region for<br />
Hauppauge if you want to control Hauppauge DEC boxes.<br />
Page 3<br />
If your set top box has<br />
an RF output<br />
If your set top box connects to<br />
WinTV via composite or S-Video
7c. Select <strong>the</strong> Device (<strong>cable</strong> or satellite), <strong>the</strong>n Vendor/Model of your set top box.<br />
The CodeSet will contain a list of codes which <strong>IR</strong><strong>Remote</strong><strong>Blaster</strong> knows about <strong>the</strong> selected Vendor.<br />
There might be as many as ten codes for <strong>the</strong> Vendor chosen.<br />
Click <strong>the</strong> Power On/Off button. You should see <strong>the</strong> <strong>IR</strong> transmitter blink after each click of <strong>the</strong><br />
Power On/Off button.<br />
If your set top box turns on or off, <strong>the</strong>n this code is <strong>the</strong> correct one for your set top box. If not, click<br />
Test Next. Continue to click Test Next until your set top box turns on or off, at which time you have<br />
found <strong>the</strong> correct code.<br />
If you cannot find a code which works with your set top box:<br />
- First make sure <strong>the</strong> <strong>IR</strong> transmitter is positioned over <strong>the</strong> remote sensor on your set top box.<br />
Remember, <strong>the</strong> <strong>IR</strong> transmitter has a very short distance and needs to be positioned over <strong>the</strong> remote<br />
sensor on your set top box.<br />
- Next, click <strong>the</strong> Test All button. This button will go through all of <strong>the</strong> codes in our database of set<br />
top boxes (over 200 devices at present). After clicking Test All, watch your set top box. If it goes on<br />
or off, immediately click Stop Test. You have found <strong>the</strong> correct code for your set top box. If your<br />
set top box does not turn on or off even after going through all <strong>the</strong> codes, <strong>the</strong>n ei<strong>the</strong>r <strong>the</strong> <strong>IR</strong> transmitter<br />
is not positioned correctly or your box is not supported.<br />
7d. Once you have determined <strong>the</strong> Code, click Next to go to <strong>the</strong> <strong>IR</strong> Channel Test menu. You can click<br />
<strong>the</strong> Send button to send a number sequence to your set top box. If your set top box is on, you<br />
should see 1 2 3 appear on <strong>the</strong> channel indicator of your set top<br />
box.<br />
7e. Click Next to go to WinTV <strong>IR</strong> <strong>Blaster</strong> Source Channel menu.<br />
This is where you specify which tuner channel or video source on<br />
<strong>the</strong> WinTV is connected to your set top box. Select <strong>the</strong> channel<br />
from <strong>the</strong> pull down list which corresponds to <strong>the</strong> way your set top<br />
box is connected to WinTV. For example, if your set top box is connected via <strong>the</strong> TV tuner connector<br />
and uses channel 3, select Ch. 3.<br />
Make sure that Use Hauppauge <strong>IR</strong> <strong>Blaster</strong> Hardware is checked. Click Next and Finish to save <strong>the</strong><br />
configuration for your set top box.<br />
Step 8: Add your set top box TV channels to <strong>the</strong> WinTV application<br />
So that <strong>the</strong> WinTV and WinTV Scheduler applications can automatically change channels via <strong>the</strong> <strong>IR</strong><br />
<strong>Blaster</strong>, you need to add set top box TV channels<br />
to WinTV Channel Manager.<br />
- in <strong>the</strong> WinTV application, click Menu / Suite<br />
Manager / Sources.<br />
Click <strong>IR</strong> <strong>Blaster</strong> Source.<br />
- Add <strong>the</strong> channels on your <strong>cable</strong> network by<br />
choosing <strong>the</strong> channel number and clicking<br />
Add. You must give <strong>the</strong> channel a name.<br />
Do this for each set top box TV channel you want<br />
to add to WinTV. When you’re finished, you will<br />
have a list of set top box channels WinTV can<br />
automatically tune to.<br />
Page 4<br />
<strong>IR</strong> <strong>Remote</strong> <strong>Blaster</strong> Quick Install Guide 4/27/08 ver. 4.3<br />
Add your set top box channels<br />
to <strong>the</strong> WinTV application<br />
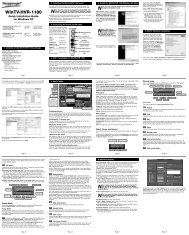
Installing <strong>the</strong> <strong>IR</strong> <strong>Remote</strong><strong>Blaster</strong> for WinTV<br />
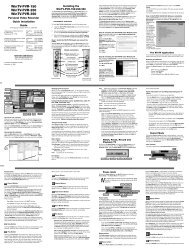
WinTV-PVR-USB2 WinTV-HVR-1600<br />
WinTV-PVR-150<br />
<strong>IR</strong> <strong>cable</strong> jack<br />
<strong>IR</strong> <strong>cable</strong> jack<br />
WinTV-HVR-1950<br />
<strong>IR</strong><strong>Remote</strong><strong>Blaster</strong><br />
Quick Installation Guide<br />
<strong>IR</strong> transmitter<br />
(blaster)<br />
<strong>IR</strong> transmitter<br />
(blaster)<br />
The <strong>IR</strong> <strong>Remote</strong><strong>Blaster</strong> lets <strong>the</strong> Hauppauge WinTV application change <strong>the</strong> channel on a satellite or <strong>cable</strong><br />
TV set top box by transmitting ‘channel change’ commands to <strong>the</strong> box via an Infra Red (<strong>IR</strong>) transmitter.<br />
The <strong>IR</strong> <strong>Remote</strong><strong>Blaster</strong> for WinTV consists of four components:<br />
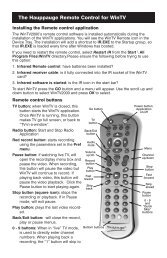
1. The Hauppauge remote control, which sends infrared signals to <strong>the</strong> <strong>IR</strong> Receiver.<br />
2. <strong>IR</strong> <strong>Remote</strong><strong>Blaster</strong> <strong>cable</strong>, which is plugged into <strong>the</strong> WinTV card. This <strong>cable</strong> has an <strong>IR</strong> <strong>cable</strong> jack<br />
and two ends: a <strong>IR</strong> receiver and an <strong>IR</strong> transmitter. The <strong>IR</strong> transmitter has a thin wire and is at<br />
<strong>the</strong> end of <strong>the</strong> longer “leg” of <strong>the</strong> <strong>cable</strong>.<br />
3. <strong>IR</strong>32 application, a program which runs in <strong>the</strong> Windows device tray and interprets signals received<br />
by <strong>the</strong> <strong>IR</strong> receiver.<br />
4. <strong>IR</strong> <strong>Blaster</strong> Config program, for configuring <strong>the</strong> codes for <strong>the</strong> <strong>IR</strong> transmitter.<br />
<strong>Note</strong>: if you are NOT using a set top box, you do not need to use <strong>the</strong> <strong>IR</strong> transmitter. if<br />
you are NOT using a set top box, you do not need to use <strong>the</strong> <strong>IR</strong> transmitter (blaster)<br />
end of <strong>the</strong> <strong>IR</strong> <strong>Remote</strong> <strong>Blaster</strong> <strong>cable</strong>.<br />
<strong>Note</strong>: you can only use <strong>the</strong> Hauppauge remote control with <strong>IR</strong> <strong>Remote</strong><strong>Blaster</strong>. The <strong>IR</strong><br />
Receiver does not respond to remote control transmitters from o<strong>the</strong>r devices like a TV<br />
set or VCR.<br />
Page 1<br />
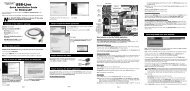
WinTV-Go-Plus<br />
<strong>IR</strong> <strong>cable</strong> jack<br />
<strong>IR</strong> <strong>Remote</strong> <strong>Blaster</strong><br />
<strong>cable</strong><br />
<strong>IR</strong> transmitter<br />
(blaster)<br />
<strong>IR</strong> receiver