Windows 7 & 8 Media Center QAM Remapping
Windows 7 & 8 Media Center QAM Remapping
Windows 7 & 8 Media Center QAM Remapping

Create successful ePaper yourself
Turn your PDF publications into a flip-book with our unique Google optimized e-Paper software.
<strong>Windows</strong> 7 & 8 <strong>Media</strong><br />
<strong>Center</strong> <strong>QAM</strong> <strong>Remapping</strong><br />
For some reason, <strong>Media</strong> <strong>Center</strong> says it doesn't find any stations. However, it actually does<br />
find them, as you'll see. If it does report finding channels, you'll want to follow the rest of<br />
this anyway. It really wants to scan again since it thinks you have no channels, but politely<br />
just select continue. Of course you won't see this screen if it found channels.
Finish the setup and now it's time to find all the unencrypted channels.<br />
At this point click on the green <strong>Media</strong> <strong>Center</strong> logo in the upper left hand corner of the<br />
screen. This takes you to the main screen. Then go down to "Tasks" and under it select<br />
"settings". Now select "TV". Then select "Guide".
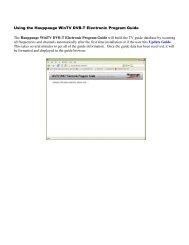
You should now be at this screen. Select "Edit Channels".<br />
You should see something similar to the above picture. Select all the channels (by clicking in<br />
the square to the left of the channel number) that don't have a picture of a lock to the right.<br />
The ones with a lock are the encrypted channels which can't be accessed and odds are there
are many more of those than the clear<strong>QAM</strong> channels. Once you have the clear<strong>QAM</strong> channels<br />
selected, click save.<br />
OK, now it's time to see what stations are available. Click on the <strong>Media</strong> <strong>Center</strong> logo at the<br />
top of the page and then go to "live TV". Channel through all the digital stations, making<br />
note of the number and the station affiliation (C107.7012 is News 12 for example)<br />
Once you've gone through them all, go back to "Tasks" then "settings", then "TV", then<br />
"Guide", then "Edit Channels".<br />
Now click on a clear<strong>QAM</strong> channel (C107.7012 for example) and you'll get this screen. Click<br />
on "Edit Listings".
You should now have a listing of all the channels on your cable network. Looking at your<br />
station listings, find the appropriate channel and double click on it.<br />
Note: You can type the first letter of the station "N" for example and it will take you to the<br />
first "N" station in the listings.
After you double click, you'll be taken back to this screen. Select "save". Now select the<br />
next station and repeat until all the clear<strong>QAM</strong> stations are mapped to the appropriate<br />
station listings.<br />
Now click on the <strong>Media</strong> <strong>Center</strong> logo and go to "TV" then "guide". You should now see the<br />
clear<strong>QAM</strong> stations listed with appropriate schedules.<br />
That's it. Now you can view and record all your clear<strong>QAM</strong> stations using <strong>Media</strong> <strong>Center</strong>. Have<br />
fun!