INSTRUCTION MANUAL CyberScan pH/Ion 510 - Welcome to ...
INSTRUCTION MANUAL CyberScan pH/Ion 510 - Welcome to ...
INSTRUCTION MANUAL CyberScan pH/Ion 510 - Welcome to ...

Create successful ePaper yourself
Turn your PDF publications into a flip-book with our unique Google optimized e-Paper software.
<strong>CyberScan</strong> <strong>pH</strong> <strong>510</strong>/<strong>Ion</strong> <strong>510</strong><br />
3.2 <strong>Ion</strong> Concentration Calibration (For <strong>Ion</strong> <strong>510</strong> only)<br />
The <strong>CyberScan</strong> <strong>Ion</strong> <strong>510</strong> meter is capable of up <strong>to</strong> 3-point ion calibration (minimum 2 point) with choice of 4<br />
options <strong>to</strong> ensure accuracy across the entire measurement range. <strong>Ion</strong> calibration options include 0.10, 1.0,<br />
10.0 or 100.0 ppm. All calibration should be at least one decade apart from each other. For example you may<br />
perform 3 point calibration <strong>to</strong> 0.10, 1.0 and 10.0, or 2-point calibration <strong>to</strong> 10.0 and 100.0. If 1-point calibration is<br />
performed an error message “Er2” is displayed. If any of calibration points are not within 1 decade, an error<br />
message “Er4” will be displayed at the end of calibration process.<br />
Calibration values are successfully s<strong>to</strong>red if the ISE slope is within the specified <strong>to</strong>lerance of 15mV/decade<br />
(minimum) and 90mV/decade (maximum), otherwise an error message “Er3” is displayed (see Figure 7). The<br />
calibration values are not s<strong>to</strong>red in<strong>to</strong> the meter’s built-in memory if any error message appears after each<br />
calibration process. Re-calibration is necessary as calibration is unsuccessfully attempted in this instance.<br />
Check that your ISE and standard solutions are in good working conditions.<br />
Ensure that you use new or fresh standard solutions during calibration. Do not reuse ion standard solution as it<br />
may be contaminated and affect the calibration and accuracy of measurements. Always s<strong>to</strong>re standard<br />
solutions in a dry, cool environment if possible. Before use, remove plastic protective cap of ISE. Briefly rinse<br />
the electrode with clean deionized water <strong>to</strong> remove any residues.<br />
Rinse probes before and after each calibration or sample measurement <strong>to</strong> avoid cross-contamination. For<br />
more details please refer <strong>to</strong> Manufacturer’s care and maintenance guide. Note the <strong>Ion</strong> calibration values will<br />
be lost once power is disconnected; only <strong>pH</strong> and mV calibration values will be retained.<br />
1. Connect an <strong>Ion</strong> Selective Electrode (ISE) <strong>to</strong> the BNC input connec<strong>to</strong>r<br />
on the back of the meter. Turn the meter ON.<br />
2. Press MODE key (if needed) <strong>to</strong> select ion measurement mode. If<br />
there is no old calibration values, then the meter displays “---“ in the<br />
upper display in measurement mode.<br />
3. Dip the ISE in<strong>to</strong> the first calibration standard. Make sure <strong>to</strong> start with<br />
the calibration standard that has the lowest concentration and move<br />
up <strong>to</strong> the standards that have higher concentrations.<br />
Swirl it gently. Press CAL key <strong>to</strong> enter the ion calibration mode. The<br />
[CAL] indica<strong>to</strong>r appears above the upper display and the upper<br />
display reads “0.10”. The lower display shows the corresponding<br />
absolute mV value of sample measured.<br />
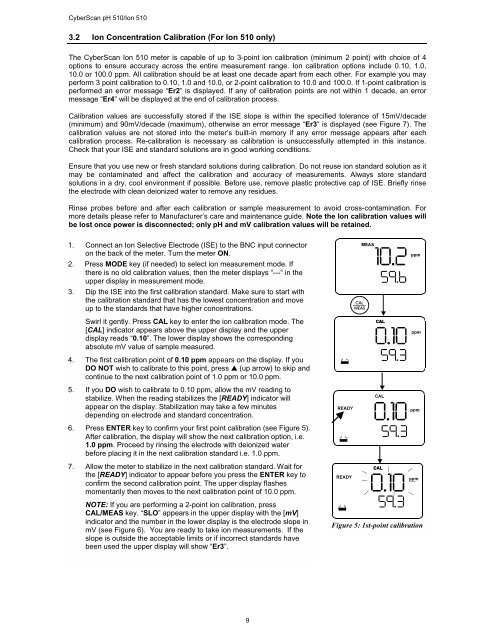
4. The first calibration point of 0.10 ppm appears on the display. If you<br />
DO NOT wish <strong>to</strong> calibrate <strong>to</strong> this point, press ▲ (up arrow) <strong>to</strong> skip and<br />
continue <strong>to</strong> the next calibration point of 1.0 ppm or 10.0 ppm.<br />
5. If you DO wish <strong>to</strong> calibrate <strong>to</strong> 0.10 ppm, allow the mV reading <strong>to</strong><br />
stabilize. When the reading stabilizes the [READY] indica<strong>to</strong>r will<br />
appear on the display. Stabilization may take a few minutes<br />
depending on electrode and standard concentration.<br />
6. Press ENTER key <strong>to</strong> confirm your first point calibration (see Figure 5).<br />
After calibration, the display will show the next calibration option, i.e.<br />
1.0 ppm. Proceed by rinsing the electrode with deionized water<br />
before placing it in the next calibration standard i.e. 1.0 ppm.<br />
7. Allow the meter <strong>to</strong> stabilize in the next calibration standard. Wait for<br />
the [READY] indica<strong>to</strong>r <strong>to</strong> appear before you press the ENTER key <strong>to</strong><br />
confirm the second calibration point. The upper display flashes<br />
momentarily then moves <strong>to</strong> the next calibration point of 10.0 ppm.<br />
NOTE: If you are performing a 2-point ion calibration, press<br />
CAL/MEAS key. “SLO” appears in the upper display with the [mV]<br />
indica<strong>to</strong>r and the number in the lower display is the electrode slope in<br />
mV (see Figure 6). You are ready <strong>to</strong> take ion measurements. If the<br />
slope is outside the acceptable limits or if incorrect standards have<br />
been used the upper display will show “Er3”.<br />
9<br />
Figure 5: 1st-point calibration