ECL Comfort 110 Application 116 Constant temperature control of ...
ECL Comfort 110 Application 116 Constant temperature control of ...
ECL Comfort 110 Application 116 Constant temperature control of ...

Create successful ePaper yourself
Turn your PDF publications into a flip-book with our unique Google optimized e-Paper software.
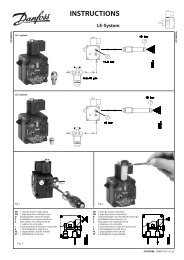
Installation<br />
Mounting the <strong>ECL</strong> <strong>Comfort</strong> <strong>control</strong>ler<br />
For easy access, you should mount the <strong>ECL</strong> <strong>Comfort</strong> <strong>control</strong>ler near the system. Select<br />
one <strong>of</strong> the three following methods:<br />
• Mounting on a wall<br />
• Mounting on a DIN rail<br />
• Mounting in a panel<br />
Screws and rawlplugs are not supplied.<br />
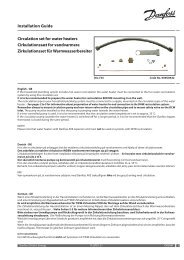
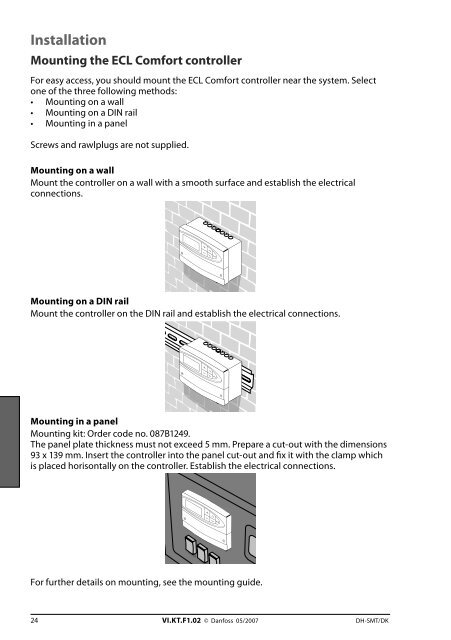
Mounting on a wall<br />
Mount the <strong>control</strong>ler on a wall with a smooth surface and establish the electrical<br />
connections.<br />
Mounting on a DIN rail<br />
Mount the <strong>control</strong>ler on the DIN rail and establish the electrical connections.<br />
Mounting in a panel<br />
Mounting kit: Order code no. 087B1249.<br />
The panel plate thickness must not exceed 5 mm. Prepare a cut-out with the dimensions<br />
93 x 139 mm. Insert the <strong>control</strong>ler into the panel cut-out and fix it with the clamp which<br />
is placed horisontally on the <strong>control</strong>ler. Establish the electrical connections.<br />
For further details on mounting, see the mounting guide.<br />
24 VI.KT.F1.02 © Danfoss 05/2007 DH-SMT/DK<br />
Danfoss<br />
87B787.10<br />
Danfoss<br />
87B788.10<br />
Danfoss<br />
87B789.10<br />
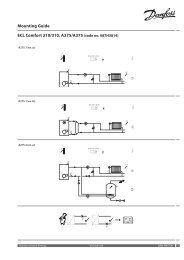
Electrical connections - 230 V a.c. - in general<br />
* Optional connections for safety thermostat<br />
Terminal Description Max. load<br />
20 Supply voltage 230 V a.c. - neutral (N)<br />
21 Supply voltage 230 V a.c. - live (L)<br />
22 Optional connections for safety thermostat<br />
23 Optional connections for safety thermostat<br />
24 M1 Actuator - open 15 VA<br />
25 M1 Actuator - close 15 VA<br />
26 M1 Actuator - neutral<br />
27 P1 Circulation pump - neutral<br />
28 P1 Circulation pump - live (relay R1) 4 (2) A<br />
29 Not to be used<br />
30 Not to be used<br />
Wire cross section: 0.5 - 1.5 mm 2<br />
Incorrect connection can damage the TRIAC outputs.<br />
DH-SMT/DK VI.KT.F1.02 © Danfoss 05/2007 25