5330/5340 IP Phones – User Guide - Mitel Edocs
5330/5340 IP Phones – User Guide - Mitel Edocs
5330/5340 IP Phones – User Guide - Mitel Edocs

Create successful ePaper yourself
Turn your PDF publications into a flip-book with our unique Google optimized e-Paper software.
NOTICE<br />
The information contained in this document is not warranted by <strong>Mitel</strong> Networks Corporation or<br />
any of its affiliates or subsidiaries ("<strong>Mitel</strong>") and is subject to change without notice. <strong>Mitel</strong><br />
assumes no liability for any errors or omissions. This document may be reproduced, either<br />
wholly or in part, solely for distribution to authorized users of <strong>Mitel</strong>'s products. In reproducing<br />
this document, content may be removed or reorder, provided the meaning is not altered. No other<br />
amendment to the document is permitted without written permission from <strong>Mitel</strong>.<br />
TRADEMARKS<br />
<strong>Mitel</strong> and Speak@Ease are trademarks of <strong>Mitel</strong> Networks Corporation.<br />
Windows and Microsoft are trademarks of Microsoft Corporation.<br />
Other product names mentioned in this document may be trademarks of their respective<br />
companies and are hereby acknowledged.<br />
<strong>Mitel</strong> <strong>5330</strong> <strong>IP</strong> and <strong>5340</strong> <strong>IP</strong> <strong>Phones</strong> - <strong>User</strong> <strong>Guide</strong><br />
November 2008<br />
®, Trademark of <strong>Mitel</strong> Networks Corporation<br />
© Copyright 2008, <strong>Mitel</strong> Networks Corporation<br />
All rights reserved<br />
IMPORTANT! This telephone is NOT suitable for direct connection to the public-switched<br />
telephone network. Connect the telephone to a <strong>Mitel</strong> Networks system only.
- i -<br />
<strong>5330</strong>/<strong>5340</strong> <strong>IP</strong> <strong>Phones</strong> <strong>–</strong> <strong>User</strong> <strong>Guide</strong><br />
ABOUT YOUR PHONE .........................................................................................................1<br />
Elements of Your Phone........................................................................................................2<br />
Ring/Message Indicators........................................................................................................4<br />
For <strong>User</strong>s on Resilient 3300 ICP Systems .............................................................................4<br />
<strong>Mitel</strong> Line Interface Module..................................................................................................4<br />
T<strong>IP</strong>S FOR YOUR COMFORT AND SAFETY ....................................................................5<br />
Don't Cradle the Handset!......................................................................................................5<br />
Protect your Hearing..............................................................................................................5<br />
Adjust the Viewing Angle .....................................................................................................5<br />
USING YOUR DEFAULT PHONE WINDOW AND KEYS..............................................6<br />
Getting Started with Your Phone...........................................................................................6<br />
<strong>5340</strong> and <strong>5330</strong> <strong>IP</strong> Phone Default Window and Keys ............................................................7<br />
ABOUT YOUR PHONE APPLICATIONS ..........................................................................8<br />
Using the Settings Application ..............................................................................................9<br />
Using the Call History Application .....................................................................................10<br />
Getting Help.........................................................................................................................12<br />
Tips for Setting up Your Phone ...........................................................................................12<br />
CUSTOMIZING YOUR PHONE ........................................................................................13<br />
Using the Dial Pad to Enter Information .............................................................................13<br />
Using the On-Screen Keyboard to Enter Information .........................................................14<br />
Specify <strong>User</strong> Information.....................................................................................................15<br />
Specify Language ................................................................................................................15<br />
Specify Display Brightness and Contrast ............................................................................16<br />
Specify Audio Feedback Options ........................................................................................17<br />
Specify Text Size.................................................................................................................17<br />
Specify Call Notification Behavior......................................................................................18<br />
Adjust the Ringer.................................................................................................................18
<strong>5330</strong>/<strong>5340</strong> <strong>IP</strong> <strong>Phones</strong> <strong>–</strong> <strong>User</strong> <strong>Guide</strong><br />
Enable a Screen Saver (<strong>5340</strong> only)......................................................................................19<br />
Program Receipt of External Messaging .............................................................................20<br />
Enable URL Displays on Your Phone .................................................................................20<br />
Enable PC Connectivity.......................................................................................................20<br />
USING THE INTEGRATED OFFICE COMPANION APPLICATION........................21<br />
About the Integrated Office Companion Application..........................................................21<br />
Installing the Integrated Office Companion Application ....................................................23<br />
Registering the Integrated Office Companion Application .................................................23<br />
Upgrading the Integrated Office Companion Application to Enhanced Mode ...................25<br />
Configuring the Integrated Office Companion Application on Your Phone.......................26<br />
Associating the Integrated Office Companion Application to Your Phone ........................27<br />
Display the Integrated Office Companion Application Toolbar .........................................28<br />
Hide the Integrated Office Companion Application Toolbar ..............................................28<br />
Elements of Your Integrated Office Companion.................................................................29<br />
Using the Telephony Toolbar ..............................................................................................31<br />
PROGRAMING FEATURES ON YOUR KEYS...............................................................47<br />
Tips on Programming Features............................................................................................47<br />
Program Feature Keys Using the Settings Application .......................................................49<br />
Clear Programming from a Key...........................................................................................51<br />
SETTING UP YOUR CONTACT LIST (<strong>5340</strong> ONLY) .....................................................52<br />
Adding Names to Your Contact List ...................................................................................52<br />
Editing Information in Your Contact List............................................................................52<br />
MAKING AND ANSWERING CALLS ..............................................................................53<br />
Dial from your People Application (<strong>5340</strong> <strong>IP</strong> Phone only) ..................................................53<br />
Phone Book..........................................................................................................................53<br />
Answer a Call.......................................................................................................................54<br />
End a Call.............................................................................................................................54<br />
- ii -
- iii -<br />
<strong>5330</strong>/<strong>5340</strong> <strong>IP</strong> <strong>Phones</strong> <strong>–</strong> <strong>User</strong> <strong>Guide</strong><br />
Redial...................................................................................................................................55<br />
Redial - Saved Number........................................................................................................55<br />
Handsfree Operation............................................................................................................55<br />
Auto-Answer........................................................................................................................56<br />
Using the Analog line ..........................................................................................................56<br />
CALL HANDLING ...............................................................................................................57<br />
Hold .....................................................................................................................................57<br />
Mute.....................................................................................................................................57<br />
Transfer................................................................................................................................58<br />
Conference...........................................................................................................................58<br />
Conference Split ..................................................................................................................58<br />
Add Held..............................................................................................................................59<br />
Swap.....................................................................................................................................59<br />
Call Forwarding ...................................................................................................................59<br />
USING OTHER FEATURES ...............................................................................................63<br />
Account Codes.....................................................................................................................63<br />
ACD.....................................................................................................................................63<br />
Attendant Call Hold - Remote Retrieve...............................................................................64<br />
Callback ...............................................................................................................................64<br />
Call Forward - Remote (I'm Here).......................................................................................64<br />
Call Forward - End Chaining...............................................................................................65<br />
Call Forward - Forced..........................................................................................................65<br />
Call Forward - Override.......................................................................................................66<br />
Call Park ..............................................................................................................................66<br />
Call Pickup...........................................................................................................................67<br />
Campon................................................................................................................................67<br />
Direct Paging .......................................................................................................................68
<strong>5330</strong>/<strong>5340</strong> <strong>IP</strong> <strong>Phones</strong> <strong>–</strong> <strong>User</strong> <strong>Guide</strong><br />
Direct Voice Call .................................................................................................................71<br />
Do Not Disturb.....................................................................................................................71<br />
Emergency Calls..................................................................................................................72<br />
Float Keys (<strong>5340</strong> <strong>IP</strong> Phone).................................................................................................73<br />
Group Listen ........................................................................................................................76<br />
Group Paging / Meet Me Answer........................................................................................76<br />
Headset Operation................................................................................................................77<br />
Hot Desking .........................................................................................................................78<br />
Hot Desk Remote Logout ....................................................................................................78<br />
Hot Desk - PIN Change .......................................................................................................79<br />
Make Busy ...........................................................................................................................79<br />
Message Waiting Indicator ..................................................................................................80<br />
Messaging - Advisory..........................................................................................................80<br />
Messaging - Callback...........................................................................................................81<br />
Messaging - Cancel Callback ..............................................................................................82<br />
Messaging - Cancel All Callbacks.......................................................................................82<br />
Music ...................................................................................................................................82<br />
Night Answer.......................................................................................................................83<br />
Override (Intrude)................................................................................................................83<br />
Paging ..................................................................................................................................83<br />
Phone Lock ..........................................................................................................................84<br />
<strong>User</strong> PIN ..............................................................................................................................85<br />
Record a Call .......................................................................................................................86<br />
Reminder..............................................................................................................................87<br />
Speak@Ease ........................................................................................................................88<br />
Speed Call............................................................................................................................88<br />
Tag Call................................................................................................................................88<br />
- iv -
- v -<br />
<strong>5330</strong>/<strong>5340</strong> <strong>IP</strong> <strong>Phones</strong> <strong>–</strong> <strong>User</strong> <strong>Guide</strong><br />
Trunk Flash..........................................................................................................................89<br />
VISUAL VOICE MAIL (<strong>5340</strong> <strong>IP</strong> PHONE ONLY)............................................................90<br />
Set Up your Mailbox............................................................................................................90<br />
Enable Visual Voice Mail....................................................................................................90<br />
Opening the Visual Voice Mail Application .......................................................................90<br />
Log Into Your Mailbox From Your Own Extension ...........................................................90<br />
Log Into Your Mailbox From Another Extension...............................................................91<br />
Log Out Of Your Mailbox...................................................................................................91<br />
About the Visual Voice Mail Main Window.......................................................................92<br />
Display Message Details......................................................................................................93<br />
Play a Voice Message..........................................................................................................94<br />
Dial Message Sender ...........................................................................................................95<br />
Save a Message....................................................................................................................95<br />
Delete a Message .................................................................................................................96<br />
Add a Message Sender to Your Contacts List .....................................................................96<br />
Forward a Message to Another Mailbox .............................................................................96<br />
Forward a Message to Your Email Address ........................................................................97<br />
USING YOUR PHONE WITH THE 5310 <strong>IP</strong> CONFERENCE UNIT .............................98<br />
Access the Conference Controller .......................................................................................98<br />
Turn the Conference Unit On and Off .................................................................................98<br />
Adjust the Conference Unit Volume ...................................................................................98<br />
Place the Conference Unit in Presentation Mode ................................................................98<br />
Exit the Conference Controller............................................................................................98<br />
Mute the Conference Unit....................................................................................................99<br />
USING THE LINE INTERFACE MODULE .....................................................................99<br />
Making and Answering Calls Using the Analog key ..........................................................99<br />
Making and Answering Calls Using the Failover Mode ...................................................101
<strong>5330</strong>/<strong>5340</strong> <strong>IP</strong> <strong>Phones</strong> <strong>–</strong> <strong>User</strong> <strong>Guide</strong><br />
USING YOUR PHONE WITH THE CORDLESS MODULE AND ACCESSORIES.102<br />
Elements of Your Cordless Module and Accessories........................................................103<br />
Handset/Headset Combinations.........................................................................................104<br />
Pairing the Cordless Module and Accessories...................................................................104<br />
Cordless Module LED Indicators ......................................................................................105<br />
Using a Cordless Device as a Remote Control..................................................................106<br />
USING THE CORDLESS HANDSET ..............................................................................106<br />
Elements of the Cordless Handset .....................................................................................107<br />
Answer a Call.....................................................................................................................107<br />
Hang up..............................................................................................................................107<br />
Dialing <strong>–</strong> Auto Dial Disabled ............................................................................................108<br />
Dialing <strong>–</strong> Auto Dial Enabled .............................................................................................108<br />
Alerting Tones and LEDs ..................................................................................................108<br />
USING THE CORDLESS HEADSET...............................................................................110<br />
Answer a Call.....................................................................................................................111<br />
Hang Up.............................................................................................................................111<br />
Dialing <strong>–</strong> Auto Dial Disabled ............................................................................................111<br />
Dialing <strong>–</strong> Auto Dial Enabled .............................................................................................111<br />
Headset Alerting Tones and LEDs ....................................................................................111<br />
USING THE CORDLESS DEVICES APPLICATION ...................................................113<br />
Viewing Cordless Module Information .............................................................................113<br />
Low Battery Level .............................................................................................................113<br />
Auto Dial............................................................................................................................114<br />
APPENDIX A: UPGRADING INTEGRATED OFFICE COMPANION .....................115<br />
Integrated Office Companion and Microsoft Framework 2.0 ...........................................115<br />
Integrated Office Companion and Microsoft Vista ...........................................................115<br />
APPENDIX B: List of Limitations .....................................................................................117<br />
- vi -
- vii -<br />
<strong>5330</strong>/<strong>5340</strong> <strong>IP</strong> <strong>Phones</strong> <strong>–</strong> <strong>User</strong> <strong>Guide</strong><br />
Integrated Office Companion Limitations.........................................................................117
ABOUT YOUR PHONE<br />
- 1 -<br />
<strong>5330</strong>/<strong>5340</strong> <strong>IP</strong> <strong>Phones</strong> <strong>–</strong> <strong>User</strong> <strong>Guide</strong><br />
The <strong>Mitel</strong>® <strong>5330</strong> and <strong>5340</strong> <strong>IP</strong> <strong>Phones</strong> are full-feature, dual port, dual mode enterprise-class<br />
telephones that provide voice communication over an <strong>IP</strong> network. They both feature a large<br />
graphics display (160 x 320) and self-labeling keys. The <strong>5330</strong> <strong>IP</strong> Phone offers 24<br />
programmable multi-function keys and the <strong>5340</strong> <strong>IP</strong> Phone offers 48 programmable multifunction<br />
keys for one-touch feature access. Both phones provide ten fixed feature keys for<br />
convenient access to features such as Conferencing, Redial, and many customizable user<br />
settings as well as navigational keys to access various screens and application layers. The<br />
<strong>5330</strong> and <strong>5340</strong> <strong>IP</strong> <strong>Phones</strong> also feature an Integrated Office Companion application, which is<br />
a PC-based desktop programming tool, that allows you to easily configure your phone from<br />
your Personal Computer (PC).<br />
The <strong>5330</strong> and <strong>5340</strong> <strong>IP</strong> <strong>Phones</strong> support <strong>Mitel</strong> Call Control (MiNet) protocol and session<br />
initiated protocols (S<strong>IP</strong>). Both phones support the Line Interface Module and 5310 <strong>IP</strong><br />
Conference Unit. Additionally, they support Hot Desking and Clustered Hot Desking as well<br />
as Resiliency. The <strong>5330</strong>/<strong>5340</strong> phones are ideal for executives and managers, and can be used<br />
as an ACD Agent or Supervisor Phone, as well as a Teleworker Phone.<br />
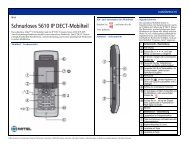
The <strong>5330</strong> <strong>IP</strong> Phone
<strong>5330</strong>/<strong>5340</strong> <strong>IP</strong> <strong>Phones</strong> <strong>–</strong> <strong>User</strong> <strong>Guide</strong><br />
Elements of Your Phone<br />
Feature Function<br />
The <strong>5340</strong> <strong>IP</strong> Phone<br />
1) Display Provides a large, high-resolution viewing area that assists you in<br />
selecting and using phone features.<br />
2) Ring/Message<br />
Indicator<br />
3) Volume, Speaker<br />
and Mute Controls<br />
Flashes to signal an incoming call and to indicate a message<br />
waiting in your voice mailbox.<br />
Provide the following audio control capability:<br />
• (UP) and (DOWN) provide volume control for the<br />
ringer, handset, and handsfree speakers.<br />
• (SPEAKER) enables and disables Handsfree mode.<br />
• (MUTE) enables Mute, which allows you to temporarily<br />
turn your phone's handset, headset or handsfree<br />
microphone off during a call.<br />
4) Fixed Function Keys Give you access to the following phone functions:<br />
• (APPLICATIONS): provides access to menus for your<br />
- 2 -
Elements of Your Phone<br />
Feature Function<br />
phone's applications and settings.<br />
5) Keypad Use to dial.<br />
6) Navigation Page<br />
Keys<br />
7) Programmable<br />
Feature Keys and<br />
Softkeys.<br />
- 3 -<br />
<strong>5330</strong>/<strong>5340</strong> <strong>IP</strong> <strong>Phones</strong> <strong>–</strong> <strong>User</strong> <strong>Guide</strong><br />
• (CANCEL): ends a call when pressed during the call,<br />
and, when you are programming the phone, eliminates any<br />
input and returns to the previous menu level.<br />
• (REDIAL): calls the last number dialed.<br />
• (HOLD): places the current call on hold.<br />
• (TRANS/CONF): initiates a call transfer or<br />
establishes a three-party conference call.<br />
• (MESSAGE): provides access to your voice mailbox<br />
and flashes to notify you of messages waiting in your voice<br />
mailbox. Note: The Ring/Message indicator also flashes<br />
when messages are waiting.<br />
Use to display additional pages of information. The <strong>5330</strong> has two<br />
page navigation keys: Back and Next. The <strong>5340</strong> has three page<br />
navigation keys: Back, Next, and Home.<br />
Provides 24 (on the <strong>5330</strong>) and 48 (on the <strong>5340</strong>) self-labeling keys<br />
that can be programmed as speed call keys, fixed function keys,<br />
hard keys, applications, or line appearance keys, according to your<br />
communication needs. On your home page, the bottom right<br />
feature key is always your Prime Line key on a <strong>5340</strong> <strong>IP</strong> Phone; and<br />
the bottom left feature key is always your Prime Line key on the<br />
<strong>5330</strong> <strong>IP</strong> Phone. The top three keys are softkeys.<br />
8) Handsfree Speaker Provides sound for Handsfree calls and background music.<br />
9) Handset Use for handset calls. If you are in headset or handsfree mode, you<br />
do not need to use the handset.
<strong>5330</strong>/<strong>5340</strong> <strong>IP</strong> <strong>Phones</strong> <strong>–</strong> <strong>User</strong> <strong>Guide</strong><br />
Ring/Message Indicators<br />
When indicator is it means that<br />
Flashing rapidly Your phone is ringing<br />
Flashing slowly A message or callback message is waiting at your phone<br />
On Your phone is ringing another phone<br />
Off Your phone is idle, or you are on a call<br />
For <strong>User</strong>s on Resilient 3300 ICP Systems<br />
If during a call, you hear a beep repeated every 20 seconds it means that your phone is<br />
switching to a secondary 3300 ICP system. The call continues and there is a change in the<br />
operation of some keys and features on your phone. Normal operation resumes when your<br />
phone switches back to the primary system. If your phone is idle and switched to the<br />
secondary system, you'll see a flashing rectangle on the display. The rectangle remains until<br />
the switch to the primary system is complete.<br />
If the phone fails over to the secondary ICP, you have access to your mailbox on the<br />
secondary ICP only if your Administrator has programmed a mailbox for you.<br />
Notes:<br />
• The mailbox on the secondary ICP will not contain the same messages as the<br />
mailboxes on the primary ICP. Any preferences that are voice mail related are not<br />
carried from the primary ICP to the secondary ICP. These preferences must be set on<br />
both ICPs.<br />
• The People and Settings applications do not support resiliency. Your logs, contact<br />
information and any Settings on the primary ICP will not be carried from the primary<br />
ICP to the secondary ICP.<br />
<strong>Mitel</strong> Line Interface Module<br />
The Line Interface module is an optional device that adds an analog phone line (POTS)<br />
capability to your phone. If Emergency Call Routing is not programmed on your 3300 ICP,<br />
you must use the Line Interface Module to dial emergency calls. For more information on<br />
emergency number dialing, refer to Emergency Calls. If you have a Line Interface Module<br />
connected to your phone, all programming of the Line Interface Module, except the Analog<br />
Key, is done by the Installer when your phone is installed. For more information, refer to<br />
Programming Features on Your Keys and Using the Line Interface Module.<br />
- 4 -
- 5 -<br />
<strong>5330</strong>/<strong>5340</strong> <strong>IP</strong> <strong>Phones</strong> <strong>–</strong> <strong>User</strong> <strong>Guide</strong><br />
T<strong>IP</strong>S FOR YOUR COMFORT AND SAFETY<br />
Don't Cradle the Handset!<br />
Prolonged use of the handset can lead to neck, shoulder, or back discomfort, especially if you<br />
cradle the handset between your ear and shoulder. If you use your phone a lot, you may find<br />
it more comfortable to use a headset. See the section on headset usage elsewhere in this guide<br />
for more information.<br />
Protect your Hearing<br />
Your phone has a control for adjusting the volume of the handset receiver or headset.<br />
Because continuous exposure to loud sounds can contribute to hearing loss, keep the volume<br />
at a moderate level.<br />
Adjust the Viewing Angle<br />
The stand built into your phone tilts to give you a better view of the keys.<br />
To tilt your telephone for better viewing:<br />
1. Turn the phone so that the front faces away from you.<br />
2. Hold the base unit firmly and press the release tabs on the sides of the stand to detach<br />
the base unit.<br />
3. Hinge the hooks of the base unit into the notches on the back of the phone and snap<br />
into place as follows:<br />
a. For a high-angle mount, hinge the<br />
two lower hooks into the bottom<br />
set of notches and snap the two<br />
upper hooks into the middle set of<br />
notches.<br />
b. For a low-angle mount, hinge the<br />
two lower hooks into the middle set<br />
of notches and snap the two upper<br />
hooks into the top set of notches.
<strong>5330</strong>/<strong>5340</strong> <strong>IP</strong> <strong>Phones</strong> <strong>–</strong> <strong>User</strong> <strong>Guide</strong><br />
USING YOUR DEFAULT PHONE WINDOW AND<br />
KEYS<br />
The <strong>5340</strong> and <strong>5330</strong> <strong>IP</strong> Phone default phone windows and keys are shown and described<br />
below. The Phone window provides access to programmable keys and the main phone<br />
interface.<br />
Getting Started with Your Phone<br />
When you receive your phone, you need to program features and applications. Press the blue<br />
Applications key to access your phone’s applications. You can then program your<br />
phone’s settings, your contact list using People (<strong>5340</strong> <strong>IP</strong> Phone), Call Forwarding and so<br />
forth. See Using Your Phone Applications.<br />
<strong>5340</strong> and <strong>5330</strong> <strong>IP</strong> Phone Window<br />
- 6 -
- 7 -<br />
<strong>5330</strong>/<strong>5340</strong> <strong>IP</strong> <strong>Phones</strong> <strong>–</strong> <strong>User</strong> <strong>Guide</strong><br />
<strong>5340</strong> and <strong>5330</strong> <strong>IP</strong> Phone Default Window and Keys<br />
Feature Function<br />
1) Softkeys Allow you to access specific call control features, which are context<br />
sensitive. Non-programmable feature keys, which are specific to the<br />
application or state of the set. The <strong>5330</strong> provides three softkeys and the<br />
<strong>5340</strong> provides six softkeys.<br />
2) Programmable<br />
Keys<br />
3) Navigation Page<br />
Keys<br />
Launch specific call control features. Use the Settings application or the<br />
Integrated Office Companion application to program these keys. The<br />
<strong>5340</strong> provides 16 programmable keys per page (a maximum of 47<br />
programmable keys plus 1 prime line key). The <strong>5330</strong> provides 8 per<br />
page (a maximum of 23 programmable keys plus 1 prime line key). For<br />
instructions on programming the keys, see Programming Features on<br />
Your Keys.<br />
Display additional pages of information The <strong>5330</strong> has two page<br />
navigation keys: Back and Next, while the <strong>5340</strong> has three page<br />
navigation keys: Back, Home, and Next.<br />
4) Status Line Displays time, date, and icons indicating feature states as follows:<br />
• Message Waiting ( ) - Indicates new voice mail.<br />
• Headset ( ) - Indicates that the phone is in headset mode.<br />
• DND ( ) - Indicates DND (Do not disturb) mode.<br />
• Logged in as ( ) - Indicates that a hot desk user is logged in.<br />
• Conference Unit ( ) - Indicates that the Conference Unit is<br />
connected and turned on.<br />
5) Information Area Provides prompts in most phone applications. Content changes based<br />
on the application.<br />
6) Footer Shows context and summary information based on information in the<br />
Programmable Keys area, such as Page Indicators, numbers of items,<br />
and so forth.
<strong>5330</strong>/<strong>5340</strong> <strong>IP</strong> <strong>Phones</strong> <strong>–</strong> <strong>User</strong> <strong>Guide</strong><br />
ABOUT YOUR PHONE APPLICATIONS<br />
Your <strong>5330</strong> and <strong>5340</strong> <strong>IP</strong> <strong>Phones</strong> provide applications that simplify the use of your phone.<br />
To open the Applications window, press the blue Applications key. The Applications<br />
home window gives the current status of your phone’s applications. To open an application,<br />
press the key beside the application name:<br />
• People (<strong>5340</strong> <strong>IP</strong> Phone only): Use the People application to add, delete and edit<br />
contact names and numbers. You can also dial anyone on your contact list from the<br />
People application. The People window displays up to eight contacts per page,<br />
ordered alphabetically by last name For information on using the People application,<br />
refer to Setting Up Your Contact List and Dial From Your People Application.<br />
• Call Forwarding: Use the Call Forwarding application to quickly set Call Forward<br />
Always and to create Call Forward profiles that identify where to send your incoming<br />
calls. The Call Forwarding window shows a list of your Call Forwarding profiles and<br />
indicates which one is active. See Call Forward for more information on how to add,<br />
edit, delete, and activate Call Forwarding profiles.<br />
• Call History: Use the Call History application to display lists of the calls that you<br />
have missed, made, and answered. This feature allows you to filter the call records<br />
and display information on each call on the list. See Using the Call History<br />
Application for more information.<br />
• Conference Unit: Use the Conference Unit application to control the 5310 <strong>IP</strong><br />
Conference Unit. Use this application to turn the conference unit off or on, to adjust<br />
the volume, or to put the conference unit into Presentation mode. You can only run<br />
one Conference Controller session at a time. The Conference Unit application is<br />
available only when your phone is connected to a 5310 Conference Unit. See Using<br />
Your Phone with the 5310 Conference Unit for more information.<br />
• Cordless Module and Accessories: Use the Cordless Module application to<br />
configure and view status of cordless accessories. See Using the Cordless Module for<br />
more information.<br />
• Settings: Use the Settings application to display and quickly change your phone’s<br />
current communications settings. See Using the Settings Application for more<br />
information.<br />
• Launch PC Application: Provides a launch point to the Integrated Office<br />
Companion Application. See Using the Integrated Office Companion Application for<br />
more information.<br />
• Help: Provides access to Launch PC Help and Quick Help and displays a list of the<br />
key icons.<br />
• Call Info: Use the Call Info application to display caller information on your phone’s<br />
- 8 -
- 9 -<br />
<strong>5330</strong>/<strong>5340</strong> <strong>IP</strong> <strong>Phones</strong> <strong>–</strong> <strong>User</strong> <strong>Guide</strong><br />
prime line. Call Info appears automatically on incoming calls if the Call<br />
Notification—Display Call Info Setting is enabled and Call Info is available<br />
You can press the programmed application key from the default Phone Window. For<br />
information on programming keys, see Programming Features On Your Keys.<br />
Using the Settings Application<br />
The Settings application provides a single location to access all your phone settings. Select<br />
any of the options below to access a window where you can view and configure settings for<br />
your phone. The Settings window provides the following:<br />
• <strong>User</strong> Information: Use to specify your name and phone number.<br />
• Languages: Allows you to select the language in which phone prompts and<br />
applications appear. Supported languages are English, French, Spanish, German,<br />
Dutch, Italian, and Portuguese. Note: The system can support up to three languages at<br />
one time. Language choices appearing in the phone display are controlled by ICP<br />
programming.<br />
• Text Size: Allows you to specify the font size (large or small) for the <strong>5340</strong> <strong>IP</strong> Phone.<br />
• Programmable Keys: Use to assign features to the Programmable Keys that are<br />
available in the Phone application.<br />
• Call Notification: Use to specify that the Phone application behavior when incoming<br />
or outgoing calls occur.<br />
• Brightness and Contrast: Allows you to adjust the display brightness and contrast of<br />
your phone.<br />
• Screen Saver: Allows you to specify a specific time of inactivity on your phone that<br />
triggers the screen saver to display.<br />
• Audio Feedback: This setting allows you to adjust the volume of the audio feedback<br />
as well as the error beeps and enable or disable the setting.<br />
• Message Key Configuration: Allows you to configure the Message key.<br />
• External Message: Allows you to program your phone to launch the Phone<br />
application when it displays special messages in the Information Display area.<br />
• Go To URL: Allows you to enable third party URLs to display in the Web Browser<br />
application.<br />
• PC Connectivity: Allows you to enter a password that is used by the phone to<br />
establish communications with the PC-resident <strong>5330</strong>/<strong>5340</strong> Integrated Office<br />
Companion application.<br />
• About <strong>5330</strong>/<strong>5340</strong> <strong>IP</strong> Phone: This screen displays the software release.
<strong>5330</strong>/<strong>5340</strong> <strong>IP</strong> <strong>Phones</strong> <strong>–</strong> <strong>User</strong> <strong>Guide</strong><br />
Using the Call History Application<br />
Use this application to display logs of your most recent 50 calls. After the 50-call limit has<br />
been reached, the oldest log is replaced each time a new call is missed, made, or answered.<br />
From this application, you can<br />
• display logs by type<br />
• display call information (if available) for the logs<br />
• return missed calls by pressing a key (<strong>5340</strong> <strong>IP</strong> only)<br />
• delete or modify digits before saving or dialing a call<br />
• delete logs<br />
If you are a hot-desk user, you can view and maintain your call history logs when you are<br />
logged into another extension.<br />
VIEW CALL LOG DETAILS<br />
1. From the idle display, press the blue Applications key and then press Call<br />
History. (Missed Calls) appears next to the key label if you have missed calls.<br />
2. Press<br />
• Missed to view your missed calls (if any).<br />
• All to view a list of all logs (<strong>5340</strong> <strong>IP</strong> only)<br />
• Answered to view logs of your incoming calls<br />
• Made to view logs of your outgoing calls.<br />
3. Use the navigation keys at the bottom of the display to move to the previous, first, or<br />
next page of logs. The total number of logs in the current list is shown in the bottom<br />
left corner of the display. The bottom right corner shows the range of logs (for<br />
example 1 -7) that are currently displayed.<br />
4. Press the key to the right of the log to call the contact (<strong>5340</strong> <strong>IP</strong> Phone only)<br />
or<br />
Press the key to the left of the log to display the call details:<br />
• Name and number (if available)<br />
• Log type and number of attempts (for example 2x)<br />
• Type of call: Transfer (Tsf.) or Conference (Conf.)<br />
• Time and date of log<br />
- 10 -
- 11 -<br />
<strong>5330</strong>/<strong>5340</strong> <strong>IP</strong> <strong>Phones</strong> <strong>–</strong> <strong>User</strong> <strong>Guide</strong><br />
• Duration of call in hours:minutes:seconds (for Made and Answered logs).<br />
5. Do one of the following:<br />
• If necessary, use the keypad, Delete Digit, and Backspace keys to modify the<br />
number. If an outgoing prefix is required to access an external trunk, you must<br />
add the digit(s). Press Dial to call the number or press To Contacts to save the<br />
contact details to the People application (<strong>5340</strong> <strong>IP</strong> Phone only).<br />
• Press or at the bottom of the set to display details for another log.<br />
• Press Close to return to the previous list.<br />
REVIEW CALL LOG ICONS<br />
1. Press the blue Applications key, press Help, and press Key Icons.<br />
2. Press or to navigate to the list of Call History icons. Note that<br />
“New” logs are any logs that have been generated since the last time you accessed the<br />
Call History application.<br />
DELETE LOGS<br />
To delete an individual log press the key to the left of the log to display the call details and<br />
then press Delete Log Entry.<br />
To delete all logs by type<br />
1. From the idle display, press the blue Applications key and then press Call<br />
History.<br />
or<br />
Press the Call Hist feature access key. (Missed Calls) appears next to the key label if<br />
you have missed calls.<br />
2. Press<br />
• Missed to view your missed calls (if any)<br />
• All to view all logs (<strong>5340</strong> <strong>IP</strong> only)<br />
• Answered to view logs of your incoming calls<br />
• Made to view logs of your outgoing calls.<br />
3. Press Delete List to delete all logs from the currently displayed list.<br />
4. You are prompted to confirm the delete. Press Delete.
<strong>5330</strong>/<strong>5340</strong> <strong>IP</strong> <strong>Phones</strong> <strong>–</strong> <strong>User</strong> <strong>Guide</strong><br />
Getting Help<br />
To access the <strong>5330</strong>/<strong>5340</strong> <strong>IP</strong> Phone help and documentation:<br />
1. Press the blue Applications key.<br />
2. Press Help. You have the following options:<br />
• Press Launch PC Help to display www.edocs.mitel.com.<br />
• Press Key Icons or Quick Help.<br />
• Press or at the bottom of the set to view items for the selected<br />
help option.<br />
3. Press Close.<br />
Tips for Setting up Your Phone<br />
After you receive your <strong>5330</strong>/<strong>5340</strong> <strong>IP</strong> Phone, use the options in the Settings application to<br />
customize your phone. After customizing your phone, press the blue Applications key to<br />
verify the settings are correct. Now, you are ready to begin using your phone.<br />
- 12 -
CUSTOMIZING YOUR PHONE<br />
Use the Settings application to customize your phone.<br />
- 13 -<br />
<strong>5330</strong>/<strong>5340</strong> <strong>IP</strong> <strong>Phones</strong> <strong>–</strong> <strong>User</strong> <strong>Guide</strong><br />
Note: The System Administrator can invoke a Lock to Factory default option on a perphone<br />
basis. When this is in effect, the system administrator sets the following settings and<br />
you cannot change them:<br />
• Programmable Keys<br />
• External Messaging<br />
• Go to URL<br />
Using the Dial Pad to Enter Information<br />
You can use the standard dial pad keys 0-9, and * and # to enter a name and or number for<br />
applications and features. Using the dial pad is the default option. You can also use the onscreen<br />
keyboard by selecting Keyboard while entering text (see Using the On-screen<br />
Keyboard).<br />
The following table illustrates the characters you can enter by pressing a key consecutively.<br />
For example, to enter the letter “e”, press the ‘3’ key twice.
<strong>5330</strong>/<strong>5340</strong> <strong>IP</strong> <strong>Phones</strong> <strong>–</strong> <strong>User</strong> <strong>Guide</strong><br />
Key Characters<br />
1 1<br />
2 a b c A B C 2<br />
3 d e f D E F 3<br />
4 g h i G H I 4<br />
5 j k l J K L 5<br />
6 m n o M N O 6<br />
7 p q r s P Q R S 7<br />
8 t u v T U V 8<br />
9 w x y z W X Y Z 9<br />
0 0<br />
* * Space<br />
‘ ‘<br />
# # . , ( ) +<br />
Characters are automatically inserted after a one-second delay. If you make an error, use<br />
Backspace and Clear (<strong>5340</strong> only) to make corrections.<br />
Press or at the bottom of the set to move the cursor forwards or backwards<br />
without deleting characters.<br />
Note: When a text entry window is open, you cannot use the dial pad for dialing.<br />
Using the On-Screen Keyboard to Enter Information<br />
The onscreen keyboard can be used to enter name and number information into applications<br />
and features.<br />
1. When prompted to enter name/number information, press Keyboard to display the<br />
on-screen keyboard.<br />
2. Press Next Page and Previous Page to navigate to the set of characters needed for<br />
your input.<br />
3. Repeatedly press the key next to the character you want to enter until that character is<br />
highlighted. The character is automatically inserted after a one-second delay. If you<br />
make an error, press or at the bottom of the set to move the cursor<br />
- 14 -
- 15 -<br />
<strong>5330</strong>/<strong>5340</strong> <strong>IP</strong> <strong>Phones</strong> <strong>–</strong> <strong>User</strong> <strong>Guide</strong><br />
backwards or forwards. This does not delete any characters. You can press<br />
Backspace or Clear (<strong>5340</strong> only) to delete characters.<br />
4. After you have entered all the characters, press Save.<br />
5. Continue with text entry as required by the application or press Close.<br />
Specify <strong>User</strong> Information<br />
To specify the phone number displayed on your phone:<br />
1. Press Settings.<br />
2. Press <strong>User</strong> Information.<br />
3. Press Edit Name.<br />
4. Using the dial pad, press the appropriate letters to spell your name (see Using the Dial<br />
Pad to Enter Information).<br />
5. Press Save.<br />
6. Press Edit Number.<br />
7. Using the dial pad, press the appropriate numbers for your line (see Using the Dial<br />
Pad to Enter Information).<br />
8. Press Save.<br />
9. Press Save again.<br />
Note: Press Cancel at any time to exit this application without making any changes or press<br />
Clear to clear the entered name and number.<br />
Specify Language<br />
To specify the language in which prompts and applications display:<br />
1. Press Settings.<br />
2. Press the Language setting.<br />
The phone displays the three language selections that are currently programmed in the<br />
ICP.<br />
3. Select the appropriate language and press Save.<br />
The phone displays your chosen language.<br />
Note: Languages supported on the <strong>5330</strong>/<strong>5340</strong> may differ from those supported on the ICP.<br />
If the phone is configured for an unsupported language, the prompts may appear in your<br />
selected language but the Application language for the phone defaults to English. The<br />
Language window displays "(name of the selected language)(Unsupported)".
<strong>5330</strong>/<strong>5340</strong> <strong>IP</strong> <strong>Phones</strong> <strong>–</strong> <strong>User</strong> <strong>Guide</strong><br />
Specify Display Brightness and Contrast<br />
You can adjust the brightness and display contrast either via the phone volume controls<br />
(when the phone is idle) or via the Settings application. (Brightness adjustment on a <strong>5330</strong> <strong>IP</strong><br />
Phone is available on models with backlit displays only.)<br />
To adjust the display contrast using the volume controls:<br />
• Repeatedly press (UP) or (DOWN).<br />
Note: You can use this method only when the phone is idle. If the phone is ringing, this<br />
action adjusts the ring volume. If the phone is in use, this action adjusts the handset, headset<br />
and speakerphone volume.<br />
To adjust the display brightness and contrast using the Settings application:<br />
1. Press Settings.<br />
2. Press Brightness and Contrast.<br />
3. Press the Brightness and Contrast keys to adjust the brightness and contrast of your<br />
screen.<br />
4. Press Save.<br />
Note: Press Cancel at any time to exit this application without making any changes.<br />
- 16 -
Specify Audio Feedback Options<br />
- 17 -<br />
<strong>5330</strong>/<strong>5340</strong> <strong>IP</strong> <strong>Phones</strong> <strong>–</strong> <strong>User</strong> <strong>Guide</strong><br />
The error beep volume in the phone is related to the volume of the speaker. You can set the<br />
beep volume using this procedure; however, adjusting the speaker volume also affects the<br />
beep volume.<br />
To adjust the volume of the audio feedback:<br />
1. Press Settings.<br />
2. Press Audio Feedback.<br />
3. Set the options using the appropriate actions described below:<br />
Option Action<br />
Turn audio feedback off for errors Press Turn Off.<br />
Adjust audio for error beeps Press Volume + or Volume <strong>–</strong><br />
Turn audio feedback on for errors Press Play Error Tone<br />
4. Click Save.<br />
Note: Press Cancel at any time to exit this application without making any changes.<br />
Specify Text Size<br />
To specify the text size that displays on the phone:<br />
1. Press Settings.<br />
2. Press Text Size.<br />
3. Select Large Text or Small Text.<br />
4. Press Save.<br />
Note: This setting is available only on the <strong>5340</strong> since the <strong>5330</strong> always uses large text. Large<br />
is the default text size on the <strong>5340</strong> <strong>IP</strong> Phone.
<strong>5330</strong>/<strong>5340</strong> <strong>IP</strong> <strong>Phones</strong> <strong>–</strong> <strong>User</strong> <strong>Guide</strong><br />
Specify Call Notification Behavior<br />
To specify that the Phone window automatically displays when you are making or receiving<br />
calls:<br />
Notes:<br />
1. Press Settings.<br />
2. Press Call Notification.<br />
3. Press the appropriate options to identify when you want the Phone window to display.<br />
For example, if you select the Made option, each time the phone goes off hook to<br />
make a call, the Phone window is displayed.<br />
4. Press Save.<br />
• When To my prime line is selected, select Display Call Info to display Call<br />
Information instead of the Phone window.<br />
• Press Cancel at any time to exit this application without making any changes.<br />
• When the Conference Unit application is displayed, the Phone application is not<br />
automatically displayed when making or receiving calls.<br />
Adjust the Ringer<br />
To adjust the Ringer Volume while the phone is idle:<br />
1. Press Superkey (must be programmed to a key).<br />
2. Press the No softkey until "Ringer Adjust?" appears.<br />
3. Press “Ring Adjust”.<br />
4. Press No.<br />
5. Press “Ringer Vol”.<br />
6. Press (UP) or (DOWN) .<br />
7. Press Superkey.<br />
Note: Adjusting ringer volume also adjusts cordless headset/handset ringer tone.<br />
To adjust the Ringer Volume while the phone is ringing:<br />
• Press (UP) or (DOWN).<br />
- 18 -
Notes:<br />
- 19 -<br />
<strong>5330</strong>/<strong>5340</strong> <strong>IP</strong> <strong>Phones</strong> <strong>–</strong> <strong>User</strong> <strong>Guide</strong><br />
• If the phone is in talk state, this action adjusts the volume of the handset, headset or<br />
speaker.<br />
• If the phone is idle, this action adjusts the contrast.<br />
To adjust the Ringer Pitch while the phone is idle:<br />
1. Press Superkey (must be programmed to a key).<br />
2. Press the No softkey until "Ringer Adjust?" appears.<br />
3. Press “Ring Adjust”.<br />
4. Press “Ringer Pitch”.<br />
5. Press (UP) or (DOWN).<br />
6. Press Superkey.<br />
Enable a Screen Saver (<strong>5340</strong> only)<br />
You can program your screen saver to turn on after a specific time period of inactivity on<br />
your phone.<br />
To enable a screen saver:<br />
1. Press Settings.<br />
2. Press Screen Saver.<br />
3. Select the inactivity time, which will activate the backlight switch to turn off.<br />
4. Press the checkbox opposite Display image if you wish the screen saver to be<br />
displayed. If you do not press this checkbox, only the set backlight is turned on.<br />
5. Use the Brightness options to adjust the Brightness of the screen saver, if necessary.<br />
6. Press Save.
<strong>5330</strong>/<strong>5340</strong> <strong>IP</strong> <strong>Phones</strong> <strong>–</strong> <strong>User</strong> <strong>Guide</strong><br />
Program Receipt of External Messaging<br />
You can program your phone to launch the Phone application when it receives messages<br />
(other than phone calls).<br />
To program receipt of External message types:<br />
1. Press Settings.<br />
2. Press External Messages.<br />
3. Press the checkbox Enable.<br />
4. Press Save.<br />
Enable URL Displays on Your Phone<br />
To enable third-party URLs to display in the Web Browser application:<br />
1. Press Settings.<br />
2. Press Go to URL.<br />
3. Press the checkbox Enable.<br />
4. Press Save.<br />
Enable PC Connectivity<br />
To enable a connection to be set up between your phone and the Integrated Office<br />
Companion (IOC) Application:<br />
1. Press Settings.<br />
2. Press PC Connectivity.<br />
3. Press the checkbox Enable.<br />
4. Press Save.<br />
Note: You can use the IOC for easy PC-based programming of the labels on your phone.<br />
For more information on setting up the IOC Application, see Configuring the Integrated<br />
Office Companion on Your Phone.<br />
- 20 -
USING THE INTEGRATED OFFICE<br />
COMPANION APPLICATION<br />
- 21 -<br />
<strong>5330</strong>/<strong>5340</strong> <strong>IP</strong> <strong>Phones</strong> <strong>–</strong> <strong>User</strong> <strong>Guide</strong><br />
About the Integrated Office Companion Application<br />
The Integrated Office Companion (IOC) enhances the use of telephony features in the office<br />
environment by providing quick and easy access to them from the computer desktop.<br />
Integrated Office Companion also allows automation of telephony, instant messaging, and<br />
multimedia features, allowing the user to be immediately attentive to incoming<br />
communications.<br />
Notes: For users familiar with the PC Companion Application; all that functionality is still<br />
available as a component of the IOC.<br />
It is recommended that if you install the Integrated Office Companion; you first uninstall the<br />
Standalone PC Companion Application (if previously installed).<br />
The following table details the features that are available in each version:<br />
Feature <strong>5330</strong><br />
Basic<br />
<strong>5330</strong><br />
Enhanced<br />
<strong>5340</strong><br />
Basic<br />
Support for XP and Vista X X X X<br />
MiNET and S<strong>IP</strong> support X X X X<br />
Tray Icon X X X X<br />
Display CLID in text entry field in deskbar<br />
on incoming call<br />
Dial number from tray icon, Telephony<br />
Toolbar<br />
X X X X<br />
X X X X<br />
Incoming call popup and answer by clicking X X X X<br />
Use of Window's telephony location X X X X<br />
Access to speed dial entries X X X X<br />
Speed Dial programming X X X X<br />
Missed call list X X X X<br />
Telephony Toolbar X X X X<br />
Add/Edit speed dial programming X X X X<br />
Search Outlook contacts X X X X<br />
<strong>5340</strong><br />
Enhanced
<strong>5330</strong>/<strong>5340</strong> <strong>IP</strong> <strong>Phones</strong> <strong>–</strong> <strong>User</strong> <strong>Guide</strong><br />
Feature <strong>5330</strong><br />
Basic<br />
- 22 -<br />
<strong>5330</strong><br />
Enhanced<br />
<strong>5340</strong><br />
Basic<br />
Presence X X X<br />
Auto Presence State change X X X<br />
Auto search of Outlook contacts (by<br />
Number and Name)<br />
X X<br />
Search Active Directory X X<br />
Drag & Dial (Dial highlighted) X X<br />
Open contact (from tray icon, Telephony<br />
Toolbar, Pop-up)<br />
X X<br />
Pause music during phone call X X<br />
Extra phone features X X<br />
Desktop search integration X X<br />
Active Directory integration X X<br />
Outlook Actions (Create Email, Create<br />
Task, Create Contact)<br />
X X<br />
Call Transfer X X<br />
Call Conference X X<br />
One-Step Conference Transfer X X<br />
Dial Extensions X X<br />
<strong>User</strong>-defined Dialling Rules X X<br />
International Language Support X X<br />
<strong>5340</strong><br />
Enhanced
- 23 -<br />
<strong>5330</strong>/<strong>5340</strong> <strong>IP</strong> <strong>Phones</strong> <strong>–</strong> <strong>User</strong> <strong>Guide</strong><br />
Installing the Integrated Office Companion Application<br />
Use this procedure for the standard install the Integrated Companion Application software.<br />
Note: There are mass deployment and configuration options for the Integrated Companion<br />
Application software. (Please see the 5300 Integrated Office Companion IT <strong>Guide</strong>)<br />
Determine the installation directory from which to install the Integrated Office Companion<br />
Application. For example, this may be a CD-ROM or a network directory. Contact your<br />
System Administrator if you have any questions.<br />
Shut down all other applications before installing the Integrated Office Companion<br />
Application.<br />
From the installation directory, double-click Setup.exe.<br />
If there is a previous installation of the Integrated Office Companion Application or PC<br />
Companion Application on your PC, the installer indicates that you should remove it first:<br />
1. Open the Control Panel and select Add or Remove Programs.<br />
2. Scroll to <strong>Mitel</strong> <strong>5330</strong> <strong>5340</strong> PC Companion Application, select it, and click Remove.<br />
3. When removal is complete, double click Setup.exe again if you exited the installation.<br />
Otherwise click OK and the installation will continue.<br />
Follow the onscreen instructions in the installation program. Optionally, during the install,<br />
you can set up the Integrated Office Companion Application’s association to the phone. If<br />
you choose not to set this up during installation, you will be required to do so when you first<br />
start up the Application. (see: “Associating the Integrated Office Companion Application to<br />
Your Phone”)<br />
To launch the Integrated Office Companion Application, click the Windows Start menu and<br />
navigate to <strong>Mitel</strong> → Integrated Office Companion.<br />
Registering the Integrated Office Companion Application<br />
When you run the Integrated Office Companion for the first time, you will be required to<br />
register your copy. A registration dialog will automatically appear.<br />
Click Get License Key to acquire a Trial Registration key.
<strong>5330</strong>/<strong>5340</strong> <strong>IP</strong> <strong>Phones</strong> <strong>–</strong> <strong>User</strong> <strong>Guide</strong><br />
This will take you to an online registration web page. Fill out the form and a Trial License<br />
Key will be emailed to you. The trial key will give you full basic functionality and a five-day<br />
trial of the enhanced functionality.<br />
Enter your license key (either a Trial key or an Enhanced key) and click Register Now.<br />
Note: If the Integrated Office Companion is unable to connect with the online registration<br />
system, a Manual Registration dialog will appear instead with a Unique Machine Identifier.<br />
To manually register:<br />
1. Click Email Machine Identifier.<br />
- 24 -
- 25 -<br />
<strong>5330</strong>/<strong>5340</strong> <strong>IP</strong> <strong>Phones</strong> <strong>–</strong> <strong>User</strong> <strong>Guide</strong><br />
2. An Activation Code will be emailed back to you. Enter the code and click Register to<br />
process the registration.<br />
Upgrading the Integrated Office Companion Application<br />
to Enhanced Mode<br />
If you have previously registered Integrated Office Companion with a Trial License Key and<br />
now wish to upgrade to Enhanced, after purchasing an Enhanced License Key, do the<br />
following:<br />
1. Right click Telephony Toolbar Menu.<br />
2. Select About… from the menu that appears.<br />
3. An about dialog should appear.<br />
4. Click Upgrade. The Licensing and Registration dialog will appear.
<strong>5330</strong>/<strong>5340</strong> <strong>IP</strong> <strong>Phones</strong> <strong>–</strong> <strong>User</strong> <strong>Guide</strong><br />
5. Enter your Enhanced License Key and click Register Now.<br />
Configuring the Integrated Office Companion Application<br />
on Your Phone<br />
Use this procedure to connect your phone to the PC. This procedure is normally required<br />
only once. When your PC and phone have successfully associated the first time, your settings<br />
are saved and reused for each subsequent connection.<br />
1. On the <strong>5330</strong> or <strong>5340</strong> press Settings or , then select PC Connectivity.<br />
The phone's <strong>IP</strong> Address appears on the display (<strong>IP</strong> Address for PC:<br />
AAA.BBB.CCC.DDD).<br />
2. Record the <strong>IP</strong> address, if desired, or repeat Step 1 when you need to view the <strong>IP</strong><br />
address.<br />
3. Within the PC Connectivity window, select Enable.<br />
4. Select Edit password and enter the password that will be used to set up the<br />
association with the PC application. You can also choose to use the default password.<br />
Record this password as you will need it to configure the PC application.<br />
5. Proceed to Installing the Integrated Office Companion Application below.<br />
- 26 -
- 27 -<br />
<strong>5330</strong>/<strong>5340</strong> <strong>IP</strong> <strong>Phones</strong> <strong>–</strong> <strong>User</strong> <strong>Guide</strong><br />
Associating the Integrated Office Companion Application<br />
to Your Phone<br />
Phone association can be performed during installation of the IOC application, or when you<br />
first the application.<br />
If this information was not entered, or only partially entered (such as entering only the <strong>IP</strong>C<br />
<strong>IP</strong>) during installation, then you will need to enter the missing association information.<br />
When setting up the association (either during the installation or when the application is first<br />
run), a Find Phone dialog will appear:<br />
Associate either by Directory Number or by <strong>IP</strong> Address, as described in the following<br />
sections.<br />
ASSOCIATION BY DIRECTORY NUMBER<br />
or<br />
IOC queries the 3300 ICP for the <strong>IP</strong> and MAC address of the phone using the phone's<br />
Directory Number (DN). With this mechanism, IOC is always able to find a programmed and<br />
in-service 5300 phone, even if its <strong>IP</strong> lease expired and was renewed with a new <strong>IP</strong> address.<br />
To associate the phone this way, a special association account was created on the 3300 ICP<br />
with the required privileges to access the Programmed <strong>Phones</strong> table. This account's user<br />
name should be "DN2<strong>IP</strong>" with a password of "InGenius". Note that the user name and<br />
password are case sensitive and should be entered as displayed.<br />
If the account is not present, it is still possible to associate the phone by DN by providing the<br />
credentials of an ICP account with sufficient privileges in the association dialog as displayed<br />
below:
<strong>5330</strong>/<strong>5340</strong> <strong>IP</strong> <strong>Phones</strong> <strong>–</strong> <strong>User</strong> <strong>Guide</strong><br />
ASSOCIATION BY <strong>IP</strong> ADDRESS (DIRECT ASSOCIATION)<br />
If association by DN fails or if it is not an option, the phone can still be associated with by <strong>IP</strong><br />
address.<br />
Note: In this case, IOC will not be able to find the phone again if the phone changes <strong>IP</strong><br />
address. You will have to re-associate the phone at the new address. The Find Phone ...<br />
command is available from IOC's tray icon and main menus.<br />
Display the Integrated Office Companion Application<br />
Toolbar<br />
To display the Telephony Toolbar if it is hidden:<br />
• Right-click on the Task Bar and check Telephony Toolbar in the Toolbars menu.<br />
Hide the Integrated Office Companion Application<br />
Toolbar<br />
To hide the Telephony Toolbar if it is hidden:<br />
• Right-click on the Task Bar and check Telephony Toolbar in the Toolbars menu.<br />
- 28 -
- 29 -<br />
<strong>5330</strong>/<strong>5340</strong> <strong>IP</strong> <strong>Phones</strong> <strong>–</strong> <strong>User</strong> <strong>Guide</strong><br />
Elements of Your Integrated Office Companion<br />
Integrated Office Companion <strong>–</strong> Telephony Toolbar<br />
The IOC Telephony Toolbar application runs as a toolbar in your Windows Task Bar. The<br />
Telephony Toolbar allows enhanced integration between the <strong>5330</strong>/<strong>5340</strong> Phone, your PC, and<br />
various Microsoft Office applications.<br />
Element Function<br />
Search Options The icons at the left of the Telephony Toolbar indicate the<br />
currently selected search options.<br />
Number/Text Entry<br />
Field<br />
Error! Objects cannot be<br />
created from editing field<br />
codes.<br />
Telephony Button<br />
Error! Objects cannot be<br />
created from editing field<br />
codes.<br />
To change the search options, left click on the search options<br />
icons. A menu will appear which will allow you to narrow<br />
the search to Corporate Directory ( ), or Microsoft Outlook<br />
( ), or to search both.<br />
Note: If Corporate Directory is not configured, the option is<br />
greyed out. If Microsoft Outlook is not running, the option is<br />
greyed out.<br />
When an incoming call occurs, the Caller Identification<br />
(CLID) is displayed in this field in two rows of text, with the<br />
name portion highlighted in bold.<br />
The CLID is displayed until another call is received, an<br />
outgoing call occurs, or you edit the contents of the text box.<br />
The button is divided into two areas:<br />
• The larger portion will cause the default action to occur<br />
(which will change based on the telephony state). This is<br />
the same action as the bottom item on the popup menu.<br />
• The smaller portion will cause a pop-up menu to appear<br />
showing all available options.<br />
Right-click on either portion of the button to cause the popup<br />
menu to appear.<br />
• Microphone Mute <strong>–</strong> Mutes the phone microphone while
<strong>5330</strong>/<strong>5340</strong> <strong>IP</strong> <strong>Phones</strong> <strong>–</strong> <strong>User</strong> <strong>Guide</strong><br />
Element Function<br />
PC Links Button<br />
Error! Objects cannot be<br />
created from editing field<br />
codes.<br />
on a call<br />
• Speed Dials <strong>–</strong> Lists programmed Speed Dial buttons<br />
(Programmed either via this menu or the phone). Allows<br />
you to program Speed Dial buttons. Also allows you to<br />
add a speed cal button for the current caller.<br />
• Missed Calls <strong>–</strong> Lists missed calls. (up to 20)<br />
• Redial <strong>–</strong> Redials current number<br />
• Call/Answer/Hold/Retrieve/Hangup <strong>–</strong> Dials an<br />
outgoing call, answers an incoming call or puts current<br />
call on hold. (Menu Item changes with phone state)<br />
• Transfer/Conference <strong>–</strong> Allows for transferring the<br />
current call to a second call or conferencing two calls<br />
together<br />
• One Step Conference/Transfer <strong>–</strong> Like the regular<br />
Transfer/Conference, but the operation will complete<br />
upon the second call being answered. If the call is not<br />
answered, the user cancels out of the call and the phone<br />
picks up the previous call that was in progress before the<br />
operation was initiated.<br />
The button is divided into two areas:<br />
• The larger portion will cause the default action to occur.<br />
This is the same action as the bottom item on the pop-up<br />
menu.<br />
• The smaller portion will cause a pop-up menu to appear<br />
showing all options available.<br />
• Right-click on either portion of the button to cause the<br />
pop-up menu to appear.<br />
• Create Task Associated with [Caller]… - Creates a<br />
Microsoft Outlook task for the current caller<br />
• Create Outlook Contact for [Caller]… - Creates a<br />
Microsoft Outlook Contact for the current caller.<br />
• Send Email to [Caller]… - Creates a Microsoft Email to<br />
the current caller (If the current caller has an email<br />
address already in Outlook Contacts, the email is<br />
- 30 -
Element Function<br />
Telephony Toolbar<br />
Menu<br />
populated accordingly)<br />
Using the Telephony Toolbar<br />
- 31 -<br />
<strong>5330</strong>/<strong>5340</strong> <strong>IP</strong> <strong>Phones</strong> <strong>–</strong> <strong>User</strong> <strong>Guide</strong><br />
• Search Outlook Contacts For [Caller]… - Searches for<br />
a Microsoft Outlook Contact for the current caller.<br />
• Desktop Search for [Caller]… - Executes a Microsoft<br />
Desktop Search for the current caller.<br />
Note: Microsoft Outlook and Microsoft Desktop Search<br />
must be installed for these respective options to be available.<br />
Click this button to bring up the Telephony Toolbar menu.<br />
• Extra Phone Features… - Allows you to configure<br />
additional features.<br />
• Settings… - Brings up the Settings Dialog Window.<br />
Here you can configure a number of Telephony Toolbar<br />
settings.<br />
• About… - Brings up the About Dialog Window. From<br />
here, you can also upgrade your registration.<br />
• Help… - Brings up a help website.<br />
• Program Phone Keys <strong>–</strong> Hides or restores the Integrated<br />
Office Companion.<br />
• Exit <strong>–</strong> Closes the Integrated Office Companion including<br />
the Telephony Toolbar and the Tray Icon.<br />
By default, the Telephony Toolbar is not visible; only the Tray Icon will be visible when the<br />
application begins.<br />
OUTGOING CALLS<br />
There are a number of ways to make an outgoing call via the Telephony Toolbar:<br />
• Search though your contacts<br />
• Manually dial a number using the PC keyboard<br />
• Dial via Speed Dials or the Missed Calls Menu
<strong>5330</strong>/<strong>5340</strong> <strong>IP</strong> <strong>Phones</strong> <strong>–</strong> <strong>User</strong> <strong>Guide</strong><br />
SEARCH CONTACTS<br />
Search Options Menu:<br />
The Telephony Toolbar has the ability to search your Microsoft Outlook Contacts or the<br />
Corporate Directory.<br />
The icons on the left side the Telephony Toolbar indicate the currently selected search<br />
options.<br />
Telephony Toolbar - Search Options<br />
Note: For these search options to be available, you must have Microsoft Outlook and/or<br />
Microsoft Active Directory installed and configured. Microsoft Outlook must be running.<br />
Contact your system administrator to install these products for you.<br />
To change the search options:<br />
• Left-click on the Search Options Icons.<br />
To perform an Outlook and/or Corporate Directory Search using the selected search options:<br />
1. Enter text characters such as a name, or portion of a name into the Text Field. The<br />
characters entered are matched against the First Name, Last Name and Company<br />
fields in the Contact and Corporate Directory records and a search results menu will<br />
popup.<br />
2. Select a name from the Search Results. A menu showing all the numbers and their<br />
associated labels displays.<br />
3. Select a number by clicking with a mouse or by pressing the Enter key.<br />
When a number is selected, it will either appear in the Text Field (If Number Preview<br />
is enabled) or dial the number.<br />
- 32 -
- 33 -<br />
<strong>5330</strong>/<strong>5340</strong> <strong>IP</strong> <strong>Phones</strong> <strong>–</strong> <strong>User</strong> <strong>Guide</strong><br />
Note: If you have Microsoft Active Directory configured, but it is unavailable at this time, a<br />
message will be reported as part of the search list.<br />
Dial extensions (enhanced Feature):<br />
If a phone number dialed contains an extension then once the call is established a menu<br />
offers the user the option to dial the extension.<br />
Performing a Desktop Search:<br />
To perform a desktop search:<br />
1. Enter text characters such as a name, or portion of a name into the Text field.<br />
2. Left-click the large portion of the PC Links.<br />
Note: For Desktop Search to be available, you must have Microsoft Windows Desktop<br />
Search installed. Contact your system administrator to install this product for you. Windows<br />
Desktop Search can be downloaded from the following site:<br />
http://www.ingeniussoftware.com/mitel/integratedofficenavigator/registration/redirect.aspx<br />
DIALING A CALL<br />
To dial a call entered in the text field:<br />
1. Enter the phone number into the Text field.<br />
Long distance and international numbers must be in a format understood by the<br />
telephony equipment. Refer to the section on Long Distance and International Calls at<br />
the end of this chapter.<br />
2. Left-click the large portion of the Telephony.
<strong>5330</strong>/<strong>5340</strong> <strong>IP</strong> <strong>Phones</strong> <strong>–</strong> <strong>User</strong> <strong>Guide</strong><br />
Integrated Office Companion applies respective dialing rules to the entered number to<br />
determine the exact number to dial. The dialing rules are defined in the “Settings menu”<br />
under “Use Windows Telephony Location” and “Dialing Rules”<br />
SPEED DIALS<br />
Speed Dials Menu<br />
To Display the Speed Dials Menu, do one of the following:<br />
• Right-click on the large portion of the Telephony button. Select Speed Dials from the<br />
popup menu.<br />
or<br />
• Right or left-click on the small portion of the Telephony button. Select Speed Dials<br />
from the popup menu.<br />
or<br />
• Left-click on the Tray Icon. Select Speed Dials from the popup menu.<br />
Telephony Toolbar - Speed Dials Menu<br />
The Speed Dials Menu displays a list of all Speed Dial entries programmed on the phone.<br />
Selecting a name from the menu will dial the number on the phone.<br />
Add a new Speed Dial / Edit an existing Speed Dial<br />
To add a new the Speed Dial (or edit an existing one):<br />
Select Add/Edit Speed Dial ….<br />
1. Select a phone button to program.<br />
2. Specify a label for the button.<br />
3. Specify a number to dial.<br />
4. Specify presence information (optional).<br />
- 34 -
5. Specify an alternative number to dial (optional).<br />
- 35 -<br />
<strong>5330</strong>/<strong>5340</strong> <strong>IP</strong> <strong>Phones</strong> <strong>–</strong> <strong>User</strong> <strong>Guide</strong><br />
Note: For Presence Information you need to have Windows Messenger, MSN Messenger,<br />
Windows Live, or Office Communicator running on your PC.<br />
PRESENCE<br />
With the Integrated Office Companion, you can display presence information in the<br />
Telephony Toolbar Speed Dial menu on the <strong>5330</strong>. (This is standard on the <strong>5340</strong> with the<br />
Basic Version)<br />
Note: For Presence Information you need to have Windows Messenger, MSN Messenger,<br />
Windows Live, or Office Communicator running on your PC.<br />
Adding presence to an existing Speed Dial<br />
To add presence to an existing the Speed Dial:<br />
1. In the Telephony Toolbar select Add/Edit Speed Dial …<br />
2. Select a phone button to program<br />
3. The dialog will then populate with the Speed Dial Button’s current setting<br />
4. Check the “Display <strong>User</strong>’s IM Presence on my phone” check box<br />
5. Select the contact from the drop down<br />
6. Click Save<br />
MISSED CALLS<br />
Missed Calls Menu<br />
To display the Missed Calls menu:<br />
• Right-click on the large portion of the Telephony button. Select Missed Calls from<br />
the popup menu.<br />
or<br />
• Right or left-click on the small portion of the Telephony button. Select Missed Calls<br />
from the popup menu.<br />
or<br />
• Left-click on the Tray Icon. Select Missed Calls from the popup menu.
<strong>5330</strong>/<strong>5340</strong> <strong>IP</strong> <strong>Phones</strong> <strong>–</strong> <strong>User</strong> <strong>Guide</strong><br />
Telephony Toolbar <strong>–</strong> Missed Calls Menu<br />
By default the Missed Calls Menu displays a list containing up to 20 of the last missed calls.<br />
Clicking a missed call dials the number of the caller.<br />
Note: If you are on the phone and receive a second call that goes to voicemail, it will NOT<br />
be added to the missed call list. If the phone is idle, an incoming call occurs and then goes to<br />
voicemail, the call is added to the missed call list. If call forward is enabled, no calls will be<br />
added to the missed call list.<br />
INCOMING CALLS<br />
When an incoming call occurs, the name and number of the caller is displayed in the CLID<br />
field in two rows of text, with the name portion highlighted in bold.<br />
Note: The CLID is displayed until the user clicks in this field, or another call is received.<br />
Once an incoming call has occurred, there are a number of functions available:<br />
• Answer <strong>–</strong> Left-click the large portion of the Telephony button to answer the<br />
incoming call<br />
• Call <strong>–</strong> Left-click the large portion of the Telephony button to call back the last caller<br />
• Create a Speed Dial for Caller:<br />
− Right-click the small portion of the Telephony button<br />
− Select Speed Dial<br />
− Select Add Speed Dial for Caller<br />
• Search Outlook Contacts for Caller:<br />
− Right-click the small portion of the PC Links button<br />
− Select Search Outlook Contacts for Caller<br />
• Create Outlook Contact for Caller:<br />
− Right-click the small portion of the PC Links button<br />
− Select Create Outlook Contact for Caller<br />
• Create Outlook Task for Caller:<br />
- 36 -
− Right-click the small portion of the PC Links button<br />
− Select Create Task Contact for Caller<br />
• Send Email to Caller:<br />
− Right-click the small portion of the PC Links button<br />
− Select Send Email to Caller<br />
• Desktop Search for Caller:<br />
− Right-click the small portion of the PC Links button<br />
− Select Desktop Search for Caller<br />
- 37 -<br />
<strong>5330</strong>/<strong>5340</strong> <strong>IP</strong> <strong>Phones</strong> <strong>–</strong> <strong>User</strong> <strong>Guide</strong><br />
Note: For the respective PC Links options to function you must have Microsoft Outlook<br />
running and Microsoft Windows Desktop Search installed. Contact your system<br />
administrator to install these products for you.<br />
TRANSFER/CONFERENCE CALLS<br />
When a call is in progress up to 3 menu items are added to the Phone Menu (Right click on<br />
button with phone or left click tray icon):<br />
Note: Trans/Conf/Hold are not supported for the S<strong>IP</strong> <strong>Phones</strong> on IOC.<br />
• Transfer/Conference Ctrl+T<br />
• One Step Transfer Alt+T (Only available if Release function is programmed on a<br />
Phone Key)<br />
• One Step Conference Alt+C
<strong>5330</strong>/<strong>5340</strong> <strong>IP</strong> <strong>Phones</strong> <strong>–</strong> <strong>User</strong> <strong>Guide</strong><br />
When pressing any of these menu items when the Telephony Toolbar is displayed, the text in<br />
the edit box will be changed to Place Second Call, and the edit box will have focus so you<br />
can start typing the name or number of the person to call.<br />
If either of the One Step operations was selected, the operation will complete upon the<br />
second call being answered. If the call is not answered, you cancel out of the call and the<br />
phone picks up the previous call that was in progress before the operation was initiated.<br />
If the Transfer/Conference item was selected, when the second call is picked up a menu<br />
with up to 3 options is presented:<br />
• Conference Ctrl+C<br />
• Trade Calls Ctrl+S (Only available if Swap function is programmed on a Phone Key)<br />
• Release Me Ctrl+R (Only available if Release function is programmed on a Phone<br />
Key)<br />
Selecting Conference establishes the conference. Selecting Trade Calls swaps between the<br />
two calls currently in progress. Selecting Release Me completes a transfer operation.<br />
TELEPHONY TOOLBAR MENU<br />
Clicking on the small button at the right of the Telephony Toolbar causes the Telephony<br />
Toolbar menu to appear, with the following menu choices:<br />
SETTINGS DIALOG<br />
Telephony Toolbar <strong>–</strong> Telephony Toolbar Menu<br />
To open the Settings dialog window, select Settings from the Telephony Toolbar menu or<br />
the Tray Icon.<br />
- 38 -
GENERAL<br />
Settings Dialog<br />
- 39 -<br />
<strong>5330</strong>/<strong>5340</strong> <strong>IP</strong> <strong>Phones</strong> <strong>–</strong> <strong>User</strong> <strong>Guide</strong><br />
The following are available options in the General area of the General tab:<br />
• Pause Music When Phone is in Use <strong>–</strong> With this setting enabled, the Telephony<br />
Toolbar will cause Microsoft’s Windows Media Player or Apple’s iTunes, to pause<br />
the music on an incoming or outgoing call.<br />
Note: iTunes: Only works with the latest (7.0.2.16). Older versions continue playing.<br />
Note: iTunes: Note that iTunes does not conform to the Microsoft Application<br />
Programming Interface (API) and treats the PAUSE message as a PLAY/PAUSE message.<br />
Meaning that if it is in a paused state it will start playing when it gets the PAUSE message<br />
again.<br />
Note: Stand-alone Windows Media Player does work correctly. If the player is embedded<br />
in a webpage while listening to music online, the music will not pause.<br />
• Use Windows Telephony Location <strong>–</strong> If the feature is turned on the Telephony<br />
Toolbar will apply dialing rules as specified in the telephony location information.<br />
Note: The Telephony Toolbar applies the Windows Telephony Location to a dialed number<br />
based on Tapi rules. You can configure additional rules on the “Dialing Rules” tab (if<br />
available)<br />
• Dial Area Code for Local Calls <strong>–</strong> Allows you to define if a phone numbers area code<br />
will be dialed along with the number.<br />
• Number Preview <strong>–</strong> If enabled, and you select a number from Corporate Directory or<br />
Outlook search, the number will be displayed in the Text Field. You will have a
<strong>5330</strong>/<strong>5340</strong> <strong>IP</strong> <strong>Phones</strong> <strong>–</strong> <strong>User</strong> <strong>Guide</strong><br />
chance to edit the number before it is dialled.<br />
The following are available options in the Incoming Call Actions area of the General tab:<br />
• Display Toast Popup With Caller ID <strong>–</strong> This setting controls whether the toast will<br />
pop-up on an incoming call.<br />
• Lookup Caller in Outlook Contacts <strong>–</strong> If this setting is on, Telephony Toolbar will<br />
automatically do a lookup in Outlook Contacts of the Caller ID of an incoming call.<br />
• Perform Windows Desktop Search with Caller ID <strong>–</strong> If this setting is on, Telephony<br />
Toolbar will automatically do a Desktop Search of the Caller ID of an incoming call.<br />
The following are available options in the Presence area of the General tab:<br />
• Change my IM status to “On the Phone” when I use my phone <strong>–</strong> This setting will<br />
cause your presence in IM to change to “On the Phone” if your phone is off the hook.<br />
The IM status will return to its appropriate state once the phone is hung up.<br />
Icon Description<br />
Error!<br />
Objects<br />
cannot<br />
be<br />
created<br />
from<br />
editing<br />
field<br />
codes.<br />
Error!<br />
Objects<br />
cannot<br />
be<br />
created<br />
from<br />
editing<br />
field<br />
codes.<br />
Error!<br />
Objects<br />
cannot<br />
be<br />
created<br />
from<br />
Offline<br />
Online<br />
Presence Icons<br />
Busy, On The Phone<br />
- 40 -
editing<br />
field<br />
codes.<br />
Error!<br />
Objects<br />
cannot<br />
be<br />
created<br />
from<br />
editing<br />
field<br />
codes.<br />
Away, Be Right Back, Out to Lunch<br />
No icon Denotes no presence information<br />
reported<br />
- 41 -<br />
<strong>5330</strong>/<strong>5340</strong> <strong>IP</strong> <strong>Phones</strong> <strong>–</strong> <strong>User</strong> <strong>Guide</strong><br />
Note: Your IM status will remain unchanged if it is set to “Appear Offline”<br />
Note: This function is only supported by Windows Messenger, MSN Messenger and<br />
Windows Live. (This feature is not supported by Office Communicator.)<br />
DIRECTORY LOOKUP<br />
This section allows you to configure the Telephony Toolbar to use Active Directory for<br />
Corporate Search.<br />
DIALING RULES<br />
The Integrated Office Communicator has 2 modes of operation where you can define dialing<br />
rules:
<strong>5330</strong>/<strong>5340</strong> <strong>IP</strong> <strong>Phones</strong> <strong>–</strong> <strong>User</strong> <strong>Guide</strong><br />
1. Define your own dialing rules:<br />
In this case a list of dialing rules displays, and controls to Add, Edit, and Remove<br />
them.<br />
2. You can use pre-defined dialing rules but can neither modify the rules or create new<br />
ones.<br />
In this case clicking Import displays a textbox where you can enter the path to<br />
already defined rules. Clicking OK imports these rules locally, and IOC verifies this<br />
location at startup for new rules. If new rules are available the Import process<br />
overwrites the existing rules with the new rules.<br />
- 42 -
- 43 -<br />
<strong>5330</strong>/<strong>5340</strong> <strong>IP</strong> <strong>Phones</strong> <strong>–</strong> <strong>User</strong> <strong>Guide</strong>
<strong>5330</strong>/<strong>5340</strong> <strong>IP</strong> <strong>Phones</strong> <strong>–</strong> <strong>User</strong> <strong>Guide</strong><br />
CONFIGURING DIALING RULES MODE - COMMAND LINE<br />
OPTIONS<br />
The IOC command line recognizes the /rules: command. This command can be used once or<br />
twice on the command line. Once to allow or deny you from defining your own dialing rules.<br />
Once to specify a path to a file containing dialing rules to import.<br />
To allow you to define its own dialing rules:<br />
/rules:yes<br />
To prevent the user from defining its own dialing rules:<br />
/rules:no<br />
To specify pre-defined dialing rules:<br />
/rules:c:\path\DialingRules.xml or /rules:\\\DialingRules.xml<br />
By default IOC allows you to define your own rules.<br />
The command line options are stored in the settings. Subsequent sessions of IOC will use the<br />
saved settings.<br />
If the path contains spaces, the /rule: command should then be quoted:<br />
"/rules:\\Machine\Rule share\DialingRules.xml"<br />
If you are allowed to use rules and the command line is used to import rules from a specific<br />
location, your will be able to see and edit a local copy of these rules. The original copy<br />
cannot be accessed for editing by IOC.<br />
POPUP NOTIFICATION OF INCOMING CALLS<br />
When an incoming call occurs, a popup toast is presented and displays the name and number<br />
of the caller (CLID).<br />
The toast pop-up can be controlled via the settings menu. You can turn the toast pop-up on or<br />
off. The default is off.<br />
Telephony Toolbar <strong>–</strong> Pop-up Notification<br />
From the pop-up, you can:<br />
• Answer the incoming call<br />
• Do an Outlook Contacts Search based on the CLID (Number and Name search)<br />
- 44 -
• Do a Desktop Search based on the CLID<br />
LONG DISTANCE AND INTERNATIONAL CALLS<br />
- 45 -<br />
<strong>5330</strong>/<strong>5340</strong> <strong>IP</strong> <strong>Phones</strong> <strong>–</strong> <strong>User</strong> <strong>Guide</strong><br />
When storing long distance and international numbers in Outlook or typing them on the<br />
telephony toolbar, certain formatting must be remembered or they become invalid when<br />
dialled. These numbers must be in format understood by the telephony equipment. The<br />
application uses Windows dialling preferences.<br />
There are four parts to such a number:<br />
1. The international dialling prefix<br />
The Microsoft Operating System software stores the international prefix in the Phone<br />
and Modem Options under the Control Panel. After the user enters the location he or<br />
she is dialling from, the proper international prefix is saved, so the user does not need<br />
to enter it for any international calls made from the computer.<br />
It is not used if the user dials a number within his or her country.<br />
2. The international or country code<br />
Prefix this number with + so the telephony equipment understands this is not a local<br />
call.<br />
This number determines whether the international dialling prefix should be appended<br />
to the number before it is dialled.<br />
3. The area code<br />
Enclose this number with () so the telephony equipment understands this is the area<br />
code portion of the number.<br />
4. The subscriber number<br />
This last sequence of digits may not contain periods or dashes such as 765-4321 or<br />
765.4321<br />
For example, in North America the number:
<strong>5330</strong>/<strong>5340</strong> <strong>IP</strong> <strong>Phones</strong> <strong>–</strong> <strong>User</strong> <strong>Guide</strong><br />
1.613.765.4321 must be entered as +1 (613) 7654321<br />
011.45.75.123456 must be entered as +45 (75) 123456<br />
In the United Kingdom, this would be:<br />
0.29.123456 must be entered as +0 (29) 123456<br />
00.966.1.123456 must be entered as +966 (1) 123456<br />
- 46 -
- 47 -<br />
<strong>5330</strong>/<strong>5340</strong> <strong>IP</strong> <strong>Phones</strong> <strong>–</strong> <strong>User</strong> <strong>Guide</strong><br />
PROGRAMING FEATURES ON YOUR KEYS<br />
Tips on Programming Features<br />
You can program your phone's programmable keys to enable features. To program your keys,<br />
use:<br />
• Settings application<br />
• Integrated Office Companion application<br />
You can assign the following to a programmable Key:<br />
• Features and Fixed function keys: see Program Feature Keys Using the Setting<br />
Application.<br />
• Applications: People, Settings, Call Forwarding, Conference Unit (see Program<br />
Phone Application)<br />
Note: Only the System Administrator can program line select and line appearance keys. The<br />
user’s Prime line by default is Key 1.<br />
FEATURES AVAILABLE FOR PROGRAMMING ON<br />
PROGRAMMABLE KEYS<br />
Feature Default Label<br />
Speed Call Speed Call<br />
Music Music<br />
Night Answer Night Ans<br />
Account Code Verified Acct Verified<br />
Account Code Non-Verified Acct Non-Ver<br />
Hot Desking Hot Desk<br />
Phonebook Phonebook<br />
Speak@Ease Speak@Ease<br />
Auto Answer Auto Ans<br />
Paging Paging<br />
Call Pickup Call Pickup<br />
Call Back Call Back
<strong>5330</strong>/<strong>5340</strong> <strong>IP</strong> <strong>Phones</strong> <strong>–</strong> <strong>User</strong> <strong>Guide</strong><br />
Feature Default Label<br />
Headset 1 Headset<br />
Make Busy Make Busy<br />
Campon Campon<br />
Override Override<br />
Direct Page Page<br />
Do Not Disturb DND<br />
Single Flash Flash<br />
Double Flash Dbl Flash<br />
Meet Me Answer Meet Me<br />
Message Waiting Indicator Msg Waiting<br />
Emergency Call Emergency<br />
Tag Call Tag Call<br />
Privacy Release Privacy Rls<br />
Swap Swap<br />
Release Release<br />
Call History Call Hist<br />
Call Park Call Park<br />
Call Park Retrieve Park Retrieve<br />
Float Keys Float Keys<br />
Group Listen Grp Listen<br />
Superkey Superkey<br />
Redial Redial<br />
Speaker Speaker<br />
Message Message<br />
Hold Hold<br />
Transfer/Conference Trans/Conf<br />
- 48 -
Feature Default Label<br />
Cancel Cancel<br />
Analog Line Analog Line<br />
1 . Turning on the Headset feature key has no effect on the Cordless Headset.<br />
- 49 -<br />
<strong>5330</strong>/<strong>5340</strong> <strong>IP</strong> <strong>Phones</strong> <strong>–</strong> <strong>User</strong> <strong>Guide</strong><br />
APPLICATIONS AVAILABLE FOR PROGRAMMING ON<br />
PROGRAMMABLE KEYS<br />
Application Default Label<br />
Applications List Applications<br />
Call History Call Hist<br />
People People<br />
Call Forwarding Forwarding<br />
Conference Unit Conf Unit<br />
Launch Integrated Office Companion<br />
Application<br />
PC App<br />
Help Help<br />
Settings Settings<br />
Call Info Call Info<br />
Visual Voice Mail Voice mail<br />
Program Feature Keys Using the Settings Application<br />
To program a Phone Feature or hard key:<br />
1. Press Settings.<br />
2. Press Programmable Keys.<br />
3. Press the key you wish to program.<br />
4. If applications are displayed, press View Features.<br />
5. Use the Page Navigation keys to move through the features list.<br />
6. Select the desired feature or fixed function key from the list. A default label is<br />
automatically assigned to the key.<br />
7. Enter the required information in the fields provided, if necessary.
<strong>5330</strong>/<strong>5340</strong> <strong>IP</strong> <strong>Phones</strong> <strong>–</strong> <strong>User</strong> <strong>Guide</strong><br />
8. If you are programming any feature other than Speed Call, Message Waiting<br />
Indicator, Call Park and Call Park Retrieve, press Save and you are finished with this<br />
procedure. If you are programming Message Waiting Indicator and or Call Park,<br />
perform the following steps:<br />
• Press the Edit Number field.<br />
• Using the dial pad, enter the appropriate numbers that correspond to the phone<br />
whose messages you wish to be notified of (Message Waiting) or the directory<br />
number (Call Park).<br />
• Press Save.<br />
9. Press Close.<br />
To program a Phone Application:<br />
1. Press Settings.<br />
2. Press Programmable Keys.<br />
3. Press the key you wish to program.<br />
4. If Features are displayed, press View Applications.<br />
5. Select the desired application.<br />
6. Press Save.<br />
7. Press Close.<br />
- 50 -
To program Speed Call:<br />
Notes:<br />
1. Press Settings.<br />
2. Press Programmable Keys.<br />
- 51 -<br />
<strong>5330</strong>/<strong>5340</strong> <strong>IP</strong> <strong>Phones</strong> <strong>–</strong> <strong>User</strong> <strong>Guide</strong><br />
3. Press the key you wish to program. If it’s already programmed, press Clear Key.<br />
4. Press Speed Call.<br />
5. Press Edit Label and enter the label for the Speed Call.<br />
6. Press Save.<br />
7. Press Edit Number and enter the phone number for the Speed Call:<br />
• The maximum length is 26 characters.<br />
• 0-9, # and *. Pause and Flash are not allowed.<br />
• You can use dial pad to enter the number.<br />
8. Press Save, and then press Save again.<br />
9. Press Close.<br />
• To return to the Feature or Applications list at any time, press Cancel or View<br />
Applications.<br />
• You can also choose to Edit the Label, Clear Information, and Clear Key.<br />
Clear Programming from a Key<br />
You may wish to clear the programming from a key if you are no longer using it.<br />
To clear the feature or application programming from a key:<br />
1. Press Settings.<br />
2. Press Programmable Keys.<br />
3. Press the key you wish to clear.<br />
4. Press Clear Key.<br />
5. Press Close.
<strong>5330</strong>/<strong>5340</strong> <strong>IP</strong> <strong>Phones</strong> <strong>–</strong> <strong>User</strong> <strong>Guide</strong><br />
SETTING UP YOUR CONTACT LIST (<strong>5340</strong><br />
ONLY)<br />
Use the People application to set up your contact list.<br />
Adding Names to Your Contact List<br />
You can add a name to your contact list by entering it directly using the People application or<br />
by copying a number from the Call Info window. Since a contact’s phone number is<br />
mandatory and its name is optional, you are prompted to enter the number first.<br />
To add a name to your contact list using the People application:<br />
1. Open the People application.<br />
2. Press New.<br />
3. Enter the number.<br />
4. Press Save. The First Name window appears.<br />
5. Press the appropriate letters to spell the first name of your contact.<br />
6. Press Save.<br />
7. Press Close.<br />
Editing Information in Your Contact List<br />
1. Open the People application.<br />
2. Press the name you wish to edit.<br />
Note: If you wish to delete the name from your contact list, press Delete.<br />
3. Press Edit Name.<br />
4. In the on-screen keyboard, update the appropriate information (see Using the Dial<br />
Pad to Enter Information).<br />
5. Press Save.<br />
6. Press Edit Number.<br />
7. In the on-screen keyboard, update the appropriate information.<br />
8. Press Save followed by Close.<br />
- 52 -
MAKING AND ANSWERING CALLS<br />
You can make a call using one of the following methods:<br />
- 53 -<br />
<strong>5330</strong>/<strong>5340</strong> <strong>IP</strong> <strong>Phones</strong> <strong>–</strong> <strong>User</strong> <strong>Guide</strong><br />
• Dial a number from the People application (for the <strong>5340</strong> <strong>IP</strong> Phone only).<br />
• Press the programmed key associated with the party you want to call. For more<br />
information about programming keys, see Programming Features On Your Keys.<br />
• Dial the number using the dialpad.<br />
• Use Phone Book (see Phone Book below).<br />
Dial from your People Application (<strong>5340</strong> <strong>IP</strong> Phone only)<br />
To dial a contact from your People list:<br />
1. Open the People application.<br />
2. Use the navigation keys to page through the contact list and select the name.<br />
3. Dial the contact name using one of the following methods:<br />
• Select a contact name and press Dial.<br />
• Press the key to the right of the contact’s dial icon in the main list. (The contact<br />
name does not need to be selected.)<br />
4. Continue the call using the speakerphone or lift the handset.<br />
Phone Book<br />
To use Phone Book:<br />
1. Press Phone Book (if available) or the key programmed as Phone Book.<br />
2. Enter the name of the desired party, as follows:<br />
• For each letter in the name, press the appropriate key on the keypad until the letter<br />
is shown in the display. For example, if the letter C is required, press the digit 2<br />
three times.<br />
• Use the softkey before proceeding.<br />
• If required, press —> softkey to add a space between the first and last name.<br />
3. Press the Lookup softkey.
<strong>5330</strong>/<strong>5340</strong> <strong>IP</strong> <strong>Phones</strong> <strong>–</strong> <strong>User</strong> <strong>Guide</strong><br />
• If the system option “Phonebook Lookup <strong>–</strong> Default to <strong>User</strong> Location” is enabled<br />
for your phone, the search is limited to names that share your location; otherwise,<br />
the entire directory is searched.<br />
• If the system option “Phonebook Lookup <strong>–</strong> Display <strong>User</strong> Location” is enabled,<br />
after the phonebook search function displays the matching name and directory<br />
number, the user’s location is displayed. The display alternates between the<br />
name/number and the location every 2 seconds.<br />
4. If no match exists, edit the original entry.<br />
or<br />
If the system option “Phonebook with Location” is enabled, press Backup. ALL<br />
LOCATIONS? Is displayed. Press Yes to search the entire directory or press No to<br />
search for only names that share your location. Edit the name and press Lookup.<br />
5. If more than one match is found, press the Next softkey.<br />
6. Do one of the following:<br />
• To make the call, press the Call softkey.<br />
• To edit the entry, press the Backup softkey.<br />
• To exit, press Cancel or Superkey.<br />
Answer a Call<br />
Do one of the following:<br />
• Select the programmable line key or Float Key (see page 73) for the ringing line that<br />
is flashing.<br />
• Lift the handset or press (SPEAKER).<br />
End a Call<br />
Do one of the following:<br />
• Press Hang Up or Cancel ( ).<br />
• Replace the handset.<br />
• Press the key that you have programmed as Cancel.<br />
• If you are in Handsfree mode, press (SPEAKER).<br />
- 54 -
Redial<br />
To redial the last number that you manually dialed:<br />
1. Lift the handset (optional).<br />
2. Press (REDIAL).<br />
Redial - Saved Number<br />
To save the last number that you manually dialed:<br />
1. Lift the handset.<br />
2. Dial the appropriate feature access code.<br />
To Redial a saved number:<br />
1. Lift the handset.<br />
2. Dial the appropriate feature access code.<br />
Handsfree Operation<br />
To use Handsfree to make a call:<br />
- 55 -<br />
<strong>5330</strong>/<strong>5340</strong> <strong>IP</strong> <strong>Phones</strong> <strong>–</strong> <strong>User</strong> <strong>Guide</strong><br />
1. If you want to use a Non<strong>–</strong>Prime Line, press a Line Appearance key.<br />
Note: Your administrator must program Line Appearances to your phone.<br />
2. Dial the number.<br />
3. Begin speaking when the called party answers. Your phone's Handsfree microphone<br />
and Handsfree speaker transmit and receive audio.<br />
To use Handsfree operation to answer calls:<br />
1. Press the flashing line key or Float Key (see page 73).<br />
2. Begin speaking. Your phone's Handsfree microphone and Handsfree speaker transmit<br />
and receive audio.<br />
To hang up while using Handsfree operation:<br />
• Press (SPEAKER).<br />
To turn Mute on during Handsfree operation:<br />
• Press (MUTE). The Mute key light turns ON.
<strong>5330</strong>/<strong>5340</strong> <strong>IP</strong> <strong>Phones</strong> <strong>–</strong> <strong>User</strong> <strong>Guide</strong><br />
To turn Mute off and return to conversation:<br />
• Press (MUTE). The Mute key light turns OFF.<br />
To disable Handsfree operation:<br />
• Lift the handset.<br />
To return to Handsfree operation:<br />
1. Press (SPEAKER).<br />
2. Hang up the handset.<br />
Auto-Answer<br />
When the Auto-Answer feature is active, incoming calls ring briefly, and then the phone<br />
answers the call in Handsfree mode. You can continue the call handsfree or use the handset.<br />
To enable or disable Auto-Answer:<br />
• Press Auto-Answer key. (See Programming Features on Your Keys for instructions<br />
on programming features on your phone.) The key is highlighted and all incoming<br />
calls are answered in Handsfree mode.<br />
To switch from Handsfree mode to handset mode:<br />
• Lift the handset<br />
To end a call, do one of the following:<br />
• Press (Cancel)<br />
• Press the Hang Up softkey.<br />
• Wait for the caller to hang up.<br />
Using the Analog line<br />
The phone can support the Line Interface Module. See Using the Line Interface Module for<br />
more information.<br />
- 56 -
CALL HANDLING<br />
Hold<br />
To place a call on Hold:<br />
1. Press (HOLD).<br />
- 57 -<br />
<strong>5330</strong>/<strong>5340</strong> <strong>IP</strong> <strong>Phones</strong> <strong>–</strong> <strong>User</strong> <strong>Guide</strong><br />
2. Press the key that you have programmed as Hold. The indicator flashes on the line<br />
that has the held call.<br />
Note: You can only retrieve a call from hold when the phone is idle.<br />
To retrieve a call from Hold, do one of the following:<br />
• Lift the handset and press the flashing line key or Float Key (see page 73).<br />
• Press the flashing indicator.<br />
• Use the Add Held feature to conference into the held call.<br />
To retrieve a call from Hold at another phone, do one of the following:<br />
• Press the flashing line key.<br />
• Dial the appropriate feature access code and the number of the station that placed the<br />
call on Hold.<br />
Mute<br />
Mute lets you temporarily turn your phone's handset, headset or handsfree microphone off<br />
during a call.<br />
To turn Mute on during a call:<br />
• Press (MUTE). The (MUTE) light turns ON.<br />
To turn Mute off and return to the conversation:<br />
• Press (MUTE). The (MUTE) light turns OFF.<br />
Note: If you are on a Handsfree MUTED call and you lift the handset, the handset<br />
microphone is automatically enabled and the MUTE light turns OFF.<br />
NOTE FOR USERS ON RESILIENT 3300 ICP SYSTEMS: If your phone switches to the<br />
secondary system while your speaker or handset is muted (that is, while the Mute key is lit)<br />
the call remains muted until you hang up.
<strong>5330</strong>/<strong>5340</strong> <strong>IP</strong> <strong>Phones</strong> <strong>–</strong> <strong>User</strong> <strong>Guide</strong><br />
Transfer<br />
To Transfer an active call:<br />
1. Press (TRANS/CONF).<br />
2. Dial the number of the third party.<br />
3. Do one of the following:<br />
• To complete the Transfer, hang up.<br />
• To announce the Transfer, wait for an answer, consult, and hang up.<br />
• To cancel the Transfer, press (CANCEL).<br />
To transfer an active call during headset operation:<br />
1. Press (TRANS/CONF).<br />
2. Dial the number of the third party.<br />
3. To complete the Transfer, press the Release feature key.<br />
Conference<br />
To form a Conference when a two<strong>–</strong>party call is already in place, or to add another party to an<br />
existing Conference:<br />
1. Press (TRANS/CONF).<br />
2. Dial the number of the next party.<br />
3. Wait for an answer.<br />
4. Press (TRANS/CONF).<br />
To leave a Conference:<br />
• Hang up or press (CANCEL).<br />
Conference Split<br />
To Split a Conference and speak privately with the original party:<br />
• Press the Split softkey.<br />
- 58 -
Add Held<br />
To move a call on hold to another line appearance:<br />
1. Press an available line key.<br />
2. Press the AddHeld softkey.<br />
3. Press the flashing line key.<br />
To add a call on Hold to an existing conversation or conference:<br />
1. Press the AddHeld softkey.<br />
2. Press the flashing line key.<br />
Swap<br />
To call another party when you are in an established two<strong>–</strong>party call:<br />
1. Press (TRANS/CONF).<br />
2. Dial the number.<br />
To alternate between the two parties:<br />
• Press the Trade Calls softkey.<br />
Call Forwarding<br />
- 59 -<br />
<strong>5330</strong>/<strong>5340</strong> <strong>IP</strong> <strong>Phones</strong> <strong>–</strong> <strong>User</strong> <strong>Guide</strong><br />
Call Forward lets you redirect incoming calls to an alternate number when<br />
• your phone is busy,<br />
• when you're not answering, or<br />
• all the time.<br />
You can program, activate, and deactivate Call Forward Always quickly through the<br />
Applications screen while you have other types of Call Forwarding, such as Busy External,<br />
activated through your Call Forwarding profiles.<br />
For example, you can enable profiles to forward calls to your voice mailbox when your<br />
phone is busy or unanswered. Then, if you must leave your desk, you can quickly enable Call<br />
Forward Always to another phone, such as your home phone or cell. After you return to your<br />
desk and deactivate Call Forwarding Always, your profiles for busy or unanswered<br />
conditions remain active.
<strong>5330</strong>/<strong>5340</strong> <strong>IP</strong> <strong>Phones</strong> <strong>–</strong> <strong>User</strong> <strong>Guide</strong><br />
USING QUICK CALL FORWARD ALWAYS<br />
To program and enable Call Forward Always:<br />
1. Launch Applications and press Call Forwarding<br />
or<br />
Press the Forwarding feature key.<br />
2. If a number is already programmed, you can<br />
• Press Activate to enable forwarding to the current number<br />
or<br />
• Enter a new destination number and then press Activate.<br />
Note: Call Forward Always takes precedence over all other types of forwarding.<br />
To deactivate Call Forward Always:<br />
1. Launch Applications and press Call Forwarding<br />
or<br />
Press the Forwarding feature key<br />
2. Press Deactivate.<br />
PROGRAMMING CALL FORWARDING USING PROFILES<br />
You can create Call Forward profiles that identify where to send your incoming calls. After<br />
you create and save a Call Forward profile in the Call Forwarding application, you can<br />
enable or disable the profile at any time.<br />
Notes:<br />
• The None Profile is a default profile provided by the system. It has no numbers<br />
programmed. Use the None Profile to turn off all Call Forwarding.<br />
• The default profile appears when the Call Forwarding set up does not match any of<br />
your profiles.<br />
• Only one call profile can be active at a time.<br />
• The dotted radio button icon next to the profile shows the current active profile.<br />
- 60 -
To create a Call Forward profile:<br />
1. Launch Applications and press Call Forwarding<br />
or<br />
Press the Forwarding feature key.<br />
2. Press Profiles.<br />
3. Press New Profile.<br />
4. Press Edit Profile Name. An on-screen keyboard displays.<br />
- 61 -<br />
<strong>5330</strong>/<strong>5340</strong> <strong>IP</strong> <strong>Phones</strong> <strong>–</strong> <strong>User</strong> <strong>Guide</strong><br />
5. Press the appropriate keys in the on-screen keyboard to enter the profile name and<br />
press Save. This profile name identifies where your phone calls will be forwarded to.<br />
6. Select the check box opposite the desired type of Call Forwarding:<br />
• Always: forwards all your phone calls<br />
• Busy Internal: forwards internal phone calls after several rings if your line is<br />
busy<br />
• Busy External: forwards external phone calls after several rings if your line is<br />
busy<br />
• No Answer Int: forwards internal phone calls redirects your calls after several<br />
rings if you don't answer<br />
• No Answer Ext: forwards external phone calls redirects your calls after several<br />
rings if you don't answer<br />
7. Press Edit Number to display the on-screen keyboard. In the on-screen keyboard,<br />
enter the appropriate number.<br />
8. Press Save.<br />
9. Press Enable.<br />
10. Press Save.<br />
11. Repeat Step 6 to Step 10 for each Call Forwarding type that you wish to program.<br />
12. Press Save. This profile is saved but it is not activated. To activate this profile, see<br />
Activate Call Forward below.<br />
13. Press Close.<br />
14. Press Close.<br />
Note: Press Cancel at any time to exit this application without making any changes.
<strong>5330</strong>/<strong>5340</strong> <strong>IP</strong> <strong>Phones</strong> <strong>–</strong> <strong>User</strong> <strong>Guide</strong><br />
ACTIVATE CALL FORWARD<br />
To turn Call Forward on once it has been programmed:<br />
1. Press the blue Applications key.<br />
2. Press Call Forwarding.<br />
3. Press Profiles.<br />
4. Press the appropriate Profile setting.<br />
5. Press Activate.<br />
6. Press Close.<br />
CANCEL CALL FORWARD<br />
To cancel Call Forward:<br />
1. Press the blue Applications key.<br />
2. Press Call Forwarding.<br />
3. Press Profiles.<br />
4. Press None setting.<br />
5. Press Activate.<br />
6. Press Close.<br />
- 62 -
USING OTHER FEATURES<br />
Account Codes<br />
- 63 -<br />
<strong>5330</strong>/<strong>5340</strong> <strong>IP</strong> <strong>Phones</strong> <strong>–</strong> <strong>User</strong> <strong>Guide</strong><br />
An account code is a series of digits that you assign to your calls, usually for accounting<br />
purposes. The code identifies the account in the call records that your system generates. A<br />
forced account code is usually entered from another extension, enabling you to use features<br />
or make calls that the extension otherwise could not. If you want this feature enabled on your<br />
phone, ask your System Administrator.<br />
To use Account Codes:<br />
1. Lift the handset.<br />
2. Dial the Account Code digits.<br />
3. Press #.<br />
To enter an Account Code during a call:<br />
1. Press Superkey (must be programmed to a key).<br />
2. Select Account Code.<br />
3. Dial the Account Code digits.<br />
4. Press the Save softkey.<br />
5. Do one of the following:<br />
ACD<br />
• For a verified account code, press the Yes key.<br />
• For a non-verified account code, press the No key.<br />
If your phone is ACD-enabled, you can log in as an agent. When there is no agent logged<br />
onto an ACD-enabled set, LOGGED OUT is displayed.<br />
To log in as an ACD agent:<br />
1. Press Superkey.<br />
2. Press Yes.<br />
3. Enter your Agent ID, using the key pad.<br />
4. Press Enter.<br />
The text, LOGGED OUT disappears.
<strong>5330</strong>/<strong>5340</strong> <strong>IP</strong> <strong>Phones</strong> <strong>–</strong> <strong>User</strong> <strong>Guide</strong><br />
Attendant Call Hold - Remote Retrieve<br />
To retrieve a call placed on Hold by the attendant:<br />
1. Lift the handset.<br />
2. Dial the appropriate feature access code.<br />
3. Dial the digits announced by the attendant.<br />
Callback<br />
The Callback feature allows you to be notified when a busy phone becomes free or when a<br />
phone has been used after a no-answer condition was encountered.<br />
To request a Callback when you reach a busy or unanswered station:<br />
1. Press Call Me Back.<br />
2. Hang up.<br />
When the party is available, your phone starts ringing, and the display shows the Callback<br />
ringing indicator.<br />
To answer a Callback:<br />
• When you see the Callback ringing indicator, lift the handset, or press the Float Key<br />
(flashing with the calling party’s name label; see page 73).<br />
Call Forward - Remote (I'm Here)<br />
To forward calls from a remote station to your current location:<br />
1. Press Superkey (must be programmed to a key).<br />
2. Press the No softkey until "Call Forwarding?" appears.<br />
3. Press the Forwarding softkey.<br />
4. Press the Next softkey until "I Am Here" appears.<br />
5. Press the To Me softkey.<br />
6. Dial the extension of the remote station.<br />
If you make an error while dialing, use the
- 65 -<br />
<strong>5330</strong>/<strong>5340</strong> <strong>IP</strong> <strong>Phones</strong> <strong>–</strong> <strong>User</strong> <strong>Guide</strong><br />
To cancel Call Forward <strong>–</strong> Remote from the station that set the remote forwarding:<br />
1. Lift the handset.<br />
2. Dial the appropriate feature access code.<br />
3. Dial the extension of the remote station.<br />
4. Hang up.<br />
To cancel Call Forward <strong>–</strong> Remote from the station that was forwarded:<br />
1. Press Superkey (must be programmed to a key).<br />
2. Press the No softkey until "Call Forwarding?" appears.<br />
3. Press the Forwarding softkey.<br />
4. Press the Review softkey.<br />
5. Press the Change Key softkey.<br />
6. Press the Turn FWD Off softkey.<br />
7. Press Superkey (must be programmed to a key).<br />
Call Forward - End Chaining<br />
To ensure that calls do not get forwarded again by the destination number:<br />
1. Lift the handset.<br />
2. Dial 64.<br />
3. Hang up.<br />
To again allow calls to be forwarded by the destination number:<br />
1. Lift the handset.<br />
2. Dial the appropriate feature access code.<br />
3. Hang up.<br />
Call Forward - Forced<br />
To force an incoming call to be forwarded:<br />
• Press the Forward softkey.
<strong>5330</strong>/<strong>5340</strong> <strong>IP</strong> <strong>Phones</strong> <strong>–</strong> <strong>User</strong> <strong>Guide</strong><br />
Call Forward - Override<br />
To override Call Forward and ring a station:<br />
1. Lift the handset.<br />
2. Dial the appropriate feature access code.<br />
3. Dial the extension number.<br />
Call Park<br />
The Call Park feature allows you to place a call in a special hold state. You, or someone else,<br />
can then retrieve the call from any extension in the system.<br />
After parking the call, the system can automatically connect you to paging equipment so that<br />
you can announce the call to the requested party.<br />
To park an active call:<br />
1. Do one of the following:<br />
• Press the Call Park feature key (must be programmed)<br />
• Press (TRANS/CONF), and then dial the appropriate feature access code.<br />
The display shows PARKED@, followed by the park destination and parking spot<br />
index (if applicable). Example: PARKED@ 1234 @ 02.<br />
2. Dial the directory number on which to park the call (not required if the number is<br />
programmed to the Call Park feature key).<br />
3. To inform a user that a parked call is waiting, do one of the following:<br />
• If automatic paging is enabled, announce the call and the park retrieve digits<br />
shown on the display.<br />
• If automatic paging is disabled, press the programmed Page key, or dial the<br />
appropriate feature access code, followed by the Paging zone number (if<br />
required). Then, announce the call and park retrieve digits shown on the display.<br />
Note: Paging over a loudspeaker is not permitted in handsfree mode; you must use the<br />
handset or headset.<br />
To retrieve a parked call:<br />
1. Do one of the following:<br />
• Dial the appropriate feature access code.<br />
• Press the Call Park - Retrieve feature key (must be programmed).<br />
- 66 -
- 67 -<br />
<strong>5330</strong>/<strong>5340</strong> <strong>IP</strong> <strong>Phones</strong> <strong>–</strong> <strong>User</strong> <strong>Guide</strong><br />
2. Dial the directory number on which the call is parked (not required if the number is<br />
programmed to the Call Park feature key).<br />
3. If there are multiple calls parked on the number, dial the two-digit index number to<br />
retrieve a specific call, or # to retrieve the longest parked call.<br />
Call Pickup<br />
To answer a call that is ringing at another extension in your Pickup Group:<br />
1. Lift the handset.<br />
2. Press the key that you programmed as Pickup.<br />
To answer a call that is ringing at another extension not in your Pickup Group:<br />
1. Lift the handset.<br />
2. Dial the appropriate feature access code.<br />
3. Dial the number of the ringing station.<br />
Campon<br />
When you get a busy tone, you can use the Campon feature to be notified when the busy<br />
party becomes available.<br />
To Campon to a busy station:<br />
• Press the I Will Wait softkey.<br />
To retrieve a call when you hear the Campon tone:<br />
• You can use the Trade Call or Call Swap feature with the (TRANS/CONF)<br />
hardkey or a programmable line key.
<strong>5330</strong>/<strong>5340</strong> <strong>IP</strong> <strong>Phones</strong> <strong>–</strong> <strong>User</strong> <strong>Guide</strong><br />
Direct Paging<br />
Direct Paging allows you to page a party through their handsfree speaker. If the paged party<br />
has Off-Hook Voice Announce enabled, the page will be heard even when the party is on a<br />
handset or headset call. If the paged party has Handsfree Answerback enabled and turned on<br />
on the phone, your page automatically establishes a handsfree call with the paged party.<br />
To page a party:<br />
1. Lift the handset.<br />
2. Press the Direct Paging feature key or dial the appropriate feature access code.<br />
3. Dial the extension number.<br />
4. Speak to the dialed party after the tone.<br />
How you answer a Direct Page depends on whether Handsfree Answerback is enabled and<br />
turned on at your phone. See one of the following procedures in this guide:<br />
• Direct Paging - Handsfree Answerback Enabled<br />
• Direct Paging - Handsfree Answerback Disabled<br />
DIRECT PAGING - HANDSFREE ANSWERBACK ENABLED<br />
When you receive a Direct Page, Handsfree Answerback automatically establishes a<br />
Handsfree call on your phone after a single burst of tone.<br />
Your administrator enables or disables Handsfree Answerback on your phone. After your<br />
administrator enables Handsfree Answerback, you can choose to turn it on or off directly<br />
from your phone.<br />
To turn Handsfree Answerback on:<br />
• When your phone is idle, press (MUTE) once. The MUTE key light flashes to<br />
indicate that Handsfree Answerback is ON.<br />
• When a Direct Page arrives, the MUTE key light turns OFF and a Handsfree call is<br />
automatically established.<br />
To turn Handsfree Answerback off:<br />
• Press the flashing (MUTE) key once. The MUTE key light turns OFF.<br />
• To respond to a Direct Page when Handsfree Answerback is OFF, see "Direct Page -<br />
Handsfree Answerback Disabled" elsewhere in this guide.<br />
Note: By default, Handsfree Answerback is turned OFF at your phone. If the (MUTE)<br />
key is OFF when your set is idle, Handsfree Answerback is OFF.<br />
- 68 -
To answer a call using Handsfree Answerback:<br />
Phone state before Page arrives To answer the Direct Page<br />
Phone is idle and MUTE<br />
is flashing<br />
You are on a handset or headset<br />
call, and MUTE is OFF<br />
You are on a MUTED<br />
handset/headset call, OR, you are<br />
on a Handsfree call<br />
To end a Handsfree Answerback call:<br />
1. Check that MUTE is OFF.<br />
2. Listen for the paging party.<br />
3. Begin speaking.<br />
- 69 -<br />
<strong>5330</strong>/<strong>5340</strong> <strong>IP</strong> <strong>Phones</strong> <strong>–</strong> <strong>User</strong> <strong>Guide</strong><br />
4. Lift the handset if you wish to switch from a<br />
Handsfree call to a handset call.<br />
1. Check that MUTE is flashing.<br />
• Press either (SPEAKER) or (CANCEL).<br />
2. Press MUTE. The light turns ON solid, and you are<br />
now speaking to the paging party and have muted<br />
your handset/headset call.<br />
3. Speak to the paging party. Press MUTE to alternate<br />
between handset/headset and handsfree calls.<br />
The party paging you receives a busy tone. Handsfree<br />
Answerback does not interrupt your call.<br />
When the Handsfree Direct Page call ends, the MUTE key light returns to the state it was in<br />
before the call was established.
<strong>5330</strong>/<strong>5340</strong> <strong>IP</strong> <strong>Phones</strong> <strong>–</strong> <strong>User</strong> <strong>Guide</strong><br />
DIRECT PAGING - HANDSFREE ANSWERBACK DISABLED<br />
Your administrator enables or disables Handsfree Answerback and you can also turn it on or<br />
off on your phone. To turn Handsfree Answerback off, see "Direct Paging - Handsfree<br />
Answerback Enabled" elsewhere in this guide. When Handsfree Answerback is disabled on<br />
your phone and you receive a Direct Page, the Direct Page is indicated by a single burst of<br />
tone.<br />
To answer Direct Page calls when Handsfree Answerback is disabled:<br />
Phone state before Page<br />
arrives:<br />
To answer the Direct Page<br />
(indicated by single burst of tone):<br />
Phone is idle and MUTE is OFF. 1. Check that MUTE is ON solid.<br />
You are on a handset call or<br />
headset call, and MUTE is OFF<br />
You are on a MUTED<br />
handset/headset call, OR, you are<br />
on a Handsfree call<br />
2. Lift the handset OR press the MUTE key to answer<br />
in Handsfree mode. (The light turns OFF.)<br />
3. Begin speaking.<br />
To end a Direct Page call, do one of the following:<br />
• Hang up the handset to end a handset call.<br />
1. Check that MUTE is flashing.<br />
• Press (SPEAKER) to end a Handsfree call.<br />
• Press (CANCEL).<br />
2,. Press MUTE. The light turns ON solid and you are<br />
now speaking to the paging party and have MUTED<br />
your handset/headset call.<br />
3. Speak to the paging party. Press MUTE to alternate<br />
between handset and handsfree calls.<br />
The party paging you receives a busy tone. Handsfree<br />
Answerback does not interrupt your call.<br />
When the Handsfree Direct Page call ends, the (MUTE) key light returns to the state it was in<br />
before the call was established.<br />
- 70 -
Direct Voice Call<br />
- 71 -<br />
<strong>5330</strong>/<strong>5340</strong> <strong>IP</strong> <strong>Phones</strong> <strong>–</strong> <strong>User</strong> <strong>Guide</strong><br />
Direct Voice Call feature allows you to establish a two-way handsfree call at another<br />
extension whether or not it has Handsfree Answerback or Auto-Answer turned on. Only<br />
extensions programmed by the system administrator to receive Direct Voice Calls can be<br />
called using this feature.<br />
To make a Direct Voice Call:<br />
1. Lift handset.<br />
2. Dial the appropriate feature access code.<br />
3. Dial the extension you want.<br />
4. Speak to called party.<br />
Do Not Disturb<br />
When you enable Do Not Disturb, callers will get a busy tone, and an on-screen text message<br />
indicating that you do not wish to be disturbed.<br />
To activate or deactivate Do Not Disturb:<br />
Press the Do Not Disturb key that you programmed. The key is highlighted when Do Not<br />
Disturb is activated and is not highlighted when Do Not Disturb is not activated. The phone<br />
status line shows the Do Not Disturb icon.<br />
To activate Do Not Disturb from a remote extension:<br />
5. Lift handset.<br />
6. Dial the number of the station to which Do Not Disturb is to apply.<br />
7. Hang up.<br />
To deactivate Do Not Disturb from a remote station:<br />
1. Lift handset.<br />
2. Dial the appropriate feature access code.<br />
3. Dial the number of the station with Do Not Disturb activated.<br />
4. Hang up.
<strong>5330</strong>/<strong>5340</strong> <strong>IP</strong> <strong>Phones</strong> <strong>–</strong> <strong>User</strong> <strong>Guide</strong><br />
Emergency Calls<br />
Warning for emergency number dialing: Consult your local authorities for Emergency<br />
Numbers and 911 or equivalent service availability in your area.<br />
There are two methods of dialing emergency numbers, based on the programming of your<br />
3300 ICP:<br />
• Emergency Call Routing NOT programmed<br />
• Emergency Call Routing programmed<br />
CAUTION: Verify with your System Administrator which type of emergency number<br />
dialing you can use.<br />
EMERGENCY CALLS WHEN EMERGENCY CALL ROUTING NOT<br />
PROGRAMMED<br />
If Emergency Call Routing is NOT programmed, Emergency Number dialing should<br />
only be performed by picking up the handset and selecting the Analog Line key you<br />
have programmed. If Privacy Mode is enabled and the Analog Line key local line is<br />
busy, dialing will not occur on the Line Interface Module line. Emergency dialing using<br />
an <strong>IP</strong> connection may not be supported due to ICP system configuration and country<br />
location. For more information, contact your System Administrator.<br />
To make an Emergency Call using the Line Interface Module line:<br />
1. Lift the handset.<br />
2. Press the Analog Line key that you have programmed.<br />
The set indicates ANALOG CALL<br />
3. Dial your Local Emergency Number.<br />
To make an Emergency Call using the Line Interface Module line, when the <strong>IP</strong> connection<br />
has failed:<br />
1. Lift the handset.<br />
2. Press the Analog Line key that you have programmed.<br />
The set indicates <strong>IP</strong> FAIL: ANALOG CALL.<br />
3. Dial your Local Emergency Number.<br />
- 72 -
- 73 -<br />
<strong>5330</strong>/<strong>5340</strong> <strong>IP</strong> <strong>Phones</strong> <strong>–</strong> <strong>User</strong> <strong>Guide</strong><br />
EMERGENCY CALLS WHEN EMERGENCY CALL ROUTING PROGRAMMED<br />
Note: This procedure is in addition to the methods described above.<br />
To make an Emergency Call if Emergency Call Routing is programmed:<br />
1. Lift the handset.<br />
2. Dial your Local Emergency Number (911 or equivalent).<br />
For more information on using the Line Interface Module line, refer to Using the Line<br />
Interface Module.<br />
Float Keys (<strong>5340</strong> <strong>IP</strong> Phone)<br />
The <strong>5340</strong> <strong>IP</strong> Phone offers 48 programmable multi-function keys for one-touch feature access.<br />
You can program three of these keys as float keys. Float keys are typically used to display<br />
unanswered ringing lines on designated keys where the ringing lines would otherwise be<br />
hidden on one of the phone’s application pages. The location of the Float keys is shown in<br />
the following figure:<br />
Up to three concurrent incoming calls with associated labels can appear on the Float keys.
<strong>5330</strong>/<strong>5340</strong> <strong>IP</strong> <strong>Phones</strong> <strong>–</strong> <strong>User</strong> <strong>Guide</strong><br />
The labels are presented in reverse video (white on black background). Float keys can also be<br />
used to support ringing line queues <strong>–</strong> due to the number of ringing lines at any one time, you<br />
are able to view the queue of unanswered “floated” lines, and answer them as quickly as<br />
possible.<br />
Only the following line types are supported for float keys on <strong>5340</strong>:<br />
• Single Line<br />
• Key System<br />
• Multicall<br />
PROGRAMMING FLOAT KEYS<br />
You program the Float Keys using the Settings application on the <strong>5340</strong> phone. You are able<br />
to program the Float Keys essentially as a mirror of any of the lines programmed on the 48<br />
programmable keys. The Float Keys reflect the state of those lines including indicators and<br />
labels, and allows you to access those lines without having to navigate to the pages where<br />
those keys may be displayed. Any answered floating line remains floating for the duration of<br />
the call, regardless of the manner in which it was answered.<br />
To enable float keys:<br />
1. Press Applications.<br />
2. Press Settings.<br />
3. Press Float Keys.<br />
4. Press Enable.<br />
5. Press Save.<br />
To program Float Keys using the Settings Application:<br />
1. Press Applications.<br />
2. Press Settings.<br />
3. Press Programmable Keys.<br />
4. Press one of the line keys that you want to appear on a Float Key. Use the Page<br />
Navigator keys to move through the list of programmed lines if necessary. The Float<br />
Configuration display appears.<br />
5. Press a key corresponding to your desired float configuration (see figure below):<br />
Float Immediate <strong>–</strong> configure the unanswered incoming call on the designated line to<br />
appear at the Float Key immediately<br />
Float after. . . <strong>–</strong> configure unanswered incoming calls to display on a Float Key<br />
after a delay of up to 60 seconds<br />
- 74 -
- 75 -<br />
<strong>5330</strong>/<strong>5340</strong> <strong>IP</strong> <strong>Phones</strong> <strong>–</strong> <strong>User</strong> <strong>Guide</strong><br />
Do Not Float <strong>–</strong> configure unanswered incoming calls to never displayed on a Float<br />
Key (this is the default setting)<br />
6. Repeat steps 3 <strong>–</strong> 5 for every line key that you want to appear on the float keys.<br />
7. Press Save.<br />
8. Press Close.<br />
To disable float keys<br />
1. Press Applications.<br />
2. Press Settings.<br />
3. Press Float Keys.<br />
4. Press Disable.<br />
5. Press Save.<br />
USING FLOAT KEYS<br />
You can set up more than three lines to float. As lines ring, they get placed into a queue<br />
which will display the first three in the float key area. If there are more than three lines<br />
configured to float, as Float Key positions are freed up, the next lines in the queue get<br />
displayed. Press the Float key of the ringing line to answer a call.
<strong>5330</strong>/<strong>5340</strong> <strong>IP</strong> <strong>Phones</strong> <strong>–</strong> <strong>User</strong> <strong>Guide</strong><br />
Group Listen<br />
With Group Listen, you can carry on a conversation using the handset or headset while<br />
allowing others nearby to listen to the person at the far end over the handsfree speaker. The<br />
handsfree microphone is disabled in Group Listen mode.<br />
To activate Group Listen while in a handset conversation:<br />
• Press the Group Listen key.<br />
Audio from the far-end party is now heard through both the handset/headset and the<br />
speaker.<br />
To make the call a normal two-way speaker call:<br />
• Press (SPEAKER).<br />
To exit Group Listen mode (and return to a normal handset/headset call):<br />
• Press the Group Listen key.<br />
To activate or deactivate Group Listen while in headset mode:<br />
• Press the Group Listen key.<br />
Group Paging / Meet Me Answer<br />
Group Paging allows you to page a group of telephones through their built-in speakers. You<br />
can belong to as many as three paging groups with one group designated as your "prime"<br />
group.<br />
When you need to respond to a Group Page but don't know the identity or extension number<br />
of the paging party, use the Meet Me Answer feature. You have up to 15 minutes after<br />
receiving the page to use Meet Me Answer.<br />
To make a Group Page:<br />
1. Lift the handset.<br />
2. Press Direct Page or dial the appropriate feature access code.<br />
3. Do one of the following:<br />
• To page your prime page group, press #.<br />
• To page a specific page group, dial the page group directory number.<br />
4. Speak to the dialed party after the tone.<br />
- 76 -
To respond to a Group Page by using Meet Me Answer:<br />
1. Lift handset.<br />
- 77 -<br />
<strong>5330</strong>/<strong>5340</strong> <strong>IP</strong> <strong>Phones</strong> <strong>–</strong> <strong>User</strong> <strong>Guide</strong><br />
2. Press the key you have programmed to Meet Me Answer or dial the appropriate<br />
feature access code.<br />
(See Programming Features on Your Phone for instructions on programming features<br />
to your phone.)<br />
3. Do one of the following:<br />
• To respond to a page from your prime page group, press #.<br />
• To respond to a page from a specific page group, dial the page group directory<br />
number.<br />
Headset Operation<br />
Note: For information about the Cordless Headset, see “USING THE CORDLESS<br />
HEADSET” on page 110.<br />
To enable Headset Operation:<br />
• Press the Headset feature key.<br />
To answer a call (when Auto Answer is disabled):<br />
• Press the flashing line key or Float Key.<br />
To answer call (when Call Notification is enabled)<br />
• Select Close and then select the prime line.<br />
To hang up:<br />
• Press (CANCEL).<br />
To mute your headset microphone:<br />
• Press the (MUTE) key. The light turns ON.<br />
To turn mute off and return to the conversation:<br />
• Press the (MUTE) key. The light turns OFF.
<strong>5330</strong>/<strong>5340</strong> <strong>IP</strong> <strong>Phones</strong> <strong>–</strong> <strong>User</strong> <strong>Guide</strong><br />
Hot Desking<br />
Hot Desking allows you to log into the telephone system from any phone designated as a Hot<br />
Desk phone. When you log in at the phone using your assigned Hot Desk <strong>User</strong> Extension<br />
Number, the phone assumes all your speed dials, features keys, call forwarding setup, and<br />
line appearances - even your language preference for the display. Any changes you make to<br />
the phone while you are logged in--for example, adding a speed dial--are saved to your<br />
personal profile. Logging in activates your profile on any phone that supports Hot Desking.<br />
When you log in as a hot desk user, Call History data is updated for you. You do not see any<br />
call logs for the phones registered DN; you only see your history data. When you log out, the<br />
registered DNs history data is displayed. To access your voice mail when you are logged in<br />
as a hot desk user, you must log in to your voice mail.<br />
To log into a Hot Desking phone (the phone must be idle):<br />
1. Press the key you have programmed to HotDesking.<br />
2. Press the Login key.<br />
3. Using the phone keys, enter your Hot Desk <strong>User</strong> Extension Number, and then press<br />
OK.<br />
4. Enter your pin number and press OK.<br />
While logged in as a hot desk user, the phone status line shows the Hot Desk icon.<br />
To log out of Hot Desking phone (the phone must be idle):<br />
1. Press the key you have programmed to HotDesking.<br />
2. Press the Logout command key.<br />
3. Press the Confirm command key.<br />
Note: Your profile can only be active on one phone at a time. If you log in from another<br />
phone without logging out from the first one, the system will automatically deactivate your<br />
profile on the first phone.<br />
Hot Desk Remote Logout<br />
A user who has forgotten to log out of a Hot Desking phone can be logged out from a phone<br />
that is configured to allow Hot Desk Remote Logout.<br />
Note: This feature must be allowed by your System Administrator via the Class of Service.<br />
To remotely log out a Hot Desking phone:<br />
1. Dial 111.<br />
- 78 -
- 79 -<br />
<strong>5330</strong>/<strong>5340</strong> <strong>IP</strong> <strong>Phones</strong> <strong>–</strong> <strong>User</strong> <strong>Guide</strong><br />
2. Dial the Hot Desk <strong>User</strong> Extension Number that you want to log out.<br />
3. Press the Logout command key.<br />
4. Press the Confirm command key.<br />
Hot Desk - PIN Change<br />
To change your Hot Desk PIN:<br />
1. Log into a Hot Desking phone.<br />
2. Press Superkey (must be programmed to a key).<br />
3. Press the HotDesk PIN softkey.<br />
4. Press the Yes softkey.<br />
5. Enter the current PIN or skip to step 6 if a PIN has not yet been assigned.<br />
6. Press the Enter softkey.<br />
7. Enter the new PIN.<br />
The PIN can include digits from 0 to 9 only and can be from 0 to 8 characters in<br />
length.<br />
8. Press the Enter softkey.<br />
9. Re-enter the new PIN.<br />
10. Press Superkey.<br />
Make Busy<br />
You can use the Make Busy feature to have your phone appear busy to other callers. If callers<br />
dial your phone number when Make Busy is enabled a message indicating that your line is<br />
busy is displayed on their phones.<br />
To enable Make Busy:<br />
• Press the key you programmed to Make Busy. The key illuminates when Make Busy<br />
is activated and MAKE BUSY is displayed.<br />
To disable Make Busy:<br />
• Press the key you programmed to Make Busy.
<strong>5330</strong>/<strong>5340</strong> <strong>IP</strong> <strong>Phones</strong> <strong>–</strong> <strong>User</strong> <strong>Guide</strong><br />
Message Waiting Indicator<br />
The Message Waiting Indicator (MWI) feature allows you to be notified when messages<br />
have been left on another phone. Once you have programmed a key to MWI, this key is<br />
always enabled.<br />
To use MWI to contact the extension that left a message:<br />
• Press the key you have programmed to MWI.<br />
Messaging - Advisory<br />
Advisory Messaging enables you to select a notice that appears on your phone display to<br />
inform people visiting your desk of your whereabouts. Select from a variety of advisory<br />
messages, including "On vacation", "In a meeting", or "Out to Lunch".<br />
To turn Messaging - Advisory on:<br />
1. Press Superkey (must be programmed to a key).<br />
2. If necessary, press the No softkey until "Advisory Msgs” appears.<br />
3. Press the Advisory softkey.<br />
4. Press the Next softkey until the desired message appears.<br />
5. Press the Turn Msg On softkey.<br />
To turn Messaging - Advisory off:<br />
1. Press Superkey (must be programmed to a key).<br />
2. If necessary, press the No softkey until "Advisory Msgs" appears. .<br />
3. Press the Yes softkey when "Advisory appears.<br />
4. Press the Turn Msg Off softkey .<br />
- 80 -
Messaging - Callback<br />
To leave a Callback Message when you hear busy or ringback tone:<br />
• Press (MESSAGE) or press the Callback softkey.<br />
To respond to a message waiting condition on your phone:<br />
1. Press (MESSAGE).<br />
- 81 -<br />
<strong>5330</strong>/<strong>5340</strong> <strong>IP</strong> <strong>Phones</strong> <strong>–</strong> <strong>User</strong> <strong>Guide</strong><br />
2. If a password is required, dial your password (and press the Enter softkey if<br />
available).<br />
3. Press the Read Message softkey, and do one or all of the following:<br />
• To display the time the message was sent, press the More Msg softkey.<br />
• To display the number of the caller, press the More Msg softkey twice.<br />
• To call the message sender, press the Call softkey.<br />
• To delete the message, press the Erase Msg softkey.<br />
• To view the next message, press (MESSAGE).<br />
You can check for messages from a remote station:<br />
1. Press Superkey (must be programmed to a key).<br />
2. Press the No softkey until "Remote Msging?" appears.<br />
3. Press the Yes softkey.<br />
4. Dial your extension number.<br />
5. Press the Enter softkey.<br />
6. If a password is required, enter your password and press the Enter softkey.<br />
7. Press the Yes softkey.<br />
You can set, change, or clear a password (up to 7 digits, not including 0):<br />
1. Press Superkey (must be programmed to a key).<br />
2. Press the No softkey until "Set Password?" appears.<br />
3. Press the Yes softkey.<br />
4. Do one of the following:<br />
• To enter a new password, enter your password.
<strong>5330</strong>/<strong>5340</strong> <strong>IP</strong> <strong>Phones</strong> <strong>–</strong> <strong>User</strong> <strong>Guide</strong><br />
• To change or clear your password, enter your current password.<br />
5. Press the Enter softkey.<br />
6. To change or clear your password, do one of the following:<br />
• To change your password, enter your new password and press the Enter softkey.<br />
• To clear your password, enter 0.<br />
7. Enter your new password again.<br />
8. If you are setting up or changing a password, press the Enter softkey.<br />
9. Press Superkey (must be programmed to a key).<br />
Messaging - Cancel Callback<br />
To cancel a Callback:<br />
1. Lift the handset.<br />
2. Dial the appropriate feature access code.<br />
3. Dial the number of the called station.<br />
4. Hang up.<br />
Messaging - Cancel All Callbacks<br />
To cancel all Callbacks:<br />
1. Lift the handset.<br />
2. Dial the appropriate feature access code.<br />
3. Hang up.<br />
Music<br />
To turn Music on and off when the phone is idle, do one of the following:<br />
• To turn the music on, press the key that you programmed to Music or the Music<br />
softkey.<br />
• To turn the music off, press the key that you programmed to Music or the Music<br />
softkey.<br />
When the Music is activated, the key you have programmed is highlighted.<br />
- 82 -
Night Answer<br />
- 83 -<br />
<strong>5330</strong>/<strong>5340</strong> <strong>IP</strong> <strong>Phones</strong> <strong>–</strong> <strong>User</strong> <strong>Guide</strong><br />
The Night Answer feature allows you to route calls to an attendant or message at night.<br />
To enable Night Answer:<br />
• Press the key you programmed to Night Answer. When you have enabled Night<br />
Answer, this key is highlighted.<br />
To disable Night Answer:<br />
• Press the key you programmed to Night Answer<br />
Override (Intrude)<br />
When you dial a number whose owner has enabled Make Busy, your phone displays the<br />
message indicating that the line is busy. You have the option to override this setting.<br />
To use Override when you encounter a busy tone:<br />
1. Press the key you programmed as Override.<br />
2. Wait for an answer.<br />
Paging<br />
To use Paging:<br />
1. Lift handset.<br />
2. Press the key that you have programmed to Page.<br />
3. Dial the Paging zone number (if required).<br />
4. Make the announcement.
<strong>5330</strong>/<strong>5340</strong> <strong>IP</strong> <strong>Phones</strong> <strong>–</strong> <strong>User</strong> <strong>Guide</strong><br />
Phone Lock<br />
Phone Lock prevents access to the features on a phone, with the following exceptions:<br />
• unlocking the set via a user PIN<br />
• Hot Desk Login and Logout support, and<br />
• Emergency Call Notification support.<br />
Phone Lock has no effect on incoming calls but restricts outgoing calls, with the following<br />
exceptions:<br />
• calls to emergency trunk routes, and<br />
• local operators.<br />
Most keys on the device are disabled, except for the dial pad and volume keys. The following<br />
access and keys are disabled:<br />
• Superkey access<br />
• Applications access<br />
• Softkeys<br />
• feature access keys<br />
• feature access codes, and<br />
• account codes<br />
Note: Softkeys will be displayed but disabled, except the hot desking softkeys will remain<br />
enabled. The Phone Lock, Hot Desk login, and Emergency Notification feature access keys<br />
will still be available. Superkey will provide Emergency Notification, if it is pending.<br />
Before locking a set, ensure that:<br />
• the set is in the idle state (there should not be any ongoing call)<br />
• you do not have any calls on hold or on consultation-hold on any line appearance<br />
• you are not in headset mode<br />
To activate Phone Lock:<br />
• Press the Phone Lock feature key or enter the Phone Lock Feature Access code.<br />
- 84 -
To de-activate Phone Lock:<br />
- 85 -<br />
<strong>5330</strong>/<strong>5340</strong> <strong>IP</strong> <strong>Phones</strong> <strong>–</strong> <strong>User</strong> <strong>Guide</strong><br />
• Press the Phone Lock feature key or enter the Phone Unlock Feature Access code.<br />
• Enter your user PIN to unlock the set.<br />
Note: If a user PIN has not been assigned, enter # when prompted for the PIN to unlock the<br />
phone.<br />
<strong>User</strong> PIN<br />
A Personal Identification Number (PIN) allows a user to log into a set as a hot desk user or<br />
generic S<strong>IP</strong> user. It is also used to de-activate the Phone Lock feature. PINs must be from 0<br />
to 8 digits in length. Only digits (0 to 9) are permitted. The default PIN is blank (length zero).<br />
<strong>User</strong>s will have one generic PIN that can be used for any required features.<br />
The <strong>User</strong> PIN initially has a zero length, allowing a user, for example, to unlock a phone<br />
using a blank PIN for Phone Lock. Setting the <strong>User</strong> PIN on the set requires the PIN to have at<br />
least one digit.<br />
To change the <strong>User</strong> PIN:<br />
1. Press SuperKey (must be programmed to a key)<br />
2. Press No until "Set <strong>User</strong> PIN?" appears.<br />
3. Press Yes softkey or the <strong>User</strong> PIN softkey.<br />
4. At the prompt "Enter Old PIN", enter your old <strong>User</strong> PIN.<br />
5. Press Enter.<br />
6. At the prompt "Enter new PIN", enter your new PIN.<br />
Use left arrow key to correct mistakes. The PIN can include digits from 0 to 9 only<br />
and can be from 0 to 8 characters in length.<br />
7. Press Enter.<br />
8. At the prompt to verify the PIN, re-enter your new PIN again. The set confirms<br />
successful or failed completion.<br />
9. Press Superkey to end the Superkey session.
<strong>5330</strong>/<strong>5340</strong> <strong>IP</strong> <strong>Phones</strong> <strong>–</strong> <strong>User</strong> <strong>Guide</strong><br />
Record a Call<br />
This feature uses your voice mail system to record your telephone conversations.<br />
Note: You may be required by law to inform the other party that you are recording the<br />
conversation. For specific instructions, consult your system administrator.<br />
To start recording while on a 2-party call:<br />
• Press the Record Call key. (See Feature Keys elsewhere in this guide for instructions<br />
on programming a Record Call key to your phone.)<br />
Note: Your system may be programmed to automatically begin recording external calls<br />
when you or the other answers.<br />
To control recording, do one or all of the following:<br />
• To pause recording, press the Pause softkey.<br />
• To resume recording after pausing, press the Resume softkey.<br />
• To stop a recording without saving it, press the Erase softkey or (CANCEL).<br />
• To stop and save a recording, press the Save softkey.<br />
Putting the call on hold saves the recording; taking the call off hold starts a new recording.<br />
Depending on system programming, hanging up, or pressing (TRANS/CONF) or a<br />
DSS key, may also save the recording.<br />
To listen to a recording:<br />
1. Lift the handset.<br />
2. Access your voice mailbox.<br />
3. Follow the prompts to retrieve the recording.<br />
- 86 -
Reminder<br />
To program a Reminder:<br />
1. Press Superkey (must be programmed to a key).<br />
2. Press the No softkey until "Timed Reminder" appears.<br />
3. Press the Reminder softkey.<br />
4. Enter the time in 24-hour format.<br />
5. Press the Save softkey.<br />
To view, change, and/or cancel a pending Reminder:<br />
1. Press Superkey (must be programmed to a key).<br />
2. Press the No softkey until "Timed Reminder" appears.<br />
3. Press the Reminder softkey.<br />
4. Do one of the following:<br />
- 87 -<br />
<strong>5330</strong>/<strong>5340</strong> <strong>IP</strong> <strong>Phones</strong> <strong>–</strong> <strong>User</strong> <strong>Guide</strong><br />
• To change the Reminder, press the Change Key softkey, enter the new time, and<br />
press the Save softkey.<br />
• To cancel the Reminder, press the Cancel No. softkey.<br />
• To exit without canceling the Reminder, press Superkey (must be programmed to<br />
a key).<br />
To acknowledge a Reminder when your phone rings once:<br />
• Press the Confirm softkey.
<strong>5330</strong>/<strong>5340</strong> <strong>IP</strong> <strong>Phones</strong> <strong>–</strong> <strong>User</strong> <strong>Guide</strong><br />
Speak@Ease<br />
<strong>User</strong>s of the Speak@Ease softkey can place a call by speaking the name of the person they<br />
wish to dial. Speak@Ease enables you to have access to <strong>Mitel</strong> Speech Server. The Speech<br />
Server is a speech recognition application that routes incoming calls to a specific destination<br />
based on spoken commands.<br />
To dial a call using Speak@Ease:<br />
1. Press the key you have programmed to Speak@Ease.<br />
2. Speak the name of the person you wish to call.<br />
Speed Call<br />
Speed Call is an application that allows you to dial a specific number with one key press.<br />
You must program Speed Call on a Programmable key. For more information on<br />
programming this key, see Program Feature Keys Using the Settings Application.<br />
To make a Speed Call:<br />
• Press the key that you have programmed as your Speed Call key.<br />
Tag Call<br />
Tag Call allows you to signal that you are the victim of a threatening or malicious call. Using<br />
the tag, your system administrator or Telephone Company can identify the source of the call<br />
and provide this information to appropriate personnel or authorities.<br />
CAUTION: Tagging a non-malicious call may result in fines or other penalties.<br />
To tag a malicious call:<br />
1. Press the programmed Tag Call key while the call is in progress. For information on<br />
how to program keys, see to Programming Features On Your Keys<br />
-OR-<br />
Press (TRANS/CONF).<br />
2. Dial the appropriate feature access code.<br />
If the call was successfully tagged, Thank You is shown on the display; otherwise, Not<br />
Allowed is displayed.<br />
Note: Tag Call can be used on active two-party calls only. Calls on hold and conference<br />
calls cannot be tagged.<br />
- 88 -
Trunk Flash<br />
- 89 -<br />
<strong>5330</strong>/<strong>5340</strong> <strong>IP</strong> <strong>Phones</strong> <strong>–</strong> <strong>User</strong> <strong>Guide</strong><br />
The Trunk Flash feature allows you to access Centrex features (if available) while you are<br />
talking on an outside call.<br />
To flash a trunk while talking on an outside call:<br />
1. Press the key you have programmed to Flash.<br />
Note: You can program a key to single flash or double flash.<br />
2. Wait for dial tone.<br />
3. Dial the Centrex feature access code.
<strong>5330</strong>/<strong>5340</strong> <strong>IP</strong> <strong>Phones</strong> <strong>–</strong> <strong>User</strong> <strong>Guide</strong><br />
VISUAL VOICE MAIL (<strong>5340</strong> <strong>IP</strong> PHONE ONLY)<br />
Set Up your Mailbox<br />
Before you can use voice mail, you must first set up your mailbox.<br />
To set up your mailbox:<br />
1. Dial the voice mail Hunt Group number provided by your system administrator.<br />
2. Follow the verbal instructions to create your personal passcode and to record your<br />
name and greeting.<br />
3. Set up Call Forwarding to direct your calls to the voice mail hunt group number.<br />
Enable Visual Voice Mail<br />
To enable Visual Voice Mail<br />
1. Press Applications.<br />
2. Press Settings.<br />
3. Press Message Key Configuration.<br />
4. Select Open Voice Mail Application.<br />
5. Press Save.<br />
Opening the Visual Voice Mail Application<br />
You can open the Visual Voice Mail application by selecting it in the Application list or by<br />
using the Settings application to program a key (either a feature key or the Message key,<br />
) to open it. See “Program Feature Keys Using the Settings Application.”<br />
Note: You must log out of Visual Voice Mail before you can access your voice mailbox<br />
from the dialpad.<br />
Log Into Your Mailbox From Your Own Extension<br />
To login to your mailbox from your extension:<br />
1. Open the Voice mail application.<br />
Note: The mailbox number assigned to the prime extension of this phone is<br />
displayed. From this window, only the mailbox assigned to this extension can be<br />
logged into. If this is not your mailbox number, see Log into your mailbox from<br />
another extension. If there is no mailbox associated with the phone’s primary DN, the<br />
mailbox status is displayed as No Mailbox. In this case, see Log into your mailbox<br />
from another extension.<br />
- 90 -
2. Enter your passcode.<br />
3. Press OK.<br />
- 91 -<br />
<strong>5330</strong>/<strong>5340</strong> <strong>IP</strong> <strong>Phones</strong> <strong>–</strong> <strong>User</strong> <strong>Guide</strong><br />
4. If you wish to have the system remember this passcode, press Remember my<br />
passcode to enable the check box ().<br />
5. Press Login.<br />
Note: While you are logged into your mailbox, no indication of any new messages arriving<br />
is provided until you log out and log in again.<br />
Log Into Your Mailbox From Another Extension<br />
To login to your mailbox from another extension:<br />
1. Open the Voice mail application.<br />
2. Press Connect as guest.<br />
3. Enter your mailbox number.<br />
4. Press Enter Passcode.<br />
5. Enter your passcode.<br />
6. Press Login.<br />
Note: If you wish to return to the owner login window, press Connect as owner at any time.<br />
Log Out Of Your Mailbox<br />
To logout of your mailbox:<br />
• Press Logout. This closes the Voice Mail application.<br />
Note: After five minutes of inactivity, you are automatically logged out of your mailbox and<br />
the Voice Mail application closes. When you close the Voice Mail application, you are not<br />
automatically logged out of your mailbox.
<strong>5330</strong>/<strong>5340</strong> <strong>IP</strong> <strong>Phones</strong> <strong>–</strong> <strong>User</strong> <strong>Guide</strong><br />
About the Visual Voice Mail Main Window<br />
The Voice Mail Application Main Window<br />
The Voice Mail application main window contains a chronological list of the voice messages<br />
in your mailbox, with the oldest message listed first. Use the Navigation keys to scroll<br />
through the messages. By default, only new messages are listed when the main screen opens.<br />
You sort the list by message type using the sorting keys (All, New, Urgent, Recorded, Saved)<br />
in Control keys area. Messages are marked in the following ways:<br />
Icon Type of Message<br />
Error!<br />
Objects<br />
cannot be<br />
created<br />
from<br />
editing<br />
field<br />
codes.<br />
Error!<br />
Objects<br />
Control Keys<br />
Message List<br />
Navigation Keys<br />
New (never played)<br />
New Confidential<br />
- 92 -
cannot be<br />
created<br />
from<br />
editing<br />
field<br />
codes.<br />
Error!<br />
Objects<br />
cannot be<br />
created<br />
from<br />
editing<br />
field<br />
codes.<br />
Error!<br />
Objects<br />
cannot be<br />
created<br />
from<br />
editing<br />
field<br />
codes.<br />
Error!<br />
Objects<br />
cannot be<br />
created<br />
from<br />
editing<br />
field<br />
codes.<br />
New Urgent<br />
New Confidential Urgent<br />
Saved<br />
Saved Confidential<br />
Saved Urgent<br />
Saved Confidential Urgent<br />
Recorded calls recorded using the Record A Call feature<br />
Note: Confidential messages cannot be forwarded.<br />
Display Message Details<br />
To display details about a message:<br />
1. Open the Voice mail application.<br />
- 93 -<br />
<strong>5330</strong>/<strong>5340</strong> <strong>IP</strong> <strong>Phones</strong> <strong>–</strong> <strong>User</strong> <strong>Guide</strong>
<strong>5330</strong>/<strong>5340</strong> <strong>IP</strong> <strong>Phones</strong> <strong>–</strong> <strong>User</strong> <strong>Guide</strong><br />
2. Login to your mailbox.<br />
3. Press on a message in your message list. The Message Details window displays<br />
showing the following information about your message:<br />
• Message sender name and number (if available)<br />
• Message type: new, saved, confidential, urgent or recorded, receipt confirmation<br />
• Date, time and duration of message<br />
The Message Details Window<br />
In this window, you can save (Keep), play, or delete (Discard) the message. You can<br />
send the voicemail to your email if the Forward to Email feature is enabled or<br />
forward it to another user. You can dial the message sender or add the message sender<br />
to your contact list in the People application.<br />
4. To view other messages and their details, use the Navigation keys ( , )<br />
to move up or down through your message list.<br />
Play a Voice Message<br />
To play a voice message:<br />
1. Open the Voice mail application.<br />
- 94 -<br />
Message Details
2. Login to your mailbox.<br />
3. Select a message in your message list.<br />
4. Press Play.<br />
- 95 -<br />
<strong>5330</strong>/<strong>5340</strong> <strong>IP</strong> <strong>Phones</strong> <strong>–</strong> <strong>User</strong> <strong>Guide</strong><br />
Control the play of the message via the following command buttons:<br />
• stop<br />
• pause<br />
• rewind the message by five seconds ( Skip)<br />
• fast forward the message by five seconds (Skip )<br />
• go to the beginning of the message (| To start)<br />
• go to the end of the message (To end |)<br />
Note: The audio connection is terminated after 30 seconds of idle time.<br />
Dial Message Sender<br />
To dial the phone number of a message sender:<br />
1. Open the Voice mail application.<br />
2. Login to your mailbox.<br />
3. Do one of the following:<br />
• In the main window Message List, press the Dial key to the right of the message.<br />
• Select a message in your message list to display the Message Details, and then<br />
press Dial.<br />
If there is no known number, the Dial key is disabled (no icon appears next to the<br />
key).<br />
If the number is external, enter the required prefix digit (for example “9”) to access an<br />
outside line before pressing Dial. When dialing from the window Message List, the<br />
number is dialed as displayed; no prefix entry is allowed.<br />
Pressing Dial may display the Phone application depending on the Call Notification<br />
preference selected in the Settings application.<br />
Save a Message<br />
To save a message:
<strong>5330</strong>/<strong>5340</strong> <strong>IP</strong> <strong>Phones</strong> <strong>–</strong> <strong>User</strong> <strong>Guide</strong><br />
1. Open the Voice mail application.<br />
2. Login to your mailbox.<br />
3. Press on a message in your message list.<br />
4. Press Keep.<br />
The saved message is removed from the new list and added to the saved list.<br />
Delete a Message<br />
To delete a message:<br />
1. Open the Voice mail application.<br />
2. Login to your mailbox.<br />
3. Press on a message in your message list.<br />
4. Press Discard.<br />
The next message in the message list is displayed. If the last message in the list was<br />
deleted, the Message Details window is closed.<br />
Add a Message Sender to Your Contacts List<br />
To add a sender to your contact list:<br />
1. Open the Voice mail application.<br />
2. Login to your mailbox.<br />
3. Select a message in your message list.<br />
4. Press To contacts.<br />
The contact is added to your contacts list in the People application. If the contact<br />
already exists in your contact list, it is not added.<br />
Forward a Message to Another Mailbox<br />
You can only forward messages to internal mailboxes. Confidential messages cannot be<br />
forwarded.<br />
To forward a message to another mailbox:<br />
1. Open the Voice mail application.<br />
2. Login to your mailbox.<br />
3. Select a message in your message list.<br />
- 96 -
4. Press Give.<br />
5. Enter the recipient’s mailbox number.<br />
6. Press Send message.<br />
Forward a Message to Your Email Address<br />
- 97 -<br />
<strong>5330</strong>/<strong>5340</strong> <strong>IP</strong> <strong>Phones</strong> <strong>–</strong> <strong>User</strong> <strong>Guide</strong><br />
You can only forward a message to your email address if the Forward to Email feature is<br />
enabled on your system. You can tell that the feature is disabled by the absence of a To<br />
Email button on your phone.<br />
To forward a message to your email address:<br />
1. Open the Voice mail application.<br />
2. Login to your mailbox.<br />
3. Select a message in your message list.<br />
4. Press To Email.<br />
The message is forwarded to your email address. If you have set your preference in<br />
the Desktop <strong>User</strong> tool to delete messages when forwarding, the message is deleted<br />
(but remains in the list until you log out of your mailbox).
<strong>5330</strong>/<strong>5340</strong> <strong>IP</strong> <strong>Phones</strong> <strong>–</strong> <strong>User</strong> <strong>Guide</strong><br />
USING YOUR PHONE WITH THE 5310 <strong>IP</strong><br />
CONFERENCE UNIT<br />
Your phone uses the 5310 <strong>IP</strong> Conference Unit for conferencing. You use the Conference<br />
Controller to turn the conference unit off or on, to adjust the volume or to put the conference<br />
unit into Presentation mode. You can only run one Conference Controller session at a time. If<br />
the 5310 Conference Unit is not connected to your phone, the Conference Controller<br />
application is not available.<br />
Access the Conference Controller<br />
To access the Conference Controller:<br />
1. Press the blue Applications key and press Conference Unit, or<br />
2. Press the key programmed to the Conference Unit application.<br />
Turn the Conference Unit On and Off<br />
1. Verify that the conference unit is connected to your phone.<br />
2. Access the Conference Controller. For more information, see Access Conference<br />
Controller.<br />
3. Press Turn On/Turn Off.<br />
While the Conference Unit is on, the icon shows in the phone status line.<br />
Adjust the Conference Unit Volume<br />
• Press Volume Up or Volume Down.<br />
Place the Conference Unit in Presentation Mode<br />
Presentation Mode is used when only one individual is speaking to a group. If another<br />
member in the group wishes to speak, you must disable Presentation Mode. Presentation<br />
Mode minimizes extraneous noise.<br />
To place the conference unit in Presentation mode<br />
• Press Presentation Mode.<br />
Exit the Conference Controller<br />
To exit the conference controller<br />
• Press Close.<br />
- 98 -
Mute the Conference Unit<br />
- 99 -<br />
<strong>5330</strong>/<strong>5340</strong> <strong>IP</strong> <strong>Phones</strong> <strong>–</strong> <strong>User</strong> <strong>Guide</strong><br />
To mute the conference unit so that conversation in the meeting room cannot be heard by<br />
individuals being conferenced:<br />
• Press Mute.<br />
USING THE LINE INTERFACE MODULE<br />
Your phone supports the <strong>Mitel</strong> Line Interface Module. The Line Interface Module allows you<br />
to make and receive calls over an analog line (Line Interface Module line) connected to your<br />
phone. The Line Interface Module operates in either of the following two modes, as<br />
determined by your System Administrator:<br />
• Line Interface Module Mode: your phone allows you to use the Line Interface<br />
Module line at any time<br />
• Failover Mode: you can use the Line Interface Module line only when the <strong>IP</strong><br />
connection has failed<br />
Note: Handsfree and on-hook dialing are not supported on the Line Interface Module line.<br />
For information on emergency number dialing using the Line Interface Module, refer to<br />
Emergency Calls.<br />
Making and Answering Calls Using the Analog key<br />
To make a call using the Analog line:<br />
1. Lift the handset.<br />
2. Press the key you programmed as Analog Line.<br />
ANALOG CALL is displayed.<br />
3. Dial the number.<br />
Note: When you make an external call over the analog line, a prefix dialing number is not<br />
required. If your phones Analog Line key has the Privacy option enabled, you cannot access<br />
the analog line when another phone is using the analog line (key is solid orange).To access<br />
the analog line, the user of the other phone must first hang up. To determine whether the<br />
Privacy option is enabled, contact your System Administrator.<br />
To answer a Call using the analog line:<br />
1. Lift the handset.<br />
2. Press the Analog Line key that is highlighted.
<strong>5330</strong>/<strong>5340</strong> <strong>IP</strong> <strong>Phones</strong> <strong>–</strong> <strong>User</strong> <strong>Guide</strong><br />
To answer a waiting call on the analog line:<br />
Note: If you have subscribed to an analog call waiting service, you may use the hookswitch<br />
or press Cancel ( ) to answer a waiting analog call. When you are on an analog call and a<br />
waiting analog call arrives, you hear a beep. This feature may not be supported in all regions.<br />
To answer a waiting analog call or return to the original analog call:<br />
1. Do one of the following:<br />
• Press and release the hookswitch<br />
• Press Cancel ( )<br />
2. Press the key you have programmed as Analog Line.<br />
To put a current call on hold to answer an incoming analog call:<br />
• Press the highlighted Analog Line key.<br />
To switch between the current call and the held call when one of the calls is using the analog<br />
line, do one of the following:<br />
• If your current call is using the analog line, press the flashing Line key of the held<br />
call. The analog call is automatically put on hold.<br />
• If your current call is using an <strong>IP</strong> line, press the highlighted Analog Line key. The <strong>IP</strong><br />
line is automatically put on hold.<br />
To end a current call when an incoming analog call arrives:<br />
• Press Cancel ( ) and then press the highlighted Analog Line key. The current call<br />
ends and you are connected to the caller on the analog line.<br />
To end the current analog call when an incoming call arrives:<br />
• Press Cancel ( ). The current analog call ends and you are connected to the new<br />
caller.<br />
- 100 -
- 101 -<br />
<strong>5330</strong>/<strong>5340</strong> <strong>IP</strong> <strong>Phones</strong> <strong>–</strong> <strong>User</strong> <strong>Guide</strong><br />
Making and Answering Calls Using the Failover Mode<br />
To make a call using the analog line during an <strong>IP</strong> connection failure:<br />
1. Lift the handset.<br />
The phone displays <strong>IP</strong> FAIL: ANALOG CALL.<br />
2. Dial the number.<br />
To answer a call using the analog line during an <strong>IP</strong> connection failure:<br />
• Lift the handset. The call is answered. The phone displays <strong>IP</strong> FAIL: ANALOG CALL.
<strong>5330</strong>/<strong>5340</strong> <strong>IP</strong> <strong>Phones</strong> <strong>–</strong> <strong>User</strong> <strong>Guide</strong><br />
USING YOUR PHONE WITH THE CORDLESS<br />
MODULE AND ACCESSORIES<br />
The cordless handset and cordless headset provide users with the capability to move around<br />
within their own office or adjacent offices while using the telephone.<br />
Both cordless devices connect to your <strong>IP</strong> telephone through the cordless module, which<br />
attaches to the back of the phone. The cordless headset rests and recharges in a headset cradle<br />
that attaches to the side of the telephone. The cordless handset recharges in the handset<br />
cradle.<br />
The Cordless Devices Application (see page 113) provides access to the configuration<br />
settings and information screens that apply to the cordless module and accessories.<br />
Note: Since only one module type can be attached to the phone at any given time, you can<br />
not, for example, use a 5310 Conference Module when the Cordless Module is attached.<br />
CAUTION: Attempting to remove the back plate on the telephone to install the Cordless<br />
Module before disconnecting the telephone’s power supply may damage the telephone. For<br />
information about installing the Cordless Module, see the Cordless Module and Accessories<br />
Installation <strong>Guide</strong> for <strong>Mitel</strong> <strong>5330</strong>/<strong>5340</strong> <strong>IP</strong> <strong>Phones</strong> available at <strong>Mitel</strong> OnLine.<br />
Figure 1. Cordless Module and Accessories on 5300 Series Phone<br />
- 102 -
Figure 2. Rear view<br />
- 103 -<br />
<strong>5330</strong>/<strong>5340</strong> <strong>IP</strong> <strong>Phones</strong> <strong>–</strong> <strong>User</strong> <strong>Guide</strong><br />
Elements of Your Cordless Module and Accessories<br />
Feature Function<br />
1) Cordless Module Attached to the back of the phone, the module<br />
contains a Light Emitting Diode (LED) indicating<br />
that a cordless device is in use; also indicates the<br />
state of pairing between the module and a cordless<br />
device.<br />
2) Cordless Headset Cordless hands free operation for calls. If you are<br />
using the cordless headset, you do not need to use<br />
the handset.<br />
3) Cordless Headset Charging Cradle Provides power to recharge the cordless headset<br />
battery.<br />
4) Cordless Handset Charging Cover Provides power to recharge the cordless handset<br />
battery. Replaces the cover supplied with the<br />
phone for corded handsets.<br />
5) Cordless Handset Cordless operation for handset calls. (You can<br />
transfer from the phone handset to the cordless<br />
headset at any time.)<br />
6) Cordless Module pairing button Initiates pairing between the Cordless Module and<br />
a cordless accessory.<br />
7) Cordless Headset Cradle cable Connects to the Cordless Module to provide power<br />
to the charging cradle.
<strong>5330</strong>/<strong>5340</strong> <strong>IP</strong> <strong>Phones</strong> <strong>–</strong> <strong>User</strong> <strong>Guide</strong><br />
Handset/Headset Combinations<br />
The following combinations of corded and cordless headset and handset are supported on the<br />
<strong>5330</strong>/<strong>5340</strong> <strong>IP</strong> Phone:<br />
• Corded handset only<br />
• Corded headset only<br />
• Corded handset and corded headset<br />
• Cordless handset only<br />
• Cordless headset only<br />
• Cordless handset and cordless headset<br />
• Corded handset and cordless headset<br />
• Corded headset and cordless handset<br />
Pairing the Cordless Module and Accessories<br />
The cordless headset and handset are optional accessories, ordered separately. Before use,<br />
each must establish communication with the Cordless Module using a procedure called<br />
pairing.<br />
Notes:<br />
• An <strong>IP</strong> telephone can have only one cordless handset and one cordless headset<br />
• A cordless handset or headset can be paired with only one <strong>IP</strong> telephone at a time<br />
• Pairing a new cordless handset or headset with the <strong>IP</strong> telephone overwrites the<br />
configuration of any previous handset or headset<br />
• Pairing cannot be performed when the cordless device is already in use.<br />
PAIRING A CORDLESS ACCESSORY WITH THE CORDLESS<br />
MODULE<br />
To pair a cordless accessory:<br />
1. Ensure that the battery of the cordless device to be paired is at least partially charged.<br />
2. Press and hold down the pairing button on the back of the Cordless Module (see<br />
Figure 2 on page 103) for 5 seconds to activate telephone pairing mode. The LED on<br />
the Cordless Module blinks. The Cordless Devices application opens on the telephone<br />
and prompts you to “Press the pairing button on the cordless device now.<br />
- 104 -
- 105 -<br />
<strong>5330</strong>/<strong>5340</strong> <strong>IP</strong> <strong>Phones</strong> <strong>–</strong> <strong>User</strong> <strong>Guide</strong><br />
3. Press and hold down the hookswitch on the cordless handset or headset for 5 seconds<br />
to activate accessory pairing mode. The LED on the cordless accessory blinks. After a<br />
moment, the Cordless Devices application displays protocol, firmware, hardware, and<br />
<strong>IP</strong>EI information for the device to be paired.<br />
4. Press Yes to confirm pairing. The Cordless Devices application confirms the pairing<br />
by displaying the paired device name and its battery level indicator.<br />
5. Press Close to exit.<br />
To unpair a cordless accessory:<br />
1. Press the blue Applications key and then press Cordless Devs.<br />
2. Press the device name that you want to unpair. The information screen for the<br />
selected device appears.<br />
3. Press Unpair this Device. If the accessory is in use, an error message is displays.<br />
Otherwise, the accessory is unpaired, removed from the display, and can no longer be<br />
used to interact with the phone.<br />
4. Press Close.<br />
For more information about the Cordless Devices Application, see page 113.<br />
Cordless Module LED Indicators<br />
The Cordless Module has a blue light-emitting diode (LED) that indicates the current status<br />
of the module (See Figure 1):<br />
Blue LED Function<br />
Solid Audio is active between the module and either the handset or<br />
headset.<br />
Blinking Pairing mode is active or a firmware upgrade is in progress.<br />
Off No audio is active.<br />
Solid for 2 seconds Pairing is successful.<br />
Blinking: LED is On and Off for equal amount of time
<strong>5330</strong>/<strong>5340</strong> <strong>IP</strong> <strong>Phones</strong> <strong>–</strong> <strong>User</strong> <strong>Guide</strong><br />
Using a Cordless Device as a Remote Control<br />
When not being used to talk, the cordless handset/headset buttons can act as a remote control<br />
device to change display contrast, volume, and mute settings on the host <strong>IP</strong> phone. For<br />
example, in a remote handsfree conference setting, the chairman can use the volume and<br />
mute buttons on a cordless device to adjust speaker levels and mute the microphone on an <strong>IP</strong><br />
phone that is not within his reach. HTML applications may also make use of the cordless<br />
device buttons but functionality may differ among applications.<br />
USING THE CORDLESS HANDSET<br />
The cordless handset provides office mobility, allowing you to make and answer calls while<br />
away from your desk. Replacing the standard corded handset, the cordless handset contains a<br />
rechargeable battery that charges in the handset cradle when not in use.<br />
To use the Cordless Handset, you must pair the handset with the phone. For more<br />
information, see “Pairing the Cordless Module and Accessories” on page 104.<br />
Figure 3. Cordless Handset on 5300 Series Phone<br />
- 106 -
Elements of the Cordless Handset<br />
Feature Function<br />
- 107 -<br />
<strong>5330</strong>/<strong>5340</strong> <strong>IP</strong> <strong>Phones</strong> <strong>–</strong> <strong>User</strong> <strong>Guide</strong><br />
1) Cordless Handset LED Blue: Light-emitting diode (LED) indicating the<br />
status of the handset.<br />
Green: LED indicating the status of the handset<br />
battery.<br />
For more information see Cordless Handset<br />
LEDs on page 109<br />
2) Hookswitch Button Lifting the handset from the cradle activates the<br />
handset. If the handset is already out of the<br />
cradle, pressing the hookswitch takes the handset<br />
off-hook. Pressing the hookswitch again returns<br />
it to on-hook.<br />
Pressing the hookswitch while on a<br />
speakerphone call, moves the call to the cordless<br />
handset.<br />
3) Mute button Mute allows you to turn the microphone off<br />
during a call.<br />
4) Volume Up and<br />
5) Volume Down buttons<br />
Up and Down provide volume control for the<br />
ringer and handset/headset.<br />
Note: The <strong>IP</strong> Phone deactivates the cordless handset when a corded handset is plugged in.<br />
Answer a Call<br />
Do one of the following:<br />
• Lift the cordless handset.<br />
• If the handset is already out of the cradle, press the hookswitch button on the handset.<br />
Note: If you have a call on hold on your Prime Line and answer another on a Line<br />
Appearance key, it will be presented over the speaker.<br />
Hang up<br />
Do one of the following:<br />
• Replace the cordless handset in the cradle.<br />
• Press the hookswitch button on the handset.
<strong>5330</strong>/<strong>5340</strong> <strong>IP</strong> <strong>Phones</strong> <strong>–</strong> <strong>User</strong> <strong>Guide</strong><br />
Dialing <strong>–</strong> Auto Dial Disabled<br />
To dial a number with Auto Dial disabled:<br />
1. Lift the handset or press the hookswitch.<br />
2. Make the call using the dial pad, or press a programmed speed dial key on the phone.<br />
Dialing <strong>–</strong> Auto Dial Enabled<br />
To dial with Auto Dial enabled:<br />
• To dial the predefined Auto Dial number, press the hookswitch on the cordless<br />
handset or headset.<br />
To program Auto Dial, refer to Using the Cordless Devices Application on page 113.<br />
Alerting Tones and LEDs<br />
The cordless accessories provide the following alerting tones:<br />
Feature Function<br />
Mute key on cordless device ON/OFF 2-pitch tone occurs immediately.<br />
Reminder tone occurs 30 seconds after<br />
activation and then regularly until<br />
deactivated.<br />
Mute key on Phone ON/OFF No immediate tone. Reminder tone occurs<br />
30 seconds after activation and then<br />
regularly until deactivated.<br />
Low battery (within 10 minutes left) 3 beeps and 20 second pause repeated 3<br />
times<br />
Low battery (within 2 minutes left) 3 rapid beeps and 1.5 second pause<br />
repeated 3 times<br />
Out of range Repetitive 3-pitch tone until you are back<br />
in range. Note: If you are out of range for<br />
more than 10 seconds, any call that is in<br />
progress is dropped and not recovered.<br />
Note: Audio indications are heard in the handset only when it is in use and may interrupt<br />
voice transmission.<br />
- 108 -
CORDLESS HANDSET LEDS<br />
The handset has two LEDs:<br />
• Blue <strong>–</strong> indicates the operational status of the handset<br />
• Green <strong>–</strong> indicates the status of the electrical charge of the battery<br />
LED<br />
Color<br />
Blue<br />
Green<br />
LED State Indicates<br />
Solid Handset is muted<br />
Blinking Handset is in pairing mode<br />
- 109 -<br />
<strong>5330</strong>/<strong>5340</strong> <strong>IP</strong> <strong>Phones</strong> <strong>–</strong> <strong>User</strong> <strong>Guide</strong><br />
Winking Active audio path between Handset and Module<br />
Off No audio path between Handset and Module OR<br />
Battery is dead<br />
Solid Battery is fully charged<br />
Blinking Battery is charging. Note: It is normal for the handset LED to<br />
cycle between blinking and solid as battery charge is<br />
maintained.<br />
Off When handset is cradled and the LED does not flash or<br />
illuminate, this indicates an absence of battery power. During<br />
the first 30 <strong>–</strong> 60 minutes that the light is off, the battery may<br />
be trickle charging. If that is the case, the LED will resume<br />
normal behavior within that 60 minute period. If the LED<br />
remains off for more than 60 minutes, then either the battery<br />
is no longer chargeable or there is a problem in the charging<br />
circuit.<br />
Blinking: LED is On and Off for equal amount of time<br />
Winking: LED is On for a short period of time and Off for a longer period
<strong>5330</strong>/<strong>5340</strong> <strong>IP</strong> <strong>Phones</strong> <strong>–</strong> <strong>User</strong> <strong>Guide</strong><br />
USING THE CORDLESS HEADSET<br />
The cordless headset offers the same capability as the cordless handset to make and answer<br />
telephone calls away from your desk while adding the convenience of hands-free operation.<br />
When not in use, the cordless headset sits in the headset charging cradle.<br />
To use the Cordless Headset, you must pair the headset with the phone. For more<br />
information, see “Pairing the Cordless Module and Accessories” on page 104.<br />
Elements of the Cordless Headset<br />
1) Microphone 5) Hookswitch and pairing button<br />
(gray section with logo imprinted)<br />
2) Boom arm 6) Speaker<br />
3) Link indicator (LED) 7) Headband<br />
4) Volume control with mute<br />
switch<br />
8) Ear hook<br />
- 110 -
Answer a Call<br />
Do one of the following:<br />
• Lift the cordless headset from the cradle.<br />
- 111 -<br />
<strong>5330</strong>/<strong>5340</strong> <strong>IP</strong> <strong>Phones</strong> <strong>–</strong> <strong>User</strong> <strong>Guide</strong><br />
• If the headset is already out of the cradle, press the hookswitch button on the headset.<br />
Hang Up<br />
Do one of the following:<br />
• Replace the cordless headset in the cradle.<br />
• If the headset is already out of the cradle, press the hookswitch button on the headset.<br />
Dialing <strong>–</strong> Auto Dial Disabled<br />
To dial a number with Auto Dial disabled:<br />
1. Lift the headset or press the hookswitch.<br />
2. Make the call using the dial pad, or press a programmed speed dial key on the phone.<br />
Dialing <strong>–</strong> Auto Dial Enabled<br />
To dial with Auto Dial enabled:<br />
To dial the predefined Auto Dial number, press the hookswitch on the cordless handset or<br />
headset.<br />
To program Auto Dial, refer to Using the Cordless Devices Application on page 113.<br />
Headset Alerting Tones and LEDs<br />
The cordless accessories provide the following alerting tones:<br />
Feature Function<br />
Mute ON/OFF 2-pitch tone occurs immediately. Reminder tone<br />
occurs 30 seconds after activation and then<br />
regularly until deactivated.<br />
Mute key on Phone ON/OFF No immediate tone. Reminder tone occurs 30<br />
seconds after activation and then regularly until<br />
deactivated.<br />
Low battery (within 10 minutes left) 3 beeps and 20 second pause
<strong>5330</strong>/<strong>5340</strong> <strong>IP</strong> <strong>Phones</strong> <strong>–</strong> <strong>User</strong> <strong>Guide</strong><br />
Feature Function<br />
Low battery (within 2 minutes left) 3 rapid beeps and 1.5 second pause<br />
Out of range Repetitive 3-pitch tone until you are back in range.<br />
Note: If you are out of range for more than 10<br />
seconds, any call that is in progress is dropped and<br />
not recovered.<br />
CORDLESS HEADSET LEDS<br />
There are two LEDs associated with the cordless headset:<br />
• A blue LED on the headset indicates the headset status<br />
• A green LED in the headset charging cradle indicates battery status<br />
LED Color LED<br />
State<br />
Blue<br />
(on headset)<br />
Green<br />
(on cradle)<br />
Indicates<br />
Solid Headset mic is muted<br />
Blinking Headset is in pairing mode<br />
Winking Active audio path between Headset and Module<br />
Solid for 2<br />
seconds<br />
Pairing successful OR<br />
New battery installed<br />
Off No audio path between Headset and Module OR<br />
Battery is dead<br />
Solid Battery is fully charged<br />
Blinking Battery is charging. Note: It is normal for the headset LED<br />
to cycle between blinking and solid as battery charge is<br />
maintained.<br />
Winking Indicates low voltage when headset is uncradled<br />
Off When headset is cradled, indicates battery is not charging.<br />
Blinking: LED is On and Off for equal amount of time<br />
Winking: LED is On for a short period of time and Off for a longer period<br />
- 112 -
USING THE CORDLESS DEVICES<br />
APPLICATION<br />
- 113 -<br />
<strong>5330</strong>/<strong>5340</strong> <strong>IP</strong> <strong>Phones</strong> <strong>–</strong> <strong>User</strong> <strong>Guide</strong><br />
The Cordless Devices Application provides access to module information and pairing for<br />
hand- or headsets.<br />
To access the Cordless Devices Application, do one of the following:<br />
• Press the blue Applications key and then press Cordless Devices<br />
• Press a feature key you have programmed as the Cordless Devices Application key.<br />
For information about programming feature keys, see page Error! Bookmark not defined..<br />
Note: When the pairing button on the Cordless Module is pressed, or when the battery level<br />
of a cordless accessory is critically low, the phone will automatically open the Cordless<br />
Devices Application.<br />
Viewing Cordless Module Information<br />
You can use the Cordless Module Application to view protocol, firmware, and hardware<br />
information about the module.<br />
To view cordless module information<br />
1. Access the Cordless Module Application.<br />
2. Press Cordless Module Info. Device information appears on the screen.<br />
3. Press Close to exit.<br />
Low Battery Level<br />
When the battery of a cordless device reaches a near-critical level, the phone displays a<br />
warning. Until the battery is recharged (or until it becomes fully discharged), the warning is<br />
repeated at each new call made using the Prime Line. To continue with a call while charging<br />
the cordless accessory, switch to speakerphone and then cradle the cordless accessory.
<strong>5330</strong>/<strong>5340</strong> <strong>IP</strong> <strong>Phones</strong> <strong>–</strong> <strong>User</strong> <strong>Guide</strong><br />
Auto Dial<br />
When a Cordless Module is installed and at least one device is paired, the Auto Dial feature<br />
is available in the Settings menu. You can program a number that is automatically dialed<br />
when a cordless device hookswitch button is pressed.<br />
To program an Auto Dial number:<br />
1. Press Settings.<br />
2. Press Auto Dial, and then press Edit Number.<br />
3. In the on-screen keyboard, enter the autodial number (see Using the Dial Pad to Enter<br />
Information).<br />
4. Press Save.<br />
5. Press Edit Label.<br />
6. In the on-screen keyboard, enter the appropriate information.<br />
7. Press Save and then press Close.<br />
To disable Auto Dial:<br />
1. Press Settings.<br />
2. Press Auto Dial.<br />
3. Press Disable Auto Dial. The Auto Dial settings you have programmed are<br />
maintained when the feature is disabled.<br />
4. Press Save.<br />
• To re-enable, repeat steps 1 and 2 and then press Enable Auto Dial.<br />
• To change Auto Dial information, press Edit Number and/or Edit Label.<br />
• Press Save to save all changes.<br />
- 114 -
- 115 -<br />
<strong>5330</strong>/<strong>5340</strong> <strong>IP</strong> <strong>Phones</strong> <strong>–</strong> <strong>User</strong> <strong>Guide</strong><br />
APPENDIX A: UPGRADING INTEGRATED<br />
OFFICE COMPANION<br />
If upgrading from a Standalone PC Companion to the Integrated Office Companion, it is<br />
recommended that you first uninstall the Standalone PC Companion.<br />
Integrated Office Companion and Microsoft Framework<br />
2.0<br />
In order to run the Integrated Office Companion, your PC will also need to have the<br />
Microsoft .NET Framework 2.0 installed.<br />
• If the Microsoft .NET Framework 2.0 is not installed when you install the Integrated<br />
Office Companion, the IOC install will download and install the Framework at that<br />
time.<br />
• The Microsoft .NET Framework 2.0 must also be present if you uninstall the<br />
Integrated Office Companion.<br />
Integrated Office Companion and Microsoft Vista<br />
If menu items and dialog boxes that interface with Microsoft Outlook and Windows Live<br />
Messenger are disabled even though the programs themselves are running, they may be<br />
running at the wrong privilege level. To remedy this go to the following files and select the<br />
Property option from the right click mouse menu:<br />
Outlook: C:\Program Files\Microsoft Office\Office12\WINWORD.EXE<br />
Live Messenger: C:\Program Files\MSN Messenger\msnmsgr.exe<br />
These are the default install directories; the user’s directory structure may be different. Select<br />
the Compatibility tab and ensure the Privilege Level is deselected. The program should NOT<br />
be running as an administrator. The Properties dialog is shown below.
<strong>5330</strong>/<strong>5340</strong> <strong>IP</strong> <strong>Phones</strong> <strong>–</strong> <strong>User</strong> <strong>Guide</strong><br />
- 116 -
APPENDIX B: List of Limitations<br />
Integrated Office Companion Limitations<br />
- 117 -<br />
<strong>5330</strong>/<strong>5340</strong> <strong>IP</strong> <strong>Phones</strong> <strong>–</strong> <strong>User</strong> <strong>Guide</strong><br />
Integrated Office Companion is designed to tie together functionality from various other<br />
applications. There are some cases of incompatible versions of these other applications that<br />
may result in limitations to certain Integrated Office Companion features.<br />
MICROSOFT WINDOWS MESSENGER AND OUTLOOK<br />
Integrated Office Companion “Presence” Feature: Due to an incompatibility between<br />
Microsoft Windows Messenger version 5.1 and Microsoft Outlook 2002, presence<br />
information may not be passed on to the Integrated Office Companion correctly. If you have<br />
this combination of Microsoft tools, it is recommended that you upgrade either one or both.<br />
Integrated Office Companion “On the Phone” Feature: There are certain combinations of<br />
Microsoft Windows Messenger and Outlook that will interfere with the functionality of the<br />
Integrated Office Companion “On the Phone” feature. The following table lists the<br />
combinations that work, and those that do not.<br />
If you’re using this version of<br />
Windows Messenger. . .<br />
. . .and this version<br />
of Outlook<br />
4.7 2002 Works<br />
4.7 2003 Works<br />
“On the Phone”<br />
feature result<br />
5.1.0639 2002 Does not work<br />
5.1.0639 2003 Works<br />
5.1.0701 2002 Works<br />
5.1.0701 2003 Works<br />
If you’re using MSN Messenger 7.0<br />
with this version of Windows<br />
Messenger. . .<br />
. . .and this version<br />
of Outlook<br />
4.7 2002 Works<br />
4.7 2003 Works<br />
5.1.0701 2003 Works<br />
If you’re using Windows Live<br />
Messenger 8.0 with this version of<br />
Windows Messenger. . .<br />
. . .and this version<br />
of Outlook<br />
“On the Phone”<br />
feature result<br />
“On the Phone”<br />
feature result
<strong>5330</strong>/<strong>5340</strong> <strong>IP</strong> <strong>Phones</strong> <strong>–</strong> <strong>User</strong> <strong>Guide</strong><br />
4.7 2003 (11.8010.8036) Works<br />
If you’re using Windows Live<br />
Messenger 8.1 with this version of<br />
Windows Messenger. . .<br />
. . .and this version<br />
of Outlook<br />
- 118 -<br />
“On the Phone”<br />
feature result<br />
4.7 2003 (11.5608.5606) See Cases below<br />
5.1.0701 2003 (11.5608.5606) See Cases below<br />
Case 1:<br />
Case 2:<br />
1. Win Messenger 4.7 installed / Outlook 2003 installed.<br />
2. Install Windows Live Messenger 8.1.<br />
3. Install IOC.<br />
RESULT: ON THE PHONE WORKS.<br />
1. Win Messenger 4.7 installed / Outlook 2003 installed.<br />
2. Install and run IOC.<br />
3. Install Windows Live Messenger 8.1.<br />
RESULT: ON THE PHONE DOESN'T WORK (even if you stop and start IOC).<br />
MICROSOFT WINDOWS MESSENGER AND OFFICE<br />
COMMUNICATOR<br />
Integrated Office Companion “Presence” and “Alternate Number” Feature: The<br />
combination of certain versions of Microsoft Windows Messenger and Microsoft Office<br />
Communicator can cause the Integrated Office Companion to fail to call an alternate phone<br />
number when the presence is set to “Away”. One valid combination that functions correctly<br />
is Microsoft Windows Messenger version 4.7.3001 and Microsoft Office Communicator<br />
1.0.559.<br />
ITUNES<br />
Integrated Office Companion “Pause Music” Feature: iTunes 7.0.2.16 does not conform<br />
to the Microsoft Application Programming Interface (API) and treats the PAUSE message as<br />
a PLAY/PAUSE message. Meaning that if it is in a paused state it will start playing when it<br />
gets the PAUSE message again.<br />
Most other versions of iTunes do not respond to the command at all and therefore, will not<br />
pause when requested from Integrated Office Companion.