INT1100 User Guide - Mitel Edocs
INT1100 User Guide - Mitel Edocs
INT1100 User Guide - Mitel Edocs

You also want an ePaper? Increase the reach of your titles
YUMPU automatically turns print PDFs into web optimized ePapers that Google loves.
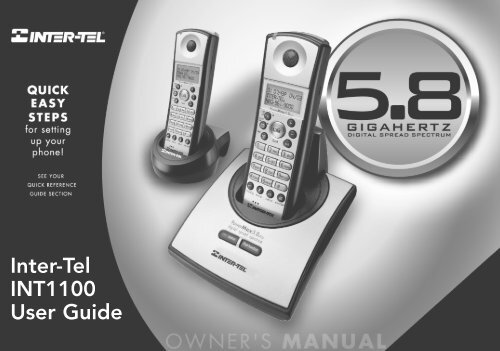
Inter-Tel<br />
<strong>INT1100</strong><br />
<strong>User</strong> <strong>Guide</strong>
Contents<br />
Welcome/Features 3<br />
Quick Reference <strong>Guide</strong> 4<br />
Controls and Functions 5<br />
Getting Started 7<br />
Read this First 7<br />
Setting up the Phone 8<br />
Terminology 12<br />
Setting Caller ID Options 13<br />
Selecting a Language 15<br />
Basics 16<br />
Making and Receiving Calls 16<br />
Redialing a Call 17<br />
Ringer Volume Setup 18<br />
Ringer Tone Setting 18<br />
Distinctive Ringer Setup 19<br />
Adjusting the Earpiece and Handset Speaker Volume 20<br />
Mute Microphone 20<br />
Tone Dialing Switch-over 21<br />
Traveling Out-of-Range 21<br />
Selecting a Different Channel 21<br />
Find Handset 22<br />
Flash and Call Waiting 22<br />
Voice Mail LED 22<br />
Phonebook 23<br />
Storing Phone Numbers, Names,<br />
Distinctive Rings, and Speed Dial 23<br />
Steps for Entering Names and Special Characters 25<br />
Viewing the Phonebook 27<br />
Making Calls Using the Phonebook 28<br />
Speed Dialing 28<br />
Editing or Erasing a Stored Name,<br />
Phone Number, Distinctive Ring, and Speed Dial 29<br />
RocketDial (One Touch Dialing) 30<br />
Chain Dialing 31<br />
Caller ID 32<br />
Viewing the Caller ID List 33<br />
Deleting Information from the Caller ID List 34<br />
Using the Caller ID Message List 35<br />
Call Waiting Deluxe Features 36<br />
Additional Information 37<br />
Changing the Digital Security Code 37<br />
Installing the Beltclip 38<br />
Headset Installation 38<br />
Note on Power Sources 39<br />
Maintenance 39<br />
General Information 40<br />
Troubleshooting 41<br />
Liquid Damage 42<br />
Precautions & Warranty 43<br />
Index 45<br />
[ 2 ]
Welcome<br />
Features<br />
Congratulations on your purchase of the Inter-Tel® cordless telephone. This phone is designed<br />
and engineered to exacting standards for reliability, long life and outstanding performance. To<br />
enjoy the best performance from this phone’s features, please read this manual carefully and<br />
save it for future reference.<br />
Note: Some illustrations in this manual may differ from the actual unit for explanation<br />
purposes.<br />
Note:<br />
As an Energy Star® Partner, Inter-Tel has determined that this product or product<br />
models meets the Energy Star® guidelines for energy efficiency.<br />
Energy Star® is a U.S. registered mark.<br />
Energy Star® applies to <strong>INT1100</strong> only.<br />
• 5.8 GHz Spread Spectrum Technology<br />
• Hands Free Speakerphone in the Handset<br />
• Caller ID and Call Waiting Caller ID<br />
• Dynamic Memory Location for Caller ID Messages and<br />
Phonebook Locations (up to 100 numbers in total)<br />
• Trilingual Language Option<br />
• 3-Line, 16 Character Backlit Handset Display<br />
• One Touch Rocket Dialing<br />
• Call Transfer<br />
• 32 Digit Redial / 3 Last Number Redial Locations (handset only)<br />
• 10 Distinctive Ring Options (6 ringers and 4 melodies)<br />
• Mute Feature<br />
• Flash and Pause<br />
• Find Handset<br />
• Hearing Aid Compatible<br />
• Tone/Pulse Dialing<br />
• Handset Earpiece, Handset Speaker, and Ringer Volume Control<br />
• Call Timer<br />
WELCOME/FEATURES [ 3 ]
Q UICK R EFERENCE G UIDE<br />
Step 1 Charging the Battery<br />
INSTALL THE HANDSET BATTERY<br />
Remove the cover.<br />
Connect the battery<br />
pack connector with<br />
the correct polarity.<br />
Replace the cover.<br />
PLUG INTO AC POWER<br />
Plug the AC adapter cord into the base unit and<br />
then to a 120V AC outlet.<br />
Place the handset in the base.<br />
Note:<br />
You must charge the battery pack continuously<br />
for 15-20 hours before using the phone.<br />
Step 2 Connecting<br />
CONNECT TO A PHONE LINE<br />
When the handset battery pack is fully charged, plug<br />
the telephone cord into the base unit and then into a<br />
telephone wall jack.<br />
Your phone is set for tone dialing. If your local network<br />
requires pulse dialing, please see “Setting up the phone,<br />
Choose the dialing mode” in your owner’s manual.<br />
Step 3 Setting up the Caller<br />
ID Options/Language<br />
Note: Three Caller ID options are<br />
available: Auto Talk, Caller ID on Call<br />
Waiting (CIDCW) and Area Code.<br />
TO SELECT CALLER ID OPTIONS<br />
Press menu/mute.<br />
Press + or - to move the pointer to<br />
“Caller ID Setup”,<br />
then press select/ch.<br />
Press + or - to move the pointer to an option,<br />
then press select/ch.<br />
Press + or - to change the option setting.<br />
Press select/ch and return the handset to<br />
the base.<br />
TO CHOOSE THE LANGUAGE<br />
Press menu/mute.<br />
Press + or - to move the pointer to “Language”,<br />
then press select/ch.<br />
Press + or - to change the option setting.<br />
Press select/ch and return the handset to<br />
the base.<br />
[ 4 ]<br />
QUICK REFERENCE GUIDE
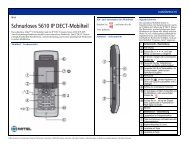
Controls and Functions<br />
1<br />
2<br />
3<br />
4<br />
5<br />
6<br />
7<br />
8<br />
9<br />
10<br />
11<br />
12<br />
13<br />
14<br />
15<br />
16<br />
17<br />
18<br />
19<br />
20<br />
21<br />
22<br />
23<br />
1. Handset Antenna<br />
2. Headset Jack Cover<br />
3. Beltclip Hole<br />
4. Handset Battery Compartment<br />
5. Voice Mail LED<br />
6. Handset Earpiece<br />
7. LCD Display<br />
8. call id (Caller ID)/ (right cursor) Key<br />
9. (Phonebook)/RocketDial/ (left cursor) Key<br />
10. spkr (speaker) Key<br />
11. /tone Key<br />
12. redial/p (pause) Key<br />
13. Menu/ (mute) Key<br />
14. Handset Microphone<br />
15. Talk/flash Key<br />
16. + (up) Key<br />
17. - (down) Key<br />
18. End Key<br />
19. # Key<br />
20. Xfer (transfer)/ del (delete) Key<br />
21. Select/ch (channel) Key<br />
22. Handset Charging Contacts<br />
23. Hands Free Speaker<br />
CONTROLS AND FUNCTIONS<br />
[ 5 ]
24<br />
28 29<br />
25<br />
26<br />
27<br />
24. Base Antenna<br />
25. Base Charging Contacts<br />
26. Status LED<br />
27. Find Handset Key<br />
28. DC Power Input<br />
29. Telephone Line Jack<br />
[ 6 ] CONTROLS AND FUNCTIONS
Read this First<br />
This cordless telephone must be set up before use. Follow these steps:<br />
Step 1 (page 9)<br />
Unpack the telephone and accessories.<br />
Step 2 (page 10)<br />
Next, choose the best location to set up the<br />
base unit.<br />
Step 3 (page 11 to 14)<br />
Then, insert the battery pack into the handset.<br />
Connect the base unit. You must charge the battery<br />
pack for 15-20 hours before plugging into the<br />
phone line and using the phone.<br />
Step 4 (page 15 to 17)<br />
Finally, set the Caller ID options, and store your area<br />
code in the memory to use the Caller ID service. Choose<br />
the language of your display.<br />
Note:<br />
Skip the area code setting if your calling area<br />
requires 10-digit dialing.<br />
About the digital security code<br />
This cordless telephone uses a digital<br />
security code to prevent unauthorized<br />
access to your base unit. This security<br />
code prevents other cordless handsets<br />
from making calls through your base unit.<br />
If you want to change the security code,<br />
see page 43.<br />
GETTING STARTED<br />
[ 7 ]
For maximum range:<br />
• Keep the antenna free of<br />
obstruction.<br />
• When the handset is not<br />
in use place the handset<br />
in an upright position.<br />
• Do not hold the handset<br />
where you would block<br />
the signal.<br />
Correct<br />
Setting up the Phone<br />
Do the following steps:<br />
A. Choose the best location C. Connect the base unit<br />
B. Install the battery pack D. Choose the dialing mode<br />
A. Choose the best location<br />
Before choosing a location for your new phone, read “Installation Considerations” on<br />
page 44. Here are some important guidelines you should consider:<br />
Avoid heat sources, such as<br />
radiators, air ducts, and sunlight<br />
Avoid television sets and<br />
other electronic equipment<br />
Avoid noise sources such as a window<br />
by a street with heavy traffic<br />
Avoid microwave ovens<br />
Avoid excessive<br />
moisture, extremely<br />
low temperatures, dust,<br />
mechanical vibration,<br />
or shock<br />
Avoid personal computers<br />
Choose a central location<br />
Avoid other cordless telephones<br />
Incorrect<br />
If your home has specially wired alarm equipment connected to the telephone line,<br />
be sure that installing the system does not disable your alarm equipment.<br />
If you have questions about what will disable your alarm equipment, contact your<br />
telephone company or a qualified installer.<br />
[ 8 ] GETTING STARTED
B. Install the battery pack<br />
Charge the battery pack for at least 15-20 hours before<br />
plugging the phone line into your base unit.<br />
1) Press down on the battery cover release and slide the cover<br />
down until it comes off.<br />
2) Connect the battery pack connector observing the correct<br />
polarity (black and red wires) to the jack inside the battery<br />
compartment.<br />
Do not exert any force on this connection. It could cause<br />
damage to the battery or to the handset. The plastic<br />
connectors will fit together in only one way. Once you are<br />
certain that you have made a good connection, then insert<br />
the battery pack into the battery compartment.<br />
Do not pinch the wires.<br />
• Use only the Inter-Tel<br />
battery (BT-446)<br />
supplied with your<br />
phone. Replacement<br />
batteries are also<br />
available through<br />
Inside Sales.<br />
• Recharge your phone on<br />
a regular basis by<br />
returning the handset to<br />
the base after each<br />
phone call.<br />
GETTING STARTED<br />
3) Securely close the battery compartment cover by sliding it<br />
up until it snaps into place.<br />
4) Place the handset in the base with the keypad facing<br />
forward.<br />
GETTING STARTED<br />
[ 9 ]
Battery use time (per charge)<br />
Fully charged (15-20 hours charge time)<br />
• Up to 4 hours continuous use<br />
• Up to 8 days when the handset is in the standby mode<br />
When you charge the handset, Caller ID summary screen and the name<br />
of the handset, HS1 appears. For TRU5860-2, if HS2 appears, you are<br />
charging the handset No. 2.<br />
Low battery alert<br />
When the battery pack is very low and needs to be charged, the<br />
phone is programmed to eliminate functions in order to save power.<br />
If the phone is in the standby mode, ”Low Battery” appears on<br />
the LCD and none of the keys will operate. If the phone is in use,<br />
”Low Battery” appears and the handset beeps. Complete your<br />
conversation as quickly as possible and return the handset to the<br />
base unit for charging.<br />
The last number dialed in the redial memory is retained for up to<br />
2 minutes while you replace the battery pack.<br />
Cleaning the battery charging contacts<br />
To maintain a good charge, it is important to clean the<br />
charging contacts on both the handset and base unit<br />
once a month. Use a dry cloth or pencil eraser to<br />
clean. If the contacts become very dirty, using water<br />
only, dampen a cloth to clean the charging contacts.<br />
Then make sure to go back over the charging contacts<br />
with a dry cloth before returning the handset to the<br />
base to charge.<br />
contacts<br />
[ 10 ] GETTING STARTED
C. Connect the base unit<br />
1) Connect the AC adapter to the DC IN 9V<br />
jack and to a standard 120V AC wall<br />
outlet.<br />
2) Set the base and charger (for TRU5860-2<br />
only) on a desk or tabletop, and place the<br />
handset in the base unit as shown.<br />
GETTING STARTED<br />
3) Make sure the status LED illuminates. If the LED does not<br />
illuminate, check to see that the AC adapter is plugged in<br />
and that the handset makes good contact with the base<br />
charging contacts.<br />
• Use only the supplied AD-312 AC adapter.<br />
Do not use any other AC adapter.<br />
• Connect the AC adapter to a continuous power supply.<br />
• Place the base unit close to the AC outlet so that you can unplug<br />
the AC adapter easily.<br />
4) After installing the battery pack in the handset,<br />
charge your handset at least 15-20 hours before<br />
plugging into the phone line.<br />
5) Once the handset battery pack is fully charged,<br />
connect the telephone line cord to the TEL LINE<br />
jack and to a telephone outlet.<br />
If your telephone outlet isn't modular<br />
type, contact your telephone company<br />
for assistance.<br />
Modular<br />
Place the power cord so<br />
that it does not create<br />
a trip hazard or where it<br />
could become chafed<br />
and create a fire or<br />
electrical hazard.<br />
GETTING STARTED<br />
[ 11 ]
• If you are not sure of<br />
your dialing system, set<br />
the unit to tone dialing.<br />
Make a trial call. If the<br />
call connects, leave the<br />
setting as is, otherwise<br />
set the unit to pulse<br />
dialing.<br />
• If your phone system<br />
requires pulse dialing<br />
and you need to send<br />
DTMF tones in certain<br />
situations during a call,<br />
you may “switch-over”<br />
to tone dialing. (Refer<br />
to “Tone Dialing Switchover”<br />
on page 21.)<br />
D. Choose the dialing mode<br />
Most phone systems use tone dialing, which sends DTMF tones through the phone lines.<br />
However some phone systems still use pulse dialing such as in rural areas. The default setting<br />
is tone dialing. Depending on your dialing system, set the mode as follows:<br />
1) When the phone is in the standby mode, press menu/mute.<br />
2) Press + or - to move the pointer to “Dial Mode”.<br />
3) Press select/ch and the display will show the current setting. (The<br />
initial setting is Tone.)<br />
4) Press + or - to change the selection.<br />
5) Press select/ch, and you will hear a confirmation tone.<br />
6) Press end to exit.<br />
Terminology<br />
Throughout this manual, terms such as Standby and Talk Mode are used. Below is the terminology<br />
explanation.<br />
Standby Mode - The handset is not in use, is off the base, and talk/flash or spkr has not been<br />
pressed. A dial tone is not present.<br />
Talk Mode - The handset is not in the base and talk/flash or spkr has been pressed enabling a<br />
dial tone. “Talk” appears in the display.<br />
[ 12 ] GETTING STARTED
Setting Caller ID Options<br />
There are three Caller ID setup options available: AutoTalk, CIDCW (Caller ID on Call Waiting),<br />
and Area Code. See page 14 for Area Code setup instructions.<br />
AutoTalk allows you to answer the phone without pressing talk/flash or spkr. If the phone rings<br />
when AutoTalk is On, simply remove the handset from the base and the phone automatically<br />
answers the call. Or if the handset is not in the base, press any number key, /tone, or # to<br />
answer the call. If you set AutoTalk to Off, you must press talk/flash or spkr to answer the call.<br />
Caller ID on Call Waiting (CIDCW) performs the same as regular Caller ID on a call waiting<br />
number. CW Deluxe allows you to handle call waiting calls in seven different ways. (See page 36.)<br />
You must subscribe to CIDCW from your phone company in order to use this feature.<br />
The CW Deluxe is a separate service available through your phone company.<br />
GETTING STARTED<br />
To change your Caller ID options:<br />
1) When the phone is in the standby mode, press menu/mute.<br />
2) Press + or - to move the pointer to “Caller ID Setup”, then<br />
press select/ch.<br />
3) Press + or - to choose “Auto Talk” or “CIDCW”,<br />
then press select/ch.<br />
4) Press + or - to change the selection.<br />
AutoTalk: “Auto Talk On” or “Auto Talk Off”<br />
CIDCW: “CIDCW On”, “CW Deluxe On” or “CIDCW Off”<br />
5) Press select/ch and you will hear a confirmation tone.<br />
6) Press end to exit.<br />
GETTING STARTED<br />
[ 13 ]
• If your calling area<br />
requires 10-digit<br />
dialing, do not program<br />
this option.<br />
• When the area code has<br />
already been stored in<br />
memory, the stored area<br />
code will be displayed.<br />
To change it, press<br />
xfer/del three times.<br />
Then enter the new<br />
area code. Or you can<br />
use /RocketDial/<br />
or call id/ to move<br />
the cursor and edit the<br />
area code.<br />
Entering Your Area Code<br />
If you enter a 3-digit area code number in the “Area Code” option, your local area code does<br />
not appear in Caller ID messages. For calls received from outside your local area code, you will<br />
see a full 10-digit number.<br />
1) When the phone is in the standby mode, press menu/mute.<br />
2) Press + or - to move the pointer to “Caller ID Setup”,<br />
then press select/ch.<br />
3) Press + or - to move the pointer to “Area Code”,<br />
then press select/ch.<br />
4) Use the number keypad (0 to 9) to enter a 3-digit<br />
area code.<br />
5) Press select/ch, and you will hear a confirmation tone.<br />
6) Press end to exit.<br />
[ 14 ] GETTING STARTED
Selecting a Language<br />
Language option can be used to choose the language of your display. You can select English,<br />
French, or Spanish.<br />
1) When the phone is in the standby mode, press menu/mute.<br />
GETTING STARTED<br />
2) Press + or - to move the pointer to “Language“,<br />
then press select/ch.<br />
3) Press + or - to choose English, French (Français), or<br />
Spanish (Español).<br />
4) Press select/ch, and you will hear a confirmation tone.<br />
5) Press end to exit.<br />
GETTING STARTED<br />
[ 15 ]
• Refer to page 13<br />
“Setting Caller ID<br />
Options” to turn the<br />
AutoTalk feature On if<br />
desired. Any key answer<br />
can be used only when<br />
AutoTalk is set to On.<br />
• The handset microphone<br />
is located on the bottom<br />
of the handset (see<br />
“Controls and Functions”<br />
on page 5). Position<br />
yourself as near to the<br />
handset as possible and<br />
speak clearly.<br />
Making and Receiving Calls<br />
On the handset, you may also use the speakerphone while talking on your phone. Using<br />
the handset speakerphone is called “hands-free conversation”. This feature allows you to<br />
easily communicate while performing other tasks, such as cooking. appears during<br />
hands-free conversation.<br />
You can easily switch a call from normal conversation to “hands-free conversation”.<br />
To switch a call, press spkr during the call.<br />
To answer a call<br />
Normal conversation<br />
Handset On the Base<br />
Pick up the handset (AutoTalk) or pick up<br />
the handset and press talk/flash.<br />
Handset Off the Base<br />
Press any number key, /tone, or #<br />
(Any Key Answer), or press talk/flash.<br />
From the Handset<br />
Hands-free conversation<br />
Handset Off the Base<br />
Press spkr.<br />
To make a call<br />
To hang up<br />
To enter a pause within<br />
the dialing sequence<br />
Handset Off the Base<br />
1) Press talk/flash.<br />
2) Listen for the dial tone.<br />
3) Dial the number.<br />
OR<br />
Dial the number, then press talk/flash.<br />
Note: If a call is not established, you will hear a beep and “Unavailable” will<br />
appear in the display.<br />
Press end, or return the handset to the base (AutoStandby).<br />
When you dial the number, press redial/p.<br />
“P” appears in the display, which represents a pause.<br />
Handset Off the Base<br />
1) Press spkr.<br />
2) Listen for the dial tone.<br />
3) Dial the number.<br />
OR<br />
Dial the number, then press spkr.<br />
[ 16 ]<br />
BASICS
Redialing a Call<br />
The last three phone numbers dialed can be quickly redialed.<br />
Redialing from Standby Mode<br />
1) Press redial/p. The phone number that was last dialed<br />
appears on the display.<br />
2) Press redial/p again. Each press of redial/p will display<br />
one of the last three numbers dialed.<br />
3) Press talk/flash or spkr. The selected number is dialed.<br />
4) To hang up, press end.<br />
• If the number exceeds<br />
32 digits, only the first<br />
32 digits are retained<br />
in redial memory.<br />
• If the redial memory is<br />
empty, you will hear<br />
a beep.<br />
• If you have not pressed any key for 30 seconds, the phone<br />
returns to standby mode.<br />
• If you press end, the operation is canceled and the phone will<br />
return to the standby mode.<br />
Redialing from Talk Mode<br />
1) Press talk/flash or spkr.<br />
2) Press redial/p. The last number dialed will be displayed and redialed.<br />
3) To hang up, press end.<br />
BASICS<br />
When using the redial feature in talk mode, only the last number<br />
dialed will be displayed.<br />
BASICS<br />
[ 17 ]
• If you select “Ringer Off”,<br />
“” appears in<br />
the display when you<br />
make or<br />
receive calls, or charge<br />
the handset.<br />
• If you set the ringer to<br />
Off, the ringer tone will<br />
not sound.<br />
[ 18 ]<br />
BASICS<br />
Ringer Volume Setup<br />
1) When the phone is in the standby mode, press menu/mute.<br />
2) Press + or - to move the pointer to “Ringer Volume”.<br />
3) Press select/ch.<br />
4) Press + or - to move the pointer through the ringer settings<br />
(Ringer Off, Ringer Low, or Ringer High).<br />
You will hear a ringer or melody at the selected volume.<br />
5) Press select/ch, you will hear a confirmation tone.<br />
6) Press end to exit.<br />
Ringer Mute (temporarily)<br />
You can temporarily mute the ringer tone. When the handset is off the<br />
base and the phone is ringing, press end. The ringer tone will return to<br />
the previous setting starting with the next incoming call.<br />
Ringer Tone Setting<br />
1) When the phone is in the standby mode, press menu/mute.<br />
2) Press + or - to move the pointer to “Ringer Tones”,<br />
then press select/ch.<br />
You can choose from 6 ringers or 4 melodies:<br />
- Ringers [Flicker, Clatter, Leap Frog, Ping Ball, Reminder,<br />
Soft Alert]<br />
- Melodies [Beethoven9, For Elise (Elise), Merry Christmas<br />
(Merry-Xmas), Home Sweet Home (Hm Swt Hm)]<br />
3) Press + or - to move the pointer. You will hear the ringer or the<br />
melody as you scroll through the options.<br />
4) Press select/ch and you will hear a confirmation tone.<br />
5) Press end to exit.
Distinctive Ringer Setup<br />
“Distinctive Ringer” allows you to preset memory locations with a designated ring tone. When<br />
an incoming call is received and the Caller ID information matches the information in one of<br />
the memory locations, the Distinctive Ring that has been stored for that particular caller will<br />
sound.<br />
If you have set multiple memory locations with distinctive rings, switching the setting to<br />
“Distinctive Off” will result in no distinctive ringing. All incoming calls will have a normal ring<br />
tone. Switching to “Distinctive On” will activate all programmed distinctive ring memory<br />
locations.<br />
1) When the phone is in the standby mode, press menu/mute.<br />
• See ”Storing Phone<br />
Numbers, Names,<br />
Distinctive Rings, and<br />
Speed Dial” on page 23<br />
for storing a Distinctive<br />
Ring in the Phonebook.<br />
2) Press + or - to move the pointer to “Distinct. Ring”,<br />
then press select/ch.<br />
3) Press + or - to choose “Distinctive On” or<br />
“Distinctive Off”.<br />
4) Press select/ch, and you will hear a confirmation tone.<br />
5) Press end to exit.<br />
BASICS<br />
BASICS<br />
[ 19 ]
Adjusting the Earpiece and<br />
Handset Speaker Volume<br />
You can select different volume levels for the handset earpiece and the handset speaker<br />
(Volume Low, Volume Medium, Volume High, and Volume Maximum). The volume can only be<br />
adjusted during a call. Press + or - to select the volume settings. When you hang up, the<br />
phone keeps the last volume setting selected.<br />
If you press + in maximum volume level or - in lowest volume level, you will hear a beep.<br />
• If you press end to<br />
cancel muting, the call<br />
is disconnected and the<br />
phone will return to<br />
standby mode.<br />
• If you press xfer/del<br />
while muting, the<br />
muting is canceled.<br />
Mute Microphone<br />
You can temporarily turn Off the microphone so that the person you are<br />
talking with cannot hear you.<br />
During a telephone call press and hold menu/mute to turn Off the<br />
microphone, and “Mute” appears on the display. Press menu/mute again<br />
to cancel muting.<br />
[ 20 ]<br />
BASICS
Tone Dialing Switch-over<br />
Some telephone companies use equipment that requires pulse dialing (sometimes referred to<br />
as rotary dialing). If you need to enter tone dialing digits, you can switch-over to tone<br />
dialing during the call. For example, entering your bank account number after you have<br />
called your bank.<br />
Initially make your call with the pulse dialing mode. Once your call<br />
connects, press /tone. Enter the desired number. These digits will be<br />
sent as tone dialing. Once the call ends, the tone mode is canceled and<br />
pulse dialing mode resumes.<br />
Traveling Out-of-Range<br />
During a call, as you begin to move your handset too far from your base unit, noise<br />
increases. If you pass the range limits of the base unit, your call will terminate within 30<br />
seconds. To avoid your call being terminated, quickly move your handset back in range.<br />
• The tone feature only<br />
applies when the dial<br />
mode is set to pulse.<br />
• This special number can<br />
be stored in a memory<br />
location. This is referred<br />
to as Chain Dialing. (See<br />
page 31.)<br />
BASICS<br />
Selecting a Different Channel<br />
If you encounter interference while using your phone, you can manually change the phone’s<br />
channel for clear operation. This function works only when the phone is in use.<br />
Press select/ch. “Scanning” appears on the display, indicating the phone is changing to<br />
another channel. For more information on interference, refer to “Radio Interference” on<br />
page 44.<br />
BASICS<br />
[ 21 ]
• If the handset battery is<br />
completely drained, the<br />
handset will not beep<br />
when paging.<br />
Find Handset<br />
To locate the handset, press find handset on the base when the<br />
base is in the standby mode. The handset beeps for 60 seconds,<br />
and “Paging” appears on the handset display.<br />
Paging is canceled when pressing any key on the handset or<br />
find handset on the base. Additionally, if you receive an incoming<br />
call, page is canceled.<br />
You must subscribe<br />
through your local<br />
telephone company<br />
to receive Call<br />
Waiting Service.<br />
Flash and Call Waiting<br />
If you have Call Waiting service and a call waiting tone sounds while<br />
you are on a call, press talk/flash to accept the waiting call. There is<br />
a short pause, then you will hear the new caller. To return to the<br />
original caller, press talk/flash again.<br />
Voice Mail LED<br />
The voice mail LED on the handset is designed to work with your<br />
voice mail service provided by your local telephone company. The LED<br />
flashes when you have new messages in your voice mail box.<br />
You may need to occasionally reset the indicator if it remains On<br />
after you’ve retrieved your messages. To reset the indicator, when the<br />
phone is in the standby mode, press and hold find handset on the<br />
base until the paging sound stops (about 5 seconds).<br />
[ 22 ] BASICS
Phonebook<br />
Phonebook allows you to dial a number using just a few key presses.<br />
Your phone stores names/numbers in the phonebook memory location, and you can search names<br />
in alphabetical order. You have a total of 100 locations that can be used for the phonebook<br />
(including the Speed dials) and Caller ID messages.<br />
• If any of the following occurs during a phonebook operation, the operation will be canceled.<br />
-Press end. The phone will return to the standby mode (or the call will be disconnected).<br />
-Press talk/flash or spkr.<br />
-Receive an incoming call, page, or transferring call (from the standby mode only).<br />
-Charge the handset<br />
-Receive a CIDCW (Caller ID on Call Waiting) (during a call only).<br />
• The idle time is 30 seconds. If the handset remains idle for 30 seconds, the phone will return to the<br />
standby mode (or back to the call).<br />
Storing Phone Numbers, Names, Distinctive<br />
Rings, and Speed Dial<br />
1) When the phone is in the standby mode, press /RocketDial/.<br />
The handset displays the number of the phonebook locations used,<br />
and information on searching and storing phonebook locations.<br />
(1st line) The number of the phonebook locations used<br />
(2nd line) How to search (press the number keypad, + or -)<br />
(3rd line) How to enter the storing operation (press select/ch)<br />
PHONEBOOK<br />
PHONEBOOK<br />
[ 23 ]
2) Press select/ch, “Store/Edit Name” appears.<br />
• When the memory is<br />
full, you will hear a<br />
beep and “Memory<br />
Full” appears. You<br />
cannot store names<br />
and numbers.<br />
• The pause key counts<br />
as one digit. Pressing<br />
redial/p more than<br />
once increases the<br />
length of pause<br />
between numbers.<br />
3) Store the name (up to 16 characters) by using the number keypad.<br />
• See the “Steps for entering names and special characters” (see page 27).<br />
• Use call id/ and /RocketDial/ to move the cursor to the desired location.<br />
• Use xfer/del to delete characters as needed.<br />
• Press and hold xfer/del to delete all the characters.<br />
If a name is not required, go to step 4.<br />
4) Press select/ch to store the name,<br />
“Store/Edit No.” appears.<br />
5) Press the number keypad to enter the phone number (up to 20 digits),<br />
press select/ch to store the number.<br />
6) “Distinctive Ring” appears. Press + or - to move the pointer<br />
to one of the Distinctive Ring options, then press select/ch.<br />
• If you select a Speed<br />
dial location where a<br />
number is already<br />
stored, the new number<br />
will replace the old<br />
number, and the old<br />
number will be stored as<br />
a phonebook location.<br />
If you choose not to store a “Distinctive Ring”, simply select the “No<br />
Selectn” option.<br />
7) “Speed Dial” appears. Press + or - to move the pointer to select<br />
the Speed dial location (10 locations: SPD1-SPD0).<br />
If you choose not to store the name/number as a Speed Dial, simply<br />
select the “No Selectn” option.<br />
8) Press select/ch. You will hear a confirmation tone and<br />
“Done!” appears on the display.<br />
[ 24 ]<br />
PHONEBOOK
Steps for Entering Names and Special Characters<br />
Refer to the letters on the number keys to select the desired characters. With each press of a<br />
number key (0-9), the displayed character appears in the following order: Upper case letters<br />
first, lower case letters next and finally the number corresponding to the key.<br />
Number of times key is pressed<br />
If you make a mistake while entering a name<br />
Use /RocketDial/ or call id/ to move the cursor to the incorrect character.<br />
Press xfer/del to erase the wrong character, then enter the correct character. To delete all<br />
characters, press and hold xfer/del.<br />
PHONEBOOK<br />
PHONEBOOK<br />
[ 25 ]
For example, to enter Inter-Tel:<br />
1) When the phone is in the standby mode, press /RocketDial/.<br />
The handset displays the number of phonebook locations you have stored, and<br />
how to search and store the phonebook locations.<br />
2) Press select/ch, “Store/Edit Name” appears.<br />
3) Press 8 twice.<br />
4) Press 6 five times.<br />
5) Press 4 six times.<br />
6) Press 3 four times, then press call id/ to move the cursor to the right.<br />
If the next character uses the same number key, you must press call id/ to move the cursor over.<br />
Otherwise the next time you press the number key, it changes the character that was previously set.<br />
7) Press 3 five times.<br />
8) Press 6 five times.<br />
9) When finished, press select/ch.<br />
To continue to store the telephone number, proceed to step 5 on page 26.<br />
[ 26 ] PHONEBOOK
Viewing the Phonebook<br />
Your phone stores names/numbers in the phonebook memory locations, and you can search<br />
names in alphabetical order. You can view the phonebook during a call as well as when the<br />
phone is in the standby mode.<br />
1) Press /RocketDial/.<br />
If you press /RocketDial/ during a call, the following<br />
screen appears.<br />
“/SD” appears on the<br />
display when you review<br />
the RocketDial, and<br />
“/SPDn” appears when<br />
you review a Speed dial.<br />
2) Press + or -, or the number keypad to view the<br />
phonebook locations.<br />
a) Alphabetical order<br />
Ascending order: Press - to view locations. The location in the RocketDial<br />
appears first in the display. Each time - is pressed, phonebook locations appear in<br />
ascending order.<br />
Descending order: Press + to view locations. A name starting with a number or a mark,<br />
or appears first. Each time + is pressed, phonebook locations appear in<br />
descending order.<br />
b) From a number key<br />
Refer to the letters on the number keys to select the first letter of the desired name.<br />
Press a number key until any name with the same initial is displayed (See the table in<br />
“Steps for Entering Names and Special Characters” on page 27).<br />
For example, to search for “Inter-Tel”, press 8 two times. Press - or + until the name is<br />
displayed. If you press + while the first name in “U” is displayed, a name starting with<br />
“T” will appear, or if you press - while the last name in “U” is displayed, a name<br />
starting with “V” will appear.<br />
3) To finish the viewing operation, press /RocketDial/ (if you view the phonebook<br />
during a call) or end.<br />
PHONEBOOK<br />
PHONEBOOK<br />
[ 27 ]
[ 28 ] PHONEBOOK<br />
Making Calls Using the Phonebook<br />
From Standby Mode<br />
1) When the phone is in the standby mode,<br />
press /RocketDial/.<br />
2) Press + or -, or the number keypad to view the phonebook locations<br />
(see “Viewing the Phonebook” on page 27).<br />
3) Press talk/flash or spkr. The displayed number is dialed.<br />
4) To hang up press end.<br />
From Talk Mode<br />
1) Press talk/flash or spkr.<br />
2) Press /RocketDial/.<br />
3) Press + or -, or the number keypad to view the phonebook locations<br />
(see “Viewing the Phonebook” on page 27).<br />
4) Press select/ch. The number in the displayed phonebook location is dialed.<br />
5) To hang up press end.<br />
Speed Dialing<br />
If you select a speed dial memory location (10 locations: SPD1 - SPD0) when storing a<br />
phone number in the phonebook dial location, you can use the speed dialing feature. When<br />
the phone is in the standby mode, press and hold a number key (0-9) associated with the<br />
speed dial. The number stored in the speed dial appears, then press talk/flash or spkr.<br />
The phone number in the speed dial (SPD1 - SPD0) is dialed.
Editing or Erasing a Stored Name, Phone<br />
Number, Distinctive Ring, and Speed Dial<br />
1) When the phone is in the standby mode,<br />
press /RocketDial/.<br />
2) Press + or -, or the number keypad to view the phonebook<br />
locations (see “Viewing the Phonebook” on page 27).<br />
Editing the Stored Data<br />
1) When the phonebook location to be edited appears, press<br />
select/ch. “Store/Edit Name” appears.<br />
2) Follow the steps 3 to 7 under “Storing Phone Numbers,<br />
Names, Distinctive Rings, and Speed Dial” on page 23 to<br />
complete the editing operation.<br />
3) Press select/ch. You will hear a confirmation tone and<br />
“Done!” appears on the display.<br />
Deleting the Stored Data<br />
1) When the phonebook location to be deleted appears,<br />
press xfer/del. “Delete Memory?” appears.<br />
2) Press + to move the pointer to “Yes”.<br />
3) Press select/ch or xfer/del. You hear a confirmation tone.<br />
“Deleted!” appears in the display.<br />
PHONEBOOK<br />
PHONEBOOK<br />
[ 29 ]
• Memory location for<br />
the RocketDial is<br />
independent from the<br />
memory location for<br />
the phonebook.<br />
• If the RocketDial is<br />
empty, you will hear<br />
a beep.<br />
RocketDial (One Touch Dialing)<br />
You can store a number you dial often in the RocketDial. The rocket<br />
dialing allows you to dial a number with one key press.<br />
Storing the RocketDial<br />
1) When the phone is in the standby mode,<br />
press /RocketDial/.<br />
2) Press - once to display the RocketDial menu, then press select/ch.<br />
Store the name, phone number, and distinctive ring by following<br />
the steps 3 to 6 under “Storing Phone Numbers, Names, Distinctive<br />
Rings and Speed Dial” on page 23.<br />
3) You will hear a confirmation tone and “Done!” appears in the<br />
display.<br />
Making calls with the RocketDial<br />
When the phone is in the standby mode, press and hold<br />
/RocketDial/. The number in the rocket<br />
location is dialed.<br />
Deleting the RocketDial<br />
1) When the phone is in the standby mode,<br />
press /RocketDial/.<br />
2) Press once - to display the RocketDial menu.<br />
3) Press xfer/del.<br />
4) Press + to move the pointer to “Yes”.<br />
5) Press select/ch or xfer/del. You will hear a confirmation tone.<br />
“Deleted!” appears in the display.<br />
Connecting<br />
8175551212<br />
[ 30 ] PHONEBOOK
Chain Dialing<br />
The memory locations in the handset are not limited to phone numbers. You can also store a<br />
group of numbers (up to 20 digits), that you need to enter once your call connects. This is<br />
referred to as Chain Dialing.<br />
An example of this is a bank account number. Store the special number in the Phonebook<br />
location (refer to “Storing Phone Numbers, Names, Distinctive Rings and Speed Dial” on<br />
page 23). Once you have called your bank, and when you are prompted to enter the account<br />
number, press /RocketDial/ and use + or - to select the number in the Phonebook<br />
location, then press select/ch.<br />
PHONEBOOK<br />
PHONEBOOK [ 31 ]
• If you answer a call<br />
before the Caller ID<br />
message is received<br />
(Example: before the<br />
second ring), the<br />
Caller ID message will<br />
not appear.<br />
• When the call is received<br />
via a telephone company<br />
that does not offer<br />
Caller ID service, the<br />
caller´s phone number<br />
and name do not appear.<br />
(This includes some<br />
international calls.)<br />
• When the call is via a<br />
private branch exchange<br />
(PBX), the caller´s phone<br />
number and name may<br />
not appear.<br />
[ 32 ] CALLER ID<br />
Caller ID<br />
You must subscribe to Caller ID service to use this feature.<br />
When the telephone rings, the Caller ID feature allows you to view the caller’s name and<br />
phone number on the display before you answer the phone. Additionally, you can dial the<br />
displayed number and store the information for memory dialing.<br />
Make sure you have turned on the Caller ID/Call Waiting feature. (See page 13.)<br />
Important:<br />
Memory locations for Caller ID messages and Phonebook locations (including Speed Dials) are<br />
common, you can store up to 100 in total. A Caller ID message is not stored when you have<br />
stored 100 of the phonebook locations. The earliest Caller ID message is overwritten when<br />
you have stored 100 of the phonebook locations and Caller ID messages in total.<br />
• If any of the following occurs during Caller ID operation, the operation will be canceled.<br />
-Press end. The phone will return to the standby mode (or the call will be disconnected).<br />
-Press talk/flash or spkr. (except for during hands-free conversation)<br />
-Receive an incoming call, page, or transferring call (from the standby mode only).<br />
-Receive a CIDCW (Caller ID on Call Waiting) (during a call only).<br />
-Charge the handset.<br />
• The idle time is 30 seconds. If the handset remains idle for 30 seconds, the phone will return to the<br />
standby mode (or back to the call).<br />
1) When the Caller ID message is received, the display shows the caller’s phone number<br />
along with the date and time. The incoming call information is stored in the Caller ID<br />
record. If the Caller ID service includes the<br />
caller’s name, the name will appear on the<br />
display. (up to 15 characters.)<br />
You may receive any one of the following messages:<br />
When invalid data is received “Incomplete Data”<br />
When a private name is received “Private Name”<br />
When a private number is received “Private Number”<br />
When a unknown name is received “Unknown Name”<br />
When a unknown number is received “Unknown Number”<br />
2) When you pick up the phone, the display changes to “Talk”.<br />
(AutoTalk feature is set to On.)
Viewing the Caller ID List<br />
The Caller ID list stores information for incoming calls – even unanswered calls. You can<br />
store 100 of the Caller ID messages and Phonebook locations (including Speed Dials) in<br />
total. You can view the Caller ID list during a call or when the phone is in the standby<br />
mode.<br />
1) Press call id/.<br />
The summary screen appears. The screen shows the number of<br />
new messages and the total number of messages.<br />
2) View the Caller ID messages by following these procedures.<br />
From new to oldest:<br />
a. Press - to display the latest Caller ID message.<br />
b. Press - to see the previous message.<br />
From oldest to new:<br />
a. Press + to display the earliest Caller ID message.<br />
b. Press + to see the next message.<br />
In alphabetic order:<br />
Press the number keypad (2-9 and 0) to display the Caller ID messages in<br />
alphabetical order. Refer to the letters on the number keys to select the desired letter.<br />
Once you view the Caller ID list in alphabetical order, you cannot switch to the Caller ID display in<br />
historical order (from new to old or from old to new) unless you exit the operation.<br />
The number of calls from<br />
the same Caller ID<br />
appears next to the<br />
received time. Once you<br />
have reviewed the new<br />
message, the number<br />
will be cleared<br />
and disappears.<br />
CALLER ID<br />
3) To finish the viewing operation, press call id/ (if you view the Caller ID list during a<br />
call) or end.<br />
CALLER ID<br />
[ 33 ]
Once the Caller ID<br />
data has been deleted,<br />
the information cannot<br />
be retrieved.<br />
Deleting Information from the Caller ID List<br />
Deleting a Caller ID message<br />
1) When the phone is in the standby mode, and while the incoming<br />
Caller ID information is displayed, press xfer/del.<br />
“Delete Message?” appears.<br />
2) Press + or - to choose “Yes” or “No”.<br />
3) Press select/ch or xfer/del.<br />
When the pointer is at “Yes”: You will hear a confirmation tone, and the Caller ID<br />
message is deleted. The next or previous Caller ID message is then displayed.<br />
When the pointer is at “No”: The display returns to the Caller ID message.<br />
Deleting all Caller ID names/numbers<br />
1) When the phone is in the standby mode, press call id/.<br />
2) Press xfer/del.<br />
3) Press + or - to choose “Yes” or “No”.<br />
4) Press select/ch or xfer/del.<br />
When the pointer is at “Yes”: You will hear a confirmation tone, and all stored<br />
Caller ID messages are deleted.<br />
When the pointer is at “No”: The display returns to the summary screen.<br />
[ 34 ] CALLER ID
Using the Caller ID Message List<br />
Calling a party from the Caller ID list<br />
From Standby mode<br />
1) Press call id/. The summary screen appears. The screen shows the<br />
number of new messages and the total number of messages.<br />
2) Use the number keypad (2-9 and 0), +, or - to view the Caller ID message list.<br />
3) Press talk/flash or spkr. The displayed phone number<br />
dials automatically.<br />
From Talk mode<br />
1) Press talk/flash.<br />
2) Press call id/. The summary screen appears.<br />
3) View the Caller ID message you want to dial.<br />
4) Press select/ch. The displayed phone number will be dialed.<br />
Connecting<br />
8002971023<br />
Long Distance calls and Area Code Setting/Cancellation<br />
While the present Caller ID information is displayed, pressing /tone will place or remove<br />
the prefix “1” in the display to set the call for a long distance call, or pressing # will set or<br />
cancel an area code. (See page 16.)<br />
Storing Caller ID messages in the Phonebook/RocketDial<br />
Messages shown in the Caller ID list can be stored in the phonebook. Using the incoming<br />
call information (i.e., Caller ID list), the phone number and name of the party on the Caller<br />
ID list can be stored in memory.<br />
1) When the phone is in the standby mode, while the incoming Caller<br />
ID information is displayed, press /RocketDial/.<br />
2) Press + or - to choose “Store in PB?” (Phonebook locations) or<br />
“Store in SD?” (RocketDial location). To cancel Storing, select<br />
“Cancel”.<br />
• You cannot make a call<br />
from the Caller ID list if<br />
your phone is connected<br />
to a private branch<br />
exchange (PBX).<br />
• When a long distance<br />
call has been set, “1”<br />
appears in the display.<br />
• If a call comes in via a<br />
telephone system that<br />
does not offer Caller ID<br />
service, no information<br />
is stored.<br />
CALLER ID<br />
[ 35 ]<br />
CALLER ID
3) Press select/ch. You will hear a confirmation tone.<br />
• You cannot store a Caller ID message in the phonebook if a phone number does not appear in the message.<br />
• You cannot set the distinctive ring or speed dial in this step. If you would like to set these options, edit<br />
the stored data.<br />
• Even if the memory locations are full, the message will be stored in the Phonebook, however, the message<br />
will be erased from the Caller ID List.<br />
• If data is already stored in the RocketDial, the old data will be overwritten by the new data.<br />
• To activate features,<br />
select “CW Deluxe On” in<br />
the Caller ID setup. See<br />
page 13.<br />
• You can also answer a<br />
waiting call immediately<br />
by pressing talk/flash,<br />
the first caller will be<br />
placed on hold. To return<br />
to the original caller,<br />
press talk/flash again.<br />
Call Waiting Deluxe Features<br />
Your phone gives you new options for call waiting. At the touch of a button, you can place the<br />
caller on hold, send them to your voice mail service, or conference them into your current call.<br />
You may be required to subscribe to Call Waiting and Call Waiting Deluxe to use these features.<br />
Not all features are available in all areas. Check with your local telephone company for details.<br />
1) When you receive a Call Waiting call, press menu/mute for a list of options.<br />
2) Press + or -, or the number keypad (1-7) to select an option. For example:<br />
press<br />
-<br />
4 times<br />
press<br />
-<br />
2 times<br />
3) Press select/ch. A confirmation screen will appear.<br />
Your phone is pre-programmed with seven call waiting options. You may select to ask the<br />
calling party to hold, send them a busy message, forward them to your voice mail, or answer<br />
and drop the first caller. You may also select to conference them into the current call or, at any<br />
time, choose to drop the first or drop the last caller.<br />
Check with your local telephone company for a full list of options.<br />
[ 36 ] CALLER ID
Changing the Digital Security Code<br />
The digital security code is an identification code used to connect the handset and the base<br />
unit. Normally, setting the code is not necessary. In the rare situation that you suspect<br />
another cordless telephone is using the same security code, you can change the code. To<br />
change the digital security code, de-register the code, then register a different code.<br />
De-register the Digital Security Code<br />
1) Remove the handset from the base. In the standby mode, press and hold xfer/del and<br />
end for 10 seconds. You will hear a confirmation tone. “De-Register?” appears.<br />
2) Press + to select “Yes”, then select/ch. You will hear a confirmation tone, and<br />
“Deregistration Complete” appears.<br />
You will need to reregister<br />
the additional<br />
handset each time you<br />
change the digital<br />
security code of the<br />
original unit.<br />
• If you have not pressed any key for 30 seconds while in the de-registering operation, the<br />
phone returns to the standby mode.<br />
• While in the de-registering operation, if you receive an incoming call, page, or transferring call,<br />
or charge the handset, or press talk/flash, spkr or end, the operation is canceled.<br />
ADDITIONAL<br />
INFORMATION<br />
ADDITIONAL INFORMATION<br />
[ 37 ]
Register the Security Code<br />
1) Unplug the AC adapter.<br />
2) Press and hold find handset on the base while you plug in the AC Adapter, hold<br />
find handset until the status LED on the base flashes.<br />
3) Press talk/flash. “Handset Registering” appears.<br />
When the operation is finished “Registration Complete” appears and the status<br />
LED is turned Off. You will hear a confirmation tone and the phone returns to the<br />
standby mode.<br />
• You must complete the registration operation within 30 seconds, or the phone returns to the standby mode.<br />
• During the registration operation, you cannot receive an incoming call, page, or make a call.<br />
Installing the Beltclip<br />
To attach the beltclip<br />
Insert the beltclip into the holes on each side of the handset.<br />
Press down until it clicks.<br />
To remove the beltclip<br />
Pull both sides of the beltclip to release the tabs from the holes.<br />
Headset Installation<br />
Your phone may be used with an optional headset, the Inter-Tel HS910.<br />
To use this feature, insert the headset plug into the headset jack. Your<br />
phone is ready for hands-free conversations. (Headset may be purchased<br />
by calling the Inter-Tel Parts Department or visiting the web site.<br />
See page 9.)<br />
[ 38 ] ADDITIONAL INFORMATION
Note on Power Sources<br />
Battery replacement and handling<br />
When the operating time becomes short, even after a battery is recharged, please replace the battery. With normal<br />
usage, your battery should last about one year.<br />
Please contact your place of purchase or the Inter-Tel Parts Department for a replacement battery. (See page 9)<br />
Warning<br />
To avoid the risk of personal injury or property damage from fire or electrical shock, only use the Inter-Tel battery<br />
model and Inter-Tel adapter model specifically designated for this product.<br />
Power Failure<br />
During the period that the power is off, you will not be able to make or receive calls with the telephone.<br />
Caution<br />
• Use the specified Inter-Tel battery pack (BT-446).<br />
• Do not remove the battery from the handset to charge it.<br />
• Never throw the battery into a fire, disassemble it, or heat it.<br />
• Do not remove or damage the battery casing.<br />
Maintenance<br />
When the handset or base unit becomes slightly dirty<br />
Wipe with a soft, dry cloth.<br />
When the handset or base unit becomes very dirty<br />
Wipe with a soft cloth that has been dampened with diluted, neutral<br />
detergent. Dry with a dry cloth.<br />
When the charging contacts become very dirty on both the handset and<br />
base unit<br />
Using water only, dampen a cloth to clean the charging contacts.<br />
Then make sure to go back over the charging contacts with a dry cloth before<br />
returning the handset to the base unit to charge.<br />
Caution<br />
Do not use paint thinner,<br />
benzene, alcohol, or other<br />
chemical products.<br />
Doing so may discolor the<br />
surface of the telephone and<br />
damage the finish.<br />
ADDITIONAL<br />
INFORMATION<br />
ADDITIONAL INFORMATION<br />
[ 39 ]
General Information<br />
The phone complies with FCC Parts 15 and 68. Operating temperature: 0 ºC to +50 ºC (+32 ºF to +122 ºF)<br />
AC Adapter Information<br />
AC Adapter part number: AD-312 for the base AD-446 for the charger (TRU5860-2 only)<br />
Input Voltage: 120V AC 60Hz 120V AC 60Hz<br />
Output Voltage: 9V DC 350 mA 9V DC 210 mA<br />
Battery Information<br />
Battery part number:<br />
BT-446<br />
Capacity: 800 mAh, 3.6V<br />
Battery use time (per charge)<br />
From fully charged<br />
Talk mode duration:<br />
Up to 4 hours<br />
Standby mode duration:<br />
Up to 8 days<br />
If the handset is left off of the base, the actual Talk mode duration will<br />
be reduced respective to the amount of time the handset is off the base.<br />
Recharge your phone on a regular basis by returning the handset to the base after each phone call. When the<br />
operating time becomes short, even after the battery is recharged, please replace the battery. With normal usage, the<br />
battery should last about one year.<br />
A replacement Inter-Tel adapter and battery may be purchase Inter-Tel accessories at your local Inter-Tel dealer or by<br />
contacting the Inter-Tel Parts Department (800) 554-3988. Hours are from 8:00 a.m. to 5:00 p.m. CST, Monday<br />
through Friday. We can also be reached on the web at www.inter-tel.com.<br />
Specifications, features, and availability of optional accessories are all subject to change without prior notice.<br />
[ 40 ] ADDITIONAL INFORMATION
Troubleshooting<br />
If your phone is not performing to your expectations, please try these simple steps first.<br />
Symptom<br />
Suggestion<br />
The status LED won’t illuminate when • Make sure the AC adapter is plugged into the base and wall outlet.<br />
the handset is placed in the base.<br />
• Make sure the handset is properly seated in the base.<br />
• Make sure the charging contacts on the handset and base are clean.<br />
The audio sounds weak<br />
• Move the handset and/or base to a different location away from metal objects<br />
and/or scratchy.<br />
or appliances and try again.<br />
• Press select/ch to help eliminate background noise.<br />
• Make sure that you are not too far from the base.<br />
Can’t make or receive calls.<br />
• Check both ends of the base telephone line cord.<br />
• Make sure the AC adapter is plugged into the base and wall outlet.<br />
• Disconnect the AC adapter for a few minutes, then reconnect it.<br />
• Change the digital security code (See page 43).<br />
• Make sure that you are not too far from the base.<br />
The handset doesn’t ring or receive • The battery pack may be weak. Charge the battery in the base unit<br />
a page.<br />
for 15-20 hours.<br />
• The handset may be too far away from the base unit.<br />
• Place the base unit away from appliances or metal objects.<br />
• Change the digital security code (See page 43).<br />
Severe noise interference.<br />
• Keep the handset away from microwave ovens, computers, remote control toys,<br />
wireless microphones, alarm systems, intercoms, room monitors, fluorescent lights,<br />
and electrical appliances.<br />
• Move to another location or turn off the source of interference.<br />
The Caller ID does not display.<br />
• The handset was picked up before the second ring.<br />
• The call was placed through a switchboard.<br />
• Call your local telephone company to verify your Caller ID service is current.<br />
“Unavailable” message is displayed • Make sure the other handset is not already in use. Both handsets cannot be<br />
on the LCD screen of the handset.<br />
in talk mode at the same time.<br />
• Place the handset for at least 5 seconds to re-register to the main base.<br />
• Make sure the handset is not too far from the main base when trying to use.<br />
The handset doesn’t communicate • Change the digital security code (See page 43).<br />
with the other handset.<br />
• Make sure that you have registered the second handset (TXC580 only).<br />
The second handset can’t join<br />
• Only one handset at a time can talk with an outside caller. To allow a different<br />
the conversation.<br />
handset to talk to the caller, transfer the call to the other handset.<br />
If you still have a problem.<br />
• Contact your local authorized Inter-Tel reseller. .<br />
TROUBLESHOOTING<br />
TROUBLESHOOTING<br />
[ 41 ]
Liquid Damage<br />
Moisture and liquid can damage your cordless phone. In case of accidental submersion, please read the following steps.<br />
Case<br />
If the handset or base is exposed to<br />
moisture or liquid, but only affects the<br />
exterior plastic housing.<br />
If moisture or liquid has entered the<br />
plastic-housing (i.e. liquid can be heard in<br />
the phone or liquid has entered the<br />
handset battery compartment or vent<br />
openings on the base).<br />
Wipe off the liquid and use as normal.<br />
Action<br />
Handset:<br />
1. Remove the battery cover and leave it off for ventilation.<br />
2. Remove the battery pack by disconnecting.<br />
3. Leave the battery cover off and the battery pack disconnected for at least 3 days.<br />
4. Once completely dry, reconnect the battery pack and the battery cover.<br />
5. Recharge the handset’s battery pack for 20 hours in the base unit before using the<br />
phone.<br />
Base:<br />
1. Disconnect the AC adapter from the base unit, cutting off electrical power.<br />
2. Disconnect the telephone cord from the base unit.<br />
3. Let dry for at least 3 days.<br />
IMPORTANT: You must unplug the telephone line while recharging the battery pack to<br />
avoid charge interruption.<br />
CAUTION:<br />
DO NOT use a microwave oven to speed up the drying process. This will cause permanent<br />
damage to the handset, base and the microwave oven.<br />
After following these steps, if your cordless telephone does not work, please send to:<br />
Inter-Tel America Corporation<br />
Parts and Service Division<br />
4700 Amon Carter Blvd.<br />
Ft. Worth, TX 76155<br />
1-800-554-3988. Monday through Friday<br />
8 a.m. to 5 p.m. CST<br />
[ 42 ] TROUBLESHOOTING
Precautions!<br />
Before you read anything else, please observe the following:<br />
Warning!<br />
Inter-Tel DOES NOT represent this unit to be waterproof. To reduce the<br />
risk of fire, electrical shock, or damage to the unit, DO NOT expose<br />
this unit to rain or moisture.<br />
Rechargeable Nickel-Metal-Hydride Battery Warning<br />
• This equipment contains a rechargeable Nickel-Metal-Hydride battery.<br />
• Nickel is a chemical known to state of California to cause cancer.<br />
• The rechargeable Nickel-Metal-Hydride battery contained in this<br />
equipment may explode if disposed of in a fire.<br />
• Do not short-circuit the battery.<br />
• Do not charge the rechargeable Nickel-Metal-Hydride battery<br />
used in this equipment in any charger other than the one<br />
designed to charge this battery as specified in the owner’s<br />
manual. Using another charger may damage the battery or<br />
cause the battery to explode.<br />
Rechargeable Nickel-Metal-Hydride<br />
Batteries Must Be Recycled or<br />
Disposed of Properly<br />
The exclamation point within an equilateral<br />
triangle is intended to alert the user to the<br />
presence of important operating and maintenance<br />
(servicing) instructions in the literature<br />
accompanying the appliance.<br />
Inter-Tel works to reduce lead content in our PVC coated cords in our<br />
product and accessories.<br />
WARNING:<br />
The cords on this products and/or accessories contain lead, a chemical<br />
known to the State of California to cause birth defects or other<br />
reproductive harm. Wash hands after handling.<br />
Important Safety Instructions<br />
When using your telephone equipment, these basic safety precautions<br />
should always be followed to reduce the risk of fire, electrical shock,<br />
and injury to persons:<br />
1. Read and understand all instructions.<br />
2. Follow all warnings and instructions marked on the product.<br />
3. Unplug this product from the wall outlet before cleaning. Use a<br />
dry cloth for cleaning without liquid or aerosol cleaners.<br />
4. Do not use this product near water; for example, near a bathtub,<br />
wash bowl, kitchen sink or laundry tub, in a wet basement, or<br />
near a swimming pool.<br />
5. Do not place this product on an unstable cart, stand, or table.<br />
The telephone may fall, causing serious damage to the unit.<br />
6. Slots and openings in the cabinet and the back or bottom are<br />
provided for ventilation. To protect the product from overheating,<br />
these openings must not be blocked or covered. This product<br />
should never be placed near or over a radiator or heat register.<br />
This product should not be placed in a built-in installation unless<br />
proper ventilation is provided.<br />
7. This product should be operated only from the type of power<br />
source indicated on the marking label. If you are not sure of the<br />
type of power supply to your home, consult your dealer or local<br />
power company.<br />
8. Do not allow anything to rest on the power cord. Do not locate<br />
this product where the cord will be damaged by persons walking<br />
on it.<br />
9. Do not overload wall outlets and extension cords, as this can<br />
result in the risk of fire or electrical shock.<br />
10. Never push objects of any kind into this product through cabinet<br />
slots, as they may touch dangerous voltage points or short out<br />
parts that could result in a risk of fire or electric shock. Never<br />
spill liquid of any kind on the product.<br />
11. To reduce the risk of electric shock, do not disassemble this product.<br />
Take it to qualified service personnel when service or repair work is<br />
required. Opening or removing covers may expose you to dangerous<br />
voltages or other risks. Incorrect reassembly can cause electric shock<br />
when the appliance is subsequently used.<br />
12. Unplug this product from the wall outlet and refer servicing to<br />
qualified service personnel under the following conditions:<br />
A. When the power supply cord is damaged or frayed.<br />
B. If liquid has been spilled into the product.<br />
C. If the product has been exposed to rain or water.<br />
D. If the product does not operate normally when following the<br />
operating instructions. (Adjust only those controls that are<br />
covered by the operating instructions. Improper adjustment<br />
of other controls may result in damage and will often require<br />
extensive repair work by a qualified technician.)<br />
E. If the product has been dropped or the cabinet has<br />
been damaged.<br />
F. If the product exhibits a distinct change in performance.<br />
13. Do not use the telephone to report a gas leak in the vicinity of<br />
the leak.<br />
Additional Battery Safety Precautions<br />
Caution! To reduce the risk of fire or injury to persons by the<br />
battery, read and follow these instructions:<br />
1. Use only the Inter-Tel battery pack specified in the<br />
owner’s manual.<br />
2. Do not dispose of the battery pack in a fire. The cell may explode.<br />
Check the Nickel Metal Hydride battery disposal package insert for<br />
disposal instructions.<br />
3. Do not open or mutilate the battery pack. Released electrolyte is<br />
corrosive and may cause damage to the eyes or skin. It may be<br />
toxic if swallowed.<br />
4. Exercise care in handling the battery in order not to short the<br />
battery with conducting materials such as rings, bracelets, and<br />
keys. The battery or conductor may overheat and cause burns.<br />
5. Charge the battery pack provided with or identified for use with<br />
this product only in accordance with the instructions and<br />
limitations specified in the owner¬s manual provided for<br />
this product.<br />
6. Observe proper polarity orientation between the battery pack and<br />
battery charger.<br />
SAVE THESE INSTRUCTIONS!<br />
Important Electrical Considerations<br />
Unplug all electrical appliances when you know an electrical storm is<br />
approaching. Lightning can pass through your household wiring and<br />
damage any device connected to it. This phone is no exception.<br />
The FCC Wants You To Know<br />
Changes or modifications to this product not expressly approved by<br />
Inter-Tel, or operation of this product in any way other than as<br />
detailed by the owner’s manual, could void your authority to operate<br />
this product. Your telephone compiles with Part 68 of FCC Rules. You<br />
must, upon request, provide the FCC registration number and the REN<br />
to your telephone company. Both numbers are on the base unit.<br />
NOTE:<br />
You must not connect your phone to:<br />
• coin-operated systems<br />
• most electronic key telephone systems<br />
The FCC has established criteria for the amount of radio frequency<br />
energy various products may produce depending on their intended<br />
usage. This product has been tested and found to comply with the<br />
FCC exposure criteria. The base unit and the base antenna was<br />
designed to be installed so that it is not in contact with any person<br />
during operations.<br />
Range<br />
Your new phone is designed to achieve the maximum possible range<br />
by transmitting and receiving according to the highest specifications<br />
set forth by the FCC. We have rated this phone to operate at a<br />
maximum distance with the qualification that the range depends upon<br />
the environment in which the telephone is used. Many factors limit<br />
range, and it would be impossible to include all the variables in our<br />
rating. The Maximum Range rating of this phone is meant to be used<br />
as a means of comparison against other range claims.<br />
PRECAUTIONS &<br />
WARRANTY<br />
PRECAUTIONS & WARRANTY<br />
[ 43 ]
Telephone Line Problems<br />
The FCC has granted the telephone company the right to disconnect<br />
service in the event that your phone causes problems on the<br />
telephone line. Also, the telephone company may make changes in<br />
facilities and services which may affect the operation of your unit.<br />
However, your telephone company must give adequate notice in<br />
writing prior to such actions to allow you time for making necessary<br />
arrangements to continue uninterrupted service.<br />
If you are having trouble with your telephone service, you must first<br />
disconnect your phone to determine if it is the cause of your problem.<br />
If you determine that it is the cause, you must leave it disconnected<br />
until the trouble has been corrected.<br />
Radio Interference<br />
Radio interference may occasionally cause buzzing and humming in<br />
your cordless handset, or clicking noises in the base. This interference<br />
is caused by external sources such as TV, refrigerator, vacuum cleaner,<br />
fluorescent lighting, or electrical storm. Your unit is NOT DEFECTIVE. If<br />
these noises continue and are too distracting, please check around<br />
your home to see what appliances may be causing the problem. In<br />
addition, we recommend that the base not be plugged into a circuit<br />
that also powers a major appliance because of the potential for<br />
interference. Be certain that the antenna on the unit is fully extended<br />
when needed.<br />
In the unlikely event that you consistently hear other voices or<br />
distracting transmissions on your phone, you may be receiving radio<br />
signals from another cordless telephone or other source of<br />
interference. If you cannot eliminate this type of interference, you<br />
need to change to a different channel.<br />
Finally, it should be noted that some cordless telephones operate at<br />
frequencies that may cause interference to nearby TVs and VCRs. To<br />
minimize or prevent such interference, the base of the cordless<br />
telephone should not be placed near or on top of a TV or VCR. If<br />
interference is experienced, moving the cordless telephone farther<br />
away from the TV or VCR will often reduce or eliminate<br />
the interference.<br />
More than One Cordless Telephone<br />
If you want to use more than one cordless telephone in your home,<br />
they must operate on different channels. Press the channel key to<br />
select a channel that provides the clearest communication.<br />
Cordless Telephone Privacy<br />
Cordless telephones are radio devices. Communications between the<br />
handset and base of your cordless telephone are accomplished by<br />
means of radio waves which are broadcast over the open airways.<br />
Because of the inherent physical properties of radio waves, your<br />
communications can be received by radio receiving devices other than<br />
your own cordless telephone unit. Consequently, any communications<br />
using your cordless telephone may not be private.<br />
Installation Considerations<br />
Selecting a Location<br />
Before choosing a location for your new phone, there are some<br />
important guidelines you should consider:<br />
• The location should be close to both a phone jack and continuous<br />
power outlet. (A continuous power outlet is an AC outlet which<br />
does not have a switch to interrupt its power.)<br />
• Keep the base and handset away from sources of electrical noise<br />
such as motors or fluorescent lighting.<br />
• The base can be placed on a desk or tabletop or mounted on a<br />
standard telephone wall plate.<br />
• You should charge your new phone for 15-20 hours before<br />
completing the installation or using the handset.<br />
Telephone Line Outlets<br />
There are two types of phone outlets:<br />
Modular Jack<br />
Most phone equipment available now uses modular jacks. Phone cords<br />
are fitted with a molded plastic connector which plugs into this type<br />
of jack. If you do not have modular phone jacks,<br />
contact your local telephone company for information about<br />
their installation.<br />
Hardwired Jack<br />
Some equipment is wired directly to a phone jack, and these types of<br />
installations require a modular jack converter. This type of installation<br />
is not difficult; however, you should contact your Inter-Tel telephone<br />
dealer or a telephone supply store for advice about the proper adapter<br />
or converter for your particular situation.<br />
Connecting the Telephone Cords<br />
Consider these safety guidelines before connecting the<br />
telephone cords:<br />
Caution!<br />
• Never install telephone wiring during a lightning storm.<br />
• Never touch uninsulated telephone wires or terminals unless the<br />
telephone line has been disconnected.<br />
• Use caution when installing or modifying telephone lines.<br />
Applying Power to the Base<br />
This phone requires an AC outlet, without a switch to interrupt power,<br />
and the included AC adapter. To relieve strain on the DC plug when<br />
the phone is placed on a desk or table, wrap the power cord around<br />
the strain relief notch on the bottom of the base.<br />
NOTE:<br />
Place the power cord so that it does not create a trip hazard,<br />
or where it could become chafed and create a fire or other<br />
electrical hazards.<br />
One Year Limited Warranty<br />
Important:<br />
Evidence of original purchase is required<br />
for warranty service.<br />
WARRANTOR: INTER-TEL, INC.<br />
ELEMENTS OF WARRANTY: Inter-Tel warrants, for one year, to the<br />
original retail owner, this Inter-Tel Product to be free from defects in<br />
materials and craftsmanship with only the limitations or exclusions set<br />
out below.<br />
WARRANTY DURATION: This warranty to the original user shall<br />
terminate and be of no further effect 12 months after the date of<br />
original retail sale. The warranty is invalid if the Product is<br />
(A) damaged or not maintained as reasonable or necessary,<br />
(B) modified, altered, or used as part of any conversion kits,<br />
subassemblies, or any configurations not sold by Inter-Tel,<br />
(C) improperly installed, (D) serviced or repaired by someone other<br />
than an authorized Inter-Tel service center for a defect or malfunction<br />
covered by this warranty, (E) used in any conjunction with equipment<br />
or parts or as part of any system not manufactured by Inter-Tel, or<br />
(F) installed or programmed by anyone other than as detailed by the<br />
owner’s manual for this product.<br />
STATEMENT OF REMEDY: In the event that the product does not<br />
conform to this warranty at any time while this warranty is in effect,<br />
warrantor will either, at its option, repair or replace the defective unit<br />
and return it to you without charge for parts, service, or any other<br />
cost (except shipping and handling) incurred by warrantor or its<br />
representatives in connection with the performance of this warranty.<br />
Warrantor, at its option, may replace the unit with a new or<br />
refurbished unit. THE LIMITED WARRANTY SET FORTH ABOVE IS THE<br />
SOLE AND ENTIRE WARRANTY PERTAINING TO THE PRODUCT AND IS IN<br />
LIEU OF AND EXCLUDES ALL OTHER WARRANTIES OF ANY NATURE<br />
WHATSOEVER, WHETHER EXPRESS, IMPLIED OR ARISING BY OPERATION<br />
OF LAW, INCLUDING, BUT NOT LIMITED TO ANY IMPLIED WARRANTIES<br />
OF MERCHANTABILITY OR FITNESS FOR A PARTICULAR PURPOSE. THIS<br />
WARRANTY DOES NOT COVER OR PROVIDE FOR THE REIMBURSEMENT OR<br />
PAYMENT OF INCIDENTAL OR CONSEQUENTIAL DAMAGES. Some states<br />
do not allow this exclusion or limitation of incidental or consequential<br />
damages so the above limitation or exclusion may not apply to you.<br />
LEGAL REMEDIES: This warranty gives you specific legal rights, and<br />
you may also have other rights which vary from state to state. This<br />
warranty is void outside the United States of America and Canada.<br />
PROCEDURE FOR OBTAINING PERFORMANCE OF WARRANTY: If, after<br />
following the instructions in the owner’s manual you are certain that<br />
the Product is defective, contact your local authorized Inter-Tel<br />
reseller.<br />
[ 44 ] PRECAUTIONS & WARRANTY
Index<br />
0 - 9<br />
10 ring options ..............................18<br />
A<br />
Area Code ....................................14<br />
AutoTalk ......................................13<br />
B<br />
Battery pack<br />
Preparing and charging ..................9<br />
Replacement and handling ............39<br />
Beltclip ........................................38<br />
C<br />
Caller ID ......................................32<br />
Caller ID service ..........................32<br />
Calling........................................35<br />
Call Waiting ..........................13, 36<br />
Deleting ....................................34<br />
Setting ......................................13<br />
Storing ......................................35<br />
Using ........................................35<br />
Viewing ......................................33<br />
Chain dialing ................................31<br />
Channel ........................................21<br />
D<br />
Deluxe Call Waiting features ............36<br />
Dialing mode ................................12<br />
Digital security code ..................7, 37<br />
Distinctive Ringer ..........................19<br />
E, F, G, H<br />
Earpiece volume ............................20<br />
General information ........................40<br />
Hands-free conversation..................16<br />
Headset installation........................38<br />
I, J, K, L<br />
Important safety instructions ..........43<br />
Language ......................................15<br />
Liquid damage ..............................42<br />
M, N, O<br />
Maintenance ..................................39<br />
Making a call ................................16<br />
Mute ............................................20<br />
One touch dialing ..........................30<br />
P, Q<br />
Phonebook ....................................23<br />
Editing ......................................29<br />
Erasing ......................................29<br />
Making calls ................................28<br />
Storing ......................................23<br />
Viewing ......................................27<br />
Precautions ..................................43<br />
R<br />
Receiving a call ............................16<br />
Redialing a call..............................16<br />
Ringer volume................................18<br />
RocketDial ....................................30<br />
S<br />
Setting up ......................................8<br />
Base unit....................................11<br />
Handset ......................................9<br />
Speed dialing ................................28<br />
T, U, V, W, X, Y, Z<br />
Troubleshooting ............................41<br />
Voice Mail LED ..............................22<br />
Warranty ......................................44<br />
[ 45 ]<br />
INDEX<br />
[ 45 ]
Part #935.0306<br />
1203<br />
Copyright December, 2003, Inter-Tel, Incorporated. All products and services mentioned<br />
are the trademarks, service marks, registered marks or registered service marks of their<br />
respective owners.<br />
Inter-Tel ® is a registered trademark of Inter-Tel, Incorporated.<br />
PowerMax is a trademark of Uniden America Corporation.