INT1100 User Guide - Mitel Edocs
INT1100 User Guide - Mitel Edocs
INT1100 User Guide - Mitel Edocs

Create successful ePaper yourself
Turn your PDF publications into a flip-book with our unique Google optimized e-Paper software.
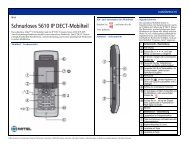
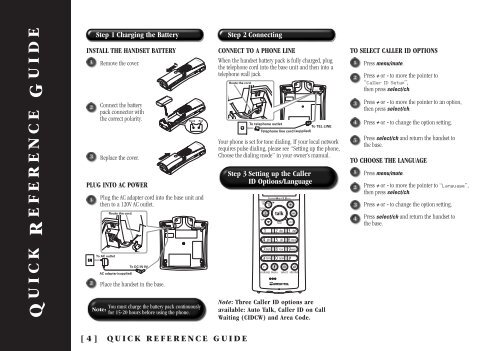
Q UICK R EFERENCE G UIDE<br />
Step 1 Charging the Battery<br />
INSTALL THE HANDSET BATTERY<br />
Remove the cover.<br />
Connect the battery<br />
pack connector with<br />
the correct polarity.<br />
Replace the cover.<br />
PLUG INTO AC POWER<br />
Plug the AC adapter cord into the base unit and<br />
then to a 120V AC outlet.<br />
Place the handset in the base.<br />
Note:<br />
You must charge the battery pack continuously<br />
for 15-20 hours before using the phone.<br />
Step 2 Connecting<br />
CONNECT TO A PHONE LINE<br />
When the handset battery pack is fully charged, plug<br />
the telephone cord into the base unit and then into a<br />
telephone wall jack.<br />
Your phone is set for tone dialing. If your local network<br />
requires pulse dialing, please see “Setting up the phone,<br />
Choose the dialing mode” in your owner’s manual.<br />
Step 3 Setting up the Caller<br />
ID Options/Language<br />
Note: Three Caller ID options are<br />
available: Auto Talk, Caller ID on Call<br />
Waiting (CIDCW) and Area Code.<br />
TO SELECT CALLER ID OPTIONS<br />
Press menu/mute.<br />
Press + or - to move the pointer to<br />
“Caller ID Setup”,<br />
then press select/ch.<br />
Press + or - to move the pointer to an option,<br />
then press select/ch.<br />
Press + or - to change the option setting.<br />
Press select/ch and return the handset to<br />
the base.<br />
TO CHOOSE THE LANGUAGE<br />
Press menu/mute.<br />
Press + or - to move the pointer to “Language”,<br />
then press select/ch.<br />
Press + or - to change the option setting.<br />
Press select/ch and return the handset to<br />
the base.<br />
[ 4 ]<br />
QUICK REFERENCE GUIDE