Create successful ePaper yourself
Turn your PDF publications into a flip-book with our unique Google optimized e-Paper software.
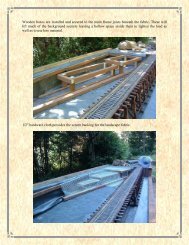
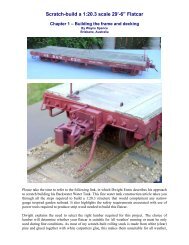
Now it’s time to start final assembly. First cut<br />
the 12 x 12 bottom stunts that go under the<br />
trusses. Drill them for truss rods to match the<br />
floor beams above. The bottom struts need a<br />
short length of 1/8” dowel to secure them to<br />
the trusses.<br />
Those 1/8” dowels holding the bottom struts in place are important. They assist in getting the<br />
bridge together. They also prevent the bottom struts from getting knocked out of place if the<br />
bridge gets bumped by accident.<br />
Now for the truss rods. There are 3 options. First is to use solid rod and run a threading die over<br />
the end. The second is to use “all thread” rod. The third is to use bicycle spokes.<br />
The most realistic option is solid rod. However it requires a die to cut the threads, which is a<br />
specialized tool. Solid rod is somewhat difficult to die unless you have a way to align the die to<br />
the rod. Eye balling it is kind of difficult. For this project I wanted to avoid special tools and<br />
methods.<br />
Bicycle spokes <strong>com</strong>e in various lengths and are threaded on one end. I have not tried them, but<br />
I am sure they work fine.<br />
I went with #2 x 56 “all thread” rod for this project. All thread in this size is available in 6-foot<br />
lengths from McMaster Carr. #2 x 56 is a bit larger then M2. Use M2 or M2.5 if that’s<br />
available.<br />
To assemble, set the trusses on the bottom<br />
struts and place the deck on top. Have an extra<br />
set of hands available. Cut lengths of all<br />
thread. Put a nut and washer on one end. Drop<br />
it down thru the holes and put another nut and<br />
washer at the bottom. Tighten each rod a little<br />
at the time until all the braces pull down tight<br />
on the angle blocks.