Rack mounting instructions
Rack mounting instructions
Rack mounting instructions

You also want an ePaper? Increase the reach of your titles
YUMPU automatically turns print PDFs into web optimized ePapers that Google loves.
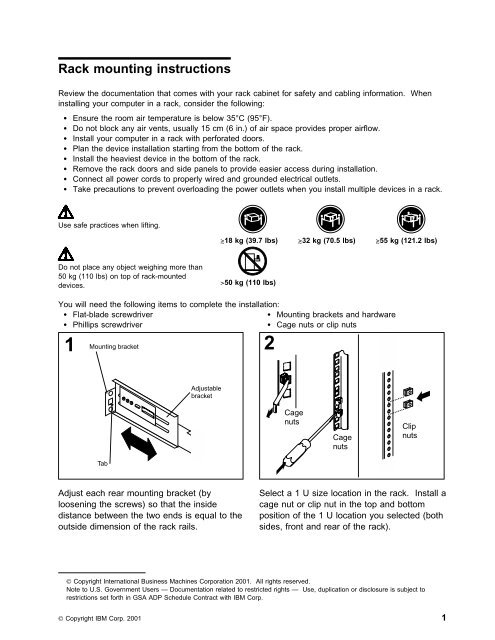
<strong>Rack</strong> <strong>mounting</strong> <strong>instructions</strong><br />
Review the documentation that comes with your rack cabinet for safety and cabling information. When<br />
installing your computer in a rack, consider the following:<br />
Ensure the room air temperature is below 35°C (95°F).<br />
Do not block any air vents, usually 15 cm (6 in.) of air space provides proper airflow.<br />
Install your computer in a rack with perforated doors.<br />
Plan the device installation starting from the bottom of the rack.<br />
Install the heaviest device in the bottom of the rack.<br />
Remove the rack doors and side panels to provide easier access during installation.<br />
Connect all power cords to properly wired and grounded electrical outlets.<br />
Take precautions to prevent overloading the power outlets when you install multiple devices in a rack.<br />
Use safe practices when lifting.<br />
Do not place any object weighing more than<br />
50 kg (110 lbs) on top of rack-mounted<br />
devices.<br />
You will need the following items to complete the installation:<br />
Flat-blade screwdriver<br />
Phillips screwdriver<br />
1<br />
Mounting bracket<br />
Tab<br />
Adjustable<br />
bracket<br />
Adjust each rear <strong>mounting</strong> bracket (by<br />
loosening the screws) so that the inside<br />
distance between the two ends is equal to the<br />
outside dimension of the rack rails.<br />
18 kg (39.7 lbs) 32 kg (70.5 lbs) 55 kg (121.2 lbs)<br />
>50 kg (110 lbs)<br />
Mounting brackets and hardware<br />
Cage nuts or clip nuts<br />
2<br />
Cage<br />
nuts<br />
Cage<br />
nuts<br />
Clip<br />
nuts<br />
Select a 1 U size location in the rack. Install a<br />
cage nut or clip nut in the top and bottom<br />
position of the 1 U location you selected (both<br />
sides, front and rear of the rack).<br />
© Copyright International Business Machines Corporation 2001. All rights reserved.<br />
Note to U.S. Government Users — Documentation related to restricted rights — Use, duplication or disclosure is subject to<br />
restrictions set forth in GSA ADP Schedule Contract with IBM Corp.<br />
© Copyright IBM Corp. 2001 1
3<br />
Mounting bracket<br />
Tab<br />
Clip nuts<br />
<strong>Rack</strong><br />
Insert the bracket tab through the center hole<br />
between the two clip nuts on the rear rail.<br />
(The right and left rails are labeled.)<br />
5<br />
Mounting<br />
rails<br />
Place the computer on the <strong>mounting</strong> brackets<br />
and slide it into the rack as far as it will go.<br />
2<br />
4<br />
Loosely install two <strong>mounting</strong> screws through<br />
the back end of the bracket. Position the<br />
<strong>mounting</strong> bracket so that it lines up with the<br />
clip nuts. Install the remaining <strong>mounting</strong><br />
screws, then tighten all the screws with a<br />
screwdriver. Repeat these steps for each<br />
<strong>mounting</strong> bracket.<br />
6<br />
Thumb screw<br />
Tighten the thumb screws on the front of the<br />
computer to secure it to the rack.
7<br />
Thumb<br />
screw<br />
Shipping<br />
bracket<br />
If you want to ship your rack with the<br />
computer installed, you must install the<br />
shipping brackets on each side of the<br />
computer. This is done by inserting the<br />
shipping bracket tab into the slot on the back<br />
of the computer. Then, use the blue thumb<br />
screw to secure the back of the computer and<br />
the shipping bracket to the <strong>mounting</strong> bracket.<br />
Repeat these steps for each computer to be installed in the rack. For more information about I/O ports<br />
and cabling your computer, refer to the User's Guide.<br />
<strong>Rack</strong> <strong>mounting</strong> <strong>instructions</strong> 3
IBM®<br />
Part Number: 24P2960<br />
Printed in the USA<br />
4