packaged terminal air conditioners - This is a secure site - Whirlpool
packaged terminal air conditioners - This is a secure site - Whirlpool
packaged terminal air conditioners - This is a secure site - Whirlpool

You also want an ePaper? Increase the reach of your titles
YUMPU automatically turns print PDFs into web optimized ePapers that Google loves.
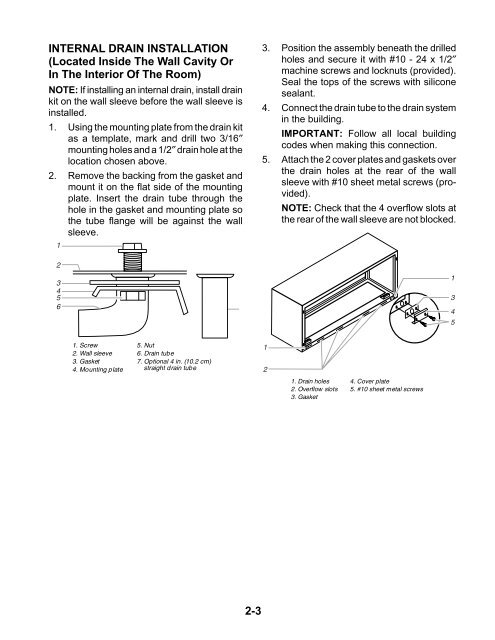
INTERNAL DRAIN INSTALLATION<br />
(Located Inside The Wall Cavity Or<br />
In The Interior Of The Room)<br />
NOTE: If installing an internal drain, install drain<br />
kit on the wall sleeve before the wall sleeve <strong>is</strong><br />
installed.<br />
1. Using the mounting plate from the drain kit<br />
as a template, mark and drill two 3/16″<br />
mounting holes and a 1/2″ drain hole at the<br />
location chosen above.<br />
2. Remove the backing from the gasket and<br />
mount it on the flat side of the mounting<br />
plate. Insert the drain tube through the<br />
hole in the gasket and mounting plate so<br />
the tube flange will be against the wall<br />
sleeve.<br />
1<br />
2<br />
3<br />
4<br />
5<br />
6<br />
1. Screw<br />
2. Wall sleeve<br />
3. Gasket<br />
4. Mounting plate<br />
5. Nut<br />
6. Drain tube<br />
7. Optional 4 in. (10.2 cm)<br />
straight drain tube<br />
2-3<br />
3. Position the assembly beneath the drilled<br />
holes and <strong>secure</strong> it with #10 - 24 x 1/2″<br />
machine screws and locknuts (provided).<br />
Seal the tops of the screws with silicone<br />
sealant.<br />
4. Connect the drain tube to the drain system<br />
in the building.<br />
IMPORTANT: Follow all local building<br />
codes when making th<strong>is</strong> connection.<br />
5. Attach the 2 cover plates and gaskets over<br />
the drain holes at the rear of the wall<br />
sleeve with #10 sheet metal screws (provided).<br />
NOTE: Check that the 4 overflow slots at<br />
the rear of the wall sleeve are not blocked.<br />
1<br />
2<br />
1. Drain holes<br />
2. Overflow slots<br />
3. Gasket<br />
4. Cover plate<br />
5. #10 sheet metal screws<br />
1<br />
3<br />
4<br />
5