packaged terminal air conditioners - This is a secure site - Whirlpool
packaged terminal air conditioners - This is a secure site - Whirlpool
packaged terminal air conditioners - This is a secure site - Whirlpool

Create successful ePaper yourself
Turn your PDF publications into a flip-book with our unique Google optimized e-Paper software.
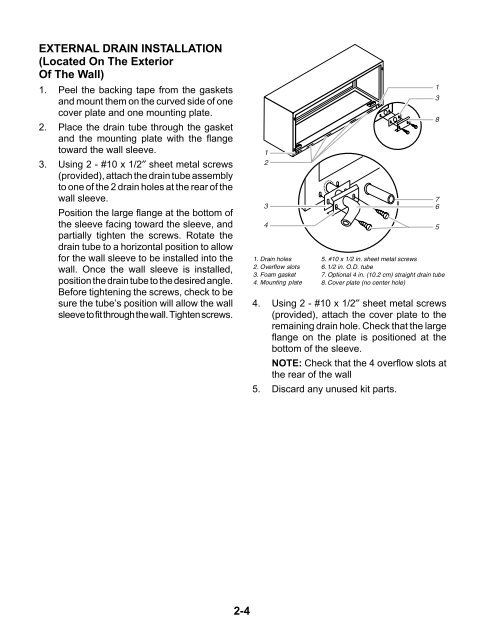
EXTERNAL DRAIN INSTALLATION<br />
(Located On The Exterior<br />
Of The Wall)<br />
1. Peel the backing tape from the gaskets<br />
and mount them on the curved side of one<br />
cover plate and one mounting plate.<br />
2. Place the drain tube through the gasket<br />
and the mounting plate with the flange<br />
toward the wall sleeve.<br />
3. Using 2 - #10 x 1/2″ sheet metal screws<br />
(provided), attach the drain tube assembly<br />
to one of the 2 drain holes at the rear of the<br />
wall sleeve.<br />
Position the large flange at the bottom of<br />
the sleeve facing toward the sleeve, and<br />
partially tighten the screws. Rotate the<br />
drain tube to a horizontal position to allow<br />
for the wall sleeve to be installed into the<br />
wall. Once the wall sleeve <strong>is</strong> installed,<br />
position the drain tube to the desired angle.<br />
Before tightening the screws, check to be<br />
sure the tube’s position will allow the wall<br />
sleeve to fit through the wall. Tighten screws.<br />
2-4<br />
1<br />
2<br />
3<br />
4<br />
1. Drain holes<br />
2. Overflow slots<br />
3. Foam gasket<br />
4. Mounting plate<br />
5. #10 x 1/2 in. sheet metal screws<br />
6. 1/2 in. O.D. tube<br />
7. Optional 4 in. (10.2 cm) straight drain tube<br />
8. Cover plate (no center hole)<br />
4. Using 2 - #10 x 1/2″ sheet metal screws<br />
(provided), attach the cover plate to the<br />
remaining drain hole. Check that the large<br />
flange on the plate <strong>is</strong> positioned at the<br />
bottom of the sleeve.<br />
NOTE: Check that the 4 overflow slots at<br />
the rear of the wall<br />
5. D<strong>is</strong>card any unused kit parts.<br />
1<br />
3<br />
8<br />
7<br />
6<br />
5