

operation - Victor Technologies
operation - Victor Technologies
operation - Victor Technologies

Create successful ePaper yourself
Turn your PDF publications into a flip-book with our unique Google optimized e-Paper software.
4.7 SERVICING TORCH HEAD COMPONENTS<br />
WARNING<br />
WARNING<br />
Tools Required<br />
Removing Torch Head<br />
Disconnect primary power to the system before disassembling<br />
the torch, leads, or power supply.<br />
NEVER touch any internal torch parts while the AC indicator<br />
light on the front panel of the control module is lit.<br />
(1) No. 1 Phillips Head Screwdriver<br />
(2) 1/4 in Open End Wrenches<br />
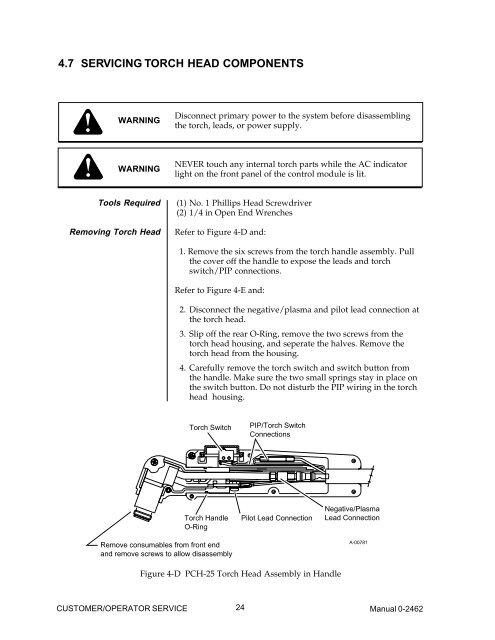
Refer to Figure 4-D and:<br />
1. Remove the six screws from the torch handle assembly. Pull<br />
the cover off the handle to expose the leads and torch<br />
switch/PIP connections.<br />
Refer to Figure 4-E and:<br />
2. Disconnect the negative/plasma and pilot lead connection at<br />
the torch head.<br />
3. Slip off the rear O-Ring, remove the two screws from the<br />
torch head housing, and seperate the halves. Remove the<br />
torch head from the housing.<br />
4. Carefully remove the torch switch and switch button from<br />
the handle. Make sure the two small springs stay in place on<br />
the switch button. Do not disturb the PIP wiring in the torch<br />
head housing.<br />
Torch Switch<br />
Torch Handle<br />
O-Ring<br />
Remove consumables from front end<br />
and remove screws to allow disassembly<br />
PIP/Torch Switch<br />
Connections<br />
Pilot Lead Connection<br />
Figure 4-D PCH-25 Torch Head Assembly in Handle<br />
Negative/Plasma<br />
Lead Connection<br />
A-00781<br />
24<br />
CUSTOMER/OPERATOR SERVICE Manual 0-2462


