

operation - Victor Technologies
operation - Victor Technologies
operation - Victor Technologies

Create successful ePaper yourself
Turn your PDF publications into a flip-book with our unique Google optimized e-Paper software.
4.8 REPLACING TORCH AND LEADS<br />
WARNING<br />
Open Power Supply<br />
Enclosure<br />
NOTE<br />
NOTE<br />
Disconnect primary power to the system before disassembling<br />
the torch, leads, or power supply.<br />
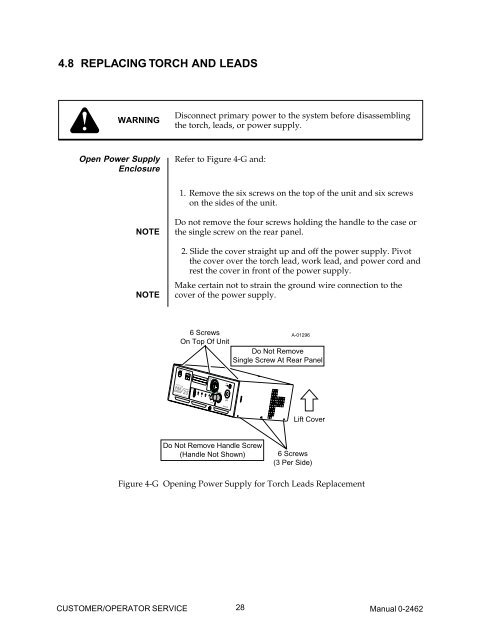
Refer to Figure 4-G and:<br />
1. Remove the six screws on the top of the unit and six screws<br />
on the sides of the unit.<br />
Do not remove the four screws holding the handle to the case or<br />
the single screw on the rear panel.<br />
2. Slide the cover straight up and off the power supply. Pivot<br />
the cover over the torch lead, work lead, and power cord and<br />
rest the cover in front of the power supply.<br />
Make certain not to strain the ground wire connection to the<br />
cover of the power supply.<br />
6 Screws<br />
On Top Of Unit<br />
INPUT POWER<br />
R<br />
R<br />
AC POWER<br />
SET<br />
RUN<br />
AC GAS DC<br />
OPERATING<br />
PRESSURE<br />
50 PSI<br />
(3.4 BAR)<br />
12 20<br />
CURRENT<br />
Do Not Remove Handle Screw<br />
(Handle Not Shown)<br />
PRESSURE<br />
WORK<br />
TORCH<br />
Made in the USA<br />
Do Not Remove<br />
Single Screw At Rear Panel<br />
Lift Cover<br />
6 Screws<br />
(3 Per Side)<br />
Figure 4-G Opening Power Supply for Torch Leads Replacement<br />
28<br />
CUSTOMER/OPERATOR SERVICE Manual 0-2462<br />
A-01296


