21009 Aldi ES+DE+EN Final Cover.fh11 - Medion
21009 Aldi ES+DE+EN Final Cover.fh11 - Medion
21009 Aldi ES+DE+EN Final Cover.fh11 - Medion

Create successful ePaper yourself
Turn your PDF publications into a flip-book with our unique Google optimized e-Paper software.
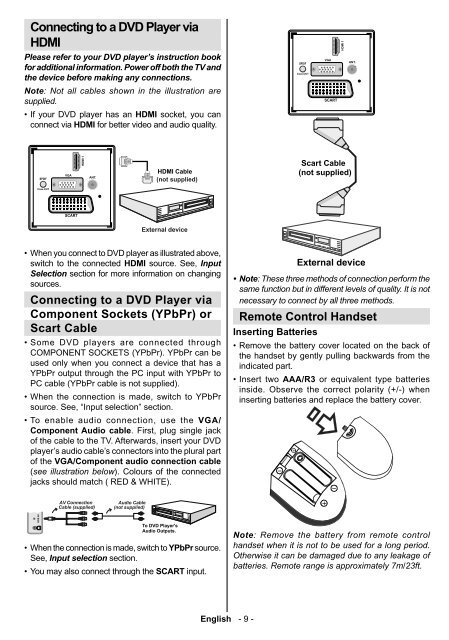
Connecting to a DVD Player via<br />
HDMI<br />
Please refer to your DVD player’s instruction book<br />
for additional information. Power off both the TV and<br />
the device before making any connections.<br />
Note: Not all cables shown in the illustration are<br />
supplied.<br />
• If your DVD player has an HDMI socket, you can<br />
connect via HDMI for better video and audio quality.<br />
�����<br />
��������<br />
����� �<br />
HDMI Cable<br />
(not supplied)<br />
External device<br />
• When you connect to DVD player as illustrated above,<br />
switch to the connected HDMI source. See, Input<br />
Selection section for more information on changing<br />
sources.<br />
Connecting to a DVD Player via<br />
Component Sockets (YPbPr) or<br />
Scart Cable<br />
• Some DVD players are connected through<br />
COMPONENT SOCKETS (YPbPr). YPbPr can be<br />
used only when you connect a device that has a<br />
YPbPr output through the PC input with YPbPr to<br />
PC cable (YPbPr cable is not supplied).<br />
• When the connection is made, switch to YPbPr<br />
source. See, “Input selection” section.<br />
• To enable audio connection, use the VGA/<br />
Component Audio cable. First, plug single jack<br />
of the cable to the TV. Afterwards, insert your DVD<br />
player’s audio cable’s connectors into the plural part<br />
of the VGA/Component audio connection cable<br />
(see illustration below). Colours of the connected<br />
jacks should match ( RED & WHITE).<br />
����� ��<br />
�� ����������<br />
����� ����������<br />
������ �����<br />
���� ���������<br />
��� ���� ��������<br />
������ ��������<br />
• When the connection is made, switch to YPbPr source.<br />
See, Input selection section.<br />
• You may also connect through the SCART input.<br />
English - 9 -<br />
�����<br />
��������<br />
Scart Cable<br />
(not supplied)<br />
External device<br />
• Note:<br />
These three methods of connection perform the<br />
same function but in different levels of quality. It is not<br />
necessary to connect by all three methods.<br />
Remote Control Handset<br />
Inserting Batteries<br />
• Remove the battery cover located on the back of<br />
the handset by gently pulling backwards from the<br />
indicated part.<br />
• Insert two AAA/R3 or equivalent type batteries<br />
inside. Observe the correct polarity (+/-) when<br />
inserting batteries and replace the battery cover.<br />
Note: Remove the battery from remote control<br />
handset when it is not to be used for a long period.<br />
Otherwise it can be damaged due to any leakage of<br />
batteries. Remote range is approximately 7m/23ft.<br />
����� �