Magic2 Voice GB Manual - Fax-Anleitung.de
Magic2 Voice GB Manual - Fax-Anleitung.de
Magic2 Voice GB Manual - Fax-Anleitung.de

Create successful ePaper yourself
Turn your PDF publications into a flip-book with our unique Google optimized e-Paper software.
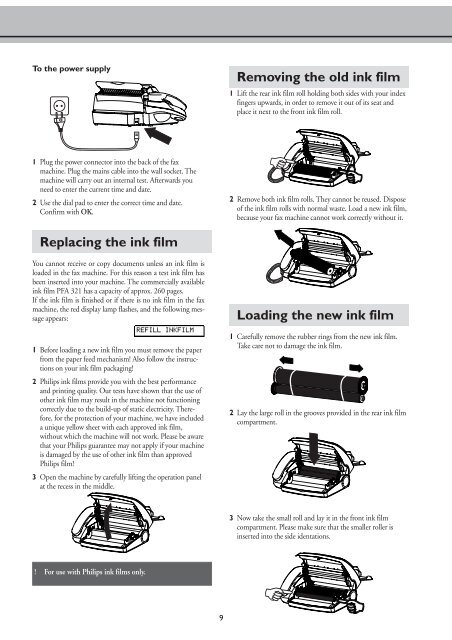
To the power supply<br />
1 Plug the power connector into the back of the fax<br />
machine. Plug the mains cable into the wall socket. The<br />
machine will carry out an internal test. Afterwards you<br />
need to enter the current time and date.<br />
2 Use the dial pad to enter the correct time and date.<br />
Confirm with OK.<br />
Replacing the ink film<br />
You cannot receive or copy documents unless an ink film is<br />
loa<strong>de</strong>d in the fax machine. For this reason a test ink film has<br />
been inserted into your machine. The commercially available<br />
ink film PFA 321 has a capacity of approx. 260 pages.<br />
If the ink film is finished or if there is no ink film in the fax<br />
machine, the red display lamp flashes, and the following message<br />
appears:<br />
refill inkfilm<br />
1 Before loading a new ink film you must remove the paper<br />
from the paper feed mechanism! Also follow the instructions<br />
on your ink film packaging!<br />
2 Philips ink films provi<strong>de</strong> you with the best performance<br />
and printing quality. Our tests have shown that the use of<br />
other ink film may result in the machine not functioning<br />
correctly due to the build-up of static electricity. Therefore,<br />
for the protection of your machine, we have inclu<strong>de</strong>d<br />
a unique yellow sheet with each approved ink film,<br />
without which the machine will not work. Please be aware<br />
that your Philips guarantee may not apply if your machine<br />
is damaged by the use of other ink film than approved<br />
Philips film!<br />
3 Open the machine by carefully lifting the operation panel<br />
at the recess in the middle.<br />
! For use with Philips ink films only.<br />
9<br />
Removing the old ink film<br />
1 Lift the rear ink film roll holding both si<strong>de</strong>s with your in<strong>de</strong>x<br />
fingers upwards, in or<strong>de</strong>r to remove it out of its seat and<br />
place it next to the front ink film roll.<br />
2 Remove both ink film rolls. They cannot be reused. Dispose<br />
of the ink film rolls with normal waste. Load a new ink film,<br />
because your fax machine cannot work correctly without it.<br />
Loading the new ink film<br />
1 Carefully remove the rubber rings from the new ink film.<br />
Take care not to damage the ink film.<br />
2 Lay the large roll in the grooves provi<strong>de</strong>d in the rear ink film<br />
compartment.<br />
3 Now take the small roll and lay it in the front ink film<br />
compartment. Please make sure that the smaller roller is<br />
inserted into the si<strong>de</strong> i<strong>de</strong>ntations.