Fp715 - Free-Instruction-Manuals.com
Fp715 - Free-Instruction-Manuals.com
Fp715 - Free-Instruction-Manuals.com

Create successful ePaper yourself
Turn your PDF publications into a flip-book with our unique Google optimized e-Paper software.
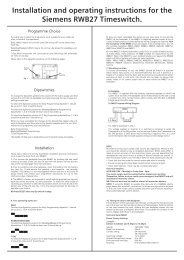
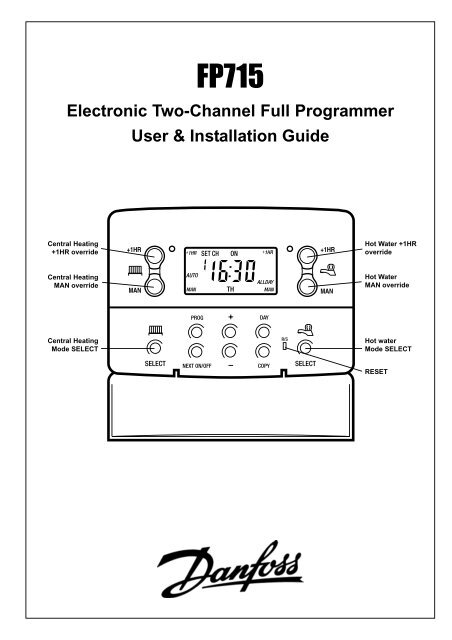
FP715<br />
Electronic Two-Channel Full Programmer<br />
User & Installation Guide<br />
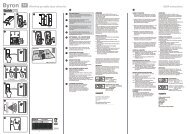
Central Heating<br />
+1HR override<br />
Central Heating<br />
MAN override<br />
Central Heating<br />
Mode SELECT<br />
+1HR +1HR<br />
MAN<br />
MAN<br />
Hot Water +1HR<br />
override<br />
Hot Water<br />
MAN override<br />
Hot water<br />
Mode SELECT<br />
RESET
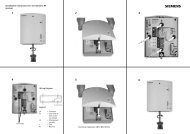
User <strong>Instruction</strong>s<br />
Before beginning programming, you should reset the unit. Open the flap on the front of the<br />
clock. Press the RESET button using a non-metallic object (e.g. a pencil or end of a bic biro<br />
pen top). This will clear all previous pre-set programmes. (Fig.1)<br />
A. Setting the correct Time and Day<br />
TIME - Press PROG once (Fig.2). The words SET TIME will appear at the top of the<br />
display. The time will flash on and off (Fig.3). Using the + and - buttons set the correct<br />
time (Fig.4)<br />
DAY - Press DAY repeatedly until the correct day of the week is displayed (Fig.5). MO is<br />
Monday, TU is Tuesday etc<br />
B. Accepting the Factory Presettings<br />
The FP715 <strong>com</strong>es ready programmed with a set of times and temperatures to suit the<br />
average household (see Factory Presettings on page 4).<br />
To accept these settings press the PROG button until the time appears and colon in the<br />
display begins to flash - the unit is now in RUN mode (Fig.6).<br />
If you wish to alter these settings follow instructions below.<br />
Your installer will have set your unit to operate in one of the following modes:<br />
5/2 day - one set of programmes for weekdays and another for weekends (Section C)<br />
7 day - different settings for each day of the week (Section D)<br />
24 hour - one set of programmes for the whole week (Section E)<br />
See INSTALLER SETTING tick box on inside flap label to ascertain<br />
which mode your unit is set and follow relevant instructions below.<br />
C. Programming the Heating - 5/2 day mode<br />
1. Press PROG (Fig.2) until SET CH ON TIME appears at the top of the display and<br />
MOTUWETHFR appears at the bottom of the display (Fig.7). Use the + and - buttons<br />
(Fig.4) to set the time you would like your heating to first <strong>com</strong>e on in the morning (Event 1).<br />
2. Press NEXT ON/OFF once only (Fig.8). Use the + and - buttons (Fig.4) to set the time<br />
you want your heating to go off (Event 2). To move to the next setting, i.e. when you would<br />
like your heating to <strong>com</strong>e on again (Event 3) press the NEXT ON/OFF button once only.<br />
3. Continue programming the central heating ON and OFF times for weekday Events 4,5,&<br />
6 as in Step 2.<br />
4. Press the DAY button once (Fig.5) and SASU will appear at the bottom of the display<br />
(Fig.9). Either press COPY (Fig.10) to keep the same settings for Saturday and Sunday as<br />
you have programmed for Monday to Friday. Alternatively, programme new ON/OFF times<br />
by pressing the NEXT ON/OFF button (Fig.8) once to move to the next setting and using the<br />
+ and - buttons (Fig.4) to set the time you want.<br />
5. Press DAY button (Fig.5) to return display to MOTUWETHFR, ready to programme the<br />
Hot Water<br />
6. Proceed to Section F<br />
D. Programming the Heating - 7 day mode<br />
1. Press PROG until SET CH ON TIME appears at the top of the display and MO appears<br />
at the bottom of the display (Fig.11). Use the + and - buttons (Fig.4) to set the time you want<br />
your heating to first <strong>com</strong>e on in the morning (Event 1).<br />
2. Press NEXT ON/OFF (Fig.8) to move to Event 2. Continue programming the central<br />
heating ON and OFF times in this way by using the + and - buttons to set the time you want<br />
and pressing the NEXT ON/OFF button to move to the next setting (Figs.4 & 8).<br />
3. Press DAY button once only (Fig.5). TU will appear at the bottom of the display. Either<br />
press COPY (Fig.10) to keep the same settings as the day before or continue programming<br />
for the rest of the week by pressing the NEXT ON/OFF button to move to the next setting,<br />
using the + and - buttons to amend the time, and by pressing DAY to advance to the next<br />
day (Figs.8,4 & 5)<br />
4. Press DAY button (Fig.5) to return display to MO, ready to programme the Hot Water<br />
5. Proceed to Section F<br />
INSTALLER SETTING<br />
24 Hour<br />
5+2 Day<br />
7 Day<br />
Fig.1<br />
Fig.2<br />
Fig.3<br />
Fig.4<br />
To alter clock<br />
& ON/OFF<br />
times<br />
Fig.5<br />
To move to<br />
next day or<br />
to weekend<br />
Fig.6<br />
Fig.7<br />
Fig.8<br />
To move to<br />
next event<br />
Fig.9<br />
Fig.10
E. Programming the Heating - 24 hour mode<br />
1. Press PROG until SET CH ON TIME appears at the top of the display. Use the +<br />
and - buttons (Fig.4) to set the time you want your heating to first <strong>com</strong>e on in the<br />
morning (Event 1).<br />
2. Press NEXT ON/OFF (Fig.8) to move to Event 2. Continue programming the<br />
central heating ON and OFF times in this way by using the + and - buttons to set the<br />
time and pressing the NEXT ON/OFF button to move to the next setting (Figs.4 & 8).<br />
3. Proceed to Section F<br />
N.B. Depending how your installer has set the clock you will be able to programme<br />
either 2 or 3 ON/OFFs per day. If your clock has been installed to allow 3 ON/OFFs<br />
and you do not wish to use one of the ON/OFF settings, simply programme the ON<br />
time to be the same as the OFF time and the setting will not operate.<br />
F. Programming the Hot Water<br />
To set the hot water programme press the PROG button (Fig.2) until the SET HW<br />
ON TIME appears on the display (Fig.12).<br />
Set the hot water programme in the same way as the heating programme, using the<br />
+ and - buttons to alter the time (Fig.14), by pressing the NEXT ON/OFF button<br />
(Fig.13) to move to the next setting and by pressing DAY (Fig.15) to advance through<br />
days of the week (7 day mode) or to advance to Saturday and Sunday programming<br />
(5/2 day mode).<br />
Finally press PROG (Fig 2) to return the unit to run mode (Fig.6).<br />
G. Running your Programme<br />
To run the central heating programme: press the SELECT button next to the<br />
symbol of a radiator (Fig.16).<br />
To run the hot water programme: press the SELECT button next to the tap symbol<br />
(Fig.16).<br />
As you press each of the SELECT buttons the display will change between ON,<br />
OFF, ALLDAY and AUTO. Select the option you require depending on your<br />
circumstances, time of the year etc (Fig.17).<br />
• AUTO = the heating or hot water <strong>com</strong>e on and go off at the programmed times<br />
• ON = the heating or hot water will remain on constantly<br />
• OFF = the heating or hot water will not <strong>com</strong>e on<br />
• ALLDAY = the clock will turn the heating or hot water on at the first programmed<br />
ON and will leave it on until your last programmed OFF<br />
H. Temporary Override Buttons<br />
The grey buttons next to the radiator are the heating override buttons (Fig.18)<br />
The grey buttons next to the tap are the hot water override buttons (Fig.18)<br />
+1HR = the heating/hot water will remain on for an extra hour. If it is pressed whilst the<br />
programme is off, the heating/hot water will <strong>com</strong>e on immediately for 1 hour then go off.<br />
MAN = if this button is pressed when either system is on, then that system will go OFF<br />
until the next programmed ON. If this button is pressed when either system is OFF, that<br />
system will <strong>com</strong>e ON until the next programmed OFF.<br />
NB. These over-rides are only temporary and do not affect the preset programmes.<br />
I. Winter Time / Summer Time Clock<br />
To change from Summer to Winter (clocks back) - press and hold - button (Fig.19)<br />
To change from Winter to Summer (clocks forward) - press and hold + button (Fig.19)<br />
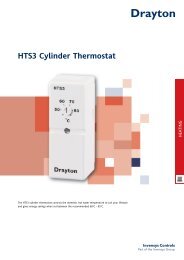
Fig.11<br />
Fig.12<br />
Fig.13<br />
To move to<br />
next event<br />
Fig.14<br />
Fig.15<br />
To alter<br />
ON/OFF<br />
times<br />
To move to<br />
next day or<br />
to weekend<br />
Fig.16<br />
Fig.17<br />
Fig.18<br />
Central Heating<br />
+1HR override<br />
Central Heating<br />
MAN override<br />
Fig.19<br />
Central Heating<br />
SELECT<br />
+1HR +1HR<br />
MAN MAN<br />
Hot Water<br />
SELECT<br />
Clocks forward<br />
(Spring)<br />
Clocks back<br />
(Autumn)<br />
Hot Water<br />
+1HR<br />
override<br />
Hot Water<br />
MAN<br />
override
Installation <strong>Instruction</strong>s<br />
Product overview<br />
The FP715 is an electronic 2-channel full programmer with independent time<br />
base serving separate heating and hot water channels. It can be set at time of<br />
installation for 7 day, 5/2 day or 24 hour operation. In addition the installer can<br />
select between 2 or 3 sets of On/Off events each day. All models in the range<br />
incorporate a permanently lit back light.<br />
Installation<br />
1. The product should only be installed by a qualified electrician or<br />
<strong>com</strong>petent heating installer. The installation must be in accordance with<br />
the current edition of the IEEE wiring regulations.<br />
2. From the top left hand corner of the wallplate there must be clearances<br />
of at least 140mm to the right, 15mm to the left, 30mm above and 100mm<br />
below in order to mount the plug-on module.<br />
3. The wallplate must be securely mounted either directly to the wall,<br />
using suitable wood screws, or to a flush mounted 1-gang electrical<br />
accessory box using M3.5 screws.<br />
4. Cable access can either be from behind for concealed cabling or from<br />
below for surface cabling. If surface cable is used, cut out cable access<br />
slot on plug-on module prior to mounting the module.<br />
5. For wiring connections refer to Diagram 1 below. FP715 models are<br />
double insulated and do not require an earth connection. However a parking<br />
terminal is provided on the wallplate, which is clearly marked with an Earth<br />
symbol.<br />
6. Prior to mounting the plug-on module, DIL switches on the rear of the<br />
plug-on module must be set. See Diagram 2 below for available options.<br />
7. Mark the INSTALLER SETTING tick box on the inside flap label to<br />
notify user in which mode their unit is set (24hr, 5/2 day or 7 day).<br />
8. Mount plug-on module to wallplate by locating tabs on top of wallplate<br />
in apertures on rear of module, hinge down and press firmly to wallplate<br />
before tightening securing screws on bottom of wallplate.<br />
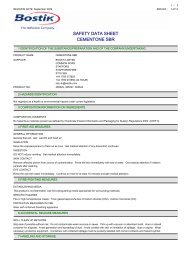
Diagram 1. - Wiring<br />
Diagram 2. - DIL Switch Settings<br />
SW.1<br />
SW.2<br />
SW.3<br />
SW.4<br />
3 ON/OFFs<br />
GRAVITY<br />
5/2 DAY<br />
7 DAY<br />
2 ON/OFFs<br />
PUMPED<br />
7 DAY or 24 HOUR<br />
24 HOUR<br />
Danfoss Randall Ltd<br />
Ampthill Road, Bedford, MK42 9ER<br />
Tel: 01234 364621<br />
Fax: 01234 219705<br />
Email: danfossrandall@danfoss.<strong>com</strong><br />
Website: www.danfoss-randall.co.uk<br />
CP715 FP715 (3028 12/01)<br />
Product specification<br />
Power supply 230 V ac, ±10%, 50/60 Hz<br />
Switching action 2 x SPDT internally linked<br />
Switch rating 230 V ac, 3(1)A<br />
Battery back-up 24 hours minimum<br />
Max. temperature 45°C<br />
Programme resolution 1 minute<br />
Dimensions, mm (W, H, D) 135 x 88 x 32<br />
Design standard EN 60730-2-7<br />
Control Pollution Situation Degree 2<br />
Rated Impulse Voltage 2.5kV<br />
Ball Pressure Test 75°C<br />
Factory Presettings<br />
Event ON/OFF Mon - Fri * Sat - Sun<br />
1 1st ON 6:30 7:30<br />
2 1st OFF 8:30 10:00<br />
3 2nd ON 12:00 12:00<br />
4 2nd OFF 12:00 12:00<br />
5 3rd ON 17:00 17:00<br />
6 3rd OFF 22:30 22:30<br />
* Each day if set in 24 hour mode<br />
Fault Check List<br />
<br />
<br />
<br />
<br />
<br />
<br />
<br />
<br />
<br />
<br />
<br />
<br />
<br />
<br />
<br />
<br />
<br />
<br />
<br />
<br />
<br />
<br />
<br />
<br />
<br />
<br />
<br />
<br />
This product <strong>com</strong>plies with the following EC Directives:<br />
Electro-Magnetic Compatibility Directive.<br />
(EMC) (89\336\EEC), (92\31\EEC)<br />
Low Voltage Directive.<br />
(LVD) (73\23\EEC), (93\68\EEC)<br />
Part No. 38033 Iss.1 03/03