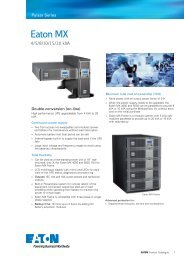
Eaton E Series DX Product Manual - Fusion Power System
Eaton E Series DX Product Manual - Fusion Power System
Eaton E Series DX Product Manual - Fusion Power System

Create successful ePaper yourself
Turn your PDF publications into a flip-book with our unique Google optimized e-Paper software.
©2008 <strong>Eaton</strong> Corporation<br />
All Rights Reserved<br />
The contents of this manual are the copyright of the publisher<br />
and may not be reproduced (even extracts) unless permission granted.<br />
Every care has been taken to ensure the accuracy of the information<br />
contained in this manual, but no liability can be accepted for any errors or omission.<br />
The right to make design modifications is reserved.
User Guide UPS 20 - 40 kVA, 380/400/415V, 50/60 Hz<br />
(3-phase input/3-phase output)<br />
614-06749-03 Revision 03<br />
1.<br />
2.<br />
3.<br />
4.<br />
Safety instructions….....……………………………………………………....……….. 01<br />
1.1 Safety caution….....………………….....………………….....…………………..... 01<br />
1.2 Audience caution….....………………….....………………….....………………01<br />
1.3 CE marking….....………………….....………………….....………………….....…02<br />
1.4 User precaution….....………………….....………………….....………………02<br />
1.5 Environment….....………………….....………………….....…………………..... 03<br />
1.6 Inquiries….....………………….....………………….....………………….....……03<br />
Introduction..........................................…………………………….....………………04<br />
2.1 <strong>System</strong> description….....………………….....………………….....………………04<br />
2.2 Basic system configuration….....………………….....………………….....……05<br />
2.3 Panel figure….....………………….....………………….....………………….....…05<br />
2.4 Exterior figure….....………………….....………………….....…………………..... 06<br />
Technical data…………………………………………….……………….....…………09<br />
3.1 Standards…………………………………………………………………………09<br />
3.2 Environment………………………………………………………………………09<br />
3.3 Dimensional drawings……………………………………………………………09<br />
3.4 Characteristics……………………………………………………………………10<br />
3.5 AC input……………………………………………………………………………10<br />
3.6 DC circuit……………………………………………………………………………10<br />
3.7 AC output……………………………………………………………………………11<br />
Mechanical installation.….…....………………………………………………………12<br />
4.1 Delivery check………………………………………………………………………12<br />
4.2 Unpacking and visual inspection………………………………………………12<br />
4.3 Planning before installation………………………………………………………14<br />
4.4 Cabinet installation………………………………………………………………15<br />
4.5 Maintenance Bypass Switch (MBS) operation…………………………………15
5.<br />
6.<br />
7.<br />
8.<br />
9.<br />
Electrical installation…………………………………..............……………………… 22<br />
5.1 Electrical Preparations…………………………………………………………… 22<br />
5.2 Installation and wire connection diagram……………………………………… 22<br />
5.3 Suggested cable and protective devices……………………………………… 25<br />
5.4 Connecting the external battery………………………………………………27<br />
5.5 Connections between battery cabinet and UPS……………………………… 29<br />
5.6 Handling the batteries…………………………………………………………… 29<br />
Software and connectivity……………………………………………………………31<br />
User operations………………………………………………………………………34<br />
7.1 Single machine operation………………………………………………………34<br />
7.2 Parallel machine operation……………………………………………………… 42<br />
Maintenance…………………………………………………………………………… 45<br />
8.1 Regular service/intervals………………………………………………………… 46<br />
8.2 Cooling fan………………………………………………………………………… 46<br />
Parallel systems…………….………………………………………………………… 47<br />
10. Recycling the used UPS or battery………………………………………………49<br />
11. Warranty………………………………………………………………………………50<br />
12. Display reference Table……………………………………………………………… 51
1 Safety instructions<br />
This user manual contains important safety instructions and operating instructions. Please<br />
read the user manual carefully before operating or working on the UPS and save it for<br />
reference in the future.<br />
1.1 Safety caution<br />
The UPS operates with external AC mains, battery cabinet(s) or bypass power. It contains<br />
components that carry hazardous voltages and high currents, The properly installed enclo-<br />
sure is earthed and IP20 rated against electrical shock and foreign objects. The user is not<br />
permitted to open it. Failure to observe this could result in electric shock risk.<br />
Only qualified personnel is allowed to install and service the UPS.<br />
Warning!<br />
Operations inside the UPS must be performed by a service engineer from the manufac-<br />
turer or from an agent authorised by the manufacturer.<br />
Use the optional Maintenance Bypass Switch (MBS) for service inside the UPS when in-<br />
stalled to the system. Remember to open battery cabinet(s) breaker. Always ensure by<br />
measuring with a multimeter that no dangerous voltages are present. For detailed MBS<br />
operation instructions please see 4.5.<br />
1.2 Audience caution<br />
The intended audiences of this manual are people who plan the installation, install, commission,<br />
and use or service the UPS. The manual provides guidelines to check delivery, installing and<br />
commissioning of the UPS. The reader is expected to know the fundamentals of electricity,<br />
wiring, electrical components and electrical schematic symbols. This manual is written for a<br />
global reader.<br />
1
1.3 CE marking<br />
The product has the CE marking in compliance with the following European directives:<br />
LVD Directive (Safety) 2006/95/EEC<br />
EMC Directive 2004/108/EEC<br />
The only user operations permitted are:<br />
Start up and shut down the UPS, excluding the commissioning start-up.Use of the LCD<br />
control panel and Emergency <strong>Power</strong> Off (EPO) switch.Use of optional connectivity modules<br />
and their software.The user must follow the precautions and only perform the described<br />
operations.Any deviations from the instructions could be dangerous to the user or cause<br />
accidental load loss.<br />
2<br />
Warning!<br />
The user is not permitted to open any screws excluding connectivity plates and the<br />
Emergency <strong>Power</strong> Off (EPO) switch. Failure to recognise the electrical hazards could<br />
prove fatal.<br />
Caution!<br />
Read the manual before operating or working on the UPS.<br />
Note!<br />
This product for commercial and industrial application in the second environment Instal-<br />
lation restrictions or additional Measures may be needed to prevent disturbances.<br />
1.4 User precaution
1.5 Environment<br />
The UPS must be installed according to the recommendations in this manual.Under no circum-<br />
stances the UPS should be installed in an airtight room, in the presence of flammable gases,<br />
or in an environment exceeding the specification.Excessive amount of dust in the operating<br />
environment of UPS may cause damage or lead to malfunction. The UPS should be always<br />
protected from the outside weather and sunshine. The recommended operating temperature<br />
is from +15 to +20 Celsius degrees.The recommended operating humidity:20% to 90%.<br />
1.6 Inquiries<br />
Address any inquiries about the UPS and battery cabinet(s) to the local office or agent<br />
authorized by the manufacturer. Please quote the type code and the serial number of the<br />
equipment.<br />
3
2 Introduction<br />
The product described in this manual is an Uninterruptible <strong>Power</strong> Supply (UPS). It is a true<br />
online, continuous duty, double conversion, solid state, three-phase system, providing con-<br />
ditioned and uninterruptible AC power to protect the end-user's load.<br />
2.1 <strong>System</strong> description<br />
<strong>Eaton</strong> E <strong>Series</strong> <strong>DX</strong> products are high-efficiency and high-performance, double conversion,<br />
pure-online and three phase input and three phase output UPS, with unit capacity ranging<br />
between 20KVA-40KVA. Categorized by capacity, the products can be further divided into<br />
20KVA, 30KVA and 40KVA. This series not only provides perfect solution for power source<br />
protection and successfully solves problems such as blackout, boost, brownouts, sags,<br />
decaying, oscillation, high voltage impulse, voltage fluctuations, surges, harmonic distortion,<br />
disturbances, frequency fluctuation etc, but also enhances adaptability to complicated working<br />
environments so that the application fields is well extended to computer equipments, commu-<br />
nication equipments and other controlling equipments with good adaptability to complicated<br />
industrial environments as well. Therefore, this series products can be applied in a diversi-<br />
fied multi-industries field such as telecommunications, financing, transportation, government,<br />
manufacturing and energy sectors.<br />
<strong>Eaton</strong> E <strong>Series</strong> <strong>DX</strong> products are also capable of ECO mode. ECO mode means UPS load is<br />
powered by bypass AC supply while in case of abnormal AC supply the load will be supplied<br />
by accumulator battery after conversion through inverter. As the energy conversion effi-<br />
ciency reaches as high as 98% and transfer time less than 10ms under ECO mode when<br />
there is normal AC supply, the energy saving effect of UPS is remarkable.<br />
Remark: ECO mode is applicable only to single unit.<br />
4
2.2 Basic system configuration<br />
2.3 Panel figure<br />
5
① AC: This light and inverter light will turn "green" when UPS is powered by Rectifier Input;<br />
② Inverter: This light will turn "green" when UPS load is through the inverter;<br />
③ Battery: This light will turn "yellow" when UPS is powered by batteries;<br />
④ Bypass: This light will turn "green" when UPS load is powered by Bypass Input;<br />
⑤ Fault: If the UPS worked under fault condition,this light would turn on and stay “red” with<br />
continuous warning tone being given off in case of UPS abnormal function;or flash “red”<br />
with intermittent warning tone being given off.<br />
⑥ LCD: Display UPS commands.<br />
⑦ :Confirm/Enter; press this button to select a menu or confirm an operation.<br />
⑧ :PageDown; press this button to switch to next screen display under the same menu.<br />
⑨ :PageUp; press this button to return to next screen display under the same menu.<br />
⑩ Esc: Escape; press this button to return to previous menu or cancel a certain operation.<br />
Remark: Refer to Chapter 12 for detailed information of LED in accordance with<br />
UPS condition.<br />
2.4 Exterior view<br />
Exterior figure of <strong>Eaton</strong> E <strong>Series</strong> <strong>DX</strong> 20KVA UPS<br />
6<br />
LCD panel<br />
Button<br />
LED indicator<br />
light<br />
PARALLEL<br />
Intelligent slot<br />
Extended slot<br />
Front view Rear view<br />
SERVICE<br />
AS400<br />
EPO<br />
RS485<br />
RS232<br />
Fan
Front view(door open)<br />
Exterior figure of <strong>Eaton</strong> E <strong>Series</strong> <strong>DX</strong> 30KVA,40KVA UPS<br />
LCD panel<br />
Button<br />
LED indicator<br />
light<br />
PARALLEL<br />
Intelligent slot<br />
Extended slot<br />
CHGR FAN<br />
Maintenance Bypass Switch<br />
Neutral Switch<br />
Bypass Input Switch<br />
Rectifier Input Switch<br />
Front view Rear view<br />
SERVICE<br />
AS400<br />
EPO<br />
RS485<br />
RS232<br />
Fan<br />
7
8<br />
Front view(door open)<br />
CHGR FAN<br />
Maintenance Bypass Switch<br />
Neutral Switch<br />
Bypass Input Switch<br />
Rectifier Input Switch
3 Technical data<br />
3.1 Standards<br />
UPS 20kVA 30kVA 40kVA<br />
Safety IEC62040-1-1:2004,EN62040-1-1:2003 and EN60950-1:2001<br />
EMC IEC62040-2:2005 and EN62040-2:2006<br />
<strong>Product</strong> IEC62040-3:1999 and EN62040-3:2001<br />
3.2 Environment<br />
UPS 20kVA 30kVA 40kVA<br />
Ambient 0 to +40℃(UPS), 15 to +25℃(battery cabinet(s))<br />
Relative humidity 20% to 90%, no condensation allowed<br />
Altitude derating coefficient See user operations section for more detail information<br />
Vibration IEC68-2-6; max.0.3mm(2 to 9Hz), max.1m/s2(9 to 200Hz) sinusoidal<br />
3.3 Dimensional drawings<br />
UPS 20kVA 30kVA 40kVA<br />
Width 420mm 470mm 470mm<br />
Depth 643mm 710mm 710mm<br />
Height 956mm 1150mm 1150mm<br />
N.W(Kg) 82 110 114<br />
G.W(Kg) 122 160 164<br />
9
3.4 Characteristics<br />
3.5 AC input<br />
10<br />
20kVA 30kVA 40kVA<br />
Efficiency-nominal load Up to 92% Up to 92% Up to 92%<br />
Noise (ISO 7779)
3.7 AC output<br />
Overload<br />
capability<br />
(Mains<br />
available)<br />
Overload<br />
capability<br />
(battery<br />
available)<br />
20kVA 30kVA 40kVA<br />
Active power 16KW 24KW 32KW<br />
Number of phases 3-phases + N<br />
Frequency 50/60HZ<br />
Voltage (L-N) 220/230/240 VAC<br />
110%
4 Mechanical installation<br />
The UPS and accessories are delivered on a specifically designed pallet that is easy to move<br />
with a forklift or a pallet jack. Keep the UPS always in upright position and do not drop the<br />
equipment. Do not stack the pallets.<br />
4.1 Delivery check<br />
The UPS is delivered with the following items:<br />
1. Winpower disc<br />
2.RS-232 serial cable<br />
3.Delivery documents<br />
4.User Guide<br />
5.Key<br />
4.2 Unpacking and visual inspection<br />
Check that there are no signs of shipping damages. The equipment should be transported in<br />
the upright position.<br />
Unpack the equipment by removing the packing and shipping materials. Make a visual inspection.<br />
Remove the equipment from the pallet and make sure that the floor surface is solid and<br />
suitable for the wheeling and heavy weight.<br />
Remove cover plate → Remove side plate → Remove stuffing and fix<br />
12<br />
Note!<br />
A claim for shipping damage must be filed immediately and the carrier must be informed<br />
within 7 days of receipt of the equipment. The packing materials should be stored for<br />
further investigation.
Check the information on the type designation label of the equipment to verify that the unit is<br />
of the correct type. The type designation label includes ratings, a CE marking, a type code, a<br />
part number and a serial number. The serial number is important when making inquiries. It<br />
allows individual recognition of the equipment.<br />
13
4.3 Planning before installation<br />
The equipment must be installed in upright position. The equipment requires space to front<br />
and back to enable cooling airflow. Service and maintenance require more than 40cm clear-<br />
ance on right hand side. All cooling air enters at front and exits at unit rear. The required<br />
minimum clearance from unit rear to an obstruction is 50cm. Because the service and user<br />
access is in the front there should be reserved enough space (min 60cm).<br />
Preparation for installation.<br />
1. Avoid extremes of ambient temperature; excessive dust, moisture or vibration; flammable<br />
gases; and corrosive or explosive atmospheres.<br />
2.Altitude for normal UPS function should not exceed 1000m.<br />
3.The battery cabinet should work within a temperature range from15℃ to 25℃.<br />
4.The maximum ambient temperature for normal UPS performance should not exceed 40℃.<br />
14
4.4 Cabinet installation<br />
The required distance for UPS units should allow for service access. The same applies to<br />
the battery cabinet(s) that should be installed next to the UPS cabinet(s).<br />
Caution!<br />
UPS cabinet(s) can fall over if the installation brake pads are not used. Both rear and<br />
front pads must be used to secure the UPS cabinet to the floor.<br />
Use a 19mm wrench in clockwise direction to screw the brake pad down to the ground,<br />
keeping the machine from moving.<br />
4.5 Maintenance Bypass Switch(MBS)<br />
Warning!<br />
All operations inside the unit must be performed only by a service engineer from the<br />
manufacturer or from an agent, authorised by the manufacturer.<br />
The operation of the MBS is allowed for a service engineer from the manufacturer or from an<br />
agent, authorised by the manufacturer. The full UPS wiring diagram with a MBS switch is<br />
presented in the installation part of the manual.<br />
15
The switching sequence for circuit breaker from normal position to maintenance position:<br />
The normal positions of the MBS switches.<br />
16
The maintenance positions of the MBS switches<br />
Transfer UPS from normal mode to maintenance bypass mode:<br />
1.The normal start position should be following:<br />
2.Use LCD to turn the UPS from normal mode to bypass mode:<br />
Switch-off action (press ESC to exit above picture)<br />
17
1)Switch-off picture 2)If it is in single machine mode, the<br />
18<br />
following will appear<br />
Remember to verify the transfer before proceeding the next step.<br />
3.Remove the locking plate of maintenance switch.<br />
4.Turn OFF the Rectifier Input switch.<br />
5.Turn the Maintenance switch to “MAINTENANCE” side.<br />
6.Turn OFF the Bypass Input switch and N switch.
7.UPS is now in the maintenance bypass mode,see below:<br />
Transfer UPS from maintenance bypass mode to normal mode:<br />
1.The normal start position should be following:<br />
2.Turn ON the Bypass Input switch and N switch<br />
When the LED of bypass turns green,the UPS enters into bypass mode.<br />
3.Turn the Maintenance switch to “UPS” side.<br />
19
Then the UPS turn to bypass mode.<br />
4.Turn ON the Rectifier Input switch.<br />
5.Use LCD to turn the UPS from bypass mode to normal mode:<br />
Switch-off action (press ESC to exit above picture)<br />
1)Switch-on picture 2)Press ENTER<br />
20
6.UPS is now in the normal mode,see below:<br />
7.Remount the locking plate of maintenance switch to the position to prevent the use of it.<br />
21
5 Electrical installation<br />
5.1 Electrical Preparations<br />
The UPS unit has the following power connections:<br />
Three-phase (L1, L2, L3), Neutral (N) and Protective Earth (PE) connection for the rectifier<br />
input.<br />
Three-phase (L1, L2, L3), Neutral (N) and Protective Earth (PE) connection for the bypass<br />
input ( N is INTERNALLY common for rectifier and bypass inputs).<br />
Three-phase (L1, L2, L3), Neutral (N) and Protective Earth (PE) connection for the load<br />
output.<br />
Positive pole (+),Negative pole (-), Common midpoint/Neutral pole and Protective Earthing<br />
(PE) connection for the external batteries.<br />
22<br />
Note!<br />
It must be ensured that no line input source can accidentally be connected to the UPS<br />
during installation.<br />
Warning!<br />
Installation may only be carried out by qualified technicians and in conformity with the<br />
applicable safety standards.<br />
Warning!<br />
The UPS unit is not applicable to the IT power distribution system.<br />
5.2 Installation and wire connection diagram
1.If UPS rectifier input and bypass input are supplied from two mains:<br />
Connect the mains 1 supply cables to the UPS rectifier input terminals L1, L2, L3, N and PE.<br />
Connect the mains 2 supply cables to the UPS bypass input terminals L1, L2, L3, N and PE.<br />
23
2.If UPS rectifier input and bypass input are supplied from one mains only:<br />
Connect the mains supply cables to the UPS rectifier input terminals L1, L2, L3, N and PE .<br />
The following three jumpers must be fixed between the rectifier and bypass input terminals:<br />
L1-L1, L2- L 2, L3- L3.<br />
Terminal block diagram<br />
24<br />
Warning!<br />
High touch current earth connection essential before connecting supply.
In order to gain access to the external electrical connections it is necessary to remove the<br />
front terminal protective panel of the UPS. Before the cables are connected they shall be<br />
passed through the cable glands to hold them in position and tightened.<br />
Connect the Protective Earthing (PE) cable first.<br />
Connect other cables as shown in the connection terminal representations on the preceding<br />
and following pages.<br />
Ensure that the UPS is isolated before removing front terminal protective panel.<br />
5.3 Suggested cable and protective devices<br />
Caution!<br />
All cables should always use copper cable type.<br />
The conductor cross sections apply for maximum currents:<br />
(1) For PVC-insulated copper cables (at 70℃)<br />
(2) When routed in conduits for electrical installations<br />
(3) When air temperature surrounding the conduits does not exceed 30℃<br />
(4) For cable lengths up to 30 m<br />
Notice!<br />
Should there be any variation in the conditions it will be necessary to verify whether the<br />
cable dimensions satisfy the requirements of IEC-287 and DIN VDE 0298. In cases<br />
where the cables are so long that they cause a drop in voltage of >3%, a larger<br />
dimension shall be selected.<br />
25
Routing of communication cables or data lines should be kept separate from the UPS input,<br />
output, and external battery cables.<br />
Use cable cross section and protective device specification<br />
26<br />
Rectifier Input L1, L2, L3, N,<br />
Bypass Input L1, L2, L3, N,<br />
Model 20kVA 30kVA 40kVA<br />
min. conductor cross section[mm ] 6 10 16<br />
max. possible cross section[mm ] 35 35 35<br />
Rectifier Input L1, L2, L3, N breaker (A) 60A 230VAC 80A 230VAC 100A 230VAC<br />
Bypass Input L1, L2, L3, breaker (A) 60A 230VAC 80A 230VAC 100A 230VAC<br />
Rectifier Input fuse (A) 60A 250VAC 80A 250VAC 100A 250VAC<br />
Bypass Input fuse (A) 60A 250VAC 80A 250VAC 100A 250VAC<br />
Output L1, L2, L3, N,<br />
min. conductor cross section[mm ] 6 10 16<br />
max. possible cross section[mm ] 35 35 35<br />
External Battery Cabinet Positive<br />
pole(+),Neutral pole,Negative pole (-),<br />
min. conductor cross section[mm ] 10 16 25<br />
max. possible cross section[mm ] 35 35 35<br />
External Battery Cabinet Fuse (A) in<br />
Positive pole(+),Neutral pole,<br />
Negative pole (-),<br />
External Battery Cabinet breaker (A)<br />
in Positive pole(+),Neutral pole,Nega-<br />
tive pole (-),<br />
Backfeed protection device<br />
80A 250VDC 120A 250VDC 150A 250VDC<br />
80A 250VDC 120A 250VDC 150A 250VDC<br />
40A 250V AC Clearance distances:>=1.4mm<br />
Break time
Notice!<br />
The following label must be displayed on all switching devices installed in the same<br />
electrical system as the UPS, even when these are located at a distance from the area<br />
in which it is located (according to European standard EN 62040-1-1).<br />
Warning!<br />
ENSURE THAT THE UNINTERRUPTIBLE POWER SYSTEM IS ISOLATED BEFORE<br />
WORKING ON THIS CIRCUIT.<br />
5.4 Connecting the external battery<br />
Before connecting the external battery, please read the notice and warning label<br />
on the UPS.<br />
Warning!<br />
In the event of malfunction, the battery cabinet chassis or battery cabinet frames may<br />
become live!<br />
Warning!<br />
Special care should be taken when working with the battery cabinet associated with<br />
the <strong>Eaton</strong> E <strong>Series</strong> <strong>DX</strong> 20 - 40 kVA. When the battery cabinet is connected the overall<br />
voltage exceeds 400V. It is very important to ensure that the batteries are installed<br />
separately, in a dedicated battery cabinet.<br />
27
28<br />
Notice!<br />
The most common battery type used in UPS installations is the valve regulated battery.<br />
Valve regulated cells are not sealed. The amount of gas given off is less than for<br />
flooded cells, but when planning the battery installation, allowance must be made for<br />
adequate ventilation and heat dissipation. Valve-regulated cells are not completely<br />
maintenace- free. They must be kept clean and their connections checked periodically<br />
to ensure they are tight, and that there is no evidence of corrosion. It is inevitable that<br />
the batteries will lose charge during transportation and storage; before attempting to<br />
carry out an autonomy test, ensure that the batteries are fully charged as this may take<br />
several hours. Cell performance typically improves after a few discharge/recharge<br />
cycles.<br />
Notice!<br />
The requirements of the EC directives are satisfied when battery cabinet are used with<br />
original accessories. If alternative batteries are used, you must ensure that the appli-<br />
cable EC directives are met and declare conformity.<br />
The battery cabinet is preferably installed to the left of the UPS.<br />
Connect the battery cabinet as follows:<br />
Check the battery fuses are not inserted and/or any external battery switch is open.<br />
Connect PE first.<br />
Connect the battery cabinet(s) with cables sized according to cable cross setion and<br />
protective device specification to terminals + (positive pole) ,- (negative pole) and Neutral<br />
pole.<br />
Refer to instruction provided with the battery cabinet or by vendor.<br />
Warning!<br />
ENSURE CORRECT POLARITY!
5.5 Connections between battery cabinet and UPS<br />
Make sure the Protective Earthing (PE) connected first.<br />
5.6 Handling the batteries<br />
Warning!<br />
External Battery Cabinet Connections<br />
Batteries are a potential source of danger due to their electrical charge and chemical<br />
composition. Therefore observe the battery handling instructions of the manufacturer.<br />
These usually can be found in the material which accompanies the shipment.<br />
29
Recharging batteries<br />
Exchanging batteries<br />
30<br />
Warning!<br />
When recharging, observe the indications on the packaging.<br />
Warning!<br />
Before replacing batteries, make sure that those to be installed are fully charged.<br />
Connecting external battery cabinet<br />
Warning!<br />
If a battery cabinet has been disconnected and is to be reconnected, the battery<br />
isolator may only be reconnected after you have made certain that voltage with the<br />
correct polarity is present on both sides of isolating device.
6 Software and connectivity<br />
The <strong>Series</strong> provide Intelligent Slot, Expanded Slot, PARALLEL, AS400, EPO, RS485 and<br />
RS232 as well as SERVICE Supervising Communication Interface exclusively available to<br />
<strong>Eaton</strong> technical personnel.<br />
1 3 4 5 7<br />
Intelligent slot<br />
Expanded slot<br />
PARALLEL<br />
PARALLEL<br />
AS400 EPO RS485 SERVICE<br />
2 6 8<br />
RS232<br />
1. Intelligent slot: suitable for Web<strong>Power</strong> card of remote supervising management,enabling<br />
you to realize remote supervising management on UPS through Internet.<br />
2. Expanded slot: Reserved for special applications<br />
3. PARALLEL: communication interface for parallel machine mode.<br />
4. Standard AS400 interface: provides AS400 and users can directly use UPS supervising<br />
function offered by AS400 system to realize power source management (See Appendix for<br />
AS400 port Pin).<br />
5. EPO: Emergency <strong>Power</strong> Off, providing the possibility of emergency shut down.Normally<br />
closed.<br />
6. Standard RS485 Interface: It can be used to monitor parallel units for completely control of<br />
UPS (See Appendix for RS485 port Pin ).<br />
7. SERVICE Interface: available only to <strong>Eaton</strong> technicians<br />
8. Standard RS232 Interface: applicable to Win<strong>Power</strong> supervising software of graphic man-<br />
agement (See Figure for RS232 port Pin)<br />
31
RS232 port<br />
RS485 port<br />
32
AS400 port<br />
Note!<br />
The UPS have to be manually reset if remote shutdown occurs.<br />
33
7 User operations<br />
7.1 Single machine operation<br />
34<br />
Warning!<br />
High touch current earth connection essential before connecting supply.<br />
The only user operations permitted are:<br />
Start up and shut down the UPS, excluding the commissioning start-up.<br />
Use of the LCD control panel and Emergency <strong>Power</strong> Off (EPO) switch.<br />
Use of optional connectivity modules and their software.<br />
Warning!<br />
The user must follow the precaution, warnings and only perform the described operation.<br />
Any deviations from the user manual could be dangerous to the user or cause acciden-<br />
tal load loss.<br />
Should the UPS be intended for application above 1000m, progressive decrease of rated<br />
output should be applied as listed in the following chart:<br />
1. Make sure L1, L2 and L3 phase sequences are correctly connected and then supply<br />
power to UPS.<br />
2. Turn on the switch on battery box (make sure that the “+”,“N” and “-” of terminal bay are<br />
in accordance with those on the battery box).<br />
3. Switch on “Input Switch” (Rectifier Input Switch,Bypass Input Switch) on UPS and fans<br />
start to rotate for UPS self-inspection. Main menu can be accessed within about 4sec and<br />
then operations should be carried.
Remark: the following drawing takes <strong>Eaton</strong> E <strong>Series</strong> <strong>DX</strong> 20KVA as an example and statistics<br />
are only for reference.<br />
1)<strong>Power</strong> on 2)Automatic access within about 4s<br />
3)Press ESC to access or automatically<br />
within 1min with no button being pressed<br />
4)Press ▼ to obtain the below informa-<br />
tion<br />
35
5)Press ▼ again to obtain the below 6)Press ▼ again to obtain the below<br />
information information<br />
7)Press ▼ again to obtain the below 8)Press ▼ again to obtain the below<br />
information information<br />
36
Note!<br />
If malfunction occurs, “x” will appear at the lower right corner of the display,while a<br />
warning occurs, “ ” will appear at the same position (as illustrated in the below picture<br />
with battery mode as an example).<br />
4. Start-up action (press ESC to exit the above picture)<br />
1)Switch-on picture 2)Press ENTER<br />
37
3)Select “Yes, Confirm” to switch on 4)Normal Switch-on<br />
the machine<br />
5)Battery power supply (switch off line input switch)<br />
38
5. Switch-off action (press ESC to exit above picture)<br />
1)Switch-off picture 2)If it is in single machine mode, the<br />
3)If it is in parallel machine mode, the 4)Press ENTER<br />
following will appear<br />
following will appear<br />
39
5)Select “Yes, Confirm” to switch off 6)Normal Switch-off<br />
the machine<br />
40<br />
Note!<br />
If you intend to switch off only one set of UPS among the parallel machine system,<br />
select “single machine switch-off”; if switch-off is intended for the entire parallel ma-<br />
chine system, select “parallel machine switch-off”.<br />
6. Help<br />
1)Help picture 2)Press ENTER on help picture
7. Configuration (press ESC to exit the above picture)<br />
You are able to access Setting picture by using user combination (default: 1234, subject to<br />
personal modification) so as to set the following programs.<br />
1)Action display (bypass power supply) 2) Press ▼<br />
3)Enter respective password 4)Select action item<br />
8. The <strong>Series</strong> is capable of DC start-up without AC input, panel display being similar to<br />
switch-on picture with AC supply. DC switch-on and off are available by following instruc-<br />
tions appearing in the pictures.<br />
41
9. Procedures of DC switch-on:<br />
42<br />
Activate DC switch-on function set under UPS bypass mode<br />
Make sure that “+”, “-” and “N” wires of batteries are properly connected to UPS<br />
Switch on batteries<br />
Lightly touch ENTER<br />
<strong>Manual</strong>ly conduct switch-on order within about 1min after LCD self-inspection<br />
Note!<br />
UPS will be switched off automatically if there is no operation within 1min after LCD self<br />
-inspection is completed!<br />
7.2 Parallel machine operation<br />
Redundancy introduction<br />
N+X is currently the most reliable power supply structure, in which N indicates the minimum<br />
UPS number required for the total load and X is the redundant UPS number, namely, the<br />
malfunctioning UPS number that the system can simultaneously bear. The larger X is, the<br />
higher reliability of system will be. For instance, if the total load of a customer registers<br />
55kVA, we can use 20KVA for N+X design. With N taking up 3, X can be selected in<br />
accordance with reliability degree or cost requirement. Supposing customer selects X=2<br />
and equalized UPS power supply is 11kVA for each unit, when one set of UPS breaks down<br />
with malfunction, the remaining four sets will provide power with almost 14kVA equalized<br />
current; if two sets of UPS fail, the remaining three sets of UPS are supposed to provide<br />
power supply with almost 18kVA equalized current. The maximum allowance of this system<br />
is for two sets of UPS going down at the same time, the chances of which are much smaller<br />
than those of one UPS malfunction. Therefore, the reliability degree can be largely enhanced,<br />
making it an optimal mode for application in locations where high degree of reliability is<br />
always a focus.<br />
<strong>Eaton</strong> E <strong>Series</strong> <strong>DX</strong> 20 - 40 kVA is capable of direct parallel connection, which only requires<br />
the parallel connection wires (optional) for 2 to 8 sets of UPS in parallel connection in order<br />
to realize power redundancy (N+X).
Parallel machine wire connection drawing(one battery supply)<br />
Parallel machine wire connection drawing(separate battery supply)<br />
43
Single machine wire connection drawing<br />
44
8 Maintenance<br />
<strong>Eaton</strong> E <strong>Series</strong> <strong>DX</strong> 20 - 40 kVA requires minimum maintenance.<br />
1. If battery is switched off, loaded equipments will not be covered for power-off protection.<br />
2. Under normal circumstance, if batteries should be found in poor performance, replace-<br />
ment should be done as soon as possible only by qualified personnel with proper training.<br />
Users are not allowed to replace without authorization.<br />
Remark:<br />
Warning!<br />
The Maintenance must be performed by a service engineer form the manufacturer or<br />
form an agent authorised by the manufacturer.<br />
A. Prior to battery replacement, switch off UPS and remove it from AC.<br />
B. Take off metallic articles such as rings and watches.<br />
C. Use screw drivers equipped with insulated handles and do not place tools or other<br />
metallic substances on the batteries.<br />
D. Short circuit or reverse connection is forbidden for battery polarity connection.<br />
3. It’s not recommended to replace batteries individually. Complete replacement should follow<br />
instructions given by battery suppliers.<br />
4. Make sure UPS vent are properly ventilated and clean side frames and fan vents from<br />
dusts every half a year (switch off AC and battery cabinet prior to cleaning)<br />
The troubleshooting procedure gives simple remedial if a malfunction occurs in the UPS.<br />
The operator should start the trouble shooting if there is an active alarm indicated on the LCD<br />
screen. Service should be contacted if the active alarm is abnormal and displayed as a<br />
service code.<br />
Should maintenance prove necessary, the following steps should be followed:<br />
1. Check if UPS input wiring is done properly.<br />
2. Check if all air switches are tripped out.<br />
3. Check if voltage input is within specified range<br />
Please refer to “Light Reference Table” of this User <strong>Manual</strong> first and then conduct proper<br />
treatment. If problems still exist, please record UPS model, serial number as well as purchase<br />
date, symptom on fault, light condition, LCD malfunction or warning information.<br />
45
8.1 Regular service/intervals<br />
The UPS requires very little maintenance if installed in an appropriate environment. In order to<br />
ensure maximum availability of the UPS, manufacturer recommends signing a proactive<br />
service agreement with a local authorised service provider.<br />
46<br />
Maintenance Interval<br />
Batteries change 3-5 years or according to battery suppliers recommendations<br />
Batteries test 18 months<br />
Cooling fan change 5 years<br />
8.2 Cooling fan<br />
The cooling fan lifespan of the UPS unit is about 60 000 operating hours. The actual lifespan<br />
depends on the environment and ambient temperature.<br />
Fan failure can be predicted by increasing noise from the fan bearings. The fan replacement<br />
is recommended once this symptom starts appearing.<br />
Do not use other than manufacturer’s specified spare parts.
9 Parallel systems<br />
Note!<br />
Parallel is only connected to identical ports for UPS of same model / kVA rating.<br />
1) Follow installation instructions for general installation requirements.<br />
2)Ventilation spacing between machines should allow for service access.<br />
3) Input wiring for each set of UPS should follow the requirements for that of single unit.Each<br />
UPS input should be connected to the same input patch board.<br />
4) Each UPS output wire should be connected to the output patch board, from which wires<br />
are distributed for load as illustrated in following figure.<br />
Remark 1: common battery pack is applicable in parallel machine mode;<br />
Remark 2: each battery pack should be of the same model from the same manufacturer;<br />
Remark 3: requirement of output wiring length:<br />
When the lead from the output terminal of each set of UPS to the output patch board is less<br />
than 20m, wire difference should be less than 20%;<br />
When the lead from the output terminal of each set of UPS to the output patch board is longer<br />
than 20m, wire difference should be less than 10%.<br />
47
48<br />
Note!<br />
Parrallel wires should be connected as a loop.
10 Recycling the used UPS or battery<br />
Before scrapping UPS or its battery cabinet, the battery bank must be removed. Local<br />
requirements must be followed in battery recycling or discard. The removal of batteries is<br />
allowed only by authorised service personnel due to high energy and voltage.<br />
Do not discard waste electrical or electronic equipment in the trash. For proper disposal,<br />
contact your local collecting/recycling/reuse or hazardous waste center and follow the local<br />
legislation.<br />
These symbols indicate on a product:<br />
You can find out which recycling firm is responsible for your neighbourhood by contacting<br />
your local authority.<br />
Batteries must not be put in the domestic refuse either!<br />
All consumers have a statutory duty to take all batteries to a collection point in their munici-<br />
pality/district or to a retail store so that they can be disposed of in an environmentally-friendly<br />
way,regardless of whether they contain toxic substances.<br />
All batteries should be fully discharged before they are returned for disposal.<br />
PROTECTION OF THE ENVIRONMENT/DISPOSAL OF THE EQUIPMENT.<br />
Do not on any account put your old equipment out with the domestic refuse.<br />
For the sake of the environment,please use your local authority’s collection point set to return<br />
and recycle old electric and electronic equipment.<br />
49
11 Warranty<br />
The product is warranted against defects in design, materials and workmanship for a period<br />
of twelve (12) months from its original date of purchase. The local office or distributor may<br />
grant a warranty period different to the above and refer to local terms of liability as defined<br />
in the supply contract.<br />
The UPS manufacturer is not responsible for<br />
1) Any costs resulting from a failure if the installation, commissioning, repair, alternation,or<br />
ambient conditions of the equipment do not fulfil the requirements specified in the documen-<br />
tation delivered with the unit and other relevant documentation.<br />
2) Equipment subjected to misuse, negligence or accident<br />
3) Equipment comprised of materials provided or designs stipulated by the purchaser.<br />
Under no circumstances shall the manufacturer, its suppliers or subcontractors be liable for<br />
special, indirect, incidental or consequential damages, losses or penalties.<br />
The technical data, information and specifications are valid at the time of printing. The UPS<br />
manufacturer reserves the right to modifications without prior notice.<br />
50
12 Display reference Table<br />
51
Should any display or warning message excluded in the above table be found,please con-<br />
tact distributor or call EATON Hot line for advice.<br />
● Indicator light is on<br />
★ Indicator light flashes<br />
Warning include one or more than one of these:<br />
1.EPO active<br />
2.Line loss<br />
3.Neutral loss<br />
4.Line phase error<br />
5.Bypass loss<br />
6.Bypass phase error<br />
7.Battery open<br />
8.Low battery voltage<br />
9.Over charger<br />
10.Battery reverse<br />
52<br />
11.Charger failure<br />
12.Battery over restrict<br />
13.Battery over temperature<br />
14.Fan over restrict<br />
15.BUS capacitor over restrict<br />
16.Fan failure<br />
17.Fan disconnected<br />
18.Low temperature Battery<br />
19.communication disconnected<br />
20.Auxiliary charger failure