ERB30Y - Free-Instruction-Manuals.com
ERB30Y - Free-Instruction-Manuals.com
ERB30Y - Free-Instruction-Manuals.com

Create successful ePaper yourself
Turn your PDF publications into a flip-book with our unique Google optimized e-Paper software.
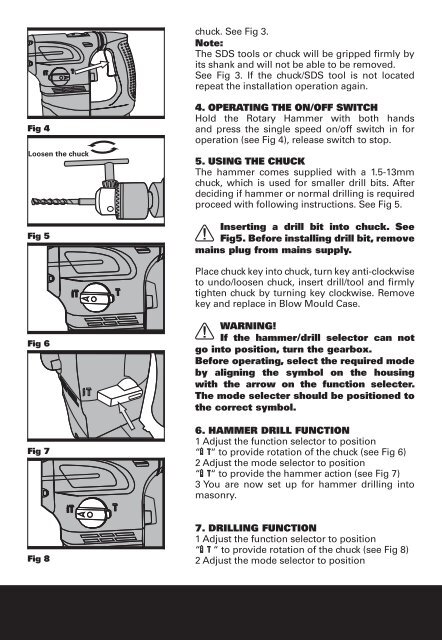
Fig 4<br />
<br />
Fig 5<br />
Fig 6<br />
Fig 7<br />
Fig 8<br />
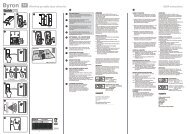
chuck. See Fig 3.<br />
Note:<br />
The SDS tools or chuck will be gripped firmly by<br />
its shank and will not be able to be removed.<br />
See Fig 3. If the chuck/SDS tool is not located<br />
repeat the installation operation again.<br />
4. OPERATING THE ON/OFF SWITCH<br />
Hold the Rotary Hammer with both hands<br />
and press the single speed on/off switch in for<br />
operation (see Fig 4), release switch to stop.<br />
5. USING THE CHUCK<br />
The hammer <strong>com</strong>es supplied with a 1.5-13mm<br />
chuck, which is used for smaller drill bits. After<br />
deciding if hammer or normal drilling is required<br />
proceed with following instructions. See Fig 5.<br />
Inserting a drill bit into chuck. See<br />
Fig5. Before installing drill bit, remove<br />
mains plug from mains supply.<br />
Place chuck key into chuck, turn key anti-clockwise<br />
to undo/loosen chuck, insert drill/tool and firmly<br />
tighten chuck by turning key clockwise. Remove<br />
key and replace in Blow Mould Case.<br />
WARNING!<br />
If the hammer/drill selector can not<br />
go into position, turn the gearbox.<br />
Before operating, select the required mode<br />
by aligning the symbol on the housing<br />
with the arrow on the function selecter.<br />
The mode selecter should be positioned to<br />
the correct symbol.<br />
6. HAMMER DRILL FUNCTION<br />
1 Adjust the function selector to position<br />
“ “ to provide rotation of the chuck (see Fig 6)<br />
2 Adjust the mode selector to position<br />
“ “ to provide the hammer action (see Fig 7)<br />
3 You are now set up for hammer drilling into<br />
masonry.<br />
7. DRILLING FUNCTION<br />
1 Adjust the function selector to position<br />
“ “ to provide rotation of the chuck (see Fig 8)<br />
2 Adjust the mode selector to position