ERB30Y - Free-Instruction-Manuals.com
ERB30Y - Free-Instruction-Manuals.com
ERB30Y - Free-Instruction-Manuals.com

You also want an ePaper? Increase the reach of your titles
YUMPU automatically turns print PDFs into web optimized ePapers that Google loves.
GENERAL DESCRIPTION<br />
This ROTARY HAMMER DRILL can be used for<br />
drilling wood, metal and masonry. It is supplied<br />
with a keyed chuck for smaller drill bits. Contained<br />
in the case is a selection of larger SDS Plus<br />
masonry bits. These fit directly into the rotary<br />
hammer. Using the hammer setting the supplied<br />
chisels can be used to break brick work. The<br />
machine uses a single phase alternating current<br />
230V, 50Hz motor, its <strong>com</strong>pact and robust format<br />
makes it versatile and efficient for uses described<br />
in specific safety instructions. It <strong>com</strong>plies to<br />
current regulations and the optimum quality of<br />
materials used will ensure a long working life in<br />
<strong>com</strong>plete safety.<br />
OPERATION INSTRUCTIONS<br />
Familiarize yourself with the rotary hammer drill<br />
before use.<br />
Note:<br />
Make sure the rotary hammer is isolated from the<br />
mains supply before fitting accessories. Before<br />
undertaking any maintenance or operations on<br />
the rotary hammer isolate the plug from the 13<br />
amp socket.<br />
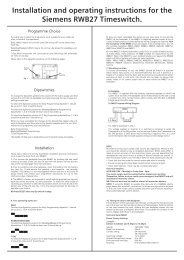
1. FITTING THE AUXILIARY HANDLE<br />
Attach the handle as shown in Fig 2 depending<br />
on being left handed or right handed.<br />
2. FITTING SDS TOOLS OR CHUCK<br />
The rotary hammer is equipped with an SDS-plus<br />
attachment system. The chuck/SDS tools have<br />
slots in the shank. These locate with tabs in the<br />
rotary hammer. Hold the rotary hammer with one<br />
hand facing away from yourself. See Fig 3.<br />
Grip and pull back the fastening sleeve and insert<br />
the chuck/SDS tool.<br />
Push inwards until a resistance is felt. It may be<br />
necessary to spin the chuck/SDS tool until the<br />
shaft drops <strong>com</strong>pletely into place.<br />
Once you are satisfied it has seated release the<br />
black fastening sleeve. This should lock the chuck<br />
or SDS tool into position.<br />
3. REMOVE SDS TOOL OR CHUCK<br />
Pull back fastening sleeve, hold and remove tool/<br />
<br />
Fig 2<br />
Fig 3<br />
6kg SDS Plus Rotary Hammer Drill