User Manual for LD3288M - TMAX Digital
User Manual for LD3288M - TMAX Digital
User Manual for LD3288M - TMAX Digital

Create successful ePaper yourself
Turn your PDF publications into a flip-book with our unique Google optimized e-Paper software.
<strong>LD3288M</strong>
Safety Instructions<br />
CAUTION<br />
RISK OF ELECTRIC SHOCK<br />
DO NOT OPEN<br />
Safety:<br />
TO REDUCE THE RISK OF ELECTRICAL SHOCK DO NOT REMOVE COVER (OR BACK). NO<br />
USER SERVICEABLE PARTS ARE INSIDE. REFER TO QUALIFIED PERSONNEL ONLY.<br />
The lightning flash with arrowhead symbol, within an equilateral triangle, is intended to alert the user to the<br />
presence of uninsulated “dangerous voltage” within the product’s enclosure that may be of sufficient magnitude<br />
to constitute a risk of electric shock to persons.<br />
The exclamation point within an equilateral triangle is intended to alert the user to the presence of important<br />
operating and maintenance (servicing) instructions in the literature accompanying the television.<br />
WARNING:<br />
TO PREVENT FIRE OR SHOCK HAZARDS, DO NOT EXPOSE THIS PRODUCT TO RAIN OR MOISTURE.<br />
NOTE TO CABLE/TV INSTALLER:<br />
This reminder is provided to call the CATV system installer’s attention to Article 820-40 of the National Electric Code<br />
(U.S.A.). The code provides guidelines <strong>for</strong> proper grounding and, in particular, specifies that the cable ground shall<br />
be connected to the grounding system of the building, as close to the point of the cable entry as practical.<br />
FCC REGULATORY INFORMATION:<br />
This television has been tested and found to comply with the limits <strong>for</strong> a Class B digital device, pursuant to Part 15<br />
of the FCC Rules. These limits are designed to provide reasonable protection against harmful interference in a residential<br />
installation. This television generates, uses and can radiate radio frequency energy and, if not installed and<br />
used in accordance with the instructions, may cause harmful interference to radio communications. However, there<br />
is no guarantee that interference will not occur in a particular installation. If this television does cause interference<br />
to other electronic equipment, which can be determined by turning the television off and on, then the user is<br />
encouraged to try to correct the interference by one or more of the following measures:<br />
- Reorient or relocate the receiving antenna.<br />
- Increase the separation between the equipment and television.<br />
- Connect the equipment into an outlet on a circuit different from that to which the television is connected.<br />
- Consult your dealer or an experienced radio/TV technician <strong>for</strong> assistance.<br />
1<br />
Any changes or modifications not expressly approved by the party responsible <strong>for</strong> compliance may void the user’s<br />
authority to operate the equipment.
Safety Instructions .................................................................................................. 1-3<br />
Table of Contents ................................................................................................... 4<br />
Introduction / What’s In the Box ............................................................................. 5<br />
Remote Control<br />
Remote Control Battery Install ............................................................................... 6<br />
Remote Control Overview ...................................................................................... 7<br />
TV Overview<br />
Front & Side Panel ................................................................................................. 8<br />
Rear Panel ............................................................................................................. 9<br />
Pedestal Removal / Wall Mounting ........................................................................ 9<br />
Installation<br />
Connection to Antenna & Cable / Satellite Box ..................................................... 10<br />
Connection to HDMI Inputs ................................................................................... 11<br />
Connection to Component (YPbPr) Inputs ........................................................... 12<br />
Connection to AV Composite Inputs....................................................... 13<br />
Connection to a Personal Computer ..................................................................... 14<br />
Connection to a Receiver / Amp ........................................................................... 15<br />
Initial TV Setup<br />
Initial Setup Wizard ............................................................................................... 16<br />
TV Channel Setup & Channel Auto Scan ............................................................. 17<br />
Audio Settings<br />
Bass / Treble / Balance ......................................................................................... 21<br />
Surround................................................................................................................ 21<br />
Audio Language .................................................................................................... 21<br />
Date & Time Settings ....................................................................................... 22<br />
Setup Settings<br />
Menu Language .................................................................................................... 23<br />
Transparency.... .................................................................................................... 23<br />
Zoom Mode .......................................................................................................... 23<br />
Noise Reduction ................................................................................................... 23<br />
XVS ...................................................................................................................... 23<br />
Restore Default .................................................................................................... 23<br />
Closed Caption Settings .................................................................................... 24<br />
Advanced Setting <strong>for</strong> PC ....................................................................................... 25<br />
Parental Control - US ............................................................................................ 26<br />
Parental Control - Canada .................................................................................... 27<br />
TV Settings<br />
Favorite ................................................................................................................. 28<br />
Add/Delete ............................................................................................................ 28<br />
Channel Label ...................................................................................................... 28<br />
DTV Signal ........................................................................................................... 28<br />
Zoom Modes ........................................................................................................ 29<br />
Table of Contents<br />
Picture Settings<br />
Contrast ................................................................................................................ 20<br />
Brightness ............................................................................................................. 20<br />
Color ..................................................................................................................... 20<br />
Tint ........................................................................................................................ 20<br />
Sharpness ............................................................................................................. 20<br />
Color Temperature ................................................................................................ 20<br />
Power Saving Mode .............................................................................................. 20<br />
..................................................................................................... 30<br />
Troubleshooting .................................................................................................. 31<br />
Index .................................................................................................................... 32<br />
Warranty .............................................................................................................. 33<br />
4
<strong>LD3288M</strong><br />
<strong>LD3288M</strong><br />
<strong>LD3288M</strong>
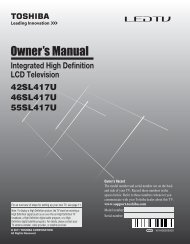
Remote Control<br />
7Overview<br />
Functions Using the Remote Control Handset<br />
1. Power – Turn the LCD display ON or OFF (Standby).<br />
2. Display – Provides program in<strong>for</strong>mation currently viewed.<br />
3. TV – Direct access to the television tuner.<br />
4. HDMI – Press repeatedly to select HDMI 1, HDMI 2, HDMI 3.<br />
5. COMP – Press repeatedly to select Component .<br />
6. AV – Press repeatly to select AV .<br />
7. VGA – Direct access to the VGA (PC) input;; press again to return to the previously viewed input.<br />
8. CH LIST – Press to display a list of channels saved in the TV tuner memory.<br />
9. Guide – Press to review scheduled programming <strong>for</strong> the current channel viewed.<br />
10. FAV – Press to display a list of favorite TV channels you have added. (pg. 26)<br />
11. Freeze – Pause and still-frame the current image on the display. Press again <strong>for</strong> live TV.<br />
12. Picture – Select preset picture modes: Dynamic > Standard > Movie > Power Saving > Personal. (pg. 18)<br />
13. Temp – Select the Color Temperature COOL > NORMAL > WARM. (pg. 18)<br />
14. Arrows/ Enter – <br />
15. Exit – Press to exit a menu that is displayed.<br />
16. Return – Press to return to the previous menu displayed.<br />
17. Sleep – Press to activate the Sleep function to turn off the TV automatically;; 5 Min > 10 Min ><br />
15 Min > 30 Min > 45 Min > 60 Min > 90 Min > 120 Min > 180 Min > 240 Min > OFF.<br />
18. Menu – Press to display the Main menu.<br />
19. Zoom – Select viewable display options: Normal > Wide > Zoom > Cinema. (pg. 27)<br />
20. Volume (+/-) – Adjust volume up (+) or volume down (-).<br />
21. Last – Press to select between the current and previously viewed TV channel.<br />
22. Mute – Press to temporarily turn sound off. Press again to resume.<br />
23. Channel – / scan channels up () or channels down ().<br />
24. Numbers / Dash – Select desired TV channel directly. For example: to select digital channel four,<br />
press “4” “-” “1” (4-1).<br />
25. Input – Press to display all input sources on screen. (pgs. 9-14)<br />
26. Audio – Select preset sound modes: PERSONAL > STANDARD > MUSIC > MOVIE (pg. 19)<br />
27. MTS – Press to select a program’s second audio channel (if available). (pg. 19)<br />
28. CCD – Select closed caption subtitles (if available) OFF > ON. (pg. 22)<br />
1<br />
3<br />
6<br />
9<br />
12<br />
15<br />
17<br />
20<br />
23<br />
24<br />
26<br />
4<br />
7<br />
10<br />
27<br />
NOTE: When using the remote<br />
control, point it directly at the TV.<br />
14<br />
18<br />
21<br />
22<br />
2<br />
5<br />
8<br />
11<br />
FREEZE<br />
13<br />
16<br />
19<br />
23<br />
25<br />
28
I<br />
INPUT SOURCE<br />
TV<br />
AV<br />
Component<br />
HDMI 1<br />
HDMI 2<br />
HDMI 3<br />
VGA
AUDIO OUT<br />
TV SIDE PANEL<br />
Headphone Jack<br />
included)<br />
one<br />
one<br />
AUDIO OUT- Connect to the audio equipment.
AUDIO OUT<br />
TV SIDE PANEL<br />
side<br />
TV SIDE PANEL
TV SIDE PANEL<br />
or<br />
side<br />
INPUT SOURCE<br />
TV<br />
AV<br />
Component<br />
HDMI 1<br />
HDMI 2<br />
HDMI 3<br />
VGA
TV SIDE PANEL<br />
AUDIO OUT<br />
one(1)<br />
INPUT SOURCE<br />
Inputs<br />
or<br />
side<br />
side<br />
TV<br />
AV<br />
Component<br />
HDMI 1<br />
HDMI 2<br />
HDMI 3<br />
VGA
TV SIDE PANEL<br />
AUDIO OUT<br />
side<br />
side<br />
INPUT SOURCE<br />
TV<br />
AV<br />
Component<br />
HDMI 1<br />
HDMI 2<br />
HDMI 3<br />
VGA
TV SIDE PANEL<br />
AUDIO OUT<br />
768<br />
side<br />
side<br />
INPUT SOURCE<br />
TV<br />
AV<br />
Component<br />
HDMI 1<br />
HDMI 2<br />
HDMI 3<br />
VGA
EaTKiTw<br />
TV SIDE PANEL<br />
TV SIDE PANEL<br />
AUDIO OUT<br />
EaTKiTw<br />
EaTKiTw<br />
EaTKiTw<br />
side<br />
Surround
Initial Setup<br />
Wizard<br />
Select Language<br />
Time Zone<br />
Set Wizard<br />
T V Setup<br />
.<br />
Initial Set u p W iza<br />
r d<br />
16
I nitial Setup Wizard<br />
TV Set up<br />
Set Wizard<br />
.<br />
INPUT SOURCE<br />
TV<br />
AV<br />
Component<br />
HDMI 1<br />
HDMI 2<br />
HDMI 3<br />
VGA<br />
17
Initial Setup Wizard<br />
Channel Scan<br />
Cable Service<br />
Error<br />
TV Setup<br />
To receive the Channel Access Code:<br />
Go to Web: www.tmaxdigital.com/activation<br />
Text your 18-digit S/N to: 1-909-939-2336<br />
Call: 1-877-833-1888<br />
Antenna ATSC<br />
How to Navigate:<br />
• Press the arrow button to highlight the item you want.<br />
Error<br />
I n itial Set up W iza<br />
rd<br />
NOTE: 1. TV reception when using an indoor/outdoor antenna is dependent on local terrain, tall buildings and distance from local area<br />
TV transmission towers.<br />
2. The Channel Access Codes are different <strong>for</strong> ATSC and cable .<br />
18 16
TV Setup<br />
Select antenna options and per<strong>for</strong>m Channel Auto Scan to receive television channels that will be stored into the TV tuner memory.<br />
To enter TV Mode:<br />
• Press the MENU button<br />
• Using the arrow buttons; scroll to highlight TV mode<br />
• Press the down arrow button to highlight CABLE or AIR<br />
Select CABLE if you subscribe<br />
to a pay television service without<br />
a set top box.<br />
Cable Mode<br />
Air Mode<br />
Select AIR when connected<br />
to an indoor/outdoor<br />
antenna.<br />
• Using the arrow button to<br />
highlight CABLE.<br />
• Press the arrow<br />
button to highlight AIR.<br />
TV C hannel S etup<br />
& Channel Auto Scan<br />
19<br />
• Press the arrow button<br />
to select AUTO SCAN. Press<br />
ENTER and the cursor will move<br />
up and CABLE SYSTEM will be<br />
displayed next.<br />
• Press the arrow button to<br />
select STD > IRC > HRC > Auto<br />
(Auto is recommended).<br />
• Press the down arrow button<br />
to select Auto Scan and press<br />
ENTER.<br />
• Channel Auto Scan may take<br />
several minutes to complete.<br />
• Press the down arrow<br />
button to select Auto Scan<br />
then press the right arrow<br />
button twice to start Channel<br />
Auto Scan.<br />
• Channel Auto Scan may<br />
take several minutes to<br />
complete.<br />
NOTE: For cable or satellite<br />
users without an indoor/<br />
outdoor TV antenna, there is<br />
no need to run Channel Auto<br />
Scan. Connect your cable or<br />
satellite set top box to one of<br />
the available inputs on the TV<br />
<strong>for</strong> viewing. See pages 11-13<br />
<strong>for</strong> connection details.
The PICTURE -<br />
ences. Adjustment options include contrast, brightness, color, sharpness and color temperature.<br />
How to Navigate:<br />
Press the MENU button on the remote control. Navigate using arrow buttons to select PICTURE. Press the down arrow button to<br />
highlight PICTURE MODE, then press the arrow button to select your viewing preference from 4 factory options:<br />
STANDARD > DYNAMIC > MOVIE >POWER SAVING * > PERSONAL . The STANDARD setting is recommended <strong>for</strong> most viewing environments.<br />
Depending on<br />
er options more pleasing.<br />
To make more critical adjustments based on your own preferences in PERSONAL:<br />
• Press down arrow button to highlight Contrast. Navigate using<br />
the arrow buttons to increase or decrease contrast intensity.<br />
• Press down arrow button to highlight Brightness. Navigate using<br />
the arrow buttons to increase or decrease overall brightness.<br />
• Press down arrow button to highlight Color. Navigate using the<br />
arrow buttons to increase or decrease color intensity.<br />
• Press down arrow button to highlight Tint. Navigate using the<br />
arrow buttons to adjust colors toward green or reddish tint.<br />
• Press down arrow button to highlight Sharpness. Navigate using<br />
the arrow buttons to soften or view crisper edges in the picture.<br />
• Press down arrow button to highlight your Color Mode<br />
preference. Navigate using the arrow buttons to select COOL<br />
(more bluish tone), NORMAL or WARM setting.<br />
M enu Adjustments Picture Setting s<br />
Note: When adjustments are complete, you may select another menu by pressing the Menu button.<br />
20
Menu Adjustments<br />
The AUDIO menu offers options to make sound enhancements while listening through the built-in speakers or to select digital audio options<br />
when connected to a Dolby <strong>Digital</strong> receiver though a (SPDIF) coaxial digital output.<br />
How to Navigate:<br />
Press the MENU button on the remote control. Navigate using arrow buttons to select AUDIO. Press the arrow button to highlight<br />
SOUND MODE, then press the arrow button to select your sound preference from 4 factory options:<br />
PERSONAL > STANDARD > MUSIC > MOVIE.<br />
To make more critical sound adjustments based on your own preferences in PERSONAL:<br />
• Press down arrow button to highlight Bass. Navigate using the<br />
arrow buttons to increase or decrease low frequency intensity.<br />
• Press down arrow button to highlight Treble. Navigate using the<br />
arrow buttons to increase or decrease high frequency intensity.<br />
Settings<br />
Audio<br />
• Press down arrow button to highlight Balance. Navigate using the<br />
arrow buttons to adjust sound towards the left or right speaker.<br />
• Press down arrow button to highlight Surround . Press the <br />
arrow button to turn the dimensional surround effect ON or OFF<br />
(<strong>for</strong> built-in speakers only).<br />
• Press down arrow button to highlight SPDIF type. Navigate using<br />
the arrow buttons to select between PCM (Analog Audio) > RAW<br />
(<strong>Digital</strong> Audio). See page 15.<br />
Surround<br />
• Press down arrow button to highlight Audio<br />
Language. Navigate using the arrow buttons<br />
to select to listen to an alternative language broadcast<br />
(if available) English > Spanish > French.<br />
Note: This feature is not available when text is<br />
grayed out.<br />
(You may select an alternative language using the<br />
remote control by pressing MTS)<br />
21<br />
Note: When adjustments are complete, you may select another menu by pressing the Menu button.
The TIME menu includes adjustment of settings <strong>for</strong> your local time zone and daylight savings time. The clock will adjust automatically after<br />
you per<strong>for</strong>m Channel Auto Scan of available broadcast channels broadcasting in your area. (See page 17 <strong>for</strong> TV Setup)<br />
How to Navigate:<br />
Press the MENU button on the remote control. Navigate using arrow t u buttons to select TIME.<br />
• Press down q arrow button to highlight Sleep Timer. Then press the<br />
u arrow button to select time to view be<strong>for</strong>e television timer turns off:<br />
5 Min > 10 Min > 15 Min > 30 Min > 45 Min > 60 Min > 90 Min > 120<br />
Min > 180 Min > 240 Min > OFF.<br />
• Press down q arrow button to highlight Time Zone. Then press the<br />
u arrow button to select between: EASTERN > CENTRAL > MOUN-<br />
TAIN > PACIFIC > ALASKA > HAWAII.<br />
• Press down q arrow button to highlight Daylight Savings Time.<br />
Navigate using the t u arrow buttons to turn this feature on or off.<br />
Note: This feature is not available when text is grayed out.<br />
Menu Adjustments Date & Time Settings<br />
Note: When adjustments are complete, you may select another menu by pressing the Menu button.<br />
22
Menu Adjustments<br />
In the SETUP menu you may change the initial set up of preferences that include settings <strong>for</strong> language, menu display, computer monitoring,<br />
closed captions, enhancement of black detail in the picture and resetting your TV back to its factory default status.<br />
How to Navigate:<br />
Press the MENU button on the remote control. Navigate using arrow t u buttons to select SETUP. Gain access to display options by pressing<br />
the down q arrow button to highlight Menu Language or other options, then press u arrow button on your remote to select.<br />
• Other languages include<br />
Spanish and French.<br />
• Highlight Noise Reduction.<br />
Navigate using the t u arrow<br />
buttons to reduce video<br />
noise: Off > Low > Medium ><br />
High (Default setting: Low)<br />
Setup Settings<br />
• Highlight Transparency.<br />
Navigate using the t u arrow<br />
buttons to turn Off u On<br />
the translucent effect of the<br />
<strong>User</strong> menu.<br />
• Highlight Zoom Mode.<br />
Navigate using the t u<br />
arrow buttons to select the<br />
viewing mode displayed:<br />
Normal > Wide > Zoom ><br />
Cinema.<br />
(This feature is also available on the<br />
remote control. See page 27)<br />
• Highlight XVS.<br />
Navigate using the t u arrow<br />
buttons to select:<br />
Off > On. XVS provides<br />
noticeable black detail<br />
enhancement that may be<br />
preferred.<br />
• Highlight Restore Default.<br />
Press the u arrow button to<br />
automatically set all adjustments<br />
back to their original<br />
settings.<br />
23<br />
When prompted, Select “Yes” to confirm.<br />
NOTE: Closed Caption and Advanced are features described on the following pages.
The SETUP menu includes adjustments <strong>for</strong> activating the Closed Caption feature <strong>for</strong> display on the television and customizing CC display<br />
types and font styles.<br />
How to Navigate:<br />
Press the MENU button on the remote control. Navigate using arrow t u buttons to select SETUP.<br />
Press the down q arrow button to highlight Closed Caption.<br />
• Press down q arrow button<br />
to highlight Advanced<br />
Selection. Navigate using<br />
the t u arrow buttons to<br />
select Service 1-6.<br />
Menu Adjustments<br />
• Press down q arrow button<br />
to highlight CC Mode.<br />
Navigate using the t u arrow<br />
buttons select Off > On<br />
> CC on Mute.<br />
• Press down q arrow button<br />
to highlight Basic Selection.<br />
Navigate using the t<br />
u arrow buttons select CC<br />
1-4, Text 1-4.<br />
• Press down q arrow<br />
button to highlight Option.<br />
Press the u arrow button to<br />
enter a menu with options to<br />
customize text fonts, colors<br />
and opacities.<br />
Closed Captions<br />
Note: When adjustments are complete, you may select another menu by pressing the Menu button. Features are not available<br />
when text is grayed out.<br />
24
PC Menu Adjustments<br />
In the SETUP menu you may adjust the position of images displayed on screen once you connect an input signal from your PC.<br />
Recommended resolution is 1,366 x 768. For use with a laptop computer, refer to your computer’s owner manual on instruction <strong>for</strong> proper<br />
display output. If your PC system uses a standard signal mode, the screen will adjust automatically. Connect an optional 3.5mm audio cable<br />
<strong>for</strong> stereo sound. See page 14 <strong>for</strong> details.<br />
How to Navigate:<br />
After connecting to a PC, press the VGA button on your remote control. Press the MENU button on the remote control and navigate using<br />
arrow buttons to select SETUP. Gain access to position adjustment options by pressing the down arrow button to highlight<br />
Advanced, then press arrow button to select from the following options.<br />
• Highlight Clock. Navigate<br />
using the arrow buttons<br />
to control the width of the<br />
image.<br />
Settings<br />
Advanced<br />
• Highlight H-Pos. Navigate<br />
using the arrow buttons<br />
to adjust the position of<br />
images displayed from side<br />
to side.<br />
• Highlight V-Pos. Navigate<br />
using the arrow buttons<br />
to adjust the position<br />
of images displayed up and<br />
down.<br />
• Highlight Phase. Navigate<br />
using the arrow buttons<br />
to improve focus and image<br />
stability.<br />
• Highlight Auto. Press the <br />
arrow button to automatically<br />
adjust the display to the best<br />
setting. When prompted,<br />
25
In the PARENTAL menu, you may block television and movie programming based on TV ratings and Motion Picture Association guidelines.<br />
To gain access and select your preferences within the Parental menu make certain your input is set to TV.<br />
How to Navigate:<br />
Press the MENU button on the remote control. Navigate using arrow buttons to select PARENTAL. Gain access to parental rating options<br />
by pressing the down arrow button to highlight ENTER PASSWORD. Enter your 4 digit code (factory default code is “0000”) unless<br />
previously changed.<br />
• To set parental controls <strong>for</strong><br />
television programming or DVD<br />
movies, press the down/up <br />
arrow buttons to highlight US.<br />
Navigate using the buttons<br />
to highlight TV/MPAA menu.<br />
Menu Adjustments<br />
• To change the password,<br />
press arrow button to<br />
display a screen to enter your<br />
again. (not illustrated)<br />
• To make changes to<br />
PARENTAL controls, highlight<br />
SYSTEM LOCK then<br />
press the arrow button to<br />
ON.<br />
NOTE: Features are not available when text is grayed out.<br />
• Highlight TV, then press the<br />
arrow button to enter the TV<br />
Ratings menu to select your<br />
preference.<br />
TV-Y Appropriate <strong>for</strong> all children<br />
TV-Y7 Appropriate <strong>for</strong> all children over 7<br />
TV-G General Audience<br />
TV - PG Parental Guidance Suggested<br />
TV - 14 Parents Strongly Cautioned<br />
TV - MA Mature Audience Only<br />
• Highlight MPAA then press the<br />
arrow button repeatedly to<br />
select your movie rating preference.<br />
G General Audience<br />
PG Parental Guidance Suggested<br />
PG13 Parents Strongly Cautioned<br />
R Restricted<br />
NC17 No One Under 17 Permitted<br />
X Adults Only<br />
Parental Control - US<br />
26
Menu Adjustments<br />
In the PARENTAL menu, you may block television and movie programming based on Canadian TV and movie rating guidelines. To gain access<br />
and select your preferences within the Parental menu make certain your input is set to TV.<br />
How to Navigate:<br />
Press the MENU button on the remote control. Navigate using arrow buttons to select PARENTAL. Gain access to rating options by<br />
pressing the down arrow button to highlight ENTER PASSWORD. Enter your 4 digit code (factory default code is “0000”) unless previously<br />
changed. See page 24 <strong>for</strong> in<strong>for</strong>mation on how to change your password.<br />
• Navigate using down arrow button<br />
to highlight CANADA ENGLISH<br />
then press the arrow button<br />
repeatedly to select your ratings<br />
preference.<br />
E Appropriate <strong>for</strong> everyone<br />
C Appropriate <strong>for</strong> all children<br />
C8+ Appropriate <strong>for</strong> everyone 8 years old and up<br />
G General Audience<br />
PG Parental Guidance<br />
14+ Appropriate <strong>for</strong> Children over 14 years old<br />
18+ Mature Audience Only<br />
Parental Control - Canada<br />
• Navigate using down arrow button<br />
to highlight CANADA FRENCH<br />
then press the arrow button<br />
repeatedly to select your ratings<br />
preference.<br />
E Appropriate <strong>for</strong> everyone<br />
G General Audience<br />
8 ans+ Appropriate <strong>for</strong> Children 8 years old and up<br />
13 ans+ Appropriate <strong>for</strong> Children 13 years old and up<br />
16 ans+ Appropriate <strong>for</strong> Children 16 years old and up<br />
18 ans+ Mature Audience Only<br />
27<br />
Note: When adjustments are complete, you may select another menu by pressing the Menu button.
The TV menu provides <strong>for</strong> the setup of your television to receive TV channels, store your favorites, add or skip channels and label them by<br />
their call letters. (For antenna and Channel Auto Scan setup, please refer to page 17.)<br />
How to Navigate:<br />
Press the MENU button on the remote control. Navigate using arrow t u buttons to select TV. Press the down q button to highlight your<br />
preferences.<br />
• Highlight FAVORITE to add channels to<br />
your Favorites List. Navigate using the t<br />
u qp arrow buttons to select channels<br />
to be added or deleted from your list. Press<br />
ENTER to add or delete a channel. A checkmark<br />
indicates a channel has been added.<br />
You may also display your FAVORITE list<br />
from the remote control by pressing FAV.<br />
• Highlight ADD/DELETE to select or skip<br />
channels already in memory. Navigate using<br />
the t u qp arrow buttons to access the<br />
list of available channels. Press ENTER to<br />
change the channels status. A checkmark<br />
indicates a channel has been added.<br />
• Highlight CHANNEL LABEL to name or<br />
rename a broadcast channel. Navigate using<br />
the u arrow button to enter the screen menu<br />
to re-label a channel. Use the qp arrow<br />
buttons to spell out each letter, number or<br />
character. Use t u arrow buttons to advance<br />
to the next space.<br />
Press ‘ENTER’ To Change<br />
Press ‘ENTER’ To Change<br />
Menu Adjustments TV Settings<br />
NOTE: The DTV SIGNAL is a measurement<br />
of signal strength <strong>for</strong> the current channel<br />
viewed.<br />
28
Zoom Modes<br />
The ZOOM function offers several viewing display options on the 16:9 screen. Press ZOOM to cycle through the following<br />
widescreen settings.<br />
Press ZOOM to cycle<br />
through the following<br />
widescreen settings.<br />
1. NORMAL<br />
Recommended <strong>for</strong> viewing native widescreen content and<br />
undistorted 4:3 images (with black bars).<br />
2. WIDE<br />
Stretches certain 4:3 content and may reduce visible black<br />
bars.<br />
3. ZOOM<br />
<br />
screen when viewing widescreen content. The Zoom effect will<br />
crop images somewhat.<br />
4. CINEMA<br />
<br />
screen eliminating visible side black bars. It may also eliminate<br />
or reduce black bars on certain widescreen movies.<br />
29
Resolution<br />
30.8 21.1 9.5<br />
30
Troubleshooting<br />
18<br />
18<br />
23<br />
26 27<br />
28<br />
23<br />
31
32<br />
23<br />
25<br />
23<br />
29<br />
20<br />
21<br />
28<br />
21 23<br />
28<br />
21<br />
18<br />
18<br />
18<br />
21<br />
21<br />
21<br />
31<br />
20<br />
27<br />
28<br />
22<br />
29<br />
20<br />
20<br />
22<br />
23<br />
20<br />
25<br />
25<br />
24<br />
25<br />
23<br />
21<br />
20<br />
20<br />
22<br />
21<br />
21<br />
22<br />
26<br />
23<br />
26 27<br />
26 27<br />
26 27<br />
26 27<br />
20<br />
23<br />
29<br />
29<br />
25
Warranty<br />
Limited North American Warranty<br />
<strong>LD3288M</strong><br />
For peace of mind and valuable services, please take a moment to register your product at www.tmaxdigital.com.<br />
Tmax <strong>Digital</strong>, Inc. expresses the following non-transferable and limited warranty on a new Apex <strong>Digital</strong> <strong>LD3288M</strong> purchased from an authorized<br />
Apex <strong>Digital</strong>® U.S. retailer. Retain the original bill of sale <strong>for</strong> proof of purchase.<br />
Limited One (1) Year Warranty<br />
We warrant the parts in this product against defects in material or workmanship <strong>for</strong> a period of one (1) year from the date of original purchase from an Apex<br />
<strong>Digital</strong>® authorized retailer. We also warrant labor charges <strong>for</strong> a period of one (1) year from the date of original purchase. During the limited warranty<br />
period, we will provide a technician to service repairs in your home <strong>for</strong> a TV that is 32" and above, or you may bring it in to an Apex <strong>Digital</strong> authorized<br />
service center. For a list of Apex <strong>Digital</strong> authorized service centers, please call the Apex <strong>Digital</strong> customer support line. Service repairs may be made with<br />
new or recertified parts. Service that is provided is warranted <strong>for</strong> the duration of the original warranty or 45 days. If it is determined to have the unit to be<br />
sent in <strong>for</strong> service/replacement, it is customer’s responsibility to retain the original packaging or provide secure packaging in order to facilitate any warranty<br />
service.<br />
Your Responsibility<br />
The above warranty is subject to the following conditions: You must retain the original bill of sales to provide proof of purchase then call Customer Service<br />
<strong>for</strong> an assessment of the problem. Labor service charges <strong>for</strong> set installation, setup, adjustment of consumer controls and installation or repair of any type<br />
of antenna or cable systems are not covered by this warranty. Reception problems caused by inadequate antenna or cable systems are your responsibility.<br />
The warranty extends only to defects in materials or workmanship as limited above and does not extend to any other products or parts, accessories that<br />
have been lost, discarded, damaged by misuse, accident, neglect, acts of God such as lightning, voltage surges in the home, improper installation, rendered<br />
illegible. Warranty does not cover cosmetic damage.<br />
How to Obtain Warranty Service<br />
If after following the operating instructions and reviewing the FAQ pages <strong>for</strong> televisions at www.tmaxdigital.com, contact Customer Service directly<br />
at (877) 833-1888, Mon. - Fri. from 7 am to 9 pm (CST), Sat. - Sun. 7 am to 6 pm (CST). You will be instructed on how your claim will be processed.<br />
Have in<strong>for</strong>mation available including date of purchase, serial number and the problem with the product. Should a problem be determined to be within the<br />
limits of the warranty you will be provided with an on-site authorization number and instructions. Proof of purchase must be confirmed be<strong>for</strong>e any warranty<br />
service can be provided. Should a claim not be covered by the limited warranty, you will be asked whether you wish to have service provided <strong>for</strong> a fee.<br />
We may charge the customer <strong>for</strong> any service call made <strong>for</strong> anything not covered by the limited warranty.<br />
Limitations<br />
Your LCD panel is an innovative device that is manufactured to precise tolerances with active per<strong>for</strong>ming pixels of at least 99.9%. As such, it is NOT a<br />
malfunction to view multiple nonper<strong>for</strong>ming pixels on your screen. All warranties implied by state law are expressly limited to the duration of the limited<br />
warranty set <strong>for</strong>th above with the exception of warranties implied by state law. The <strong>for</strong>egoing warranty is exclusive and in lieu of all other warranties,<br />
guarantees, agreements etc., with respect to repair or replacement of any parts. We shall not be liable <strong>for</strong> consequential or incidental damage or exclusions<br />
and imitations of incidental or consequential damages, so the above may not apply to you.<br />
For our Pixel Policy, please refer to our website www.tmaxdigital.com.<br />
This warranty gives you specific rights though these rights may vary from state to state. Some states do not allow limitations on the duration of the warranty<br />
or exclusions and limitations of incidental or consequential damages, so the above may not apply to you.<br />
33