Sanyo-DP42545 (English) - Specs and reviews at HDTV Review
Sanyo-DP42545 (English) - Specs and reviews at HDTV Review
Sanyo-DP42545 (English) - Specs and reviews at HDTV Review

You also want an ePaper? Increase the reach of your titles
YUMPU automatically turns print PDFs into web optimized ePapers that Google loves.
AS<br />
Model No.:<br />
<strong>DP42545</strong><br />
Plasma TV<br />
Owner’s Manual<br />
ENGLISH<br />
Table of Contents . . . . . . . . . . 3<br />
AS<br />
As Real As It Gets!<br />
“Read this manual before assembling (or using) this product.”<br />
Need assistance?<br />
Visit our website <strong>at</strong> www.sanyoctv.com<br />
or<br />
Call toll free 1.800.877.5032<br />
We Can Help!<br />
Importado Por : Comercializadora México<br />
Americana, S. DE R.L. DE C.V.<br />
Nextengo N o 78<br />
Col. Santa Cruz Acayucan<br />
Del. Azcapotzalco, México D.F. C.P. 02770<br />
RFC CMA 9109119L0<br />
Telefono: 55-5328-3500<br />
Printed in U.S.A. SMC, March 2005<br />
Part No.: 1AA6P1P4792A–<br />
Service Code: 610 320 0781
CAUTION<br />
RISK OF ELECTRIC SHOCK DO NOT OPEN<br />
CAUTION: TO REDUCE THE RISK OF ELECTRIC SHOCK, DO NOT REMOVE COVER (OR<br />
BACK). NO USER-SERVICEABLE PARTS INSIDE. REFER SERVICING TO QUALIFIED<br />
SERVICE PERSONNEL.<br />
THIS SYMBOL INDICATES THAT DANGEROUS VOLTAGE CONSTITUT-<br />
ING A RISK OF ELECTRIC SHOCK IS PRESENT WITHIN THIS UNIT.<br />
THIS SYMBOL INDICATES THAT THERE ARE IMPORTANT OPERATING<br />
AND MAINTENANCE INSTRUCTIONS IN THE LITERATURE ACCOMPA-<br />
NYING THIS UNIT.<br />
WARNING: TO REDUCE THE RISK OF FIRE OR ELECTRIC SHOCK, DO NOT EXPOSE THIS<br />
APPLIANCE TO RAIN OR MOISTURE.<br />
IMPORTANT SAFETY INSTRUCTIONS<br />
1. Read these instructions.<br />
2. Keep these instructions.<br />
3. Heed all warnings.<br />
4. Follow all instructions.<br />
5. Do not use this appar<strong>at</strong>us near w<strong>at</strong>er.<br />
6. Clean only with dry cloth.<br />
7. Do not block any ventil<strong>at</strong>ion openings. Install in<br />
accordance with the manufacturer’s instructions.<br />
8. Do not install near any he<strong>at</strong> sources such as radi<strong>at</strong>ors,<br />
he<strong>at</strong> registers, stoves, or other appar<strong>at</strong>us<br />
(including amplifiers) th<strong>at</strong> produce he<strong>at</strong>.<br />
9. Do not defe<strong>at</strong> the safety purpose of the polarized or<br />
grounding-type plug. A polarized plug has two blades<br />
with one wider than the other. A grounding-type plug<br />
has two blades <strong>and</strong> a third grounding prong. The wide<br />
blade or the third prong are provided for your safety.<br />
If the provided plug does not fit fully into your outlet,<br />
consult an electrician for replacement of the obsolete<br />
outlet.<br />
10. Protect the power cord from being walked on or<br />
pinched particularly <strong>at</strong> plugs, convenience receptacles,<br />
<strong>and</strong> the point where they exit from the<br />
appar<strong>at</strong>us.<br />
11. Only use <strong>at</strong>tachments/accessories specified by the<br />
manufacturer.<br />
12. Use only with the cart, st<strong>and</strong>, tripod,<br />
bracket, or table specified by the manufacturer,<br />
or sold with the appar<strong>at</strong>us.<br />
When a cart is used, use caution when<br />
moving the cart/appar<strong>at</strong>us combin<strong>at</strong>ion<br />
to avoid injury from tip-over.<br />
13. Unplug this appar<strong>at</strong>us during lightning storms or<br />
when unused for long periods of time.<br />
14. Refer all servicing to qualified service personnel. Servicing<br />
is required when the appar<strong>at</strong>us has been<br />
damaged in any way, such as power-supply cord or<br />
plug is damaged, liquid has been spilled or objects<br />
have fallen into the appar<strong>at</strong>us, the appar<strong>at</strong>us has<br />
been exposed to rain or moisture, does not oper<strong>at</strong>e<br />
normally, or has been dropped.<br />
15. If an outside antenna is connected to the television<br />
equipment, be sure the antenna system is grounded<br />
so as to provide some protection against voltage<br />
surges <strong>and</strong> built up st<strong>at</strong>ic charges. In the U.S. Selection<br />
810-21 of the N<strong>at</strong>ional Electrical Code provides<br />
inform<strong>at</strong>ion with respect to proper grounding of the<br />
mast <strong>and</strong> supporting structure, grounding of the leadin<br />
wire to an antenna discharge unit, size of<br />
grounding conductors, loc<strong>at</strong>ion of antenna discharge<br />
unit, connection to grounding electrodes, <strong>and</strong><br />
requirements for the grounding electrodes.<br />
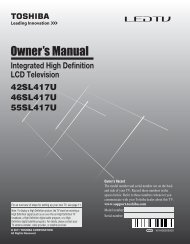
EXAMPLE OF ANTENNA GROUNDING ACCORDING TO NATIONAL<br />
ELECTRICAL CODE, ANSI/NFPA 70<br />
ELECTRIC<br />
SERVICE<br />
EQUIPMENT<br />
GROUND CLAMPS<br />
POWER SERVICE GROUNDING<br />
ELECTRODE SYSTEM<br />
(NEC ART 250, PART H)<br />
ANTENNA<br />
LEAD IN<br />
WIRE<br />
GROUND<br />
CLAMP<br />
ANTENNA<br />
DISCHARGE UNIT<br />
(NEC SECTION 810-20)<br />
GROUNDING CONDUCTORS<br />
(NEC SECTION 810-21)<br />
NEC - NATIONAL ELECTRICAL CODE<br />
“Note to CATV system installer:<br />
This reminder is provided to call the CATV system installer’s <strong>at</strong>tention to<br />
Article 820-40 of the NEC th<strong>at</strong> provides guidelines for proper grounding<br />
<strong>and</strong>, in particular, specifies th<strong>at</strong> the cable ground shall be connected to<br />
the grounding system of the building, as close to the point of cable entry<br />
as practical.”<br />
16. An outside antenna system should not be loc<strong>at</strong>ed in<br />
the vicinity of overhead power lines or other electrical<br />
light or power circuits, or where it can fall into such<br />
power lines or circuits. When installing an outside<br />
antenna system, extreme care should be taken to<br />
keep from touching such power lines or circuits as<br />
contact with them might be f<strong>at</strong>al.<br />
17. "Appar<strong>at</strong>us shall not be exposed to dripping or<br />
splashing <strong>and</strong> no objects filled with liquids, such as<br />
vases, shall be placed on the appar<strong>at</strong>us."<br />
2
TO THE OWNER<br />
Welcome to the World of <strong>Sanyo</strong><br />
Thank you for purchasing this <strong>Sanyo</strong> Plasma television. You<br />
made an excellent choice for Performance, Reliability, Fe<strong>at</strong>ures,<br />
Value, <strong>and</strong> Styling.<br />
Important Inform<strong>at</strong>ion<br />
Before installing <strong>and</strong> oper<strong>at</strong>ing this Plasma TV, read this<br />
manual thoroughly. This Plasma TV provides many convenient<br />
fe<strong>at</strong>ures <strong>and</strong> functions. Oper<strong>at</strong>ing the Plasma TV properly<br />
enables you to manage those fe<strong>at</strong>ures <strong>and</strong> maintain it in good<br />
condition for many years to come. Improper oper<strong>at</strong>ion may<br />
result in not only shortening the product-life, but may also<br />
cause malfunctions or other serious problems.<br />
If your Plasma TV seems to oper<strong>at</strong>e improperly, read this<br />
manual again, check oper<strong>at</strong>ions <strong>and</strong> cable connections <strong>and</strong> try<br />
the solutions in the “Helpful Hints” section, page 29 of this<br />
manual. If the problem still persists, visit our website <strong>at</strong><br />
www.sanyoctv.com or call 1.800.877.5032. We Can Help!<br />
CONTENTS<br />
Important Safety Instructions . . . . . . . . . . . . . . . . . . . . . . . . . . . . . . . 2<br />
To The Owner . . . . . . . . . . . . . . . . . . . . . . . . . . . . . . . . . . . . . . . . . . . . . 3<br />
Contents . . . . . . . . . . . . . . . . . . . . . . . . . . . . . . . . . . . . . . . . . . . . . . . . . . 3<br />
Fe<strong>at</strong>ures . . . . . . . . . . . . . . . . . . . . . . . . . . . . . . . . . . . . . . . . . . . . . . . . . . 4<br />
Specific<strong>at</strong>ions . . . . . . . . . . . . . . . . . . . . . . . . . . . . . . . . . . . . . . . . . . . . 4<br />
H<strong>and</strong>ling Precautions . . . . . . . . . . . . . . . . . . . . . . . . . . . . . . . . . . . . . . 5<br />
Care <strong>and</strong> Cleaning . . . . . . . . . . . . . . . . . . . . . . . . . . . . . . . . . . . . . . . . . 5<br />
Cleaning the Plasma TV . . . . . . . . . . . . . . . . . . . . . . . . . . . . . . . . . . . . . . 5<br />
Caring for the Plasma TV . . . . . . . . . . . . . . . . . . . . . . . . . . . . . . . . . . . . . 5<br />
Install<strong>at</strong>ion Precautions . . . . . . . . . . . . . . . . . . . . . . . . . . . . . . . . . . . . 6<br />
Child Safety . . . . . . . . . . . . . . . . . . . . . . . . . . . . . . . . . . . . . . . . . . . . . . . . 6<br />
Positioning Precautions . . . . . . . . . . . . . . . . . . . . . . . . . . . . . . . . . . . . . 6<br />
Removing the Plasma Feet . . . . . . . . . . . . . . . . . . . . . . . . . . . . . . . . . 6<br />
First-Things-First (Required Initial Setup) . . . . . . . . . . . . . . . . . . . . 7<br />
Initial Signal Connections . . . . . . . . . . . . . . . . . . . . . . . . . . . . . . . . . . . . 7<br />
Digital RF Antenna Connection . . . . . . . . . . . . . . . . . . . . . . . . . . . . . . 7<br />
Analog RF Antenna Connection . . . . . . . . . . . . . . . . . . . . . . . . . . . . . 7<br />
Install B<strong>at</strong>teries . . . . . . . . . . . . . . . . . . . . . . . . . . . . . . . . . . . . . . . . . . . . . 8<br />
Connect AC Power Cord . . . . . . . . . . . . . . . . . . . . . . . . . . . . . . . . . . . . . 8<br />
Channel Search . . . . . . . . . . . . . . . . . . . . . . . . . . . . . . . . . . . . . . . . . . . . . 8<br />
Auto D<strong>at</strong>e <strong>and</strong> Time Setting (Optional) . . . . . . . . . . . . . . . . . . . . . . . . . 8<br />
Antenna Selection (Optional) . . . . . . . . . . . . . . . . . . . . . . . . . . . . . . . . . 8<br />
Glossary of Cables . . . . . . . . . . . . . . . . . . . . . . . . . . . . . . . . . . . . . . . . . 9<br />
Top <strong>and</strong> Back Panels . . . . . . . . . . . . . . . . . . . . . . . . . . . . . . . . . . . . . . 9<br />
Choose Your Connection . . . . . . . . . . . . . . . . . . . . . . . . . . . . . . . . . . 10<br />
Digital A/V Connections . . . . . . . . . . . . . . . . . . . . . . . . . . . . . . . . . . . 11<br />
Use the Component Jacks to Connect a DVD Player<br />
or Other Digital Equipment . . . . . . . . . . . . . . . . . . . . . . . . . . . . . . . . . . 11<br />
Connecting Digital Audio Output to a Multi-Channel Receiver . . . 11<br />
Analog A/V INPUT Connections . . . . . . . . . . . . . . . . . . . . . . . . . . . 12<br />
Use the Video1 Jacks to Connect a VCR<br />
or other Analog Equipment . . . . . . . . . . . . . . . . . . . . . . . . . . . . . . . . . . 12<br />
Analog Audio Output Connections . . . . . . . . . . . . . . . . . . . . . . . . . . . . 13<br />
Typical Home The<strong>at</strong>er Connections . . . . . . . . . . . . . . . . . . . . . . . . . 13<br />
Using the Remote Control . . . . . . . . . . . . . . . . . . . . . . . . . . . . . . . . . 14<br />
Precautions . . . . . . . . . . . . . . . . . . . . . . . . . . . . . . . . . . . . . . . . . . . . . . . 14<br />
Remote Control Keys . . . . . . . . . . . . . . . . . . . . . . . . . . . . . . . . . . . 14 ~ 15<br />
TV Adjustment <strong>and</strong> Setup . . . . . . . . . . . . . . . . . . . . . . . . . . . . . . . . . . 16<br />
Basic Menu Oper<strong>at</strong>ion . . . . . . . . . . . . . . . . . . . . . . . . . . . . . . . . . . . . . . 16<br />
Menu Navig<strong>at</strong>ion Map . . . . . . . . . . . . . . . . . . . . . . . . . . . . . . . . . . . . 16<br />
Channel Setup Options . . . . . . . . . . . . . . . . . . . . . . . . . . . . . . . . . . . . . . 17<br />
Channel Search . . . . . . . . . . . . . . . . . . . . . . . . . . . . . . . . . . . . . . . . . . 17<br />
Digital Cable Search (Optional) . . . . . . . . . . . . . . . . . . . . . . . . . . . . . 17<br />
Digital Add-on Search . . . . . . . . . . . . . . . . . . . . . . . . . . . . . . . . . . . . 18<br />
Antenna Selection (Analog Only) . . . . . . . . . . . . . . . . . . . . . . . . . . . 18<br />
Digital Channel Scan Memory . . . . . . . . . . . . . . . . . . . . . . . . . . . . . 19<br />
Analog Channel Scan Memory . . . . . . . . . . . . . . . . . . . . . . . . . . . . . 20<br />
Initial Channel (Analog Only) . . . . . . . . . . . . . . . . . . . . . . . . . . . . . . . 20<br />
Closed-Captioning . . . . . . . . . . . . . . . . . . . . . . . . . . . . . . . . . . . . . . . . . . 21<br />
Changing the Look of Digital Captions . . . . . . . . . . . . . . . . . . . . . . 21<br />
To View Captions . . . . . . . . . . . . . . . . . . . . . . . . . . . . . . . . . . . . . . . . . 21<br />
V-Guide (Parental Control) Oper<strong>at</strong>ion . . . . . . . . . . . . . . . . . . . . . . . . . 22<br />
Block or UnBlock Movie or TV Program . . . . . . . . . . . . . . . . . . . . . 22<br />
Temporarily Unblock a Movie or TV Program . . . . . . . . . . . . . . . . 23<br />
TV R<strong>at</strong>ings (Age/Content-Based) . . . . . . . . . . . . . . . . . . . . . . . . . . . 23<br />
MPAA Movie R<strong>at</strong>ings (Age-Based) . . . . . . . . . . . . . . . . . . . . . . . . . 23<br />
Setup Menu Options . . . . . . . . . . . . . . . . . . . . . . . . . . . . . . . . . . . . . . . . 24<br />
Setting the D<strong>at</strong>e <strong>and</strong> Time . . . . . . . . . . . . . . . . . . . . . . . . . . . . . . . . . 24<br />
Digital Audio Output . . . . . . . . . . . . . . . . . . . . . . . . . . . . . . . . . . . . . . 25<br />
TV Speaker . . . . . . . . . . . . . . . . . . . . . . . . . . . . . . . . . . . . . . . . . . . . . . 25<br />
Screen Saver . . . . . . . . . . . . . . . . . . . . . . . . . . . . . . . . . . . . . . . . . . . . 26<br />
Menu Language . . . . . . . . . . . . . . . . . . . . . . . . . . . . . . . . . . . . . . . . . . 27<br />
Picture/Sound Adjustment Options . . . . . . . . . . . . . . . . . . . . . . . . . . . 27<br />
Preset Picture <strong>and</strong> Sound Options . . . . . . . . . . . . . . . . . . . . . . . . . . 27<br />
Manual Picture <strong>and</strong> Sound Adjustments . . . . . . . . . . . . . . . . . . . . 28<br />
Color Enhancer . . . . . . . . . . . . . . . . . . . . . . . . . . . . . . . . . . . . . . . . . . 28<br />
Dynamic AI . . . . . . . . . . . . . . . . . . . . . . . . . . . . . . . . . . . . . . . . . . . . . . 28<br />
Helpful Hints (Problems/Solutions) . . . . . . . . . . . . . . . . . . . . . . . . . 29<br />
Mexico Guarantee . . . . . . . . . . . . . . . . . . . . . . . . . . . . . . . . . . . . . . . . 30<br />
United St<strong>at</strong>es <strong>and</strong> Canada Warranty . . . . . . . . . . . . . . . . . . . . . . . . 31<br />
3
FEATURES<br />
◆ 42" Plasma Screen<br />
◆ RF Antenna Input Jacks: Digital <strong>and</strong> Analog<br />
◆ Built-in Digital <strong>and</strong> Analog Tuners<br />
◆ Receivable Form<strong>at</strong>s: ATSC Digital Tuner for Terrestrial<br />
Broadcasts <strong>and</strong> non-scrambled (ClearQAM) broadcasts,<br />
NTSC Analog Tuner for VHF / UHF or CATV<br />
◆ Receives 181 Analog Channels (VHF 2~13 <strong>and</strong> UHF 14~69;<br />
Cable TV 1, 14~125); <strong>and</strong> 99 Digital Channels<br />
◆ Autom<strong>at</strong>ic Channel Search<br />
◆ Channel Scan Memory<br />
◆ Initial Channel (Analog Only)<br />
◆ Auto Shut Off<br />
◆ 3-D Digital Comb Filter (for better picture detail)<br />
◆ V-Chip for Movies <strong>and</strong> TV Guidelines R<strong>at</strong>ing Limits<br />
(Parental Control)<br />
◆ Closed-Captioning: Analog EIA-608B <strong>and</strong> Digital EIA-708B<br />
◆ Audio Modes: TV—Main <strong>and</strong> Sub<br />
NTSC—Stereo, Mono, <strong>and</strong> SAP<br />
◆ Front Surround Sound<br />
◆ Bass / Treble<br />
◆ Audio Form<strong>at</strong>: Dolby ® Digital for TV <strong>and</strong> Analog for NTSC<br />
◆ Front Speakers 6 x 12 cm (two)<br />
◆ Trilingual Menu Options<br />
◆ Factory Preset Adjustments for Picture / Sound<br />
◆ Picture Shape: Normal, Full, Zoom 1, <strong>and</strong> Zoom 2<br />
◆ Color Enhancer<br />
◆ Dynamic AI (Auto-Image Control)<br />
◆ D<strong>at</strong>e / Time (Auto Clock)<br />
◆ Sleep Timer (3 hours)<br />
◆ Component Video Input (two sets)<br />
◆ Rear AV Input<br />
◆ S-Video Input<br />
◆ Optical Digital Audio Out<br />
◆ Fixed Audio Out<br />
◆ XDS (Extended D<strong>at</strong>a Services) Displays St<strong>at</strong>ion Call Letters,<br />
Title of Show, <strong>and</strong> R<strong>at</strong>ings when Broadcast<br />
◆ 32-Key Remote Control<br />
SPECIFICATIONS<br />
Screen Size:<br />
42 inches (Measured Diagonally)<br />
Panel Type:<br />
Plasma Display<br />
Aspect R<strong>at</strong>io 16:9<br />
Display area: 716 mm (W) x 399 mm (H)<br />
Resolution: 852 x 480 pixels<br />
Color System: NTSC<br />
Scanning Form<strong>at</strong>: 480p (all signals are converted to 480p)<br />
RF Antenna Input: Analog–UHF / VHF / CATV 75 ohm<br />
Digital–75 ohm<br />
Power Requirement: Source: AC 120V, 60Hz<br />
Power Consumption: 300 W<strong>at</strong>ts (Maximum)<br />
Sound:<br />
Two Speakers, size: 6x12cm<br />
Amplifier:<br />
Built-in with 5.0W/ch<br />
Jacks <strong>and</strong> Connectors:<br />
Video1 Input:<br />
S-Video1, Video <strong>and</strong> Audio L / R<br />
Component2 Input: Component (Y / Pb / Pr)<br />
Component3 Input: Component (Y / Pb / Pr)<br />
Digital Audio Output: S/P DIF or PCM<br />
Analog Audio Output: Audio L / R<br />
Service Input Jacks: For Production use only<br />
Size <strong>and</strong> Weight (approxim<strong>at</strong>ely):<br />
Horizontal Dim. (Width): 47.5 in. (1205.8 mm)<br />
Vertical Dim. (Height): 28.2 in. (715.2 mm)<br />
Depth Dim. (Thickness): 9.8 in. (248.3 mm)<br />
Weight:<br />
84.1 lbs., (38.2 Kg)<br />
Environmental Consider<strong>at</strong>ions<br />
Oper<strong>at</strong>ing Temper<strong>at</strong>ure: 32°F ~ 104°F (0°C ~ 40°C)<br />
Humidity: 20 ~ 80%<br />
Storage Temper<strong>at</strong>ure: 14°F ~ 122°F (-10°C ~ 50°C)<br />
Humidity: 20 ~ 80 %<br />
Specific<strong>at</strong>ions are subject to change without notice.<br />
CAUTION: FCC Regul<strong>at</strong>ions st<strong>at</strong>e th<strong>at</strong> improper modific<strong>at</strong>ions or<br />
unauthorized changes to this unit may void the<br />
user’s authority to oper<strong>at</strong>e the unit.<br />
Trademarks Inform<strong>at</strong>ion:<br />
Manufactured under license from Dolby Labor<strong>at</strong>ories.<br />
Dolby <strong>and</strong> the double-D symbol are trademarks of<br />
Dolby Labor<strong>at</strong>ories.<br />
4
SERVICE<br />
DIGITAL<br />
AUDIO<br />
OUTPUT<br />
DIGITAL<br />
ANTE NA IN<br />
UHF/VHF/CATV<br />
AC AC IN 120V 120V<br />
HANDLING PRECAUTIONS<br />
• H<strong>and</strong>le the Plasma TV carefully when installing. Do<br />
Not Drop.<br />
• Loc<strong>at</strong>e the set away from he<strong>at</strong>, excessive dust, <strong>and</strong><br />
direct sunlight.<br />
NOTE:<br />
When the Plasma TV is not used for a long period of<br />
time, dark dots may be observed. This is a characteristic<br />
of the Plasma display. If this occurs, turn the<br />
Plasma TV On <strong>and</strong> leave it on about one hour. These<br />
dots will gradually disappear.<br />
• Before placing the Plasma TV face down, make sure<br />
there are no objects under the screen. Leaving any<br />
object may cause damage on the screen surface.<br />
H<strong>and</strong> Slots<br />
• Throughout the install<strong>at</strong>ion process, h<strong>and</strong>ling by more<br />
than two people is recommended.<br />
• When removing the feet, use a working space th<strong>at</strong> is<br />
larger than the screen size. The work surface must be<br />
fl<strong>at</strong> <strong>and</strong> covered with a soft cloth or blanket to protect<br />
the screen surface.<br />
CARE AND CLEANING<br />
CLEANING THE PLASMA TV<br />
The surface of the cabinet can be damaged if not properly<br />
maintained. Many common household aerosol sprays,<br />
cleaning agents, solvents, <strong>and</strong> polishes will cause permanent<br />
damage to the fine surface.<br />
1. Unplug the power cord before cleaning the Plasma<br />
TV.<br />
2. Gently wipe the screen <strong>and</strong> cabinet with dry soft<br />
cloth.<br />
The screen is likely to be damaged if it is not maintained<br />
properly. Do not use hard objects like a hard cloth or<br />
paper. Do not use solvents or abrasives.<br />
CARING FOR THE PLASMA TV<br />
Do not bump or scr<strong>at</strong>ch the panel surface as this causes<br />
flaws on the surface of the screen.<br />
Do not display a still image on the screen for a long time.<br />
Otherwise, an afterimage or ghost may appear on a part<br />
of the panel. To prevent this symptom, use the “Screen<br />
Saver” function of the Plasma TV. See page 26.<br />
There may be some tiny black points <strong>and</strong>/or blight points<br />
on the Plasma Display Panel. These points are normal.<br />
NOTES: Never spray liquids on the<br />
screen.<br />
Do not use benzene, thinner, or<br />
any vol<strong>at</strong>ile substances to clean<br />
the Plasma TV. These chemicals<br />
may damage the cabinet finish.<br />
5
SERVICE<br />
DIGITAL<br />
AUDIO<br />
OUTPUT<br />
DIGITAL<br />
ANTE NA IN<br />
UHF/VHF/CATV<br />
AC IN 120V<br />
VIDEO IN L-AUDIO-R<br />
INSTALLATION PRECAUTIONS<br />
CHILD SAFETY<br />
<strong>Sanyo</strong> is committed to making home entertainment safe <strong>and</strong> enjoyable. Always<br />
use an appropri<strong>at</strong>e table or st<strong>and</strong> when positioning your TV. Use appropri<strong>at</strong>e<br />
brackets, braces, or straps to anchor your furniture in place. But never screw<br />
anything directly to the television.<br />
Do not place televisions on dressers, shelves, desks, carts, etc. where curious<br />
or excited children could pull, push, or otherwise cause the unit to fall <strong>and</strong><br />
cause personal injury.<br />
Never place toys or other items on top of the TV th<strong>at</strong> could pique children’s<br />
curiosity causing them to climb about the furniture.<br />
Always use st<strong>and</strong>s th<strong>at</strong> are designed to support the size <strong>and</strong> combined weight<br />
of your television <strong>and</strong> other electronic devices.<br />
AS<br />
POSITIONING PRECAUTIONS<br />
• Place this Plasma TV as indic<strong>at</strong>ed here. Failure to do so<br />
may result in a fire hazard. Allowing the proper amount<br />
of space <strong>at</strong> the top, sides, <strong>and</strong> rear of the Plasma TV<br />
cabinet is critical for proper air circul<strong>at</strong>ion <strong>and</strong> cooling of<br />
the unit. The dimensions shown here indic<strong>at</strong>e the<br />
minimum space required. If the Plasma TV is to be built<br />
into a compartment or similarly enclosed, these<br />
minimum distances must be maintained.<br />
• Do not cover the ventil<strong>at</strong>ion slots on the Plasma TV.<br />
He<strong>at</strong> build-up can reduce the life of your Plasma TV, <strong>and</strong><br />
can also be dangerous.<br />
• If the Plasma TV is not to be used for an extended<br />
period of time, unplug it from the power outlet.<br />
Removing the Plasma Feet<br />
Remove two (2) screws from each foot bracket, then slide<br />
the feet out of the brackets.<br />
6
FIRST-THINGS-FIRST<br />
This Plasma television will reproduce a crystal clear Digital picture <strong>and</strong> exceptional sound.<br />
The signal makes the difference!<br />
1INITIAL SIGNAL CONNECTIONS<br />
Digital (DTV) RF Antenna Connection<br />
• Connect an RF Antenna to the Digital Antenna In terminal.<br />
The Digital tuner in this Plasma TV receives digital signals<br />
from an external antenna. Digital signals from a STB are<br />
received through the Component In jacks (see page 11).<br />
Digital Antenna Input<br />
Plasma TV Back<br />
Digital RF<br />
Antenna<br />
Analog RF Antenna Connection<br />
• Connect a Cable signal (with or without a cable box),<br />
S<strong>at</strong>ellite Receiver, or RF antenna to the Analog RF<br />
input.<br />
The analog tuner in this Plasma TV receives Analog<br />
Antenna signals, Analog Cable signals, or the RF output<br />
from a S<strong>at</strong>ellite Receiver, VCR, or cable box.<br />
Plasma<br />
TV Back<br />
UHF/VHF/CATV<br />
UHF/VHF/CATV<br />
Plasma<br />
TV Back<br />
Plasma<br />
TV Back<br />
UHF/VHF/CATV<br />
OR<br />
OR<br />
IN<br />
FROM ANT.<br />
OUT<br />
OUT TO TV<br />
VCR Back<br />
IN<br />
FROM ANT.<br />
OUT<br />
OUT TO TV<br />
VCR Back<br />
IN<br />
FROM ANT.<br />
OUT<br />
OUT TO TV<br />
VCR Back<br />
Analog Cable<br />
CH3<br />
CH4<br />
CATV IN<br />
OUT TO TV<br />
Analog S<strong>at</strong>ellite Receiver<br />
S-VIDEO<br />
VIDEO<br />
VIDEO<br />
L- AUDIO-R<br />
L- AUDIO-R<br />
IN FROM<br />
SAT.<br />
Analog RF<br />
Antenna<br />
CATV FRANCHISE NOTE: Cable companies, like public<br />
utilities, are franchised by local government authorities.<br />
To receive cable programs, even with equipment<br />
which is capable of receiving cable channels, the consumer<br />
must subscribe to the cable company’s service.<br />
NOTES: If you do not have a VCR, connect signal directly to TV 75 ohm<br />
terminal (UHF/VHF/CATV).<br />
The only resolution available with any of these analog connections,<br />
regardless of the original content, is st<strong>and</strong>ard analog (SDTV).<br />
■<br />
■<br />
■<br />
If you move the TV to a new loc<strong>at</strong>ion, press the RESET key<br />
twice after connecting the signal <strong>and</strong> turning on the TV.<br />
TV will autom<strong>at</strong>ically select an Antenna mode for the type<br />
of Analog RF signal connected (Antenna or Cable).<br />
Use “Antenna Selection” in the Setup menu to change<br />
the Antenna Mode, if necessary, see page 18.<br />
■<br />
When tuned to an analog channel, the TV will switch off<br />
autom<strong>at</strong>ically after 15 minutes if there is no signal reception<br />
(cable out or st<strong>at</strong>ion not broadcasting).<br />
Exception—When the Video mode is selected, the TV will<br />
not autom<strong>at</strong>ically switch off when signal reception has<br />
stopped for 15 minutes.<br />
7
2INSTALL BATTERIES<br />
IMPORTANT NOTE: Spent or discharged<br />
b<strong>at</strong>teries must be recycled or<br />
• Install two “AAA” B<strong>at</strong>teries (not included) so th<strong>at</strong> the<br />
“+” <strong>and</strong> “–” marks on the b<strong>at</strong>teries m<strong>at</strong>ch the “+” <strong>and</strong><br />
disposed of properly in compliance<br />
“–” marks inside the Remote.<br />
with all applicable laws. For detailed<br />
To review the remote control functions, go to pages 14~15.<br />
inform<strong>at</strong>ion, contact your local County<br />
Solid Waste Authority.<br />
3CONNECT AC POWER CORD<br />
To POWER CORD<br />
CONNECTOR on back<br />
• Connect AC Power Cord (supplied) to the Plasma TV<br />
of Plasma TV.<br />
<strong>and</strong> electrical outlet as shown here.<br />
The AC outlet must be near this equipment <strong>and</strong> must be<br />
easily accessible.<br />
4CHANNEL SEARCH (REQUIRED SET-UP)<br />
When the television is powered on for the first time,<br />
it autom<strong>at</strong>ically checks for the presence of Digital <strong>and</strong><br />
Analog RF signals.<br />
• Press the POWER key to turn on the TV.<br />
• Then press the CHANNEL UP key to autom<strong>at</strong>ically<br />
search for available channels: Digital<br />
(ATSC) <strong>and</strong> Analog (NTSC).<br />
If an analog channel was found, the TV will<br />
start Auto Clock Setting (see step 5).<br />
NOTES: Channel inform<strong>at</strong>ion found during channel search is<br />
stored in two Channel Scan Memory d<strong>at</strong>abases<br />
(Analog <strong>and</strong> Digital). After channel search is completed,<br />
the TV will tune to the lowest Digital channel or lowest<br />
Analog channel if no digital channels are found.<br />
If the TV does not detect any digital or analog channels,<br />
a message advising the viewer to check the cables <strong>and</strong><br />
antenna connections will appear. In this case, you must<br />
press the CHANNEL UP key again to repe<strong>at</strong> the<br />
channel search process. If after two searches the TV still<br />
fails to detect any channels, the TV will tune to analog<br />
channel 3. These two channel searches are required<br />
even if you plan to use the TV only as a monitor.<br />
If no analog or digital channels are found after the<br />
second search, Channel Search will default to off-air<br />
analog channels 2 through 69 <strong>and</strong> digital channel D3-1.<br />
Select analog channels using the remote control<br />
keypad. See page 14, item number 2.<br />
CH<br />
INPUT<br />
1<br />
6<br />
4 5 7 8<br />
INFO<br />
RECALL<br />
MENU<br />
0<br />
CAPTION EXIT<br />
VOL<br />
POWER<br />
2 3<br />
ENTER<br />
9<br />
SLEEP<br />
TUNER MUTE<br />
First<br />
Please connect all signals<br />
<strong>and</strong> antennas to jacks <strong>and</strong><br />
the terminals on the back.<br />
Then press CHannel UP key.<br />
➠ Analog<br />
To 120 V AC outlet.<br />
Analog Antenna 34<br />
5AUTO DATE AND TIME SETTING<br />
(OPTIONAL)<br />
If an analog channel was found during channel search, the<br />
TV will begin Auto D<strong>at</strong>e <strong>and</strong> Time setting. This fe<strong>at</strong>ure<br />
searches for a local PBS st<strong>at</strong>ion th<strong>at</strong> is broadcasting D<strong>at</strong>e<br />
<strong>and</strong> Time d<strong>at</strong>a. These d<strong>at</strong>a are used to autom<strong>at</strong>ically set<br />
the d<strong>at</strong>e <strong>and</strong> time. (This may take several seconds.)<br />
After the D<strong>at</strong>e <strong>and</strong> Time are set, the lowest Digital<br />
channel (or lowest Analog channel if no active digital<br />
channel is stored in the Channel Scan Memory) will be<br />
tuned.<br />
To cancel auto D<strong>at</strong>e <strong>and</strong> Time setting, press the<br />
CHANNEL UP key. To set the D<strong>at</strong>e <strong>and</strong> Time manually,<br />
see page 24.<br />
6ANTENNA SELECTION (OPTIONAL)<br />
To change the initial analog tuning system setup (from<br />
antenna to cable or cable to antenna), use the on-screen<br />
menu. See “Antenna Selection” on page 18.<br />
8
SERVICE<br />
DIGITAL<br />
AUDIO<br />
OUTPUT<br />
DIGITAL<br />
ANTENNA IN<br />
UHF/VHF/CATV<br />
GLOSSARY OF CABLE TYPES<br />
Audio Cables—Provides analog left <strong>and</strong><br />
right audio for your external equipment<br />
connections.<br />
Optical Audio—Use this cable to connect<br />
the TV’s digital audio output to a multichannel<br />
audio receiver.<br />
Composite Audio/Video (RCA type)—Use<br />
these cables for st<strong>and</strong>ard analog<br />
audio / video connections. Normally cables<br />
are color-coded: Yellow for Video, White for<br />
(L) Audio, <strong>and</strong> Red for (R) Audio.<br />
S-Video Cable—This cable provides separ<strong>at</strong>e<br />
luminance <strong>and</strong> color signals for higher<br />
resolution <strong>and</strong> better picture quality. Use this<br />
cable instead of the regular composite video<br />
cable (RCA type), when available.<br />
Component:Y, Pb, Pr—Use these cables to<br />
connect your component equipment. This<br />
connection provides the best picture, but<br />
does not include sound. (Cable colors:<br />
Y=green, Pb=blue, <strong>and</strong> Pr=red.)<br />
NOTE:<br />
Coaxial Cable—Use to connect a signal to<br />
your Digital or Analog RF Antenna In terminal.<br />
None of these cables are supplied with this Plasma TV.<br />
Channel<br />
▼▲ keys<br />
Power key<br />
TOP AND BACK PANELS<br />
Volume<br />
– + keys<br />
CH<br />
POWER<br />
VOL<br />
Top Panel (see items 8, 11, & 17 on page 15)<br />
Back Panel (L)<br />
➀ ➁ ➂ ➃<br />
Back Panel (L)—Bottom View<br />
➀ Service Jacks—For production use only.<br />
➁ Digital Audio Output—Use an Optical Audio cable to<br />
connect the Digital Audio Output to an advanced stereo<br />
home the<strong>at</strong>er system equipped with Dolby ® Digital 5.1.<br />
➄ ➅ ➆ ➇ ➈ ➀ ➉<br />
➅ S-Video Input (Video 1)—To enhance video detail<br />
connect an S-Video cable to the S-Video jack instead<br />
of using the Video jack, if available on your external<br />
equipment. (S-Video connection will override connection<br />
to the Video 1 input jack.)<br />
➆ Audio/Video Input (Video 1)—Connect st<strong>and</strong>ard<br />
video equipment here using a composite audio / video<br />
cable (see page 12).<br />
NOTE:<br />
Back Panel (R)<br />
S-Video connection overrides the Video 1 composite<br />
connection.<br />
➂ Digital Antenna Input—Connect an RF antenna<br />
coaxial cable to this terminal as shown on page 7.<br />
➃ Analog Antenna Input—Connect an RF antenna or<br />
the RF output from a VCR or S<strong>at</strong>ellite Receiver to this<br />
terminal using a coaxial cable as shown on page 7.<br />
➄ Analog Audio Out (L/R) Jacks—Connect external<br />
audio equipment here. (See page 13.)<br />
➇ Component Video <strong>and</strong> Audio Input (COMPO 2 &<br />
COMPO 3)—Connect digital video equipment to the Y,<br />
Pb, Pr video <strong>and</strong> L/R audio jacks using a Component<br />
cable <strong>and</strong> an Audio cable.<br />
➈ Reset Button—Press this button to reset the TV’s<br />
digital microprocessor if the image “freezes” or “stalls.”<br />
➉<br />
AC IN 120V—Connect power cord here. See page 8.<br />
9
CHOOSE YOUR CONNECTION<br />
This Plasma TV is designed to h<strong>and</strong>le several different<br />
connections making it comp<strong>at</strong>ible with Digital <strong>and</strong> Analog<br />
devices.<br />
In order to receive the best performance from your<br />
Plasma TV, choose your connection using this chart; then<br />
go to the specified page for detailed instructions.<br />
Digital Signal<br />
Connections<br />
Comp<strong>at</strong>ible External<br />
Equipment<br />
Cables Needed<br />
(Not Supplied)<br />
Go to Page<br />
COMPONENT IN<br />
(Y, Pb, Pr)<br />
DIGITAL CABLE BOX / DVD PLAYER<br />
Component Video Cable<br />
11<br />
Will accept <strong>HDTV</strong>,<br />
EDTV, & SDTV video<br />
content (requires separ<strong>at</strong>e<br />
analog audio<br />
connections).<br />
DIGITAL<br />
SATELLITE<br />
RECEIVER<br />
Audio Cable<br />
DIGITAL AUDIO OUT<br />
(Only available when<br />
received as part of a<br />
Digital RF signal)<br />
MULTI-CHANNEL<br />
RECEIVER<br />
Optical Digital Cable<br />
11<br />
Analog Signal<br />
Connections<br />
Comp<strong>at</strong>ible External<br />
Equipment<br />
Cables Needed<br />
(Not Supplied)<br />
Go to Page<br />
COMPOSITE VIDEO or<br />
S-VIDEO IN<br />
Composite Video Cable<br />
12<br />
LEFT & RIGHT<br />
ANALOG AUDIO IN<br />
ANALOG CABLE BOX /<br />
DVD PLAYER<br />
SATELLITE<br />
RECEIVER<br />
S-Video Cable<br />
VCR<br />
ANALOG AUDIO OUT<br />
STEREO AMPLIFIER<br />
SYSTEM<br />
Audio Cable<br />
13<br />
10
USE THE COMPONENT JACKS TO CONNECT A DVD PLAYER<br />
OR OTHER DIGITAL EQUIPMENT<br />
Switch off TV <strong>and</strong> external equipment before connecting<br />
cables. (Cables are not supplied.) Follow these steps to<br />
easily connect your STB or DVD to this Plasma TV.<br />
1<br />
Connect a DVD Player’s (or other digital equipment’s)<br />
Component Video Out to the TV’s Component Video<br />
Input jacks.<br />
DIGITAL A/V CONNECTIONS<br />
OPT.<br />
DIGITAL<br />
OUT<br />
S-VIDEO OUT<br />
VIDEO OUT SELECT<br />
S<br />
COPONENT<br />
COMPONENT VIDEO OUT<br />
Y PB PR<br />
R L<br />
AUDIO OUT<br />
VIDEO OUT<br />
DVD Player<br />
(or other Digital<br />
Device, such as,<br />
a Digital S<strong>at</strong>ellite<br />
Receiver, or<br />
Digital Cable Box)<br />
1<br />
2<br />
Connect<br />
3<br />
Press<br />
4<br />
Press<br />
NOTE:<br />
4<br />
a DVD Player’s (or other digital equipment’s)<br />
Audio Out to the TV’s Component L/R Audio Input jacks.<br />
the POWER key to turn on the Plasma TV. Turn<br />
on external equipment.<br />
the INPUT key to select the Input source<br />
(Compo 2 or Compo 3).<br />
“No Signal” will appear on the screen for five seconds<br />
when no signal or an unacceptable video form<strong>at</strong> signal<br />
is detected <strong>at</strong> the Compo 2 or Compo 3 inputs.<br />
Remote Control<br />
INPUT<br />
POWER<br />
1 2 3<br />
4 5 6<br />
3<br />
Wh<strong>at</strong> you will need<br />
for connections:<br />
Component Video Cable – 1<br />
Audio Cable – 1<br />
■<br />
■<br />
AUDIO<br />
OUTPUT<br />
L<br />
R<br />
VIDEO 1 COMPO 2 COMPO 3<br />
S-VIDEO Y Y<br />
V Pr Pr<br />
L<br />
(MONO)<br />
AUDIO<br />
R<br />
Pb<br />
RESET<br />
SERVICE<br />
TV Back Component Jacks<br />
L<br />
R<br />
2<br />
Compo 2 <strong>and</strong> Compo 3 jacks are identical. Comp<strong>at</strong>ible<br />
equipment can be connected to either set of jacks,<br />
such as, a DVD player connected to Compo 3 <strong>and</strong> a<br />
S<strong>at</strong>ellite Receiver connected to Compo 2.<br />
Press the INPUT key after connecting the cables to<br />
select the Component 2 or Component 3 input signal.<br />
There is NO need to tune to a blank channel.<br />
Pb<br />
L<br />
R<br />
CONNECTING DIGITAL AUDIO OUTPUT TO A MULTI-CHANNEL RECEIVER<br />
Dolby ® Digital Audio provides 5.1 channels of surround<br />
sound (five full-range channels [5] <strong>and</strong> one low-frequency<br />
effect channel [.1]). A fiber optics cable is used to carry<br />
the 5.1 surround sound (for low-noise signal transfer).<br />
1<br />
Using a Fiber Optics cable, connect the TV’s Digital<br />
Audio Output to the Digital Audio Input of a Multi-<br />
Channel Receiver. (Fiber optics cable is not supplied.)<br />
2<br />
Press<br />
the POWER key to turn on the TV, then turn on<br />
the external equipment.<br />
NOTES: When making the connection, do not pinch or kink the<br />
fiber optics cable.<br />
1<br />
Multi-Channel<br />
Receiver<br />
Optical<br />
Digital Cable<br />
DIGITAL<br />
DIGITAL<br />
AUDIO<br />
ANTENNA IN<br />
OUTPUT<br />
Back View of<br />
Plasma TV<br />
Red light visible <strong>at</strong> the Digital Audio Output does not<br />
necessarily indic<strong>at</strong>e th<strong>at</strong> Dolby 5.1 audio is available.<br />
Digital audio is made up of light pulses th<strong>at</strong> the human<br />
eye cannot detect. Dolby 5.1 audio is available <strong>at</strong> the<br />
Digital Audio Output only when received as part of a<br />
Digital antenna signal.<br />
AS<br />
11
ANALOG A/V CONNECTIONS<br />
USE THE VIDEO1 JACKS TO CONNECT A VCR OR OTHER ANALOG DEVICE<br />
Switch off TV <strong>and</strong> external equipment before connecting<br />
cables. (Cables are not supplied.) Follow these steps to<br />
easily connect your VCR.<br />
1<br />
Connect<br />
NOTE:<br />
VCR’s Audio / Video Out to the TV’s Video1 In<br />
Jacks.<br />
For Mono VCR (single audio jack) connect VCR’s Audio<br />
Out to TV’s Audio (L) Input.<br />
Optional<br />
2<br />
Connect VCR’s S-Video Out to the TV’s S-Video In Jack.<br />
NOTE: S-Video jack connection overrides a Video jack connection.<br />
■<br />
■<br />
Press the INPUT key after connecting cables to<br />
access the Video1 Input. There is NO need to tune<br />
to a blank channel.<br />
Any comp<strong>at</strong>ible analog video device can be connected<br />
to these jacks.<br />
3<br />
Press<br />
the POWER key to turn on the TV, turn on<br />
external equipment.<br />
Remote Control<br />
4<br />
Press<br />
the INPUT key to select Video1 to view the<br />
VCR program.<br />
NOTE: “No Signal” will appear on the screen for five seconds<br />
when no signal is detected <strong>at</strong> the Video1 input.<br />
4<br />
INPUT<br />
POWER<br />
1 2 3<br />
4 5 6<br />
7<br />
8 9<br />
INFO<br />
SLEEP<br />
3<br />
Back View<br />
of VCR<br />
IN<br />
OUT<br />
R-AUDIO-L<br />
R-AUDIO-L<br />
VIDEO<br />
VIDEO<br />
S-VIDEO OUT<br />
RF<br />
CHANNEL<br />
3 4<br />
IN<br />
FROM ANT.<br />
VHF/UHF<br />
TO TV<br />
OUT<br />
2<br />
NOTE:<br />
Composite jacks offer only analog<br />
480i (SDTV) resolution.<br />
1<br />
AUDIO<br />
OUTPUT<br />
VIDEO 1<br />
S-VIDEO<br />
S-Video<br />
Jack<br />
COMPO 2 COMPO 3<br />
Y<br />
Pb<br />
Y<br />
Pb<br />
RESET<br />
Wh<strong>at</strong> you will need<br />
for connections:<br />
V Pr Pr<br />
SERVICE<br />
Audio / Video Cable – 1<br />
L<br />
L<br />
L<br />
L<br />
S-Video Cable – 1<br />
TV AV Input<br />
Jacks<br />
R<br />
(MONO)<br />
AUDIO<br />
R<br />
R<br />
R<br />
12
ANALOG AUDIO OUTPUT CONNECTIONS<br />
Connecting Audio Out Jacks to a Stereo Amplifier<br />
Switch off TV <strong>and</strong> external equipment before connecting<br />
cables. (Cables are not supplied.)<br />
1<br />
Connect the TV Audio Out (R/L) to a Stereo Amplifier<br />
In (R/L).<br />
2<br />
Press<br />
the POWER key to turn on the TV, then turn on<br />
your external equipment.<br />
NOTES: Do not connect external speakers directly to the TV.<br />
When TV Speaker is in the ON mode, sound will be<br />
reproduced through your TV <strong>and</strong> the stereo amplifier.<br />
When TV Speaker is in the OFF mode, sound will be<br />
reproduced only through the stereo amplifier. (See page<br />
25 to set TV Speaker.)<br />
Wh<strong>at</strong> you will need<br />
for connections:<br />
Audio Cable – 1<br />
1<br />
AUDIO<br />
OUTPUT<br />
L<br />
R<br />
VIDEO 1<br />
S-VIDEO<br />
TV Back<br />
V<br />
L<br />
(MONO)<br />
AUDIO<br />
R<br />
Remote Control<br />
INPUT<br />
POWER<br />
1 2 3<br />
2<br />
Stereo Amplifier<br />
TYPICAL HOME THEATER CONNECTIONS<br />
13
USING THE REMOTE CONTROL<br />
PRECAUTIONS<br />
To ensure safe oper<strong>at</strong>ion, please observe the following<br />
precautions:<br />
Use (2) AAA alkaline b<strong>at</strong>teries, see page 8.<br />
Replace both b<strong>at</strong>teries <strong>at</strong> the same time. Do not use a<br />
new b<strong>at</strong>tery with a used b<strong>at</strong>tery.<br />
Risk of explosion, if b<strong>at</strong>tery is replaced by an incorrect<br />
type.<br />
If b<strong>at</strong>teries have leaked in the Remote Control Unit,<br />
carefully wipe the case clean <strong>and</strong> load new b<strong>at</strong>teries.<br />
Do not expose the Remote Control Unit to moisture,<br />
or he<strong>at</strong>.<br />
REMOTE CONTROL KEYS<br />
➀Input Key—Press to change the input signal<br />
source as follows: Analog RF ➡ Digital RF ➡ Video1<br />
➡ Component2 ➡ Component3 ➡ Analog RF.<br />
➁Number Keys—Two keys must be pressed to select<br />
a channel. Example: Press 0 then 6 to select channel<br />
6. For Analog cable channels above 100, press <strong>and</strong><br />
hold the 1 key until C1– – appears.<br />
➂Info Key—Press to display Digital Full Banner or Analog<br />
Brief Banner inform<strong>at</strong>ion (press the INFO key again to<br />
remove the display).<br />
Digital Off-air Channel Full Banner—Contains a twopart<br />
Channel Number (Major <strong>and</strong> Minor). If available,<br />
the following is also included—St<strong>at</strong>ion ID, Program<br />
Title, D<strong>at</strong>e / Time (if set), Signal Strength, Video Resolution,<br />
V-Guide Program R<strong>at</strong>ing, <strong>and</strong> Audio Reception.<br />
Program<br />
Title<br />
Virtual Channel<br />
Major Minor<br />
St<strong>at</strong>ion ID<br />
Current<br />
Time/D<strong>at</strong>e<br />
Digital Cable Channel Full Banner—Contains a twopart<br />
Cable Channel Number (Major <strong>and</strong> Minor). If<br />
available the following is also included—D<strong>at</strong>e / Time (if<br />
set), Signal Strength, Video Resolution, V-Guide<br />
Program R<strong>at</strong>ing, <strong>and</strong> Audio Reception.<br />
Cable<br />
Indic<strong>at</strong>or<br />
“DC”<br />
Video Resolution<br />
05<br />
NBC<br />
10:26 pm<br />
Virtual Channel<br />
Major Minor<br />
Digital Cable Channel Full Banner<br />
Analog<br />
Antenna<br />
Signal Strength<br />
C 39<br />
FOX<br />
10:26 pm<br />
Analog<br />
Cable<br />
Analog Brief Banners<br />
V-Guide<br />
Program R<strong>at</strong>ing<br />
Current<br />
Time/D<strong>at</strong>e<br />
Video 1<br />
10:26 pm<br />
Audio<br />
Reception<br />
Video 1<br />
Input<br />
➃Recall Key—Select the first channel you want to<br />
w<strong>at</strong>ch; then select another channel using the<br />
NUMBER keys. Press RECALL to easily switch<br />
between the channels.<br />
NOTE:The RECALL key can not toggle between a Digital<br />
<strong>and</strong> Analog channel. See TUNER key description.<br />
Video Resolution<br />
Signal Strength<br />
V-Guide<br />
Program R<strong>at</strong>ing<br />
Digital Off-air Channel Full Banner<br />
Audio<br />
Reception<br />
➄Menu key—Press this key to display the on-screen<br />
setup menu.<br />
➅Tuner Key—Use this key to toggle from one tuning<br />
system to another, digital channels <strong>and</strong> analog channels.<br />
NOTE: The TUNER key is inactive when an external input is<br />
selected (Video1, Compo 2, or Compo 3).<br />
14
➆Caption Key—Press to select analog or digital captioning.<br />
The Analog Caption modes are: CC1, CC2, QuikCap<br />
<strong>and</strong> OFF. The Digital Caption modes are: Digital<br />
CC1~Digital CC6, QuikCap, <strong>and</strong> OFF. (See page 21.)<br />
➇Channel Scanning (CH ▲▼)—Press the CHANNEL<br />
SCAN ▲▼ keys to tune to the next higher or lower<br />
channel in the Channel Scan Memory d<strong>at</strong>abase. The<br />
scanning loop includes analog channels, digital channels,<br />
<strong>and</strong> all A / V inputs.<br />
➈Pix Shape Key—Use this key to change the video<br />
display form<strong>at</strong>. Available options depend on the signal<br />
received <strong>and</strong> the broadcast’s aspect r<strong>at</strong>io. Options<br />
include: Normal, Full, Zoom1, <strong>and</strong> Zoom2.<br />
Factory preset modes: Analog antenna signal <strong>and</strong> all<br />
Video inputs—FULL; Digital antenna signal—ZOOM2.<br />
➉Audio Key—Press to select the desired audio mode,<br />
if available: Digital—Main, Sub1, Sub2, or Sub3;<br />
Analog—Stereo, Mono, & SAP (antenna signals only).<br />
18<br />
Reset Key—Press twice to restore factory settings.<br />
The TV will autom<strong>at</strong>ically start Channel Search <strong>and</strong><br />
clear all customized settings.<br />
NOTE:<br />
The RESET Function includes a channel search.<br />
Current Digital <strong>and</strong> Analog channel d<strong>at</strong>abases will be<br />
deleted <strong>and</strong> new ones cre<strong>at</strong>ed by the Channel Search<br />
process. To receive Digital Cable channels, see page 17<br />
for Digital Cable Search.<br />
These fe<strong>at</strong>ures will reset to factory defaults.<br />
• Picture / Sound Adjustments:<br />
Color, Tint, Contrast, Brightness,<br />
Sharpness, Color<br />
Enhancer, Dynamic AI, Bass,<br />
Treble, <strong>and</strong> Surround Sound<br />
• Channel Memory—Digital<br />
<strong>and</strong> Analog channel d<strong>at</strong>abases<br />
will be replaced<br />
• Initial Channel to OFF<br />
• Analog Audio to Stereo<br />
• Captioning to OFF<br />
• V-Guide to OFF<br />
• TV Speakers to ON<br />
• Digital Audio Output to<br />
Dolby ® Digital<br />
• Menu Language to <strong>English</strong><br />
• Auto Clock (<strong>and</strong> Sleep Timer<br />
if previously set)<br />
• Any Video mode to TV mode<br />
If desired, personal settings can be made again using the<br />
menu options. (See page 27.)<br />
11 Power key—Press this key to turn the TV on <strong>and</strong> off.<br />
12<br />
13<br />
Sleep Key—Press this key, then press the “0” key to<br />
set the Sleep Timer. The sleep timer can be set from<br />
30 minutes up to 3 hours in 30 minutes increments.<br />
The Sleep Timer will switch off the TV autom<strong>at</strong>ically.<br />
(The Sleep Timer will be cancelled if the TV is turned<br />
off or if a power failure occurs.)<br />
Mute Key—Press once to minimize the volume. Press<br />
again to restore. This key will not mute sound from<br />
the audio out jacks.<br />
➀<br />
➁<br />
➂<br />
➃<br />
➄<br />
INPUT<br />
POWER<br />
1 2 3<br />
4 5 6<br />
7 8 9<br />
INFO<br />
RECALL<br />
MENU<br />
0<br />
SLEEP<br />
TUNER MUTE<br />
ENTER<br />
11<br />
12<br />
13<br />
14<br />
14<br />
Enter key—Press this key to select an option from the<br />
menu system, when required.<br />
➅<br />
15<br />
15<br />
16<br />
Cursor ▲ (Up) ▼ (Down) keys—Press these keys to<br />
move the cursor up <strong>and</strong> down within the menu.<br />
Cursor (Left) (Right) keys—Press these keys to<br />
move the cursor left <strong>and</strong> right within the menu.<br />
▲<br />
▼<br />
Exit key—Press this key to exit from the menu<br />
system.<br />
➆<br />
➇<br />
➈<br />
CAPTION<br />
CH<br />
PIX SHAPE<br />
AUDIO<br />
EXIT<br />
RESET<br />
VOL<br />
16<br />
17<br />
18<br />
17<br />
Volume (VOL + –) Keys—Press the VOL + – keys to<br />
adjust the volume. The screen displays Green left <strong>and</strong><br />
right arrows th<strong>at</strong> turn Red <strong>and</strong> blink as many times as<br />
you press the VOL + – keys.<br />
➉<br />
15
TV ADJUSTMENT AND SETUP<br />
BASIC MENU OPERATION<br />
The on-screen menu system provides the viewer with easy access to<br />
adjustments <strong>and</strong> settings. Just use the MENU, CURSOR, ENTER, <strong>and</strong><br />
EXIT keys on the remote control <strong>and</strong> follow the on-screen instructions.<br />
Generally, you will use the CURSOR ▲▼ keys to highlight or select a<br />
menu item <strong>and</strong> the CURSOR keys to make an<br />
adjustment. The ENTER key is used to confirm a setting,<br />
when necessary, <strong>and</strong> to select the next field. After you<br />
have completed your adjustments, press the EXIT key to<br />
return to normal TV viewing.<br />
▲<br />
▼<br />
On-screen menu options will vary depending on the input<br />
signal type (Analog or Digital). Most adjustment options<br />
are common to both Digital <strong>and</strong> Analog menus, in those<br />
cases the Digital menu will be shown in the adjustments.<br />
MENU<br />
CAPTION<br />
ENTER<br />
EXIT<br />
REMOTE CONTROL<br />
DIGITAL MAIN MENU<br />
Menu Navig<strong>at</strong>ion Map<br />
SUB MENUS<br />
ANALOG MAIN MENU<br />
IMPORTANT FACTS:<br />
This TV has two distinct menu<br />
systems, one for Analog signals <strong>and</strong><br />
one for Digital signals. Therefore,<br />
menu options will vary according to<br />
the signal being received (Analog or<br />
Digital). The Menu Navig<strong>at</strong>ion Map<br />
shown here indic<strong>at</strong>es available<br />
Digital options. Analog menu<br />
options vary slightly. When a specific<br />
menu (digital or analog) is required<br />
for an adjustment, it is specified in<br />
the setup instructions.<br />
If you press the MENU key while<br />
tuned to an Analog channel (or<br />
signal), the Analog Main menu will<br />
appear. If you press the MENU key<br />
while tuned to a Digital channel (or<br />
signal), the Digital Main menu will<br />
appear. (Press the TUNER key to<br />
switch quickly between Digital <strong>and</strong><br />
Analog channels.)<br />
Also, some options are not available<br />
in combin<strong>at</strong>ion. Unavailable options<br />
will appear “grayed-out” in the<br />
menu. For example, after a Digital<br />
Cable Search, Digital Add-on Search<br />
will be “grayed-out” because th<strong>at</strong><br />
option is not supported for Digital<br />
Cable Channels.<br />
The TV will exit the Menu system if<br />
30 seconds elapse between entries.<br />
16
Channel Search<br />
Use Channel Search to replace the<br />
existing Digital <strong>and</strong> Analog Channel<br />
Scan d<strong>at</strong>abases, such as, if you move<br />
to another city.<br />
NOTES: To receive Digital Cable channels,<br />
you have to perform a Digital<br />
Cable Search.<br />
To add new Digital channels to<br />
the existing d<strong>at</strong>abase, use Digital<br />
Add-on Search. See page 18.<br />
1<br />
Press<br />
2<br />
Press<br />
CHANNEL SETUP OPTIONS<br />
the TUNER key to select<br />
the Digital Tuner.<br />
the MENU key to display<br />
the Main menu.<br />
3<br />
Use<br />
4<br />
Use<br />
5<br />
Use<br />
NOTE:<br />
the CURSOR ▲▼ keys to<br />
highlight the Channel c<strong>at</strong>egory.<br />
Press ENTER.<br />
the CURSOR ▲▼ keys to<br />
highlight the Channel Search<br />
option. Press ENTER.<br />
the CURSOR ▼ key to<br />
choose Yes. Press ENTER.<br />
After Channel Search is complete,<br />
the TV will tune to the<br />
lowest Digital Cable channel (or<br />
Digital D03 if no Digital channels<br />
are found).<br />
➠<br />
Digital Cable Search<br />
(Optional)<br />
This Plasma TV can receive unscrambled<br />
(ClearQAM) Digital Cable<br />
Channels, when available. However,<br />
not all cable companies provide Clear-<br />
QAM digital channels.<br />
Searching for Digital Cable Channels<br />
will take about 10 minutes, please be<br />
p<strong>at</strong>ient.<br />
Channel numbers will appear under<br />
the progress bar only when a channel<br />
is found.<br />
IMPORTANT FACT: This TV maintains only<br />
one d<strong>at</strong>abase of digital channels. Therefore,<br />
when you search for ClearQAM digital<br />
cable channels, the d<strong>at</strong>abase of digital<br />
antenna channels will be deleted. You will<br />
only be able to receive those ClearQAM<br />
channels your cable company provides.<br />
Cable companies rearrange virtual channels<br />
as programming changes, which may<br />
cause the program you are w<strong>at</strong>ching to<br />
move to another channel. This message<br />
will appear on the screen briefly to notify<br />
you of a change. You will have to reloc<strong>at</strong>e<br />
the program you were w<strong>at</strong>ching by scanning<br />
through the channels.<br />
To restore the digital antenna channel<br />
d<strong>at</strong>abase, reconnect the antenna <strong>and</strong> use<br />
the menu system to perform a normal<br />
Channel Search.<br />
1<br />
Connect<br />
2<br />
Press<br />
3<br />
Press<br />
4<br />
Use<br />
5<br />
Use<br />
Program change from<br />
cable company<br />
a Digital Cable signal<br />
directly to the TV’s Digital Antenna<br />
In terminal.<br />
DIGITAL<br />
AUDIO<br />
OUTPUT<br />
DIGITAL<br />
ANTENNA IN<br />
UHF<br />
Digital<br />
Cable Signal<br />
the TUNER key to select<br />
the Digital Tuner.<br />
the MENU key to display<br />
the Main menu.<br />
the CURSOR ▲▼ keys to<br />
highlight the Channel c<strong>at</strong>egory.<br />
Press ENTER.<br />
the CURSOR ▲▼ keys to<br />
highlight the Digital Cable Search<br />
option. Press ENTER.<br />
6<br />
Use<br />
the CURSOR ▼ key to<br />
choose Yes. Press ENTER.<br />
➠<br />
Channel Setup Options continued on next page.<br />
17
CHANNEL SETUP OPTIONS (CONTINUED)<br />
Digital Add-on Search<br />
Use this fe<strong>at</strong>ure to add new channels<br />
to the Digital Antenna Channel d<strong>at</strong>abase.<br />
Also, use this fe<strong>at</strong>ure to add<br />
channels when broadcast towers are in<br />
opposite directions from your loc<strong>at</strong>ion.<br />
NOTE: Go to www.antennaweb.org <strong>and</strong><br />
type in your zip code to obtain<br />
specific tower vector inform<strong>at</strong>ion.<br />
Channel numbers will appear under<br />
the progress bar only when a channel<br />
is found.<br />
1<br />
Press<br />
2<br />
Press<br />
3<br />
Use<br />
the TUNER key to select<br />
the Digital Tuner.<br />
the MENU key to display<br />
the Main menu.<br />
the CURSOR ▲▼ keys to<br />
highlight the Channel c<strong>at</strong>egory.<br />
Press ENTER.<br />
4<br />
Use<br />
5<br />
Use<br />
NOTE:<br />
the CURSOR ▲▼ keys to<br />
highlight the Digital Add-on<br />
Search option. Press ENTER.<br />
the CURSOR ▼ key to<br />
choose Yes. Press ENTER.<br />
Turn your Antenna <strong>and</strong> repe<strong>at</strong><br />
these steps for each direction in<br />
which there are transmitting<br />
towers.<br />
➠<br />
Antenna Selection (Analog)<br />
Use this fe<strong>at</strong>ure to switch between<br />
Analog Off-air channels <strong>and</strong> Analog<br />
Cable channels.<br />
NOTE:<br />
1<br />
Press<br />
To ensure th<strong>at</strong> all available channels<br />
are included in the channel<br />
scanning loop, you should<br />
perform a Channel Search after<br />
switching between Off-air <strong>and</strong><br />
Cable channels.<br />
the TUNER key to select<br />
the Analog tuner.<br />
2<br />
Press<br />
3<br />
Use<br />
4<br />
Use<br />
5<br />
Use<br />
6<br />
Press<br />
the MENU key to display<br />
the Main menu.<br />
the CURSOR ▲▼ keys to<br />
highlight the Channel c<strong>at</strong>egory.<br />
Press ENTER.<br />
the CURSOR ▲▼ keys to<br />
highlight the Antenna Selection<br />
option. Press ENTER.<br />
the CURSOR ▲▼ keys to<br />
choose CABLE or VHF / UHF.<br />
the EXIT key to return to<br />
normal TV viewing.<br />
➠<br />
18
Digital Channel Scan Memory<br />
Digital Channel Scan Memory is a<br />
d<strong>at</strong>abase of active channels th<strong>at</strong> you<br />
scan through using the CHANNEL<br />
SCAN ▲▼ keys. This list can be customized<br />
by deleting <strong>and</strong>/or adding<br />
digital channels.<br />
1<br />
Press the TUNER key to select<br />
the Digital tuner.<br />
2<br />
Press<br />
the MENU key to display<br />
the Main menu.<br />
4<br />
Use the CURSOR ▲▼ keys to<br />
highlight the Channel Scan<br />
Memory option. Press ENTER.<br />
“Add?” will appear below the channel<br />
number if the selected channel is not<br />
in the d<strong>at</strong>abase. “Delete?” will<br />
appear below the channel number if<br />
the selected channel is already in the<br />
d<strong>at</strong>abase.<br />
5<br />
Use<br />
the CHANNEL ▲▼ keys or<br />
numerical keys to select desired<br />
channel.<br />
6<br />
Press<br />
7<br />
When<br />
the ENTER key to delete or<br />
add the channel.<br />
you have finished adding<br />
<strong>and</strong> / or deleting channels, press<br />
the EXIT key to return to normal<br />
TV viewing.<br />
3<br />
Use<br />
the CURSOR ▲▼ keys to<br />
highlight the Channel c<strong>at</strong>egory.<br />
Press ENTER.<br />
■<br />
■<br />
When a digital channel is deleted,<br />
all of th<strong>at</strong> channel’s sub-channels<br />
are deleted as well.<br />
Only previously deleted digital channels<br />
can be added back to the<br />
d<strong>at</strong>abase.<br />
➠<br />
■<br />
If one digital sub-channel is added<br />
back to the d<strong>at</strong>abase all of th<strong>at</strong><br />
channel’s sub-channels will be<br />
added back.<br />
■<br />
If the last remaining digital channel<br />
is deleted the entire previous<br />
Digital Channel Scan Memory d<strong>at</strong>abase<br />
will be restored autom<strong>at</strong>ically.<br />
Channel Setup Options continued on next page.<br />
19
Analog Channel Scan Memory<br />
Analog Channel Scan Memory is a<br />
d<strong>at</strong>abase of active channels th<strong>at</strong> you<br />
scan through using the CHANNEL<br />
SCAN ▲▼ keys. This list can be customized<br />
by deleting <strong>and</strong>/or adding<br />
digital channels.<br />
1<br />
Press the TUNER key to select<br />
the Analog tuner.<br />
2<br />
Press<br />
CHANNEL SETUP OPTIONS (CONTINUED)<br />
the MENU key to display<br />
the Main menu.<br />
3<br />
Use<br />
the CURSOR ▲▼ keys to<br />
highlight the Channel c<strong>at</strong>egory.<br />
Press ENTER.<br />
4<br />
Use the CURSOR ▲▼ keys to<br />
highlight the Channel Scan<br />
Memory option. Press ENTER.<br />
“Add?” will appear below the channel<br />
number if the selected channel is not<br />
in the d<strong>at</strong>abase. “Delete?” will<br />
appear below the channel number if<br />
the selected channel is already in the<br />
d<strong>at</strong>abase.<br />
5<br />
Use<br />
6<br />
Press<br />
7<br />
When<br />
the CHANNEL ▲▼ keys or<br />
numerical keys to select desired<br />
channel.<br />
the ENTER key to delete or<br />
add the channel.<br />
you have finished adding<br />
<strong>and</strong> / or deleting channels, press<br />
the EXIT key to return to normal<br />
TV viewing.<br />
➠<br />
■<br />
If the last remaining analog channel<br />
is deleted (cable channel or off-air<br />
channel) ALL analog channels (cable<br />
or off-air) will be restored autom<strong>at</strong>ically,<br />
regardless of the previous<br />
Analog Channel Scan Memory d<strong>at</strong>abase.<br />
Initial Channel (Analog Only)<br />
This television can be programmed to<br />
tune to your favorite analog channel<br />
each time it is powered on.<br />
1<br />
Press the TUNER key to select<br />
the Analog tuner.<br />
5<br />
Use<br />
6<br />
Use<br />
the CURSOR ▼ key to<br />
select On. Press ENTER.<br />
the CHANNEL ▲▼ keys or<br />
numerical keys to select the<br />
desired analog channel.<br />
NOTE:<br />
If the TV is powered Off while<br />
any video mode is selected, th<strong>at</strong><br />
video mode will be tuned when<br />
the TV is powered On again<br />
(Video 1, Component 2, or Component<br />
3).<br />
2<br />
Press<br />
the MENU key to display<br />
the Main menu.<br />
7<br />
Press<br />
the ENTER key to set the<br />
initial channel. Press the EXIT key<br />
to return to normal TV viewing.<br />
3<br />
Use<br />
the CURSOR ▲▼ keys to<br />
highlight the Channel c<strong>at</strong>egory.<br />
Press ENTER.<br />
➠<br />
4<br />
Use<br />
the CURSOR ▲▼ keys to<br />
highlight the Initial Channel<br />
option. Press ENTER.<br />
20
CLOSED-CAPTIONING<br />
Closed-Captioning is hidden textual<br />
inform<strong>at</strong>ion transmitted along with the<br />
picture <strong>and</strong> sound. Turning Captioning<br />
ON causes the TV to open these captions<br />
<strong>and</strong> superimpose them on the<br />
screen.<br />
Because different types of closed-captions<br />
can be transmitted with the<br />
picture <strong>and</strong> sound, separ<strong>at</strong>e captioning<br />
modes are provided. The captioning<br />
modes recognized by this model are:<br />
Analog EIA-608B <strong>and</strong> Digital EIA-708B.<br />
Local broadcasters decide which<br />
caption signals to transmit.<br />
Changing the Look of Digital<br />
Captions<br />
The Size, Style, Color, Opacity, <strong>and</strong><br />
Edge Style of Digital captions can be<br />
changed.<br />
NOTES: If Opacity is set to Transparent,<br />
captions may be difficult to see.<br />
Some screens include a Sample<br />
text box display to instantly view<br />
your selection.<br />
Only true EIA 708B Digital Closed-<br />
Captions are affected by all these<br />
settings.<br />
Analog captions generally will not<br />
respond to these adjustments,<br />
however, upconverted analog captions<br />
may respond to some options.<br />
1<br />
Press<br />
2<br />
Press<br />
3<br />
Use<br />
4<br />
Use<br />
5<br />
Some<br />
6<br />
Press<br />
the TUNER key to select<br />
the Digital Tuner. (Note: Digital<br />
Font options are available only<br />
from the Digital Main menu.)<br />
the MENU key to display<br />
the Main menu.<br />
the CURSOR ▲▼ keys to<br />
highlight the Digital Caption<br />
c<strong>at</strong>egory. Press ENTER.<br />
the CURSOR ▲▼ keys to<br />
highlight an option. Press ENTER.<br />
choices have Background<br />
<strong>and</strong> Foreground options. Choose<br />
Background or Foreground <strong>and</strong><br />
press ENTER when necessary,<br />
then use the CURSOR ▲▼ or<br />
keys to select the desired<br />
▲<br />
▼<br />
effect.<br />
Otherwise, simply use the<br />
CURSOR ▲▼ or keys to<br />
select the desired effect.<br />
▲<br />
▼<br />
the MENU key to move<br />
back to the Digital Caption menu,<br />
then repe<strong>at</strong> Steps 4 <strong>and</strong> 5 for<br />
each option you want to change.<br />
7<br />
When<br />
you have finished making<br />
adjustments, press the EXIT key<br />
to return to normal TV viewing.<br />
Main Menu—Digital Font<br />
➠<br />
Sub Menu—Digital Font Size<br />
To View Captions<br />
1<br />
Press the CAPTION key to<br />
select caption modes.<br />
Digital modes are: Digital CC1<br />
through Digital CC6, QuikCap, <strong>and</strong><br />
Off.<br />
Analog modes are: CC1, CC2,<br />
QuikCap <strong>and</strong> Off.<br />
Digital CC1<br />
Digital Caption<br />
CAPTION<br />
RECALL<br />
MENU<br />
TUNER<br />
MUTE<br />
EXIT<br />
MUTE<br />
ENTER<br />
QuikCap Oper<strong>at</strong>ion<br />
QuikCap turns captioning on <strong>and</strong> off<br />
with the Mute function. Press the<br />
MUTE key on the remote control to<br />
block the TV sound; the captions<br />
display autom<strong>at</strong>ically. Press the MUTE<br />
key again to restore the sound. Captions<br />
will disappear.<br />
1<br />
Press the CAPTION key to<br />
select QuikCap.<br />
CAPTION<br />
RECALL TUNER<br />
MENU<br />
ENTER<br />
EXIT<br />
MUTE<br />
CC1<br />
Analog Caption<br />
QuikCap<br />
CC1<br />
21
V-GUIDE (PARENTAL CONTROL) OPERATION<br />
NOTE: This fe<strong>at</strong>ure is designed to comply with the United St<strong>at</strong>es<br />
of America’s FCC V-Chip regul<strong>at</strong>ions. Therefore it may not function<br />
with broadcasts th<strong>at</strong> origin<strong>at</strong>e in other countries.<br />
This <strong>Sanyo</strong> Plasma television is equipped with an electronic<br />
Block or Unblock Movie or<br />
TV Program<br />
The TV will autom<strong>at</strong>ically block r<strong>at</strong>ings<br />
above or unblock r<strong>at</strong>ings below a selection.<br />
For example, if you block TV r<strong>at</strong>ing<br />
TV-PG, r<strong>at</strong>ings TV-14 <strong>and</strong> TV-MA will be<br />
blocked autom<strong>at</strong>ically; or if you block<br />
Movie r<strong>at</strong>ing PG-13, r<strong>at</strong>ings R, NC17,<br />
<strong>and</strong> X will be blocked autom<strong>at</strong>ically.<br />
Blocking TVY7 does not block higher<br />
r<strong>at</strong>ings.<br />
Content r<strong>at</strong>ings are represented by<br />
the initials: FV (fantasy violence),<br />
D (suggestive dialog), L (adult language),<br />
S (sexual situ<strong>at</strong>ions), <strong>and</strong><br />
V (violence).<br />
1<br />
Press<br />
2<br />
Use<br />
3<br />
Use<br />
4<br />
Use<br />
V-Chip to interpret MPAA <strong>and</strong> TV Parental Guidelines r<strong>at</strong>ing<br />
codes. When these codes are detected, the TV will autom<strong>at</strong>ically<br />
display or block the program, depending upon<br />
choices you make when setting R<strong>at</strong>ingup the V-Guide system.<br />
the MENU key to display<br />
the Main menu.<br />
the CURSOR ▲▼ keys to<br />
highlight the V-Guide c<strong>at</strong>egory.<br />
Press ENTER.<br />
the CURSOR ▲▼ keys to<br />
select On (or OFF to deactiv<strong>at</strong>e<br />
V-Guide). Press ENTER.<br />
the CURSOR ▼ key to highlight<br />
Adjust. Press ENTER.<br />
5cc Allow All Block All<br />
Use the CURSOR ▲▼ <strong>and</strong><br />
MOVIE<br />
keys to select Movie or TV<br />
G TV-Y<br />
r<strong>at</strong>ings. Press ENTER to Block or<br />
PG TV-Y7<br />
Unblock selected r<strong>at</strong>ing.<br />
PG13 TV-G<br />
A lock symbol R will TV-PG appear beside a<br />
r<strong>at</strong>ing when NC17 it is blocked. TV-14<br />
6<br />
When<br />
▲<br />
▼<br />
X<br />
you have finished making<br />
adjustments, press the EXIT key<br />
to return to normal TV viewing.<br />
MOVIE RATINGS<br />
TV FV D L S V<br />
TV-MA<br />
Move ENTER Select MENU Back EXIT Exit<br />
TV RATINGS<br />
➠<br />
➠<br />
LOCKED<br />
SYMBOL<br />
RATED GUIDELINES<br />
(Gray Boxes)<br />
■<br />
■<br />
You can block portions of a TV r<strong>at</strong>ing by choosing one or<br />
more of the Content r<strong>at</strong>ings (D, L, S, & V). By blocking<br />
just the L & S content r<strong>at</strong>ings of TV-14, for example, TV-<br />
14 r<strong>at</strong>ed programs with a D <strong>and</strong>/or V content r<strong>at</strong>ing could<br />
still be viewed.<br />
V-Guide limits on programming received via the Analog<br />
antenna input, Digital antenna input, Video 1 input, <strong>and</strong><br />
any 480i signals received through the Component jacks<br />
can be controlled by this TV.<br />
■<br />
■<br />
Networks <strong>and</strong> local st<strong>at</strong>ions may or may not include the<br />
content portion of the TV Parental Guidelines.<br />
The TV will autom<strong>at</strong>ically block r<strong>at</strong>ings above or unblock<br />
r<strong>at</strong>ings below a selection. For example, if you block TV<br />
r<strong>at</strong>ing TV-PG, r<strong>at</strong>ings TV-14 <strong>and</strong> TV-MA will be blocked<br />
autom<strong>at</strong>ically; or if you block Movie r<strong>at</strong>ing PG-13, r<strong>at</strong>ings<br />
R, NC17, <strong>and</strong> X will be blocked autom<strong>at</strong>ically. Blocking<br />
TVY7 does not block higher r<strong>at</strong>ings.<br />
■<br />
V-Guide limits on digital programming received through<br />
the Component jacks are controlled by the external<br />
device connected to those jacks (such as a DVD Player or<br />
Digital S<strong>at</strong>ellite Receiver). Refer to your external device’s<br />
owner’s manual for instructions on setting V-Guide limits.<br />
22
LIGHT<br />
REC<br />
TRACKING<br />
PLAY<br />
STOP<br />
MUTE<br />
PAUSE<br />
VOL<br />
CH<br />
CH<br />
DISPLAY<br />
MENU<br />
GUIDE<br />
VOL<br />
1<br />
4<br />
7<br />
CAPTION<br />
RECA L<br />
2 3<br />
5 6<br />
8 9<br />
0<br />
SL EP<br />
T VCR<br />
VIDEO<br />
SAT AUX<br />
RESET<br />
POWER<br />
TV<br />
Temporarily Unblock a Movie<br />
or TV Program<br />
1<br />
Press the INFO key, then within<br />
three (3) seconds press the<br />
ENTER key.<br />
This temporarily turns the V-Guide OFF.<br />
The V-Guide will remain in the OFF<br />
mode until the TV power is switched<br />
OFF. When the TV is switched back<br />
ON, the V-Guide will be ON.<br />
The V-Guide can be reset to ON by<br />
using the menu system <strong>and</strong> selecting<br />
On in Step 3 under, “Block or Unblock<br />
Movie or TV Program” above.<br />
INFO<br />
key<br />
INPUT<br />
POWER<br />
1<br />
2 3<br />
4 5 6<br />
7 8<br />
9<br />
0<br />
RECALL<br />
MENU<br />
INFO<br />
SLEEP<br />
TUNER MUTE<br />
ENTER<br />
ENTER<br />
key<br />
TV R<strong>at</strong>ings (Age/Content-Based)<br />
ALL CHILDREN—Program is designed to be<br />
appropri<strong>at</strong>e for children ages 2-6.<br />
DIRECTED TO OLDER CHILDREN—Program is<br />
designed for children 7 <strong>and</strong> above. m<strong>at</strong>erial may<br />
include mild fantasy violence (FV) or comedic<br />
violence.<br />
GENERAL AUDIENCE—Program suitable for all<br />
ages. Contain little or no violence, no strong language<br />
or sexual dialogue or situ<strong>at</strong>ions.<br />
MPAA Movie R<strong>at</strong>ings (Age-Based)<br />
G GENERAL AUDIENCES—All ages admitted.<br />
PG<br />
PARENTAL GUIDANCE SUGGESTED—Some<br />
m<strong>at</strong>erial may not be suitable for children.<br />
PG-13 PARENTAL GUIDANCE CAUTIONED—Some<br />
m<strong>at</strong>erial may be inappropri<strong>at</strong>e for children under 13.<br />
R<br />
RESTRICTED—Under 17 requires accompanying<br />
parent or adult guardian<br />
PARENTAL GUIDANCE SUGGESTED—Program<br />
contains m<strong>at</strong>erial th<strong>at</strong> may be unsuitable for<br />
younger children. M<strong>at</strong>erial contains one or more<br />
for the following: moder<strong>at</strong>e violence (V), some<br />
sexual situ<strong>at</strong>ions (S), infrequent coarse language<br />
(L), or some suggestive dialogue (D).<br />
NC17<br />
NOTE:<br />
NO ONE 17 AND UNDER ADMITTED<br />
Movies with r<strong>at</strong>ings of MPAA N/A or MPAA Not R<strong>at</strong>ed<br />
<strong>and</strong> TV Programs with a r<strong>at</strong>ing of None will not be<br />
blocked even if Block All is selected in the menu.<br />
PARENTS STRONGLY CAUTIONED—Some<br />
m<strong>at</strong>erial is unsuitable for children under 14 years<br />
of age. Parents are strongly urged to use cautions<br />
against letting children th<strong>at</strong> 14 w<strong>at</strong>ch un<strong>at</strong>tended.<br />
M<strong>at</strong>erial contains intense violence (V), intense<br />
sexual situ<strong>at</strong>ions (S), strong coarse language (L),<br />
or intensely suggestive dialogue (D).<br />
MATURE AUDIENCE ONLY—Program is<br />
designed to be viewed by adults <strong>and</strong> therefore<br />
may be unsuitable for children under 17 years of<br />
age.<br />
V-GUIDE ENTER<br />
VCR CABLE<br />
Y7<br />
When codes are being transmitted <strong>and</strong> received, <strong>and</strong><br />
V-Guide is set to ON, the V-Chip blocks programming<br />
according to the settings you choose.<br />
TV<br />
PG<br />
TV<br />
MA<br />
AS<br />
TV PG<br />
14 TV<br />
23
SETUP MENU OPTIONS<br />
Setting the D<strong>at</strong>e <strong>and</strong> Time<br />
Auto D<strong>at</strong>e <strong>and</strong> Time Setting<br />
1<br />
Press the MENU key to display<br />
the Main menu.<br />
2<br />
Use<br />
3<br />
Use<br />
the CURSOR ▲▼ keys to<br />
highlight the Setup c<strong>at</strong>egory.<br />
Press ENTER.<br />
the CURSOR ▲▼ keys to<br />
highlight the D<strong>at</strong>e / Time option.<br />
Press ENTER.<br />
4<br />
Use the CURSOR ▲▼ keys to<br />
select Auto Clock. Press ENTER.<br />
The TV will begin searching for an<br />
analog PBS channel transmitting d<strong>at</strong>e<br />
<strong>and</strong> time d<strong>at</strong>a. If these d<strong>at</strong>a are found,<br />
they will be used to set the D<strong>at</strong>e <strong>and</strong><br />
Time autom<strong>at</strong>ically. If no d<strong>at</strong>e <strong>and</strong><br />
time d<strong>at</strong>a are found, the Manual setup<br />
screen will be displayed. When the<br />
process is completed (or cancelled),<br />
the last analog channel will be tuned.<br />
NOTE:<br />
If the D<strong>at</strong>e <strong>and</strong> Time are set<br />
autom<strong>at</strong>ically, the D<strong>at</strong>e <strong>and</strong> Time<br />
will be upd<strong>at</strong>ed each time th<strong>at</strong><br />
PBS st<strong>at</strong>ion is tuned.<br />
Manual D<strong>at</strong>e <strong>and</strong> Time Setting<br />
4<br />
Use the CURSOR ▲▼ keys to<br />
select Manual Setup. Press<br />
ENTER.<br />
5<br />
Use<br />
NOTE:<br />
6<br />
When<br />
the CURSOR ▲▼ keys to<br />
select the Hour. Press the<br />
ENTER key (or Cursor keys)<br />
to step to the next field. Continue<br />
until all fields are<br />
popul<strong>at</strong>ed.<br />
▲<br />
▼<br />
The TV will ignore all entries if<br />
the MENU or EXIT key is<br />
pressed before all fields are popul<strong>at</strong>ed.<br />
you have entered d<strong>at</strong>a in all<br />
of the fields, press the EXIT key<br />
to return to normal TV viewing.<br />
■<br />
➠<br />
If a power failure occurs after the<br />
D<strong>at</strong>e/Time has been set using the<br />
Auto Clock method, the Auto Clock<br />
setting screen will appear when the<br />
TV is powered on.<br />
24
Digital Audio Output<br />
Use this fe<strong>at</strong>ure to choose the form<strong>at</strong><br />
of the audio output signal: Dolby<br />
Digital or PCM.<br />
1<br />
Press the TUNER key to select<br />
the Digital Tuner.<br />
2<br />
Press<br />
3<br />
Use<br />
the MENU key to display<br />
the Main menu.<br />
the CURSOR ▲▼ keys to<br />
highlight the Setup c<strong>at</strong>egory.<br />
Press ENTER.<br />
4<br />
Use<br />
5<br />
Use<br />
6<br />
Press<br />
the CURSOR ▲▼ keys to<br />
highlight the Digital Audio option.<br />
Press ENTER.<br />
the CURSOR ▲▼ keys to<br />
select Dolby Digital or PCM.<br />
the EXIT key to return to<br />
normal TV viewing.<br />
NOTE:<br />
The Digital Audio Output option is<br />
available only when you are<br />
w<strong>at</strong>ching a Digital channel<br />
received via the Digital Antenna<br />
Input. If you are w<strong>at</strong>ching a signal<br />
from any other source (Analog<br />
tuner or A / V inputs), the Digital<br />
Audio output option will be<br />
“grayed-out” (unavailable).<br />
➠<br />
TV Speaker<br />
NOTE:<br />
1<br />
Press<br />
Sound will not be reproduced<br />
through your television speakers<br />
when the OFF mode is selected.<br />
the MENU key to display<br />
the Main menu.<br />
4<br />
Use<br />
5<br />
Press<br />
the CURSOR ▲▼ keys to<br />
select On or Off.<br />
the EXIT key to return to<br />
normal TV viewing.<br />
2<br />
Use<br />
3<br />
Use<br />
the CURSOR ▲▼ keys to<br />
highlight the Setup c<strong>at</strong>egory.<br />
Press ENTER.<br />
the CURSOR ▲▼ keys to<br />
highlight the TV Speaker option.<br />
Press ENTER.<br />
➠<br />
Setup Menu continued on next page.<br />
25
SETUP MENU OPTIONS (CONTINUED)<br />
Screen Saver<br />
Displaying a still picture for a long<br />
time may cause an “afterimage” or<br />
“ghost” on the screen. To neutralize<br />
this situ<strong>at</strong>ion, a Picture Rot<strong>at</strong>ion function<br />
is provided.<br />
Use this fe<strong>at</strong>ure to<br />
protect the Plasma screen from<br />
“afterimage.”<br />
If an afterimage occurs, use the White<br />
P<strong>at</strong>tern fe<strong>at</strong>ure immedi<strong>at</strong>ely to repair<br />
the panel. The more severe the afterimage,<br />
the longer the curing process<br />
may take. It may be impossible to<br />
repair all cases of afterimage burn.<br />
The sooner you remove a still picture<br />
<strong>and</strong> activ<strong>at</strong>e White P<strong>at</strong>tern, the more<br />
likely it is th<strong>at</strong> the panel can be<br />
repaired.<br />
NOTE:<br />
1<br />
Press<br />
Afterimage (or image burn) is not<br />
covered under warranty.<br />
the TUNER key to select<br />
the Analog Tuner. (NOTE: The<br />
Screen Saver setting is available<br />
only from the Analog Main<br />
menu. However, it functions in<br />
all modes.)<br />
Picture Rot<strong>at</strong>ion Setup (saver)<br />
4<br />
Use the CURSOR ▲▼ keys to<br />
highlight the Screen Saver option.<br />
Press ENTER.<br />
5<br />
Use<br />
6<br />
Use<br />
7<br />
Press<br />
the CURSOR ▲▼ keys to<br />
highlight Picture Rot<strong>at</strong>ion. Press<br />
ENTER.<br />
the CURSOR keys to<br />
select On, then use the ▲▼<br />
keys to highlight Cycle Time.<br />
Then use the keys to set a<br />
cycle time of 15 Minutes, 30<br />
Minutes, or 60 Minutes.<br />
▲<br />
▼<br />
▲<br />
▼<br />
the EXIT key to return to<br />
normal TV viewing.<br />
White P<strong>at</strong>tern Setup (panel repair)<br />
4<br />
Use the CURSOR ▲▼ keys to<br />
highlight the Screen Saver option.<br />
Press ENTER.<br />
5<br />
Use<br />
6<br />
Use<br />
7<br />
Use<br />
the CURSOR ▲▼ keys to<br />
highlight White P<strong>at</strong>tern. Press<br />
ENTER.<br />
the ▲▼ keys to highlight<br />
Display Time. Then use the<br />
keys to set a display time of<br />
10 Minutes, 30 Minutes, or<br />
60 Minutes, depending on the<br />
severity of the afterimage.<br />
the ▲▼ keys to highlight<br />
White P<strong>at</strong>tern. Then use the<br />
CURSOR keys to select On.<br />
▲<br />
▼<br />
▲<br />
▼<br />
NOTE: Pressing any key except<br />
VOLUME ▲▼ <strong>and</strong> AUDIO will<br />
cancel the curing process <strong>and</strong><br />
return the TV to normal viewing.<br />
2<br />
Press<br />
3<br />
Use<br />
the MENU key to display<br />
the Main menu.<br />
the CURSOR ▲▼ keys to<br />
highlight the Setup c<strong>at</strong>egory.<br />
Press ENTER.<br />
➠ ➠<br />
➠<br />
26
Menu Language<br />
1<br />
Press<br />
2<br />
Use<br />
the MENU key to display<br />
the Main menu.<br />
the CURSOR ▲▼ keys to<br />
highlight the Setup c<strong>at</strong>egory.<br />
Press ENTER.<br />
3<br />
Use<br />
4<br />
Use<br />
5<br />
Press<br />
the CURSOR ▲▼ keys to<br />
highlight the Menu Language<br />
option. Press ENTER.<br />
the CURSOR ▲▼ keys to<br />
select <strong>English</strong>, Español, or<br />
Français.<br />
the EXIT key to return to<br />
normal TV viewing.<br />
PICTURE/SOUND ADJUSTMENT OPTIONS<br />
Preset Picture <strong>and</strong> Sound<br />
Options<br />
Select Sports, Movie, or News to<br />
m<strong>at</strong>ch the program you are w<strong>at</strong>ching.<br />
The TV will adjust the picture <strong>and</strong><br />
sound accordingly.<br />
A yellow bullet will display beside the<br />
selected option.<br />
1<br />
Press<br />
the MENU key to display<br />
the Main menu.<br />
2<br />
Use<br />
3<br />
Use<br />
4<br />
Press<br />
the CURSOR ▲▼ keys to<br />
highlight the Picture / Sound<br />
c<strong>at</strong>egory. Press ENTER.<br />
the CURSOR ▲▼ keys to<br />
choose either Movie, Sports, or<br />
News.<br />
the EXIT key to return to<br />
normal TV viewing.<br />
➠ ➠<br />
Picture/Sound Menu continued on next page.<br />
27
Manual Picture <strong>and</strong> Sound<br />
Adjustments<br />
The available manual options are:<br />
Picture: Choose this option to<br />
adjust the Color, Tint, Contrast,<br />
Brightness, <strong>and</strong><br />
Sharpness.<br />
Sound: Choose this option to<br />
adjust the Bass <strong>and</strong> Treble.<br />
Surround: Choose either On or Off.<br />
NOTE:<br />
1<br />
Press<br />
2<br />
Use<br />
Color Enhancer<br />
Selecting Warm will deepen the picture<br />
red tints <strong>and</strong> Cool will highlight the<br />
picture blue tints.<br />
1<br />
Press the MENU key to display<br />
the Main menu.<br />
2<br />
Use<br />
28<br />
Surround sound is not available<br />
on Digital channels.<br />
the MENU key to display<br />
the Main menu.<br />
the CURSOR ▲▼ keys to<br />
highlight the Picture / Sound<br />
c<strong>at</strong>egory. Press ENTER.<br />
the CURSOR ▲▼ keys to<br />
highlight the Picture / Sound<br />
c<strong>at</strong>egory. Press ENTER.<br />
Dynamic AI<br />
This fe<strong>at</strong>ure performs real-time correction<br />
of white <strong>and</strong> dark color<br />
grad<strong>at</strong>ions, to reduce fl<strong>at</strong> black areas<br />
of dark scenes. It also autom<strong>at</strong>ically<br />
corrects low-contrast images, increasing<br />
definition for a much more<br />
dynamic picture quality.<br />
1<br />
Press the TUNER key to select<br />
the Analog Tuner.<br />
2<br />
Press<br />
PICTURE/SOUND ADJUSTMENT OPTIONS (CONTINUED)<br />
the MENU key to display<br />
the Main menu.<br />
3<br />
Use<br />
4<br />
Use<br />
5<br />
Use<br />
6<br />
Then<br />
7<br />
Press<br />
3<br />
Use<br />
4<br />
Use<br />
5<br />
Press<br />
3<br />
Use<br />
4<br />
Use<br />
5<br />
Use<br />
the CURSOR ▲▼ keys to<br />
highlight the Manual option.<br />
Press ENTER.<br />
the CURSOR ▲▼ keys to<br />
select Picture, Sound, or Surround.<br />
Press ENTER.<br />
the CURSOR ▲▼ keys to<br />
select the option you want to<br />
adjust.<br />
use the CURSOR<br />
keys to make an adjustment (or to<br />
set On / Off).<br />
▲<br />
▼<br />
the MENU key to move<br />
back to the Picture / Sound<br />
menu, if necessary.<br />
the CURSOR ▲▼ keys to<br />
highlight the Color Enhancer<br />
option. Press ENTER.<br />
the CURSOR ▲▼ keys to<br />
choose Normal, Warm, or Cool.<br />
the EXIT key to return to<br />
normal TV viewing.<br />
the CURSOR ▲▼ keys to<br />
highlight the Picture / Sound<br />
c<strong>at</strong>egory. Press ENTER.<br />
the CURSOR ▲▼ keys to<br />
highlight the Dynamic AI option.<br />
Press ENTER.<br />
the CURSOR ▲▼ keys to<br />
choose On or Off. Press the EXIT<br />
key to return to normal TV<br />
viewing.<br />
8<br />
Repe<strong>at</strong><br />
Steps 4 through 7 as<br />
necessary.<br />
When you have finished making<br />
adjustments, press the EXIT key to<br />
return to normal TV viewing.<br />
DYNAMIC AI<br />
On<br />
Off<br />
➠ ➠ ➠
HELPFUL HINTS (PROBLEMS/SOLUTIONS)<br />
Because of the Quality we build into our product,<br />
very few problems are actual TV defects. Most problems<br />
only involve simple hookup or setup changes th<strong>at</strong><br />
can be solved by the customer. Please check the chart<br />
Problem: Check these Conditions: Try these Solutions: Page No.<br />
TV turns off<br />
autom<strong>at</strong>ically<br />
No picture, sound<br />
(Digital Picture)<br />
●<br />
●<br />
Check signal (Cable/Ant.) connection<br />
Power surge protection fe<strong>at</strong>ure<br />
● Check antenna/external connections<br />
● May be st<strong>at</strong>ion trouble, NO signal broadcast<br />
● MUTE function may be on.<br />
● The Plasma TV takes a few seconds to<br />
display an image.<br />
No Captioning ● Check if st<strong>at</strong>ion is broadcasting a<br />
Closed-Caption signal.<br />
● Select another channel.<br />
Cannot customize<br />
Caption<br />
Cannot display<br />
picture on a full<br />
screen<br />
Poor Picture/Sound<br />
(w<strong>at</strong>ching Analog)<br />
“No Signal” message<br />
appears on screen<br />
Pixil<strong>at</strong>ion of Digital<br />
image<br />
No TV Stereo or<br />
SAP sound<br />
Cannot select or scan<br />
some channels<br />
No Cable channels<br />
above number 13<br />
Remote Control<br />
will not work TV<br />
●<br />
Digital Caption signal is not being<br />
broadcast.<br />
●<br />
●<br />
●<br />
●<br />
●<br />
●<br />
●<br />
●<br />
●<br />
Press POWER key.<br />
The sleep timer may have been set.<br />
Unplug TV momentarily.<br />
Adjust antenna.<br />
Try a different channel.<br />
Press RESET key to restart channel<br />
search.<br />
Adjust Volume.<br />
7, 15<br />
7, 15<br />
Press CAPTION key to select captioning<br />
mode. 21<br />
Press CAPTION key to select Analog<br />
captioning.<br />
15, 21<br />
● Pillar Box (4:3) signal being broadcast. ● Use the PIX SHAPE key to exp<strong>and</strong> or<br />
zoom the image. 15<br />
●<br />
●<br />
●<br />
●<br />
●<br />
●<br />
●<br />
●<br />
●<br />
●<br />
●<br />
●<br />
●<br />
●<br />
●<br />
●<br />
●<br />
●<br />
●<br />
Check if program is in color.<br />
Check antenna/external connections.<br />
Color or Tint misadjusted.<br />
May be st<strong>at</strong>ion trouble.<br />
May be MUTE function is on.<br />
Check Audio/Video connections.<br />
Check external equipment connections.<br />
Check external equipment setting.<br />
Check antenna connection.<br />
Press INFO key <strong>and</strong> check signal<br />
strength.<br />
Check if st<strong>at</strong>ion is broadcasting a true<br />
MTS stereo signal or a SAP signal.<br />
Channel may be removed from<br />
memory.<br />
Check antenna connections.<br />
No digital signal being broadcast<br />
V-Guide is set to block programming.<br />
Weak Signal<br />
Cable Channel Indic<strong>at</strong>or C should<br />
appear next to channel number.<br />
Check b<strong>at</strong>teries.<br />
Check if TV is plugged in.<br />
Poor Color ● Check if program is in color.<br />
● Color or Time misadjusted.<br />
Afterimages (ghosts)<br />
appear<br />
Cabinet makes<br />
popping sound<br />
●<br />
●<br />
Do not display the same image on<br />
screen for a long period of time. Afterimages<br />
or ghosts may appear on parts<br />
of the panel.<br />
This is a normal condition during<br />
warm-up <strong>and</strong> cool down of the plastic<br />
cabinet parts.<br />
below <strong>and</strong> try the solutions listed for your problem. If<br />
the problem still persists, before returning your TV,<br />
please visit our website <strong>at</strong> www.sanyotv.com or call us<br />
toll free <strong>at</strong> 1.800.877.5032. We Can Help!<br />
●<br />
●<br />
●<br />
●<br />
●<br />
●<br />
●<br />
●<br />
Try a different channel.<br />
Adjust antenna.<br />
Press RESET key to restart channel<br />
search.<br />
Adjust Volume.<br />
Press INPUT key.<br />
Switch on external equipment.<br />
Turn antenna, install signal booster.<br />
Set external equipment output connections<br />
to m<strong>at</strong>ch input connections.<br />
Turn antenna, install signal booster.<br />
12, 13,<br />
15, 27<br />
11 ~ 14<br />
●<br />
● Install outdoor Digital antenna.<br />
7, 14<br />
●<br />
●<br />
●<br />
●<br />
●<br />
●<br />
●<br />
●<br />
●<br />
●<br />
Press AUDIO key.<br />
Select CH. SCAN MEMORY <strong>and</strong> manually<br />
add channels or start CH. (channel) search.<br />
Set V-Guide to ALLOW ALL or press<br />
RESET key to clear all settings <strong>and</strong> restart<br />
channel search.<br />
Turn antenna, install signal booster.<br />
Switch Antenna Selection to Cable.<br />
Replace b<strong>at</strong>teries.<br />
Aim remote control <strong>at</strong> front of TV.<br />
15<br />
15,<br />
17 ~ 19<br />
22 ~ 23<br />
18<br />
8,<br />
14 ~ 15<br />
Select Sports, Movie, or News to m<strong>at</strong>ch<br />
the program you are w<strong>at</strong>ching in the<br />
menu system.<br />
Use the Screen Saver function.<br />
Use the White Screen Fe<strong>at</strong>ure to repair<br />
the panel.<br />
26<br />
27 ~ 28<br />
29
MEXICO GUARANTEE<br />
IMPORTADOR:<br />
COMERCIALIZADORA MEXICO<br />
DESCRIPTION: Television<br />
AMERICANA, S.DE R.L. DE C.V.<br />
AV. NEXTENGO N o BRAND: SANYO<br />
78<br />
MODEL: <strong>DP42545</strong><br />
COL. SANTA CRUZ ACAYUCAN<br />
DEL. AZCAPOTZALCO, MÉXICO, C.P. 02770<br />
RFC: CMA9109119L0<br />
GUARANTEE<br />
THE APPARATUS THAT YOU HAVE ACQUIRED HAS A ONE YEAR GUARANTEE FOR MANUFACTURING DEFECTS<br />
AND A ONE YEAR SERVICE WARRANTY FROM THE DATE OF PURCHASE GRANTED BY:<br />
COMERCIALIZADORA MEXICO-AMERICANA, S. DE R.L. DE C.V.<br />
UNDER THE FOLLOWING CONDITIONS:<br />
1. TO MAKE THE GUARANTEE EFFECTIVE, SIMPLY SHOW THIS POLICY FILLED OUT BY THE STORE OR SUP-<br />
PLIER UNIT OR THIS SALES INVOICE, WITH THE APPARATUS IN ANY OF THE SERVICE CENTERS INDICATED<br />
ON THIS GUARANTEE.<br />
2. IF THE FAULT IS ATTRIBUTED TO A MANUFACTURING DEFECT, THE APPARATUS WILL BE REPLACED OR<br />
YOUR MONEY REFUNDED. DURING THE 30 DAYS SUBSEQUENT TO THE PURCHASE THE GUARANTEE WILL<br />
BE VALID AT THE STORE WERE THE APPARATUS WAS PURCHASED, PRESENTING THE ABOVE DOCUMENTS.<br />
3. REPAIR TIME WILL NEVER BE MORE THAN 30 DAYS. IF THIS TIME HAS ELAPSED, AND THE PRODUCT ISN’T<br />
REPAIRED, COMERCIALIZADORA MEXICO AMERICANA, S. DE R.L. DE C.V. WILL PROCEED TO EFFECTUATE<br />
THE EXCHANGE FOR AN EQUIVALENT APPARATUS OR THE RETURN OF THE BUYING-SALE COST RESPEC-<br />
TIVELY.<br />
4. THIS GUARANTEE WILL COVER ITS TOTALITY OF PIECES, COMPONENTS AND SERVICE REPAIR OF<br />
PRODUCT, AND THE RESPECTIVE COST OF TRANSPORTATION.<br />
THIS GUARANTEE WILL BE NULL AND VOID IN THE FOLLOWING CIRCUMSTANCES:<br />
* WHEN PRODUCT HAS BEEN USED IN A DIFFERENT CONDITION THAN ITS NORMAL USE.<br />
* WHEN PRODUCT HASN’T BEEN OPERATING CORRECTLY ACCORDING TO THE INSTRUCTIONS IN THIS<br />
MANUAL.<br />
* WHEN PRODUCT HAS BEEN CHANGED OR REPAIRED BY PERSONS NOT AUTHORIZED FROM THE<br />
MANUFACTURER, IMPORTER, OR MERCHANT RESPONSIBLE RESPECTIVE.<br />
CENTRO DE SERVICIO Y LUGAR DONDE OBTENER PARTES, COMPONENTES, CONSUMIBLES Y ACCESORIOS:<br />
SUCURSAL VALLEJO SUCURSAL MINERVA<br />
Poniente 126 N o 288 B Silos N o 135, Col. Minerva<br />
Col. Nueva Vallejo Deleg. Iztapalapa<br />
México, D.F. México, D.F. 09810<br />
Tels. 5567-5378 Tels. 5646-4551<br />
5368-0105, 8589-8033 5646-4550<br />
STAMP, DATE AND SIGNATURE<br />
OF<br />
STORE<br />
DESCRIPTION: ________________________________ BRAND: __________________ MODEL:________________________<br />
CLIENT’S NAME: _________________________________________________________________________________________<br />
ADDRESS: _______________________________________________________________________________________________<br />
EXTERIOR NUMBER: _____________________________________ INTERIOR NUMBER: __________________________<br />
SUB DIVISION: ___________________________________________ STATE/DELEGATION: __________________________<br />
TELEPHONE: _____________________________________________<br />
30
UNITED STATES AND CANADA WARRANTY<br />
ONE-YEAR LIMITED WARRANTY<br />
THIS LIMITED WARRANTY IS VALID ONLY ON SANYO PLASMA TELEVISIONS PURCHASED AND USED IN THE<br />
UNITED STATES OF AMERICA, CANADA, AND PUERTO RICO, EXCLUDING THE UNITED STATES’ OTHER TER-<br />
RITORIES AND PROTECTORATES. THIS LIMITED WARRANTY APPLIES ONLY TO THE ORIGINAL PURCHASER,<br />
AND DOES NOT APPLY TO PRODUCTS USED FOR INDUSTRIAL OR COMMERCIAL PURPOSES.<br />
FOR ONE YEAR from the d<strong>at</strong>e of purchase, <strong>Sanyo</strong> Manufacturing Corpor<strong>at</strong>ion will replace any defective<br />
Plasma TV.<br />
To insure proper warranty exchange, keep the original sales receipt for evidence of purchase. Return the<br />
defective Plasma TV to the retailer along with the receipt <strong>and</strong> the included accessories, such as the remote<br />
control. The defective Plasma TV will be exchanged for the same model, or a replacement model of equal<br />
value, if necessary. Replacement model will be contingent on availability <strong>and</strong> <strong>at</strong> the sole discretion of <strong>Sanyo</strong><br />
Manufacturing Corpor<strong>at</strong>ion.<br />
THE FOREGOING WARRANTY IS EXCLUSIVE AND IN LIEU OF ALL OTHER WARRANTIES OF<br />
MERCHANTABILITY OR FITNESS FOR A PARTICULAR PURPOSE.<br />
OBLIGATIONS<br />
For one year from the d<strong>at</strong>e of purchase, <strong>Sanyo</strong> Manufacturing Corpor<strong>at</strong>ion warrants this product to be free<br />
from defects in m<strong>at</strong>erial <strong>and</strong> workmanship under normal use <strong>and</strong> conditions. Should replacement be necessary<br />
under this warranty for any reason due to manufacturing defect or malfunction during the first year<br />
from d<strong>at</strong>e of original purchase, <strong>Sanyo</strong> Manufacturing Corpor<strong>at</strong>ion will provide a new Plasma TV via<br />
exchange <strong>at</strong> the retailer.<br />
For customer assistance, whether during or out of the warranty period, call toll free 1-800-877-5032.<br />
Weekdays 7:30 AM – 7:00 PM Central Time<br />
S<strong>at</strong>urday 7:30 AM – 4:00 PM Central Time<br />
This warranty expresses specific contractual rights; retail purchasers may have additional st<strong>at</strong>utory rights<br />
which vary from st<strong>at</strong>e to st<strong>at</strong>e.<br />
(EFFECTIVE: March 1, 2005)<br />
For your protection in the event of theft or loss of this product, please fill in the inform<strong>at</strong>ion requested below<br />
<strong>and</strong> KEEP IN A SAFE PLACE FOR YOUR OWN PERSONAL RECORDS.<br />
Model No.______________________________ D<strong>at</strong>e of Purchase _________________________<br />
Serial No.______________________________ Purchase Price ___________________________<br />
(Loc<strong>at</strong>ed on back of unit)<br />
Where Purchased_________________________<br />
AS<br />
<strong>Sanyo</strong> Manufacturing Corp.<br />
3333 <strong>Sanyo</strong> Road, Forrest City, AR 72335<br />
This symbol on the namepl<strong>at</strong>e means the product is Listed by Underwriters’<br />
Labor<strong>at</strong>ories Inc. It is designed <strong>and</strong> manufactured to meet rigid<br />
U.L. safety st<strong>and</strong>ards against risk of fire, casualty <strong>and</strong> electrical hazards.