MASTER BOOK – SECTION 1 Rev. 2007 - EKA Group
MASTER BOOK – SECTION 1 Rev. 2007 - EKA Group
MASTER BOOK – SECTION 1 Rev. 2007 - EKA Group

Create successful ePaper yourself
Turn your PDF publications into a flip-book with our unique Google optimized e-Paper software.
4.1 <strong>–</strong> INSTALLATION<br />
3 - INSTALLATION<br />
The floor installation has to be carried out in accordance with the above mentioned conditions. The slab in the<br />
room should be cleaned with a vacuum cleaner and a layer of anti-dust paint, preferably polyurethanic or<br />
epossidic types (because they do not alter in the time), should be applied. This procedure must be followed<br />
when the subfloor void will be used as an air-supply/return duct.<br />
The installation method depends on type of floor, with or without stringers. Once the layout of the panels has<br />
been decided, the installation can start.<br />
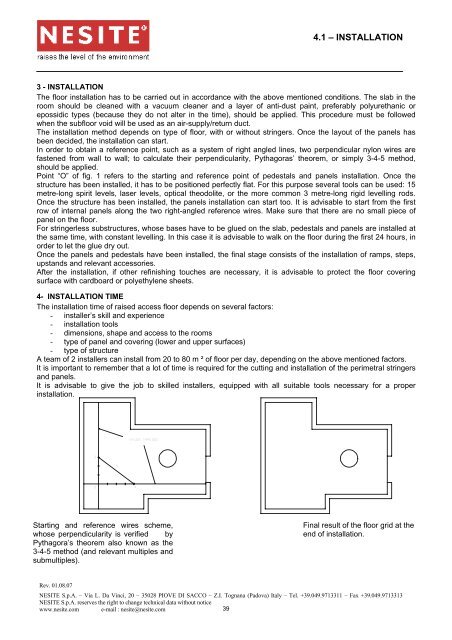
In order to obtain a reference point, such as a system of right angled lines, two perpendicular nylon wires are<br />
fastened from wall to wall; to calculate their perpendicularity, Pythagoras’ theorem, or simply 3-4-5 method,<br />
should be applied.<br />
Point “O” of fig. 1 refers to the starting and reference point of pedestals and panels installation. Once the<br />
structure has been installed, it has to be positioned perfectly flat. For this purpose several tools can be used: 15<br />
metre-long spirit levels, laser levels, optical theodolite, or the more common 3 metre-long rigid levelling rods.<br />
Once the structure has been installed, the panels installation can start too. It is advisable to start from the first<br />
row of internal panels along the two right-angled reference wires. Make sure that there are no small piece of<br />
panel on the floor.<br />
For stringerless substructures, whose bases have to be glued on the slab, pedestals and panels are installed at<br />
the same time, with constant levelling. In this case it is advisable to walk on the floor during the first 24 hours, in<br />
order to let the glue dry out.<br />
Once the panels and pedestals have been installed, the final stage consists of the installation of ramps, steps,<br />
upstands and relevant accessories.<br />
After the installation, if other refinishing touches are necessary, it is advisable to protect the floor covering<br />
surface with cardboard or polyethylene sheets.<br />
4- INSTALLATION TIME<br />
The installation time of raised access floor depends on several factors:<br />
- installer’s skill and experience<br />
- installation tools<br />
- dimensions, shape and access to the rooms<br />
- type of panel and covering (lower and upper surfaces)<br />
- type of structure<br />
A team of 2 installers can install from 20 to 80 m ² of floor per day, depending on the above mentioned factors.<br />
It is important to remember that a lot of time is required for the cutting and installation of the perimetral stringers<br />
and panels.<br />
It is advisable to give the job to skilled installers, equipped with all suitable tools necessary for a proper<br />
installation.<br />
NYLON THREADS<br />
3<br />
5<br />
0<br />
4<br />
Starting and reference wires scheme,<br />
whose perpendicularity is verified by<br />
Pythagora’s theorem also known as the<br />
3-4-5 method (and relevant multiples and<br />
submultiples).<br />
Final result of the floor grid at the<br />
end of installation.<br />
<strong>Rev</strong>. 01.08.07<br />
NESITE S.p.A. <strong>–</strong> Via L. Da Vinci, 20 <strong>–</strong> 35028 PIOVE DI SACCO <strong>–</strong> Z.I. Tognana (Padova) Italy <strong>–</strong> Tel. +39.049.9713311 <strong>–</strong> Fax +39.049.9713313<br />
NESITE S.p.A. reserves the right to change technical data without notice<br />
www.nesite.com e-mail : nesite@nesite.com<br />
39