
Create successful ePaper yourself
Turn your PDF publications into a flip-book with our unique Google optimized e-Paper software.
42” LED<br />
1080p HDTV LCD<br />
Part No.: 1JC0P1P0015 - -<br />
© 2012 <strong>Sanyo</strong> Manufacturing Corporation<br />
PROTECTING THE LCD-<br />
LED SCREEN<br />
CAUTION: The screen can be damaged if<br />
it is not maintained properly.<br />
• Do not use hard objects such as hard<br />
cloth or paper to clean the screen.<br />
• Do not use excessive pressure when<br />
cleaning the screen; excessive pressure<br />
can cause permanent discoloration or<br />
dark spots.<br />
• NEVER spray liquids on the screen.<br />
HANDLING PRECAUTIONS<br />
• Handle by the cabinet only.<br />
• Handling by two or more people is recommended.<br />
• Never touch the screen when handling.<br />
• Handling damage is not covered under<br />
warranty.<br />
• Do not remove the protective film<br />
covering the front cabinet while<br />
handling the HDTV.<br />
Model No.:<br />
DP42142<br />
Owner’s<br />
<strong>Manual</strong><br />
(English)<br />
Please read before operating your HDTV!<br />
POSITIONING THE HDTV<br />
• Always use a firm and flat surface when<br />
positioning your HDTV.<br />
• Do not position the unit in a confined<br />
area.<br />
• Allow adequate space for proper ventilation.<br />
• Do not position the HDTV where it is<br />
easily reachable by small children and<br />
may present risk of injury.<br />
• Once HDTV is positioned, remove the<br />
protective film covering front cabinet.<br />
The American Academy of Pediatrics discourages<br />
media use by children younger<br />
than two years. For more information,<br />
visit www.aap.org.<br />
TRADEMARKS ________<br />
Manufactured under license from Dolby<br />
Laboratories. “Dolby” is a trademark of<br />
Dolby Laboratories.<br />
HDMI, the HDMI Logo and High-Definition<br />
Multimedia Interface are trademarks or registered<br />
trademarks of HDMI Licensing LLC in<br />
the United States and other countries.<br />
ENERGY STAR<br />
As an Energy Star ® Partner,<br />
<strong>Sanyo</strong> Manufacturing Corporation<br />
has determined that this product<br />
meets the Energy Star ® guidelines<br />
for energy efficiency.<br />
Manufactured under license from Audyssey<br />
Laboratories. U.S. and foreign patents pending.<br />
Audyssey Dynamic Volume ® is a registered<br />
trademark of Audyssey Laboratories.<br />
SPECIFICATIONS<br />
Power Requirement:<br />
Source: AC 120V, 60Hz<br />
AC Power Consumption: 90 watts<br />
Weight: 31.2 lbs (without stand)<br />
Dimensions _________________________<br />
WIDTH HEIGHT DEPTH<br />
w/stand 38.9 24.7 7.7<br />
w/out stand 38.9 23.7 2.9<br />
NOTE: Dimensions are in inches<br />
SANYO television customers<br />
should contact MRM<br />
Recycling at 888-769-0149 or<br />
visit their website at<br />
www.mrmrecycling.com<br />
regarding SANYO’s waste<br />
management plan.<br />
ENERGY STAR is a set of power-saving guidelines issued by the U.S. Environmental Protection<br />
Agency (EPA). ENERGY STAR is a joint program of the U.S. Environmental Protection Agency and<br />
the U.S. Department of Energy helping us all save money and protect the environment through<br />
energy efficient products and practices.<br />
Changes to default as-shipped television configuration and settings or enabling certain optional<br />
features and functionalities will change the energy consumption of the television, this may<br />
increase energy consumption beyond the limits required for ENERGY STAR qualification.<br />
CAUTION<br />
RISK OF ELECTRIC SHOCK DO NOT OPEN!<br />
CAUTION: TO REDUCE RISK OF ELECTRIC SHOCK, DO NOT REMOVE COVER (OR BACK). NO<br />
USER-SERVICEABLE PARTS INSIDE. REFER SERVICING TO QUALIFIED SERVICE PERSONNEL.<br />
1. Read these instructions.<br />
2. Keep these instructions.<br />
3. Heed all warnings.<br />
4. Follow all instructions.<br />
5. Do not use this apparatus near water.<br />
6. Clean only with dry cloth.<br />
7. Do not block any ventilation openings. Install in accordance<br />
with the manufacturer’s instructions.<br />
8. Do not install near any heat sources such as radiators, heat<br />
registers, stoves, or other apparatus (including amplifiers) that<br />
produce heat.<br />
9. Do not defeat the safety purpose of the polarized or groundingtype<br />
plug. A polarized plug has two blades with one wider than<br />
the other. A grounding-type plug has two blades and a third<br />
grounding prong. The wide blade or the third prong are provided<br />
for your safety. If the provided plug does not fit fully into your outlet,<br />
consult an electrician for replacement of the obsolete outlet.<br />
10. Protect the power cord from being walked on or pinched particularly<br />
at plugs, convenience receptacles, and the point<br />
where they exit from the apparatus.<br />
11. Only use attachments/accessories specified by the<br />
manufacturer.<br />
12. Use only with the cart, stand, tripod, bracket,<br />
or table specified by the manufacturer, or sold<br />
with the apparatus. When a cart is used, use<br />
caution when moving the cart/apparatus<br />
combination to avoid injury from tip-over.<br />
13. Unplug this apparatus during lightning storms or when unused<br />
for long periods of time.<br />
14. Refer all servicing to qualified service personnel. Servicing is<br />
required when the apparatus has been damaged in any way,<br />
such as power-supply cord or plug is damaged, liquid has been<br />
spilled or objects have fallen into the apparatus, the apparatus<br />
has been exposed to rain or moisture, does not operate normally,<br />
or has been dropped.<br />
THIS SYMBOL INDICATES THAT DANGEROUS VOLTAGE CONSTITUTING A RISK<br />
OF ELECTRIC SHOCK IS PRESENT WITHIN THIS UNIT.<br />
THIS SYMBOL INDICATES THAT THERE ARE IMPORTANT OPERATING AND MAINTE-<br />
NANCE INSTRUCTIONS IN THE LITERATURE ACCOMPANYING THIS UNIT.<br />
WARNING: TO REDUCE THE RISK OF FIRE OR ELECTRIC SHOCK, DO NOT EXPOSE THIS APPLIANCE TO RAIN OR MOISTURE.<br />
IMPORTANT SAFETY INSTRUCTIONS<br />
15. If an outside antenna is connected to the television equipment,<br />
be sure the antenna system is grounded so as to provide some<br />
protection against voltage surges and built up static charges.<br />
In the U.S. Selection 810-21 of the National Electrical Code provides<br />
information with respect to proper grounding of the mast<br />
and supporting structure, grounding of the lead-in wire to an<br />
antenna discharge unit, size of grounding conductors, location<br />
of antenna discharge unit, connection to grounding electrodes,<br />
and requirements for the grounding electrodes.<br />
16. An outside antenna system should not be located in the vicinity<br />
of overhead power lines or other electrical light or power<br />
circuits, or where it can fall into such power lines or circuits.<br />
When installing an outside antenna system, extreme care<br />
should be taken to keep from touching such power lines or circuits<br />
as contact with them might be fatal.<br />
EXAMPLE OF ANTENNA GROUNDING ACCORDING<br />
TO NATIONAL ELECTRICAL CODE, ANSI/NFPA 70<br />
“Note to CATV system installer:<br />
This reminder is provided to call the CATV system installer’s<br />
attention to Article 820-40 of the NEC that provides guidelines for<br />
proper grounding and, in particular, specifies that the cable<br />
ground shall be connected to the grounding system of the building,<br />
as close to the point of cable entry as practical.”<br />
17. Wall or Ceiling Mounting—The product should be mounted to<br />
a wall or ceiling only as recommended by the manufacturer.<br />
18. Apparatus shall not be exposed to dripping or splashing, and no<br />
objects filled with liquids, such as vases, shall be placed on it.<br />
19. When the MAINS plug is used as the disconnect device, the<br />
disconnect device shall remain readily operable.<br />
FCC INFORMATION ________________________________________________<br />
This equipment has been tested and found to comply with the limits for a Class B digital device, pursuant to Part 15 of the FCC Rules.<br />
These limits are designed to provide reasonable protection against harmful interference in a residential installation. This equipment generates,<br />
uses and can radiate radio frequency energy and, if not installed and used in accordance with the instructions, may cause harmful<br />
interference to radio communications. However, there is no guarantee that interference will not occur in a particular installation. If<br />
this equipment does cause harmful interference to radio or television reception, which can be determined by turning the equipment off<br />
and on, the user is encouraged to try to correct the interference by one or more of the following measures:<br />
– Reorient or relocate the receiving antenna.<br />
– Increase the separation between the equipment and receiver.<br />
– Connect the equipment into an outlet on a circuit different from that to which the receiver is connected.<br />
– Consult the dealer or an experienced radio/TV technician for help.<br />
CAUTION: FCC Regulations state that improper modifications or unauthorized changes to this unit may void the user’s authority to<br />
operate the unit.<br />
This equipment is a Class II or double insulated electrical appliance. It has been designed in such a way that it does not require<br />
a safety connection to electrical earth.<br />
GETTING STARTED<br />
STAND ASSEMBLY ______<br />
NOTE: Skip these steps if you are wall<br />
mounting the TV.<br />
1<br />
Place HDTV face down on a<br />
padded or cushioned flat surface<br />
to protect the screen and finish.<br />
2<br />
Carefully insert both foot stands to<br />
the bottom of the HDTV and<br />
secure each one by inserting a<br />
M4x30 screw on top, and the<br />
longer M6x40 screw on the bottom<br />
as indicated in the diagram below.<br />
NOTE: Foot stand screws are found in<br />
the literature package.<br />
M4x30<br />
3<br />
Position<br />
M6x40<br />
the HDTV on a firm and<br />
flat surface with adequate space<br />
for proper ventilation.<br />
WALL MOUNTING (OPTIONAL)<br />
Wall mounting of the HDTV must be<br />
performed by a skilled person.<br />
For foot stand disassembly (if needed):<br />
• Place HDTV face down on a padded or<br />
cushioned flat surface to protect the<br />
screen and finish.<br />
• Remove the two (2) screws securing<br />
each foot stand. CAUTION: Hold the<br />
stands firmly as you remove screws.<br />
1<br />
Remove the four (4) M6x12 screws<br />
threaded in the VESA holes on the<br />
back of the TV.<br />
2<br />
Use the removed screws to secure<br />
the TV to a wall mounting kit.<br />
NOTE: Wall mounting kit is not included.<br />
VESA standard interface: 200 x 200<br />
Mounting screws measurements:<br />
Diameter: M6 (6mm) Length: 12mm<br />
BATTERY INSTALLATION<br />
Install two (2) “AAA” batteries in the<br />
remote control. (Not included)<br />
PRECAUTIONS:<br />
• Replace both batteries at the same<br />
time. Do not use a new battery with a<br />
used battery.<br />
• There’s a risk of explosion if a battery<br />
is replaced by an incorrect type.<br />
• Keep away from moisture.<br />
• Be sure to match the “+” and “–”<br />
signs on the batteries with marks<br />
inside the remote control.<br />
• Please properly dispose of used up<br />
batteries.<br />
WARNING: The batteries (or battery<br />
pack) shall not be exposed to excessive<br />
heat such as sunshine, fire or the like.<br />
ANTENNA CONNECTION FOR<br />
OFF-AIR SIGNALS OR CABLE<br />
Hook up your antenna or your cable<br />
service to the HDTV’s ANT terminal<br />
with the use of a 75 OHM coaxial cable.<br />
NOTE: Keep your indoor antenna at<br />
least 3 ft. away from the television<br />
set and any other electronic<br />
equipment.<br />
ANTENNA<br />
CABLE<br />
ANALOG / DIGITAL<br />
ANTENNA IN<br />
The tuner in this HDTV can receive:<br />
• Digital and Analog off air signals<br />
from an antenna<br />
• Analog or ClearQAM cable channels<br />
from a direct Cable TV connection.<br />
INITIAL CHANNEL SEARCH<br />
Before proceeding, please make<br />
sure to correctly hook up your<br />
antenna or cable connection and<br />
all AV equipment to your HDTV.<br />
1. PLUG IN AC POWER CORD<br />
120V AC, 60Hz<br />
2. TURN ON TV<br />
3. TV SET LOCATION SELECTION:<br />
Select “Home Mode” to set the<br />
HDTV’s backlight to an Energy Star<br />
qualified level, or select “Store<br />
Mode” to set the backlight to a retail<br />
display level.<br />
4. CHANNEL AND SIGNAL SEARCH:<br />
Select “Signal Search” and press<br />
ENTER to perform a channel search<br />
from an Antenna or a direct Cable<br />
connection, and a signal search<br />
from devices hooked up to the<br />
HDTV’s AV input jacks.<br />
5. SIGNAL SEARCH RESULT SCREEN<br />
The final setup screen displays analog<br />
and digital channels found, as<br />
well as AV inputs detected.<br />
Select Finish Setup and press<br />
ENTER.<br />
NOTE: If you wish to repeat the<br />
process, select Repeat.<br />
Channel Search Result: Succesfully Completed<br />
Analog Channels 16 Digital Channels 26<br />
Video 1 Video 2 HDMI 1 HDMI 2<br />
Finish Setup<br />
Repeat<br />
HDMI 3<br />
If you are having problems, call us toll-free at 1-800-877-5032<br />
AV INPUT SELECTION<br />
Press the INPUT key to select the<br />
correct AV input for the video source<br />
you wish to watch.<br />
NOTE: Unused AV inputs may be disabled<br />
with the Input Setting feature.<br />
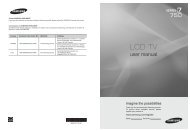
HDTV INPUT/OUTPUT REFERENCE ________________________________________<br />
1<br />
2<br />
3<br />
4<br />
5<br />
6<br />
7<br />
HDMI (INPUT1, INPUT2 & INPUT3)<br />
Use HDMI INPUT1, 2 & 3 to hookup HD digital devices such<br />
as a Blu-ray player, HD Cable Box, HD Satellite Receiver or<br />
Video-game System.<br />
Connect your digital device’s HDMI output to any of the<br />
three (3) HDMI inputs on your HDTV with the use of an HDMI<br />
cable.<br />
NOTE: A DVI connection is possible via the HDMI (DVI) INPUT1<br />
using an appropriate cable or adapter and connecting the<br />
audio to the AUDIO mini stereo jack.<br />
Analog / Digital Antenna Input<br />
Hook up your indoor or outdoor digital antenna, or a direct<br />
Cable service (Analog or ClearQAM).<br />
USB<br />
USB input jack is used to connect a USB mass storage<br />
device to watch digital images stored in JPEG format.<br />
AUDIO mini stereo jack (3.5mm)<br />
For AUDIO signal from DVI device (using HDMI INPUT1).<br />
Digital Audio Output (Coaxial)<br />
Hookup a multichannel receiver with the use of a phonotype<br />
digital audio cable.<br />
VIDEO INPUT1 (COMPOSITE)<br />
Yellow (Video), plus white and red (Audio) input jacks.<br />
COMPOSITE connections are used to hookup your analog<br />
equipment such as a VCR or an older DVD player.<br />
NOTE: Match the color of your device’s output jack, the connector<br />
and the HDTV’s input jack.<br />
VIDEO INPUT2 (COMPONENT)<br />
Green (Y), blue (Pb), and red (Pr) Video inputs plus the<br />
white and red Audio inputs.<br />
COMPONENT connection will accept SDTV, EDTV and<br />
HDTV video signals. Use it for great image quality from digital<br />
devices such as a DVD player or Video Game system.<br />
Match your digital device’s Component output jacks to the<br />
Component input jack set (VIDEO2) on your HDTV.<br />
NOTE: A composite connection is possible via VIDEO INPUT2<br />
using the Y (VIDEO) jack and the L/R audio jacks (see<br />
Video2 Setting.)<br />
4<br />
5<br />
1<br />
AUDIO<br />
DIGITAL<br />
AUDIO<br />
OUTPUT<br />
HDTV BACK PANEL<br />
(MONO)<br />
HDMI<br />
3<br />
HDMI<br />
2<br />
HDMI<br />
(DVI)<br />
INPUT1<br />
2<br />
(MONO)<br />
VIDEO<br />
(VIDEO)<br />
Printed in Mexico, April 2012<br />
US2J / 42-Z5GH / GXBM<br />
VIDEO<br />
INPUT<br />
VIDEO<br />
INPUT<br />
<strong>Sanyo</strong> Manufacturing Corp. 3333<br />
<strong>Sanyo</strong> Road, Forrest City, AR 72335<br />
7<br />
3<br />
1<br />
2<br />
6<br />
Need help? www.sanyoctv.com 1-800-877-5032 Need help? www.sanyoctv.com 1-800-877-5032
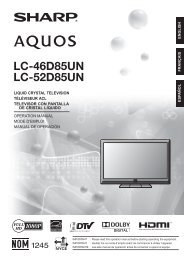
REMOTE CONTROL OPERATION _______________________________<br />
SUB CH. Use for the direct selection of<br />
digital subchannels. For example: for<br />
ECO<br />
ONTIMER<br />
channel 39.1 press the 3 and 9 keys,<br />
followed by the dash –, and 1 keys.<br />
MUTE. Mute or restore the sound.<br />
INFO. Displays theChannel Information<br />
banner.<br />
PIX SHAPE. Cycles through the various<br />
aspect ratios. The different settings<br />
either stretch, zoom, or fill the image<br />
on your screen. Bars may appear on<br />
top and bottom of your screen (or on<br />
left and right sides) depending on the<br />
SUB CH<br />
broadcasted signal or program.<br />
INFO<br />
DYN VOL<br />
DYN VOL. Modifies the Dynamic<br />
Volume feature settings<br />
MENU. Display or hide the on-screen<br />
menu.<br />
HELP. Displays the on-screen Help menu.<br />
CURSOR▲▼⊳ . Move the on-screen<br />
cursor in the desired direction.<br />
ENTER. Set or select the highlighted<br />
option on the screen.<br />
POWER. Turns your HDTV On or Off. EXIT. Exits the on-screen menu.<br />
INPUT. Selects the video source to<br />
view. Holding down the key displays<br />
the Input List.<br />
ECO. Modifies the Energy Saver level.<br />
AUDIO. Selects the desired Audio<br />
mode. Stereo, Mono, or SAP (when<br />
available.)<br />
ON TIMER. Displays the current switch<br />
on time (if activated.)<br />
CAPTION. Cycles through the available<br />
Caption modes (when available.)<br />
RESET. Pressing it twice restores your<br />
HDTV to its factory settings. All user<br />
customized settings will be cleared.<br />
SLEEP. Displays the “Off” Timer. While<br />
Off Timer is on-screen, press the “0”<br />
key to Set the amount of time (in 30<br />
minute increments) at which the HDTV<br />
will turn off.<br />
NUMERIC KEYS. Choose a channel<br />
directly.<br />
CH ▲▼. Scan through the channels in<br />
the memory database.<br />
VOL + – . Increases or decreases the<br />
audio level.<br />
RECALL. Switch between current channel<br />
and last selected channel or input.<br />
ON-SCREEN MENU<br />
OPERATION<br />
CHANNEL<br />
Display the On Screen menu and use<br />
the CURSOR ⊳ keys to select<br />
Channel. Press ENTER.<br />
Channel Search<br />
Auto – Searches the detected mode,<br />
Cable or Air.<br />
Cable – Searches for analog and<br />
unscrambled (ClearQAM) digital cable<br />
channels.<br />
Air (Antenna) – Searches for analog<br />
and digital off-air channels.<br />
Digital Add-On – Searches digital channels<br />
adding newly found digital channels<br />
to the channel database.<br />
IMPORTANT FACT: This HDTV maintains only<br />
one database of digital channels. Therefore,<br />
when you search for cable channels, the<br />
database of antenna digital channels will be<br />
deleted. You will only be able to receive those<br />
ClearQAM channels your cable company<br />
provides.<br />
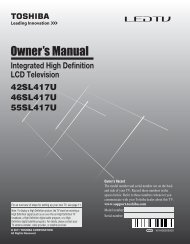
Channel Scan Memory<br />
Channel Scan Memory lists all Analog<br />
and Digital channels found. It also lists<br />
Analog channels that were not found,<br />
which can be added.<br />
Use the CURSOR ▲▼ keys to move the<br />
channel select bar through all enabled<br />
and disabled channels.<br />
NOTE: You can use the CH ▲▼ keys to<br />
change page.<br />
Press ENTER to enable or disable the<br />
selected channel.<br />
TV<br />
Move<br />
Channel Scan Memory<br />
Analog<br />
Digital<br />
Digital<br />
Analog<br />
Analog<br />
Analog<br />
Digital<br />
CH<br />
Page<br />
03<br />
03-1<br />
03-2<br />
04<br />
05<br />
06<br />
06-1<br />
ENTER<br />
Select<br />
WREG-DT<br />
WCVB<br />
WEXT<br />
NICK<br />
NICK<br />
VBCT<br />
MENU<br />
Return<br />
EXIT<br />
NOTE: For information on local digital<br />
channels, visit www.antennaweb.org<br />
Input Setting<br />
Input Setting feature allows the<br />
removal of unused inputs from the AV<br />
input loop.<br />
Use the CURSOR ▲▼ keys to select an<br />
AV input. Press ENTER to disable<br />
(uncheck) or enable (check) the highlighted<br />
input.<br />
TV<br />
Move<br />
Channel Setting<br />
Channel Search<br />
Channel Scan Memory<br />
Input Setting<br />
Video2 Setting<br />
ENTER<br />
Select<br />
MENU<br />
Video1<br />
Video2<br />
HDMI1<br />
HDMI2<br />
HDMI3<br />
USB<br />
Return<br />
NOTE: At least one input must and<br />
will remain checked.<br />
Unchecked box means the input will<br />
be skipped<br />
EXIT<br />
Exit<br />
:Skip<br />
Exit<br />
Video2 Setting<br />
Use this feature to establish either a<br />
Component or Composite connection<br />
to the VIDEO INPUT 2 jacks on your<br />
HDTV.<br />
Use the CURSOR ▲▼ keys to select the<br />
type of connection you’ll use in VIDEO<br />
INPUT 2.<br />
Press ENTER, a blue mark will appear<br />
next to the selected option indicating it<br />
as the active option.<br />
SETUP<br />
Display the On Screen menu and use<br />
the CURSOR ⊳keys to select Setup.<br />
Press ENTER.<br />
Menu Language<br />
Choose between English, Spanish and<br />
French for your On Screen menu’s display<br />
language.<br />
Press ENTER on the desired language.<br />
Digital Caption<br />
Captioning is textual information transmitted<br />
along with the picture and<br />
sound. Turning Captioning ON (by<br />
pressing the CAPTION key during normal<br />
TV viewing) causes the HDTV to<br />
open these captions (digital or<br />
analog) and superimpose them on the<br />
screen.<br />
NOTE: Local broadcasters decide<br />
which caption signals to transmit.<br />
Use the CURSOR ▲▼ and ⊳keys to<br />
modify Font, Background, and<br />
Foreground of digital caption text.<br />
Energy Solution<br />
ECO (ENERGY SAVER)<br />
ECO controls the LED backlight brightness<br />
to reduce power consumption.<br />
– Level 1: Energy Saver feature is off.<br />
– Level 2: Low power consumption.<br />
– Level 3: Lowest power consumption.<br />
Press ENTER on the desired level.<br />
LIGHT SENSOR<br />
This feature detects ambient room<br />
light brightness and uses that reading<br />
to control the panel brightness level<br />
and picture parameters to reduce the<br />
HDTV’s power consumption.<br />
NOTE: When room lighting is dark,<br />
the panel brightness and/or the<br />
picture setting parameters<br />
such as brightness and contrast<br />
are lowered. When room<br />
lighting is bright, parameters<br />
are affected opposite.<br />
Use the CURSOR ▲▼ keys to select On<br />
or OFF and press ENTER.<br />
AUTO SHUT-OFF<br />
When Auto Shut-off feature is set to<br />
ON, it will allow the HDTV to automatically<br />
turn off when no video and/or<br />
audio signals are being received.<br />
NOTES: By factory default, this feature<br />
is set to ON. The HDTV<br />
will automatically turn off if<br />
no AV signals are received in<br />
a time span of 15 minutes.<br />
Use the CURSOR ▲▼ keys to select On<br />
or OFF and press ENTER.<br />
Mode (Home/Store)<br />
Use the Mode (Home/Store) option if<br />
you would like to change the initial<br />
Energy Saving Mode chosen at HDTV’s<br />
first power on.<br />
Home Mode - For saving energy and<br />
power consumption reduction.<br />
Store Mode - High brightness and<br />
contrast for display at retailer store.<br />
NOTE: Only Home Mode qualifies for<br />
Energy Star.<br />
Press ENTER on the desired mode.<br />
Clock Timer<br />
This feature allows you to set a<br />
Current Time for your HDTV and<br />
enable a Switch On Time for the HDTV<br />
to turn on at a specific time of day.<br />
When On Timer Function is set to ON,<br />
the TV will automatically turn on at the<br />
previously set Switch on Time.<br />
Use the CURSOR ▲▼ and ⊳keys to<br />
modify the Current Time and/or Switch<br />
On Time.<br />
V-Chip (parental control)<br />
Use this feature to automatically block<br />
programs with content you deem as<br />
inappropriate for viewing by your<br />
children.<br />
NOTE: This feature is designed to comply<br />
with the United States of<br />
America’s FCC V-Chip regulations.<br />
Therefore, it may not function<br />
with broadcasts that originate<br />
in other countries.<br />
ADJUSTING THE V-CHIP RATINGS<br />
Select ON and press ENTER. Select<br />
Adjust (Standard) and press ENTER.<br />
TV<br />
Move<br />
Setup<br />
Menu Language<br />
V – Chip<br />
Digital Caption<br />
Energy Solution<br />
Clock Timer<br />
Mode (Home/Store)<br />
ENTER<br />
Select<br />
MENU<br />
Off<br />
On<br />
Adjust (standard)<br />
Return<br />
NOTE: Blocking a rating will automatically<br />
block all higher ratings.<br />
Unblocking a rating will automatically<br />
unblock all lower<br />
ratings.<br />
For V-Chip (Movie) ratings select Movie<br />
and press ENTER, and then select the<br />
desired MPAA rating limit. Press the<br />
EXIT key to close the V-Chip menu.<br />
EXIT<br />
Exit<br />
V-Chip (continued)<br />
For V-Chip (TV) ratings select TV and<br />
press ENTER. Use the CURSOR ▲ ▼<br />
keys to select a rating and press ENTER.<br />
Use the CURSOR ▲ ▼ keys to set the<br />
rating’s status as Blocked or Viewable.<br />
Once ratings are set, press the EXIT key<br />
to close the V-Chip menu.<br />
NOTE: Some TV ratings offer more<br />
detailed settings such as<br />
Dialogue, Language, Sexual,<br />
and Violence.<br />
ADVANCED V-CHIP SYSTEM (RRT5)<br />
RRT5 (V-Chip Regional Ratings 5) is an<br />
advanced V-Chip ratings system for over<br />
the air digital channels. When the HDTV<br />
detects compatible RRT5 data, it’s<br />
downloaded & stored in memory, and<br />
the Setup V-Chip screen is then modified<br />
to show the Adjust (Advanced)<br />
option.<br />
Use the CURSOR ▲ ▼ and ⊳keys to<br />
highlight the different options, and use<br />
the ENTER key to block or unblock the<br />
selected rating.<br />
NOTE: When vertical scroll bars appear,<br />
press CURSOR ▲▼ to gain<br />
access to the additional ratings.<br />
MORE INFORMATION<br />
Additional information about MPAA<br />
(Motion Picture Association of<br />
America) and V-Chip rating can be<br />
found at: www.mpaa.org and<br />
www.v-chip.org, respectively.<br />
1 Audyssey Dynamic Volume solves the<br />
problem of large variations in volume level<br />
between television programs, commercials,<br />
and between the soft and loud passages of<br />
movies. Audyssey Dynamic EQ is integrated<br />
into Dynamic Volume so that as the playback<br />
volume is adjusted automatically, the perceived<br />
bass response, tonal balance, surround<br />
impression and dialog clarity remain the same.<br />
PICTURE<br />
Display the On Screen menu and use<br />
the CURSOR ⊳ keys to select<br />
Picture. Press ENTER.<br />
You may choose between Vivid, Mild,<br />
and Standard, which have predetermined<br />
fixed picture parameter<br />
values, or choose the <strong>Manual</strong> option<br />
for customized personal settings.<br />
NOTE: Each AV input can have its<br />
own picture mode (pre-determined<br />
or manual.) Current<br />
input’s selected option is indicated<br />
by a blue marker.<br />
MANUAL PICTURE SETTINGS<br />
<strong>Manual</strong> parameters to adjust include:<br />
• Color • Tint<br />
• Contrast • Brightness<br />
• Sharpness • Color Temperature<br />
The Detailed Setting option allows for<br />
the adjustment of several additional<br />
parameters such as:<br />
• Signal Balancer • Noise Reduction<br />
• White Balance • Edge Enhancer<br />
• H-Size / V-Size • Dynamic Contrast<br />
SOUND<br />
Display the On Screen menu and use<br />
the CURSOR ⊳ keys to select<br />
Sound. Press ENTER.<br />
Choose sound setting option:<br />
Auto – Sound settings are linked to<br />
the current Picture option and parameters<br />
are adjusted accordingly.<br />
Dynamic, Mild, Standard –<br />
Predetermined sound parameters not<br />
linked with any Picture option.<br />
MANUAL SOUND SETTINGS<br />
The <strong>Manual</strong> option provides different<br />
parameters that can be personally<br />
adjusted:<br />
• Bass & Treble<br />
• Bass Extension<br />
• Audyssey Dynamic Volume 1<br />
• Detailed Setting<br />
– Equalizer: Personalize audio highs<br />
and lows.<br />
TV<br />
Move<br />
Picture<br />
Vivid<br />
Mild<br />
Standard<br />
<strong>Manual</strong><br />
ENTER<br />
Select<br />
MENU<br />
Color<br />
Tint<br />
Contrast<br />
Brightness<br />
Sharpness<br />
Color Temperature<br />
Detailed Setting<br />
Default<br />
Return<br />
EXIT<br />
ADJUSTING A PICTURE SETTING<br />
Use the CURSOR ▲▼ keys to highlight<br />
the picture parameter you wish to<br />
adjust. Press the ENTER key to enter the<br />
value adjustment screen. Modify the<br />
selected parameter’s value by pressing<br />
the CURSOR ⊳ keys.<br />
NOTE: CURSOR ▲▼ keys select the<br />
next/previous parameter without<br />
returning to the previous<br />
menu screen.<br />
Once adjustments are complete, press<br />
the EXIT key to return to normal TV<br />
viewing.<br />
TV<br />
Move<br />
<strong>Manual</strong><br />
Bass<br />
Treble<br />
Bass Extension<br />
Audyssey Dynamic Volume<br />
Detailed Setting<br />
Default Sound<br />
ENTER<br />
Select<br />
MENU<br />
Return<br />
ON<br />
Medium<br />
EXIT<br />
ADJUSTING A SOUND SETTING<br />
Use the CURSOR ▲▼ keys to highlight<br />
the sound parameter you wish to adjust.<br />
Press the ENTER key to enter the value<br />
adjustment screen. Modify the selected<br />
parameter’s value by pressing the<br />
CURSOR ⊳keys.<br />
NOTE: CURSOR ▲▼ keys select the<br />
next/previous parameter without<br />
returning to the previous<br />
menu screen.<br />
Once adjustments are complete, press<br />
the EXIT key to return to normal TV<br />
viewing.<br />
Exit<br />
Exit<br />
USB INPUT<br />
PHOTO VIEWER<br />
View pictures on your HDTV with the<br />
use of a USB mass storage device (not<br />
included.)<br />
HDTV BACK PANEL<br />
HDMI<br />
(DVI)<br />
INPUT1<br />
USB FLASH<br />
DRIVE<br />
Insert the flash drive into the USB port,<br />
the TV will display the Photo Viewer<br />
screen, select Shuffle Play or Browse<br />
Photos and press ENTER to begin.<br />
NOTE: A thumbnail hide icon will<br />
appear if a picture cannot be decoded<br />
or if no thumbnail data is available.<br />
USING THE PHOTO VIEWER<br />
Press ENTER on a thumbnail photo to<br />
enable the Rotate, Full View and Start<br />
Slideshow functions.<br />
Once in Full View mode:<br />
Use the CURSOR ⊳keys to change<br />
picture.<br />
Press ENTER to show the full view<br />
options menu.<br />
• Rotate<br />
• Zoom In / Out<br />
• Pan<br />
• Slideshow setup<br />
• Start Slideshow • Browse Photo<br />
SLIDE SHOW<br />
In the Slideshow Setup menu you may<br />
turn the Shuffle and Quick Change<br />
options ON or OFF.<br />
Press ENTER on Start Slideshow<br />
either from the Thumbnail View<br />
Screen or from the full view options<br />
menu to start the slideshow from the<br />
current picture.<br />
ONE-YEAR LIMITED PARTS AND LABOR<br />
WARRANTY<br />
THIS LIMITED PARTS AND LABOR WARRANTY IS VALID ONLY ON SANYO TELEVISIONS<br />
PURCHASED AND USED IN THE UNITED STATES OF AMERICA, CANADA, AND PUERTO<br />
RICO, EXCLUDING ALL OTHER U.S. TERRITORIES AND PROTECTORATES. THIS LIMITED<br />
WARRANTY APPLIES ONLY TO THE ORIGINAL RETAIL PURCHASER, AND DOES NOT<br />
APPLY TO PRODUCTS USED FOR INDUSTRIAL OR COMMERCIAL PURPOSES.<br />
WARRANTY APPLICATION<br />
FOR ONE YEAR from the date of original retail purchase <strong>Sanyo</strong> Manufacturing<br />
Corporation (SMC) warrants this TV to be free from manufacturing defects in materials and<br />
workmanship under normal use and conditions for parts and labor.<br />
For the FIRST 90 DAYS from the date of original retail purchase, <strong>Sanyo</strong> Manufacturing<br />
Corporation will replace any defective TV via exchange at the retailer. To ensure proper<br />
warranty application, keep the original-dated-sales receipt for evidence of purchase.<br />
Return the defective TV to the retailer along with the receipt and the included<br />
accessories, such as the remote control. The defective TV will be exchanged for the same<br />
model, or a replacement model of equal value, if necessary. Replacement model will be<br />
contingent on availability and at the sole discretion of <strong>Sanyo</strong> Manufacturing Corporation.<br />
THE FOREGOING WARRANTY IS EXCLUSIVE AND IN LIEU OF ALL OTHER WARRANTIES<br />
OF MERCHANTABILITY OR FITNESS FOR A PARTICULAR PURPOSE.<br />
OBLIGATIONS<br />
For one year from the date of purchase, <strong>Sanyo</strong> Manufacturing Corporation warrants<br />
this product to be free from defects in material and workmanship under normal use and<br />
conditions. During the first 90 days under this warranty for any manufacturing defect or<br />
malfunction <strong>Sanyo</strong> Manufacturing Corporation will provide a new TV via exchange at<br />
the retailer.<br />
HOW TO MAKE A CLAIM UNDER THIS WARRANTY<br />
Please call 1-800-877-5032. Please be prepared to give us the television’s model number<br />
and serial number when you call. The model number and serial number are printed on a<br />
label attached to the back of the unit.<br />
For customer assistance, call toll free 1-800-877-5032.<br />
This warranty expresses specific contractual rights; retail purchasers may have additional<br />
statutory rights which vary from state to state.<br />
(EFFECTIVE: March 1, 2007)<br />
Your <strong>Sanyo</strong> HDTV is registered at the time of purchase,<br />
please keep sales receipt for future reference.<br />
For your protection in the event of theft or loss of this product, please fill in the<br />
information requested below and KEEP IN A SAFE PLACE FOR YOUR OWN<br />
PERSONAL RECORDS.<br />
Model No. ______________________ Serial No. _____________________________<br />
(Located on back of unit)<br />
(Located on back of unit)<br />
Purchase date ___________________ Purchase Price _________________________<br />
Where Purchased _________________________