Therma - Rad Draft.pdf - Hurlcon Heating
Therma - Rad Draft.pdf - Hurlcon Heating
Therma - Rad Draft.pdf - Hurlcon Heating

You also want an ePaper? Increase the reach of your titles
YUMPU automatically turns print PDFs into web optimized ePapers that Google loves.
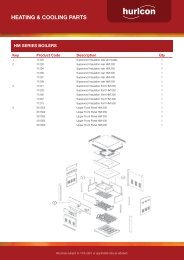
INSTALLATION AND OPERATING INSTRUCTIONS I INSTALLATION AND OPERATING INSTRUCTIONS<br />
<strong>Therma</strong>-<strong>Rad</strong><br />
Panel <strong>Rad</strong>iators<br />
INSTALLATION AND<br />
OPERATING INSTRUCTIONS<br />
Melbourne: 03 9554 2275 Gold Coast: 07 5552 2600 Perth: 08 9350 2600<br />
Sydney: 02 9853 2100 Townsville: 07 4750 3100 sales@hurlconheating.com.au<br />
Brisbane: 07 3308 5400 Adelaide: 08 8152 7600 www.hurlconheating.com.au<br />
3/08/2011 1
INDEX<br />
1 - Introduction........................................................................................3<br />
2 - General Advice..................................................................................3<br />
3 - Technical Specifications....................................................................3<br />
4 - Sizes & Types available ....................................................................4<br />
5 - Calculating Water flow.......................................................................5<br />
6 - Heat Correction Factors ....................................................................5<br />
7 - Pressure Loss....................................................................................6<br />
8 - Packing..............................................................................................6<br />
9 - Panel Dimensions .............................................................................7<br />
10 - Installation Details ...........................................................................7<br />
11 - Positioning of wall brackets .............................................................8<br />
12 - Methods of Plumbing.......................................................................9<br />
13 - Problem Solving ............................................................................10<br />
14 - Water Treatment............................................................................10<br />
15 - Warranty........................................................................................10<br />
<strong>Therma</strong>-<strong>Rad</strong> Panel <strong>Rad</strong>iators 2
1 - INTRODUCTION<br />
This brochure has been compiled to give our customers complete technical information on selecting, installing and<br />
commissioning <strong>Therma</strong>-<strong>Rad</strong> Steel Panel <strong>Rad</strong>iators. <strong>Therma</strong>-<strong>Rad</strong> radiators are produced on the most modern<br />
automated radiator manufacturing equipment. The <strong>Therma</strong>-<strong>Rad</strong> radiators are manufactured to ISO 9001 Quality<br />
Management System and are certified to comply with the following international standards EN 442, BS EN ISO<br />
9001:2000, NFP 52 - 011 & - 012. <strong>Therma</strong>-<strong>Rad</strong> radiators have the convector fins welded to the waterways for<br />
maximum heat transfer. All the radiators are tested to 13 bar pressure to ensure that the completed product is fault<br />
free before leaving the factory. The <strong>Therma</strong>-<strong>Rad</strong> radiators are fully cleaned, prime coated and electro statically<br />
powder coated before packing.<br />
2 - GENERAL ADVICE<br />
1. The radiator outputs in this catalogue are quoted with the standard conditions of water temperatures of 90 o<br />
C flow and 70 o C return with an ambient air temperature of 20 o C. The radiators can be used at different<br />
temperatures but their heat output will vary accordingly. Please refer to page 6 for further details.<br />
2. <strong>Therma</strong>-<strong>Rad</strong> radiators are designed to be installed in a sealed system only. Never drain the water in the<br />
heating system unless absolutely necessary, add water only if needed. Each time you add water or<br />
change the water in the heating system, corrosion occurs and the life of the radiator will decrease.<br />
<strong>Therma</strong>-<strong>Rad</strong> radiators can be used indefinitely without changing the water in the system. Refer also to<br />
section 14.<br />
3. The pipe work should be pressure tested to eliminate any leaks but DO NOT use MAINS PRESSURE if<br />
the radiators are connected.<br />
4. Use only OVENTROP or approved valves both on the flow and return side of each radiator. The manual or<br />
thermostatic valves should be placed on the inlet side with the lockshield valve for flow control on the<br />
outlet side. The use of thermostatic valves will provide more comfort and economy.<br />
5. Keep the packing on the radiator until the installation is completed to prevent any unwanted scratches or<br />
damage to the radiator.<br />
6. Use the air vent in one of the top connections to eliminate all the air from the radiator.<br />
7. The normal system pressure for a closed vented sealed system is between 1 - 2 Bars when cold.<br />
3 - TECHNICAL SPECIFICATIONS<br />
All <strong>Hurlcon</strong> <strong>Therma</strong>-<strong>Rad</strong> radiators are manufactured to the following standards.<br />
Steel quality ST 12.03 DIN 1543<br />
Panel gauge<br />
1.20 mm cold rolled steel<br />
Convector fins<br />
0.45 mm cold rolled steel<br />
Top & side covers<br />
0.75 mm cold rolled steel<br />
Test pressure<br />
13 BAR minimum<br />
Working pressure<br />
10 BAR maximum<br />
Connections<br />
Standard radiator 4 places -1/2” BSP<br />
Compact valve radiator 6 places -1/2” BSP<br />
Paint specification Epoxy-polyester Powder RAL 9016<br />
Accessories supplied with each <strong>Therma</strong>-<strong>Rad</strong><br />
Screws and plastic wall plugs<br />
Wall hangers<br />
Blanking plug G 1/2''<br />
Airvent plug G 1/2''<br />
Side panels (mounted onto the panel radiator)<br />
Grills (mounted onto the panel radiator)<br />
<strong>Therma</strong>-<strong>Rad</strong> Panel <strong>Rad</strong>iators 3
4 - SIZES & TYPES AVAILABLE<br />
Available radiators range from 400mm wide to 3000mm long in 100 mm steps.<br />
Heights of 200, 300, 400, 500, 600, 700, 900, are available.<br />
All are available as Types 10, 11, 21, 22, 33. Refer to drawings page 7. See page 11 for complete size and<br />
output table.<br />
NOTE. <strong>Hurlcon</strong> has a wide range of sizes in stock however check the availability with your nearest <strong>Hurlcon</strong> sales<br />
office prior to commencing installation as delivery of special orders can be up to 10 -12 weeks.<br />
Technical Data<br />
<strong>Rad</strong>iator Height<br />
<strong>Rad</strong>iator Type *<br />
Heat output in<br />
Watts per m<br />
Water content in<br />
litres per m<br />
Weight in<br />
kg per m<br />
200<br />
300<br />
400<br />
500<br />
600<br />
700<br />
900<br />
11 592 1.1 7.9<br />
21 790 2.1 11.3<br />
22 1108 2.1 15.8<br />
33 1622 3.2 17.7<br />
11 742 1.7 9.7<br />
21 1150 3.4 15<br />
22 1437 3.4 18.7<br />
33 2085 5.1 27.6<br />
11 966 2.1 13.1<br />
21 1440 4.2 22.9<br />
22 1803 4.2 31.2<br />
33 2638 6.3 36.5<br />
11 1158 2.5 16.3<br />
21 1730 5 25<br />
22 2157 5.0 31.2<br />
33 3164 7.5 46.0<br />
11 1356 2.9 19.4<br />
21 1970 5.8 30.7<br />
22 2485 5.8 37.4<br />
33 3638 8.7 55.3<br />
11 1540 3.3 22.5<br />
21 2230 6.6 33.9<br />
22 2800 6.6 43.5<br />
33 4078 9.9 64.4<br />
11 1919 4.1 28.6<br />
21 2750 8.2 43.4<br />
22 3458 8.2 55.8<br />
33 4967 12.3 82.9<br />
<strong>Therma</strong>-<strong>Rad</strong> Panel <strong>Rad</strong>iators 4
5 - CALCULATING WATER FLOW<br />
To ascertain water flow requirement to a panel radiator the following information must be known.<br />
- Output required from the radiator.<br />
- Temperature difference between Flow and Return (∆T).<br />
Then Water in flow l/s can be calculated by the formula<br />
Flow in l/s = output kW<br />
∆T x 4.18<br />
Example<br />
Required output of 2.0 kW<br />
Boiler capacity - flow 80 o C return 70 o C thus ∆T = 10<br />
The calculation is<br />
Required Flow = 2.0<br />
10 x 4.18 = 0.048 l/s ( x 3600 = 172.8 l/hr )<br />
6 – HEAT CORRECTION FACTORS<br />
For selection of the Panel size.<br />
The <strong>Therma</strong>-<strong>Rad</strong> radiator heat outputs vary according to the difference between the room air temperature and the<br />
average of the flow and return water temperatures (called mean water temperature). The data supplied is based<br />
on 90/70 o C water temperatures and 20 o C ambient air temperature C f = 1<br />
Flow Room<br />
Correction Factor C f<br />
water Temp Return water Temperature o C<br />
Temp<br />
o C 40 45 50 55 60 65 70 75<br />
24 1.97 1.71 1.53 1.38 1.27 1.17 1.10 1.03<br />
22 1.81 1.59 1.43 1.31 1.20 1.12 1.05 0.99<br />
90 o C 20 1.68 1.49 1.35 1.24 1.14 1.07 1.00 0.95<br />
18 1.56 1.40 1.27 1.17 1.09 1.02 0.96 0.91<br />
15 1.41 1.28 1.18 1.09 1.02 0.95 0.90 0.86<br />
24 2.10 1.82 1.62 1.46 1.34 1.24 1.16 1.09<br />
22 1.92 1.69 1.52 1.38 1.27 1.18 1.11 1.05<br />
85 o C 20 1.78 1.58 1.42 1.30 1.21 1.12 1.06 1.00<br />
18 1.65 1.48 1.34 1.24 1.15 1.07 1.01 0.96<br />
15 1.49 1.35 1.24 1.14 1.07 1.00 0.95 0.90<br />
24 2.24 1.94 1.72 1.56 1.42 1.32 1.24 1.16<br />
22 2.05 1.80 1.61 1.46 1.35 1.25 1.18 1.11<br />
80 o C 20 1.89 1.67 1.51 1.38 1.27 1.19 1.12 1.06<br />
18 1.75 1.57 1.42 1.31 1.21 1.13 1.07 1.01<br />
15 1.58 1.42 1.30 1.21 1.12 1.06 1.00 0.95<br />
24 2.41 2.08 1.85 1.66 1.52 1.41 1.32<br />
22 2.20 2.20 1.72 1.56 1.43 1.34 1.25<br />
75 o C 20 2.02 2.02 1.61 1.47 1.35 1.27 1.19<br />
18 1.87 1.87 1.51 1.38 1.28 1.20 1.13<br />
15 1.67 1.67 1.38 1.27 1.19 1.12 1.06<br />
24 2.61 2.25 1.99 1.79 1.64 1.52<br />
22 2.37 2.07 1.85 1.67 1.54 1.43<br />
70 o C 20 2.17 1.91 1.72 1.57 1.45 1.35<br />
18 2.00 1.78 1.61 1.47 1.37 1.28<br />
15 1.79 1.61 1.47 1.35 1.27 1.19<br />
24 2.85 2.44 2.15 1.94<br />
22 2.58 2.24 1.99 1.81<br />
65 o C 20 2.35 2.07 1.85 1.69<br />
18 2.15 1.91 1.73 1.59<br />
15 1.91 1.72 1.57 1.45<br />
24 3.14 2.68 2.36<br />
22 2.82 2.45 2.18<br />
60 o C 20 2.56 2.24 2.02<br />
18 2.34 2.07 1.87<br />
15 2.03 1.85 1.69<br />
Example.<br />
Required 2.0 kW heating<br />
Conditions<br />
Flow temp 80 oC<br />
Return temp 70 oC<br />
Ambient air 22 oC<br />
From the chart<br />
Cf = 1.18<br />
Corrected <strong>Rad</strong>iator<br />
2 kW x 1.18 = 2.36 kW<br />
std output required.<br />
Select the radiator size of<br />
600 / 22 / 1000<br />
with 2.49 kW std output<br />
being closest to the panel<br />
output required.<br />
1. Outputs increase by approximately 2 % when top grilles are not fitted.<br />
2. Correction factor for other temperature conditions available on request.<br />
<strong>Therma</strong>-<strong>Rad</strong> Panel <strong>Rad</strong>iators 5
7 - PRESSURE LOSS<br />
The pressure loss through a radiator and valves are relatively low but can be calculated by the following formulae.<br />
For a <strong>Therma</strong>-<strong>Rad</strong> panel radiator with OVENTROP valves the calculations are as follows:-<br />
For type 11 panels P 11 = 164<br />
For type 22 panels P 22 = 97<br />
Thus for the example of a 2 kW heat output and with a calculated water flow of 172 l/h (from section 5), the<br />
pressure loss through the panel will be:-<br />
Pressure loss P r = P X X (water flow l/h) 2<br />
For a type 11 panel<br />
Pressure loss = 164 x (172) 2<br />
10,000 x 1,000<br />
10,000 x 1,000<br />
= 0.49 kPa<br />
For a type 22 panel<br />
Pressure loss = 97 x (172) 2 = 0.29 kPa<br />
10,000 x 1,000<br />
Add to this the pressure loss through the valves to obtain the total loss per radiator.<br />
Pressure loss for a standard OVENTROP radiator valve set is<br />
P v = (36 x flow l/s / K v ) 2<br />
= kPa pressure loss.<br />
K v = 1.1 for standard OVENTROP valve set<br />
Thus for our example 2.0 kW radiator, the pressure loss for the valves with a water flow of 0.04 l/s is as follows<br />
P v = (36 x 0.048 / 1.1 ) 2<br />
= 2.47 kPa pressure loss.<br />
Total loss through radiator = P r + P v = P t kPa = 0.29 + 2.47 = 2.75 kPa<br />
8 - PACKING<br />
1. In order to protect the <strong>Therma</strong>-<strong>Rad</strong> radiator and avoid damage from external effects, all four corners of the<br />
radiator are protected with thick cardboard.<br />
2. To protect against dirt etc. the radiators are shrink wrapped in heavy plastic. This heavy-duty protection<br />
minimises the risk of damage in the delivery and installation phase.<br />
3. It is recommended that the wrapping should be kept on the radiator until on all construction work is<br />
completed.<br />
<strong>Therma</strong>-<strong>Rad</strong> Panel <strong>Rad</strong>iators 6
9 - PANEL DIMENSIONS<br />
Types and basic sizes - cover panels & grilles fitted to types 11, 21, 22 & 33 (not shown).<br />
50 50 67 100 160<br />
30/10 55/35 78/56 90/70 90/70<br />
Type 10 Type 11 Type 21 Type 22 Type 33<br />
10 - INSTALLATION DETAILS<br />
A method of installation.<br />
1. Determine the size and position of the radiator to be installed in the room.<br />
2. Determine the height above the floor for the radiator (usually between 90 and 150 mm). Check the height<br />
of the skirting board to clear the radiator mounting bracket and the radiator.<br />
3. Locate & drill the four mounting holes according to the details below.<br />
4. Fix the brackets in place with the appropriate fixing screws and level the brackets.<br />
5. Cut away the packing around the four ½” BSP connections point and fit the air bleed plug to a top corner<br />
and the valve unions and plug according to the plumbing requirements. Refer page 9.<br />
6. It is wise to check a sample radiator for dimensions before committing the pipe work. This allows for<br />
varying valve fittings and bracket location.<br />
7. Determine the position of the pipe entries through the floor or wall. Drill oversize holes to allow for<br />
alignment variations and expansion movement.<br />
8. Fit the radiator to the wall brackets using the plastic inserts on the brackets. Leave the outer packing on to<br />
protect the paint finish during the installation phase.<br />
9. Install the radiator valves and plumb to suit. DO NOT water test with MAINS PRESSURE water.<br />
10. When the installation is complete, fill the system, check for leaks, and eliminate all air from the system.<br />
11. Commission and run the boiler to heat the water.<br />
12. Balance the system using the lockshield valves to give proportional flow to all radiators.<br />
13. Re-check for air in the system and the circulator is running quietly.<br />
<strong>Therma</strong>-<strong>Rad</strong> Panel <strong>Rad</strong>iators 7
11 – POSITIONING OF WALL BRACKETS<br />
Standard radiator.<br />
L<br />
Type 11 = 115<br />
All others = 100<br />
Concealed<br />
brackets<br />
25<br />
60m<br />
m<br />
- 85<br />
<strong>Rad</strong>iator Height H<br />
H<br />
25 43<br />
60m<br />
m<br />
- 85<br />
Centre Line<br />
of Valves<br />
90 -150 mm<br />
TYPE 10,11 TYPE 21,22,33<br />
35 or 55 70 or 90<br />
Compact valve radiator.<br />
Intergrated<br />
Compact valve<br />
L<br />
Type 11 = 115<br />
All others = 100<br />
Concealed<br />
brackets<br />
25<br />
60m<br />
m<br />
- 85<br />
<strong>Rad</strong>iator Height H<br />
H<br />
60m<br />
m<br />
- 85<br />
30<br />
Centre Line of<br />
Valves<br />
90 -150 mm<br />
Return<br />
50<br />
Pipe centres<br />
Flow<br />
TYPE 10,11 TYPE 21,22,33<br />
35 or 55 70 or 90<br />
All panels 1800mm and longer come with 3 rd central bracket<br />
<strong>Therma</strong>-<strong>Rad</strong> Panel <strong>Rad</strong>iators 8
12 - METHODS OF PLUMBING<br />
- With the four ½” connections, fit the control valve (manual or thermostatic), lockshields and air bleeds.<br />
The connections may be on the same side for the smaller radiator or opposite sides for longer radiators to<br />
ensure good water distribution.<br />
- An air bleed plug must always be located at the top of the radiator.<br />
Typical Methods of Plumbing a Standard 4 Port <strong>Rad</strong>iator<br />
Typical Method of Plumbing a Compact Valve 6 Port <strong>Rad</strong>iator<br />
Integrated valve<br />
Notes<br />
Air bleed plug MUST be in one of the top connections of the radiator<br />
<strong>Rad</strong>iator must be installed level and vertical.<br />
<strong>Therma</strong>-<strong>Rad</strong> Panel <strong>Rad</strong>iators 9
13 - PROBLEM SOLVING<br />
1. A panel radiator needs a continuous flow of hot water to work effectively.<br />
2. If the radiator is hot at the bottom but cold at the top - bleed the air out.<br />
3. If the radiator flow pipe is hot and the return cold - increase the flow of water by re-balancing the system.<br />
4. If the radiator or the pipe work is noisy, check for air in the system. Switch the circulator off and allow the<br />
air to settle to the top of the radiators. Then bleed the radiators, top up water if necessary.<br />
5. A radiator will be hot only at maximum heat output. A warm radiator indicates that the boiler has switched<br />
off or the thermostatic valve, if fitted, has adjusted the output down to suit the required room conditions.<br />
It is wise to provide an external drain at the lowest point of the pipe work in the event that the system has<br />
to be drained for maintenance or modification.<br />
14 - WATER TREATMENT<br />
- There is a basic need to treat the water contained in all heating systems that have steel panel radiators.<br />
- There will always be some corrosion in a steel panel radiator system even though the system is closed.<br />
- The water in a closed system will promote corrosion unless the initial charge of water is correctly treated.<br />
- Open vented systems in particular should be treated, as open vented systems are not completely sealed<br />
off from the atmosphere. It is essential to provide a tank open to the atmosphere if proper venting and<br />
expansion of the system is to be achieved.<br />
- The same tank that is used to fill the system provides the capacity for the storage of water that has<br />
expanded when heated. When the system cools down, this same water is drawn back into the system<br />
taking with it a small quantity of dissolved oxygen.<br />
- Even without any leakages from the system, there will be evaporation losses from the surface of the tank<br />
depending on the ambient temperature.<br />
- In practice the development of corrosion in a system reduces the transfer of heat through the formation of<br />
black iron oxide sludge. This corrosion process causes noises from the boiler and circulator eventuating in<br />
the premature failure of the radiators, circulator and boiler.<br />
- For the above reasons, it suggested that the system is thoroughly flushed through at the time of<br />
installation.<br />
- The system should then be filled with a stable water treatment solution that does not require continuous<br />
topping up. For example RAD-PROTEX. Please refer to our technical department.<br />
15 - WARRANTY<br />
<strong>Therma</strong><strong>Rad</strong> panel radiators are guaranteed for 10 years against defects in material or workmanship.<br />
Warranty includes rework or replacement of the radiator (parts only).<br />
The products must be installed and used according to accepted plumbing practices, like BS5449.<br />
Failure to do so will void the guarantee.<br />
The below items must also be followed or else the warranty may be voided:<br />
1. <strong>Therma</strong><strong>Rad</strong> panel radiators should be used in closed heating systems. Never use in open circuit (steam,<br />
thermal spring , boiled water or tap water)<br />
2. After the installation, the system should be tested by an expertised personnel. Otherwise, damage may<br />
occur in the place of installation.<br />
3. Please ensure that the connection elements are free of any dirt and burr after the installation. If necessary,<br />
flush the system to get rid of particles before testing or using the system.<br />
4. Do not use the radiators in humid environment (swimming pool, sauna bath, green house)<br />
5. Do not overtighten the stoppers, airvents or valves, otherwise the connection threads could be damaged.<br />
6. Keep the packaging on the radiator even after installing the radiator until all construction work is finished.<br />
The packaging will prevent scratches and damage on the radiator surface or paint.<br />
7. Maximum working pressure of the radiators is 10 bars.<br />
8. When filling the radiators for the first time, heating system controls should be closed and the system<br />
should be set to right pressure.<br />
9. Never empty the water in heating system. Add water when needed. Each time you add or change water to<br />
your heating system, corrosion occurs and its life time will decrease.<br />
10. Please take cautions against freezing risk.<br />
11. Use an anti-corrosion agent in the system if the water is very aggressive or acidic.<br />
12. Avoid dropping or flexing (bending) the radiators when carrying or transporting it.<br />
13. Please do not use corrosive or abrasive agents to clean your radiator.<br />
14. Do not place more than 20 kgs onto the radiator so as to avoid the brackets coming out of the wall.<br />
15. This warranty shall not apply to any radiators that have been subject to accident, negligence, alteration,<br />
abuse or misuse.<br />
<strong>Therma</strong>-<strong>Rad</strong> Panel <strong>Rad</strong>iators 10
Height 200 300 400 500 600 700 900<br />
Types 11 22 33 11 22 33 11 22 33 11 22 33 11 22 33 11 22 33 11 22 33<br />
w/m 540 1100 1500 742 1437 2085 966 1803 2638 1158 2157 3164 1356 2485 3638 1540 2800 4078 1919 3458 4967<br />
400 0.22 0.44 0.60 0.30 0.57 0.83 0.39 0.72 1.06 0.46 0.86 1.27 0.54 0.99 1.46 0.62 1.12 1.63 0.77 1.38 1.99<br />
500 0.27 0.55 0.75 0.37 0.72 1.04 0.48 0.90 1.32 0.58 1.08 1.58 0.68 1.24 1.82 0.77 1.40 2.04 0.96 1.73 2.48<br />
600 0.32 0.66 0.90 0.45 0.86 1.25 0.58 1.08 1.58 0.69 1.29 1.90 0.81 1.49 2.18 0.92 1.68 2.45 1.15 2.07 2.98<br />
700 0.38 0.77 1.05 0.52 1.01 1.46 0.68 1.26 1.85 0.81 1.51 2.21 0.95 1.74 2.55 1.08 1.96 2.85 1.34 2.42 3.48<br />
800 0.43 0.88 1.20 0.59 1.15 1.67 0.77 1.44 2.11 0.93 1.73 2.53 1.08 1.99 2.91 1.23 2.24 3.26 1.54 2.77 3.97<br />
900 0.49 0.99 1.35 0.67 1.29 1.88 0.87 1.62 2.37 1.04 1.94 2.85 1.22 2.24 3.27 1.39 2.52 3.67 1.73 3.11 4.47<br />
1000 0.54 1.10 1.50 0.74 1.44 2.09 0.97 1.80 2.64 1.16 2.16 3.16 1.36 2.49 3.64 1.54 2.80 4.08 1.92 3.46 4.97<br />
1100 0.59 1.21 1.65 0.82 1.58 2.29 1.06 1.98 2.90 1.27 2.37 3.48 1.49 2.73 4.00 1.69 3.08 4.49 2.11 3.80 5.46<br />
1200 0.65 1.32 1.80 0.89 1.72 2.50 1.16 2.16 3.17 1.39 2.59 3.80 1.63 2.98 4.37 1.85 3.36 4.89 2.30 4.15 5.96<br />
1300 0.70 1.43 1.95 0.96 1.87 2.71 1.26 2.34 3.43 1.51 2.80 4.11 1.76 3.23 4.73 2.00 3.64 5.30 2.49 4.50 6.46<br />
1400 0.76 1.54 2.10 1.04 2.01 2.92 1.35 2.52 3.69 1.62 3.02 4.43 1.90 3.48 5.09 2.16 3.92 5.71 2.69 4.84 6.95<br />
1500 0.81 1.65 2.25 1.11 2.16 3.13 1.45 2.70 3.96 1.74 3.24 4.75 2.03 3.73 5.46 2.31 4.20 6.12 2.88 5.19 7.45<br />
1600 0.86 1.76 2.40 1.19 2.30 3.34 1.55 2.88 4.22 1.85 3.45 5.06 2.17 3.98 5.82 2.46 4.48 6.52 3.07 5.53 7.95<br />
1700 0.92 1.87 2.55 1.26 2.44 3.54 1.64 3.07 4.48 1.97 3.67 5.38 2.31 4.22 6.18 2.62 4.76 6.93 3.26 5.88 8.44<br />
1800 0.97 1.98 2.70 1.34 2.59 3.75 1.74 3.25 4.75 2.08 3.88 5.70 2.44 4.47 6.55 2.77 5.04 7.34 3.45 6.22 8.94<br />
1900 1.03 2.09 2.85 1.41 2.73 3.96 1.84 3.43 5.01 2.20 4.10 6.01 2.58 4.72 6.91 2.93 5.32 7.75 3.65 6.57 9.44<br />
2000 1.08 2.20 3.00 1.48 2.87 4.17 1.93 3.61 5.28 2.32 4.31 6.33 2.71 4.97 7.28 3.08 5.60 8.16 3.84 6.92 9.93<br />
2100 1.13 2.31 3.15 1.56 3.02 4.38 2.03 3.79 5.54 2.43 4.53 6.64 2.85 5.22 7.64 3.23 5.88 8.56 4.03 7.26 10.43<br />
2200 1.19 2.42 3.30 1.63 3.16 4.59 2.13 3.97 5.80 2.55 4.75 6.96 2.98 5.47 8.00 3.39 6.16 8.97 4.22 7.61 10.93<br />
2300 1.24 2.53 3.45 1.71 3.31 4.80 2.22 4.15 6.07 2.66 4.96 7.28 3.12 5.72 8.37 3.54 6.44 9.38 4.41 7.95 11.42<br />
2400 1.30 2.64 3.60 1.78 3.45 5.00 2.32 4.33 6.33 2.78 5.18 7.59 3.25 5.96 8.73 3.70 6.72 9.79 4.61 8.30 11.92<br />
2500 1.35 2.75 3.75 1.86 3.59 5.21 2.42 4.51 6.60 2.90 5.39 7.91 3.39 6.21 9.10 3.85 7.00 10.20 4.80 8.65 12.42<br />
2600 1.40 2.86 3.90 1.93 3.74 5.42 2.51 4.69 6.86 3.01 5.61 8.23 3.53 6.46 9.46 4.00 7.28 10.60 4.99 8.99 12.91<br />
2700 1.46 2.97 4.05 2.00 3.88 5.63 2.61 4.87 7.12 3.13 5.82 8.54 3.66 6.71 9.82 4.16 7.56 11.01 5.18 9.34 13.41<br />
2800 1.51 3.08 4.20 2.08 4.02 5.84 2.70 5.05 7.39 3.24 6.04 8.86 3.80 6.96 10.19 4.31 7.84 11.42 5.37 9.68 13.91<br />
2900 1.57 3.19 4.35 2.15 4.17 6.05 2.80 5.23 7.65 3.36 6.26 9.18 3.93 7.21 10.55 4.47 8.12 11.83 5.57 10.03 14.40<br />
3000 1.62 3.30 4.50 2.23 4.31 6.26 2.90 5.41 7.91 3.47 6.47 9.49 4.07 7.46 10.91 4.62 8.40 12.23 5.76 10.37 14.90<br />
3/08/2011 11
INSTALLATION AND OPERATING INSTRUCTIONS I INSTALLATION AND OPERATING INSTRUCTIONS<br />
HURLCON HEATING Pty. Limited. A.B.N. 97 007 284 504<br />
www.hurlconheating.com.au email: sales@hurlconheating.com.au<br />
Information and specifications subject to change without notice.<br />
Victoria: New South Wales: Queensland: South Australia: Western Australia: Gold Coast: Townsville:<br />
Ph: (03) 9554 2275 Ph: (02) 9853 2100 Ph: (07) 3308 5400 Ph: (08) 8152 7600 Ph: (08) 9350 2600 Ph: (07) 5552 2600 Ph: (07) 4750 3100<br />
Fax: (03) 9554 2272 Fax: (02) 98532170 Fax: (07) 3308 5470 Fax: (08) 8152 7670 Fax: (08) 9350 2670 Fax: (07) 5552 2670 Fax: (07) 4750 3170<br />
3/08/2011 12