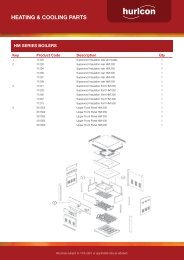
Bolero ND Cleaner - Hurlcon Heating
Bolero ND Cleaner - Hurlcon Heating
Bolero ND Cleaner - Hurlcon Heating

You also want an ePaper? Increase the reach of your titles
YUMPU automatically turns print PDFs into web optimized ePapers that Google loves.
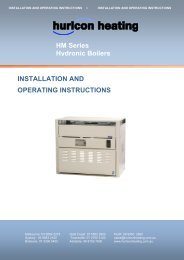
INSTALLATION A<strong>ND</strong> OPERATING INSTRUCTIONS I INSTALLATION A<strong>ND</strong> OPERATING INSTRUCTIONS<br />
Genus IV<br />
Hydronic Central <strong>Heating</strong><br />
Thermostat<br />
<strong>Bolero</strong> <strong>ND</strong><br />
<strong>Cleaner</strong><br />
INSTALLATION A<strong>ND</strong><br />
OPERATING INSTRUCTIONS<br />
Melbourne: 03 8796 8600 Gold Coast: 07 5552 2600 Perth: 08 9350 2600<br />
Sydney: 02 9853 2100 Townsville: 07 4750 3100 sales@astralpool.com.au<br />
Brisbane: 07 3308 5400 Adelaide: 08 8152 7600 www.astralpool.com.au<br />
23/04/2010
INSTALLING THE GENUS IV CENTRAL HEATING THERMOSTAT.<br />
The <strong>Hurlcon</strong> Genus IV room controller is only compatible with <strong>Hurlcon</strong> Hydronic boilers marked ‘GIV compliant’.<br />
Note:<br />
The appliance is not intended for use by young children or infirm person without supervision. Please ensure that<br />
young children are supervised to ensure that they do not play with the appliance.<br />
Thermostat location and Installation.<br />
‣ The Genus IV room thermostat should be fitted in the main living area or room that you wish to have the<br />
most accurate control over.<br />
‣ Avoid locations where the thermostat will be exposed to direct sunlight or draughts, such as near windows<br />
or doorways, or affected by heating sources.<br />
‣ Mounting height should be approximately 1500mm above floor level.<br />
‣ The unit can be flush mounted by using the bracket and flush mount housing, or surface mounted.<br />
Run the 6 core cable (purchased separately) from the boiler to the selected thermostat location. Do not connect at<br />
the boiler end until the room controller mounting is complete.<br />
Flush mounting<br />
Select a suitable location ensuring that there are no likely obstructions where the hole will be cut. Cut a hole<br />
175mm x 67mm using the template supplied. Pull the cable through the left hand knock out of the metal bracket.<br />
Fit the metal bracket into the hole and bend the tabs down to fit. Plug the cable into the RJ socket on the back of<br />
the housing. Slide the controller into the bracket ensuring that the cable feeds back into the wall cavity until it is<br />
flush. The rubber gasket will hold the thermostat in place.<br />
Genus IV Hydronic Central <strong>Heating</strong> Thermostat 2
Surface mounting.<br />
Select a suitable location for the thermostat. Mark the mounting holes making sure the housing is the right way up.<br />
Bring the 6 core cable through the wall. Mount the base to the wall (fixings not supplied). Remove the flush mount<br />
housing from the rear of the thermostat. Plug the cable into the RJ socket and snap the controller into the base.<br />
The cable can now be plugged into the boiler Genus controller as shown. The cable may be plugged into either of<br />
the RJ connectors.<br />
With the power to the boiler turned on, the Genus IV room thermostat will be powered up and ready for<br />
programming.<br />
The boiler will automatically learn that it is connected to a Genus IV room thermostat. If after a few<br />
minutes of being powered up communication does not take place a manual setting can be made at the<br />
boiler to configure the controller. Refer to page 11 in the boiler instruction manual for details.<br />
Genus IV Hydronic Central <strong>Heating</strong> Thermostat 3
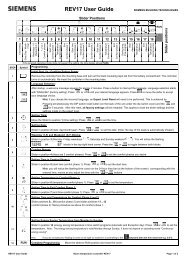
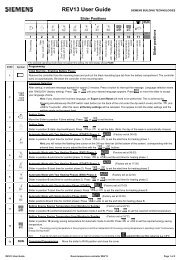
Programming the Genus IV Central <strong>Heating</strong> Thermostat.<br />
Before beginning, the boiler must be commissioned and powered up to enable programming of the <strong>Hurlcon</strong> GIV<br />
Central <strong>Heating</strong> Thermostat. The thermostat is powered by low voltage from the boiler.<br />
To activate the LCD display back lighting press any button once. After no buttons are pressed for a short period<br />
the display will automatically dim.<br />
What do all the buttons do?<br />
On / off<br />
Turns the controller and boiler system off or on. In the off mode the display will still function and show room<br />
temperature and time.<br />
Arrows<br />
Used to adjust settings up or down.<br />
Prog<br />
Used to select programming mode for time periods.<br />
Clock<br />
Used to set the system time.<br />
Man / auto<br />
Toggles between automatic and manual operation.<br />
Skip<br />
Allows a one button push to jump into the next programmed time period.<br />
Programming.<br />
Once installation is complete and the cable connected at the boiler the Genus IV room controller display should be<br />
on. The room controller derives its power from the boiler therefore the boiler must be switched on during this<br />
process.<br />
Setting the Clock.<br />
The clock is in 24hr format. Time periods can be set in 1 minute intervals.<br />
With the display showing the room temperature, push the button marked ‘clock’. The display will indicate the<br />
current day. Push the up or down button until the correct day is displayed. Push ‘clock’ again to set the time.<br />
Push the up and down buttons to set the hour. Push ‘clock’ again. Push the up and down buttons to set the<br />
minutes. Push ‘clock’ again when the time is set, the display will revert to Room Temperature and lock the<br />
settings to memory.<br />
Once you have finished programming ‘clock’ must be pressed to cycle through any remaining settings until the<br />
display returns to the room temperature.<br />
Genus IV Hydronic Central <strong>Heating</strong> Thermostat 4
Programming time periods.<br />
The thermostat can be programmed for Monday to Friday (M-F) and weekend (WE) operation with two time<br />
periods per day (P1-P2)<br />
With the display showing the room temperature, push the button marked ‘prog’. The display will show ‘M-F P1 on<br />
at’ and a time. Push the up or down button until the desired start time is displayed. This changes in 10 min<br />
intervals. Push ‘prog’ again to set ‘M-F P1 on Temp’. Push the up and down buttons to set the desired<br />
temperature. Push ‘prog’ again. ‘M-F P1 off at‘ is now displayed. Push the up or down button until the desired off<br />
time is displayed. This changes in 10 min intervals.<br />
Push ‘prog’ again to set the ‘P2’ time and temperatures as above.<br />
Push ‘prog’ again to set the ‘Sleep Temp’. Push the up and down buttons to set the desired temperature. A<br />
setting below 10° turns the system off during the sleep period.<br />
Push ‘prog’ again to set the weekend ‘W/E’ time and temperature periods as for Monday to Friday.<br />
Once the ‘W/E Sleep Temp’ has been set pushing ‘prog’ again you will be prompted to save settings ‘yes’ or ‘no’.<br />
Select yes by pushing the up arrow or no by pushing the down arrow. The display returns to the room<br />
temperature.<br />
If you have finished programming and have not cycled all of the way through the settings, ‘prog’ must be pressed<br />
to cycle through any remaining settings until prompted to save settings ‘yes’ or ‘no’. Select yes by pushing the up<br />
arrow or no by pushing the down arrow. The display returns to the room temperature.<br />
Manual and Automatic modes.<br />
Pushing the ‘auto / man’ button selects automatic or manual operating modes.<br />
Automatic.<br />
The heating system will operate on the time and temperature settings programmed. The display shows the actual<br />
and set temperatures, time period and auto.<br />
Manual.<br />
The heating system will operate continuously to the set temperature displayed. To adjust the set temperature<br />
push the up or down button. To resume automatic operation push the ‘auto / man’ button again.<br />
Skip.<br />
In automatic mode if the ‘skip’ button is pushed the controller jumps ahead to the next programmed time period.<br />
For example if the controller is programmed for P1 off at 8.00am and at 7.30 you are ready to leave the house and<br />
don’t need the heater on. Pushing the skip button will send the controller to the ‘P1 off’ time and temperature<br />
settings. Pushing ‘skip’ again will revert the controller back to the current period.<br />
The controller resumes automatic operation at the next programmed switching time in this case ‘P2 on’.<br />
On / off<br />
The boiler can be turned on or off by pressing the ‘on/off’ button at any time. The Genus controller on the boiler<br />
will display Set Temp, Actual Temp and OFF. If the boiler was running the pump inside the boiler may run on for a<br />
short time.<br />
Battery.<br />
The battery fitted to the thermostat is for volatile memory back up only, and should last many years. For service or<br />
replacement parts contact your installer or nearest <strong>Hurlcon</strong> office.<br />
Genus IV Hydronic Central <strong>Heating</strong> Thermostat 5
WARRANTY.<br />
Your Genus IV thermostat is covered by a limited 12 month warranty against defects in materials or manufacture<br />
from the date of purchase plus 30 days to allow for installation.<br />
This warranty covers goods returned to <strong>Hurlcon</strong> for inspection, and <strong>Hurlcon</strong> will repair or replace at its discretion<br />
any goods deemed faulty after such inspection.<br />
<strong>Hurlcon</strong> shall not be responsible for consequential damages of any kind. This warranty does not cover damage<br />
caused by accident or misuse. The warranty is only valid when the thermostat is used for the purpose for which it<br />
is intended and installed with a <strong>Hurlcon</strong> GIV compliant boiler. No person is authorised to make representations on<br />
behalf of <strong>Hurlcon</strong>.<br />
To place a service call, contact <strong>Hurlcon</strong> Service on freecall 1300 727 116.<br />
Genus IV Hydronic Central <strong>Heating</strong> Thermostat 6
Genus IV Hydronic Central <strong>Heating</strong> Thermostat 7
INSTALLATION A<strong>ND</strong> OPERATING INSTRUCTIONS I INSTALLATION A<strong>ND</strong> OPERATING INSTRUCTIONS<br />
ASTRALPOOL Pty. Limited. A.B.N. 97 007 284 504<br />
www.astralpool.com.au email: service@astralpool.com.au<br />
Information and specifications subject to change without notice.<br />
Victoria: New South Wales: Queensland: South Australia: Western Australia: Gold Coast: Townsville:<br />
Ph: (03) 8796 8600 Ph: (02) 9853 2100 Ph: (07) 3308 5400 Ph: (08) 8152 7600 Ph: (08) 9350 2600 Ph: (07) 5552 2600 Ph: (07) 4750 3100<br />
Fax: (03) 8796 8670 Fax: (02) 98532170 Fax: (07) 3308 5470 Fax: (08) 81527670 Fax: (08) 9350 2670 Fax: (07) 5552 2670 Fax: (07) 4750 3170<br />
Genus IV Hydronic Central <strong>Heating</strong> Thermostat 8