REV13 User Guide - Hurlcon Heating
REV13 User Guide - Hurlcon Heating
REV13 User Guide - Hurlcon Heating

Create successful ePaper yourself
Turn your PDF publications into a flip-book with our unique Google optimized e-Paper software.
<strong>REV13</strong> <strong>User</strong> <strong>Guide</strong><br />
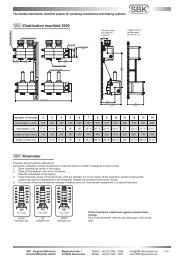
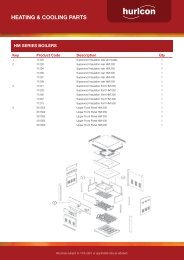
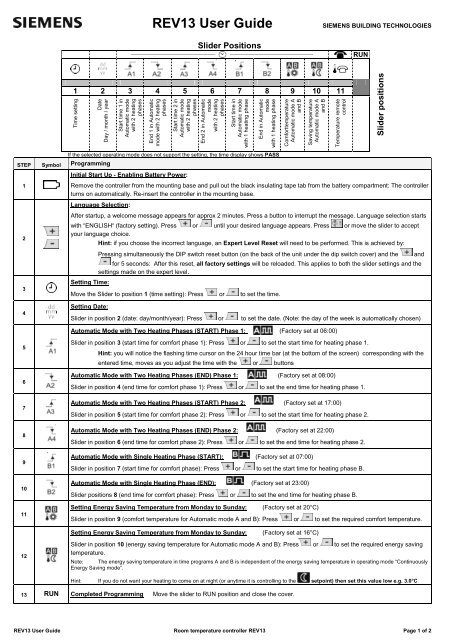
Slider Positions<br />
SIEMENS BUILDING TECHNOLOGIES<br />
RUN<br />
1 2 3 4 5 6 7 8 9 10 11<br />
Time setting<br />
Date<br />
Day / month / year<br />
Start time 1 in<br />
Automatic mode<br />
with 2 heating<br />
phases<br />
End 1 in Automatic<br />
mode with 2 heating<br />
phases<br />
Start time 2 in<br />
Automatic mode<br />
with 2 heating<br />
phases<br />
End 2 in Automatic<br />
mode<br />
with 2 heating<br />
phases<br />
Start time in<br />
Automatic mode<br />
with 1 heating phase<br />
End in Automatic<br />
mode<br />
with 1 heating phase<br />
Comforttemperature<br />
Automatic mode A<br />
and B<br />
Saving temperature<br />
Automatic mode A<br />
and B<br />
Temperature remote<br />
control<br />
Slider positions<br />
If the selected operating mode does not support the setting, the time display shows PASS<br />
STEP Symbol Programming<br />
1<br />
Initial Start Up - Enabling Battery Power:<br />
Remove the controller from the mounting base and pull out the black insulating tape tab from the battery compartment: The controller<br />
turns on automatically. Re-insert the controller in the mounting base.<br />
2<br />
3<br />
Language Selection:<br />
After startup, a welcome message appears for approx 2 minutes. Press a button to interrupt the message. Language selection starts<br />
with “ENGLISH“ (factory setting). Press or until your desired language appears. Press or move the slider to accept<br />
your language choice.<br />
Hint: if you choose the incorrect language, an Expert Level Reset will need to be performed. This is achieved by:<br />
Pressing simultaneously the DIP switch reset button (on the back of the unit under the dip switch cover) and the and<br />
for 5 seconds: After this reset, all factory settings will be reloaded. This applies to both the slider settings and the<br />
settings made on the expert level.<br />
Setting Time:<br />
Move the Slider to position 1 (time setting): Press or to set the time.<br />
4<br />
Setting Date:<br />
Slider in position 2 (date: day/month/year): Press or to set the date. (Note: the day of the week is automatically chosen)<br />
Automatic Mode with Two <strong>Heating</strong> Phases (START) Phase 1: (Factory set at 06:00)<br />
5<br />
6<br />
7<br />
8<br />
9<br />
10<br />
11<br />
12<br />
Slider in position 3 (start time for comfort phase 1): Press or to set the start time for heating phase 1.<br />
Hint: you will notice the flashing time cursor on the 24 hour time bar (at the bottom of the screen) corresponding with the<br />
entered time, moves as you adjust the time with the or buttons<br />
Automatic Mode with Two <strong>Heating</strong> Phases (END) Phase 1: (Factory set at 08:00)<br />
Slider in position 4 (end time for comfort phase 1): Press or to set the end time for heating phase 1.<br />
Automatic Mode with Two <strong>Heating</strong> Phases (START) Phase 2: (Factory set at 17:00)<br />
Slider in position 5 (start time for comfort phase 2): Press or to set the start time for heating phase 2.<br />
Automatic Mode with Two <strong>Heating</strong> Phases (END) Phase 2: (Factory set at 22:00)<br />
Slider in position 6 (end time for comfort phase 2): Press or to set the end time for heating phase 2.<br />
Automatic Mode with Single <strong>Heating</strong> Phase (START): (Factory set at 07:00)<br />
Slider in position 7 (start time for comfort phase): Press or to set the start time for heating phase B.<br />
Automatic Mode with Single <strong>Heating</strong> Phase (END): (Factory set at 23:00)<br />
Slider positions 8 (end time for comfort phase): Press or to set the end time for heating phase B.<br />
Setting Energy Saving Temperature from Monday to Sunday:<br />
(Factory set at 20°C)<br />
Slider in position 9 (comfort temperature for Automatic mode A and B): Press or to set the required comfort temperature.<br />
Setting Energy Saving Temperature from Monday to Sunday:<br />
(Factory set at 16°C)<br />
Slider in position 10 (energy saving temperature for Automatic mode A and B): Press or to set the required energy saving<br />
temperature.<br />
Note: The energy saving temperature in time programs A and B is independent of the energy saving temperature in operating mode “Continuously<br />
Energy Saving mode“.<br />
Hint: If you do not want your heating to come on at night (or anytime it is controlling to the setpoint) then set this value low e.g. 3.0°C<br />
13 RUN Completed Programming Move the slider to RUN position and close the cover.<br />
<strong>REV13</strong> <strong>User</strong> <strong>Guide</strong> Room temperature controller <strong>REV13</strong> Page 1 of 2
Operating Mode Selection<br />
There are five operating modes as described in the table below.<br />
Operating mode symbol descriptions<br />
Automatic 24-hour mode with two heating phases (typical setting during winter)<br />
Automatic 24-hour mode with one heating phase (Ideal for when you are at home<br />
for the day)<br />
Continuous comfort mode (heater will maintain set point continuously until<br />
removed) e.g. heater will be on 24/7<br />
Continuous energy saving mode (Night time set point).<br />
Continuous Frost protection mode/OFF Mode (continuous frost protection, can<br />
be set between 8°C and 3°C, if room temperature drops below this set value the<br />
heater will turn on). To set this use the or buttons and wait until it stops<br />
flashing<br />
Select operating mode<br />
Press the operating mode button<br />
to scroll down and back up to the top in order to select one of 5 modes.<br />
Operating modes with time program<br />
and<br />
The controller offers both time programs Automatic modes (two heating phases) and (one heating phase)<br />
Do you feel too warm / too cold?<br />
Press or to set the temperature. The setting is temporary and active only until the next time the controller<br />
activates a change.<br />
Note: To set your own programs, see: "Enter customized temperatures and switching<br />
times".<br />
Continuous operating modes , and .<br />
The controller offers continuous operating modes "Continuous comfort mode“ ,<br />
"Continuous energy saving mode“ and frost protection mode .<br />
Do you feel too warm / too cold?<br />
Press or to set a continuous temperature.<br />
How can I tell if my heater should be running?<br />
When the REV Controller requires the heate to be heating you should see the<br />
screen.<br />
symbol on the right side of the<br />
<strong>REV13</strong> <strong>User</strong> <strong>Guide</strong> Room temperature controller <strong>REV13</strong> Page 2 of 2