service manual.vp - eTundra
service manual.vp - eTundra
service manual.vp - eTundra

Create successful ePaper yourself
Turn your PDF publications into a flip-book with our unique Google optimized e-Paper software.
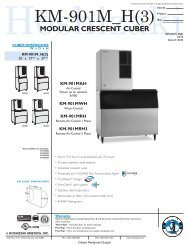
General Installation - Remote<br />
Precharged Line Routing<br />
Do not connect the precharged tubing until all routing and forming of the tubing is complete.<br />
See the Coupling Instructions for final connections.<br />
1. Each set of pre-charged tubing lines contains a 3/8” diameter liquid line, and a 1/2” diameter<br />
discharge line. Both ends of each line have quick connect couplings, the end without access<br />
valves goes to the ice maker.<br />
Note: The openings in the building ceiling or wall, listed in the next step, are the minimum sizes<br />
recommended for passing the refrigerant lines through.<br />
2. Have the roofing contractor cut a minimum hole for the refrigerant lines of 1 3/4”. Check<br />
local codes, a separate hole may be required for the electrical power supply to the condenser.<br />
Caution: Do NOT kink the refrigerant tubing while routing it.<br />
3. Route the refrigerant tubes thru the roof opening. Follow straight line routing whenever<br />
possible. Excess tubing may EITHER be coiled up INSIDE the building OR cut out prior to<br />
connection to the ice maker and condenser.<br />
If the excess tubing is cut out, after re-brazing the tubing must be evacuated prior to<br />
connection to the ice maker or condenser.<br />
Note brazing requires a nitrogen purge.<br />
If the excess tubing is to be coiled, spiral it horizontally to avoid excess trapping in the lines.<br />
5. Have the roofing contractor seal the holes in the roof per local codes<br />
September 2006 Page 15