Spalted Wood
Spalted Wood
Spalted Wood

You also want an ePaper? Increase the reach of your titles
YUMPU automatically turns print PDFs into web optimized ePapers that Google loves.
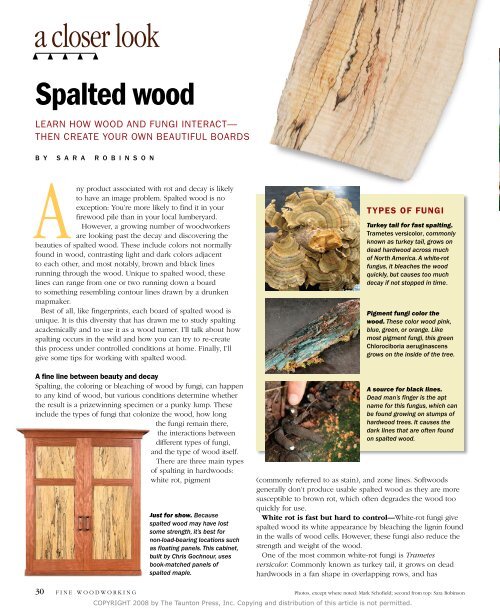
a closer look<br />
<strong>Spalted</strong> wood<br />
LEARN HOW WOOD AND FUNGI INTERACT—<br />
THEN CREATE YOUR OWN BEAUTIFUL BOARDS<br />
B Y S A R A R O B I N S O N<br />
Any product associated with rot and decay is likely<br />
to have an image problem. <strong>Spalted</strong> wood is no<br />
exception: you’re more likely to find it in your<br />
firewood pile than in your local lumberyard.<br />
However, a growing number of woodworkers<br />
are looking past the decay and discovering the<br />
beauties of spalted wood. These include colors not normally<br />
found in wood, contrasting light and dark colors adjacent<br />
to each other, and most notably, brown and black lines<br />
running through the wood. unique to spalted wood, these<br />
lines can range from one or two running down a board<br />
to something resembling contour lines drawn by a drunken<br />
mapmaker.<br />
Best of all, like fingerprints, each board of spalted wood is<br />
unique. It is this diversity that has drawn me to study spalting<br />
academically and to use it as a wood turner. I’ll talk about how<br />
spalting occurs in the wild and how you can try to re-create<br />
this process under controlled conditions at home. Finally, I’ll<br />
give some tips for working with spalted wood.<br />
A fine line between beauty and decay<br />
Spalting, the coloring or bleaching of wood by fungi, can happen<br />
to any kind of wood, but various conditions determine whether<br />
the result is a prizewinning specimen or a punky lump. These<br />
include the types of fungi that colonize the wood, how long<br />
the fungi remain there,<br />
the interactions between<br />
different types of fungi,<br />
and the type of wood itself.<br />
There are three main types<br />
of spalting in hardwoods:<br />
white rot, pigment<br />
Just for show. Because<br />
spalted wood may have lost<br />
some strength, it’s best for<br />
non-load-bearing locations such<br />
as floating panels. This cabinet,<br />
built by Chris Gochnour, uses<br />
book-matched panels of<br />
spalted maple.<br />
TYPES OF FUNGI<br />
Turkey tail for fast spalting.<br />
Trametes versicolor, commonly<br />
known as turkey tail, grows on<br />
dead hardwood across much<br />
of North America. A white-rot<br />
fungus, it bleaches the wood<br />
quickly, but causes too much<br />
decay if not stopped in time.<br />
Pigment fungi color the<br />
wood. These color wood pink,<br />
blue, green, or orange. Like<br />
most pigment fungi, this green<br />
Chlorociboria aeruginascens<br />
grows on the inside of the tree.<br />
A source for black lines.<br />
Dead man’s finger is the apt<br />
name for this fungus, which can<br />
be found growing on stumps of<br />
hardwood trees. It causes the<br />
dark lines that are often found<br />
on spalted wood.<br />
(commonly referred to as stain), and zone lines. Softwoods<br />
generally don’t produce usable spalted wood as they are more<br />
susceptible to brown rot, which often degrades the wood too<br />
quickly for use.<br />
White rot is fast but hard to control—White-rot fungi give<br />
spalted wood its white appearance by bleaching the lignin found<br />
in the walls of wood cells. However, these fungi also reduce the<br />
strength and weight of the wood.<br />
One of the most common white-rot fungi is Trametes<br />
versicolor. Commonly known as turkey tail, it grows on dead<br />
hardwoods in a fan shape in overlapping rows, and has<br />
30 FINE WOOdWOrkINg<br />
Photos, except where noted: Mark Schofield; second from top: Sara robinson<br />
COPYRIGHT 2008 by The Taunton Press, Inc. Copying and distribution of this article is not permitted.
Spalt your own<br />
Keep the wood damp. To help maintain an even dampness around the boards, pour in and<br />
then wet some vermiculite (left). Lay dampened boards in the container and place pieces of<br />
fungi in contact with them (center). Then cover the boards with more damp vermiculite and put<br />
a loose lid on the container. After six weeks, remove a sample block, clean off the vermiculite,<br />
and inspect the amount of spalting (right). Check every two weeks until there is enough.<br />
alternating colored bands of brown, blue, yellow, red, or black.<br />
It can be found from July through October in North America.<br />
Trametes versicolor is an aggressive colonizer, making it<br />
fantastic for spalting due to its quick growth, but care should be<br />
taken not to let it decay the wood past a usable state.<br />
Pigment fungi can be hard to locate—Blue-stain fungi are<br />
the most common types of pigmentation, but there are other<br />
fungi that impart vivid hues of pink, green, and orange. Most of<br />
these brightly colored fungi are secondary colonizers, meaning<br />
they can only spalt wood after another fungus has gone through<br />
and taken away some of the wood’s natural barriers.<br />
Pigment fungi can be allowed to spalt wood for much longer<br />
than white-rot fungi, and not as much care is needed to ensure<br />
the continued stability of the wood.<br />
Pigment fungi in the genus Ceratocystis spp. don’t have an<br />
easily recognizable fruiting body, like a mushroom, so often<br />
the only way to find them is in fallen timber. If you see wood<br />
with blue stain, gather shavings or sawdust for do-it-yourself<br />
spalting (see below).<br />
Lines usually need two or more fungi—Thin, winding lines<br />
of black, red, and sometimes brown that streak across wood are<br />
known as zone lines. They form when one fungus erects a sort<br />
of wall to protect its resources, or when two or more fungi antagonize<br />
each other.<br />
Xylaria polymorpha (dead man’s finger) is probably the<br />
most well-known fungus that causes these zone lines. It grows<br />
worldwide on decaying hardwood and generally resembles a<br />
cluster of black “fingers” growing up out of a stump or log. This<br />
fungus can erect zone lines on its own, but also puts them up<br />
quickly when another fungus is near.<br />
DIY spalting<br />
Spalting wood is a lot like growing plants. With the right<br />
amounts of food, water, and heat, you should end up with good<br />
results, but success is by no means guaranteed.<br />
rather like home cooking, every result is likely to be slightly<br />
different.<br />
Nasty to nice. After removing the<br />
spalted board from the vermiculite,<br />
allow it to air-dry. When ready<br />
to work, lightly plane or sand the<br />
surface and apply a clear finish to<br />
display the spalting.<br />
First, pick your wood. Maple,<br />
birch, and beech are ideal, as their<br />
pale colors act as a blank canvas.<br />
due to its hardness, maple is especially good because areas<br />
that receive too much spalting won’t turn as soft as, say, a piece<br />
of aspen.<br />
Air-dried wood comes already laden with dormant spores of<br />
different fungi, so there is no need to introduce more spores.<br />
kiln-dried wood is more hit-and-miss because steam sterilizing<br />
will kill all the spores, but regular kiln-drying may kill only<br />
some of them. In either case, to be on the safe side, you’ll<br />
need to obtain fungal spores, either by collecting them out in<br />
the woods or checking your firewood pile for spalted wood.<br />
If the piece is too small to make anything out of, you can cut<br />
the wood and use the sawdust or shavings for your spalting<br />
experiments.<br />
Bag it or bin it—The ideal conditions for spalting are darkness<br />
with around 80% humidity and 80ºF temperature. To achieve these<br />
www.finewoodworking.com July/AuguST 2008 31<br />
COPYRIGHT 2008 by The Taunton Press, Inc. Copying and distribution of this article is not permitted.
a closer look continued<br />
Turning spalted wood<br />
Turning is a great way to display spalted wood. You can turn dried<br />
blanks, but green wood has a more consistent density.<br />
Reinforce soft areas. <strong>Wood</strong> that<br />
has been softened by fungi can be<br />
hardened by soaking it with cyanoacrylate<br />
(“Super”) glue. The glue<br />
won’t show after a finish has been<br />
applied.<br />
Controlled sanding. Some sections<br />
of spalted wood are softer<br />
than others, so it is better to use<br />
foam sanding pads on a drill press<br />
rather than sanding the work<br />
while it is on the lathe.<br />
conditions, you can place the wood in either a plastic bag (but don’t<br />
seal it, because the fungi require oxygen) or a plastic storage bin.<br />
These bins are not airtight and they come in a variety of sizes. If<br />
you use a plastic container, it’s advisable to pack some sort of filler<br />
around the wood to help prevent moisture loss. Vermiculite, a dry,<br />
flaky soil additive available at garden-supply centers, is a relatively<br />
clean material.<br />
Finally, break the fungi into small pieces and place them on<br />
the wood. The board does not need to be covered completely;<br />
however, the more places you stick some spores, especially on<br />
the end grain, the quicker the piece will spalt. Place the bin<br />
somewhere warm and dark, and wait.<br />
The amount of time it takes for a piece of wood to start<br />
spalting will vary by species, fungi, temperature, and the size<br />
of the piece. Because moving the wood slows the spalting,<br />
it is best to place a few small sample pieces of wood in the<br />
container at the start of the experiment. Starting at six weeks,<br />
remove a block every two weeks to check it for softness and<br />
color. If you like what you have, remove the board from the bin<br />
or bag. If not, wait another two weeks and check again.<br />
Once you remove the spalted wood from its container, make<br />
sure to air-dry it before use (unless you will be turning it that<br />
day). The fungi will continue to colonize the wood until the<br />
moisture content drops below 20%.<br />
wood dust, so if you sand spalted wood, wear a mask. However,<br />
people with immune system disorders should not work with<br />
spalted wood.<br />
Because areas of heavy white rot are likely to be softer than<br />
regular wood, when handplaning, use a low-angle blade to<br />
slice through the wood. When turning, pockets of rot can cause<br />
dig-ins and uneven sanding in the final product. If areas of<br />
the wood are spongy, or if there are small splotches of white<br />
throughout the piece, you might want to stabilize those areas<br />
with a two-part, five-minute epoxy resin or cyanoacrylate glue.<br />
It’s a good idea to turn spalted wood when it is green<br />
because the whole piece is soft, which minimizes the difference<br />
in hardness between spalted and unspalted areas. Because the<br />
grain rises as the wood dries, sanding is most efficient after the<br />
wood has dried.<br />
Finally, softer areas of spalted wood will soak up finish, so it<br />
may take several extra coats before the cells become saturated.<br />
While you’ll probably spend a bit more time shaping and<br />
finishing spalted wood than traditional lumber, the end results<br />
are well worth it. <br />
•<br />
Working with spalted wood<br />
There is a misconception among many woodworkers that<br />
working with spalted wood is particularly dangerous. Most<br />
fungal spores are about as harmful to a healthy adult as<br />
32<br />
FINE woodworking<br />
Full of character. The left-hand<br />
bowl is silver maple spalted with blue<br />
stain and two types of white rot. The<br />
other bowl is box elder, but the pink<br />
streaks in this case are caused by<br />
spalting.<br />
COPYRIGHT 2008 by The Taunton Press, Inc. Copying and distribution of this article is not permitted.
www.finewoodworking.com<br />
COPYRIGHT 2008 by The Taunton Press, Inc. Copying and distribution of this article is not permitted.<br />
July/August 2008 33