
Create successful ePaper yourself
Turn your PDF publications into a flip-book with our unique Google optimized e-Paper software.
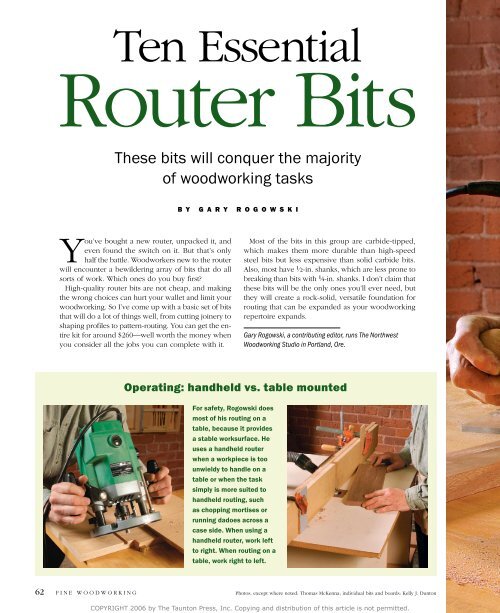
Ten <strong>Essential</strong><strong>Router</strong> <strong>Bits</strong>These bits will conquer the majorityof woodworking tasksb y G a r y R o g o w s k iYou’ve bought a new router, unpacked it, andeven found the switch on it. But that’s onlyhalf the battle. Woodworkers new to the routerwill encounter a bewildering array of bits that do allsorts of work. Which ones do you buy first?High-quality router bits are not cheap, and makingthe wrong choices can hurt your wallet and limit yourwoodworking. So I’ve come up with a basic set of bitsthat will do a lot of things well, from cutting joinery toshaping profiles to pattern-routing. You can get the entirekit for around $260—well worth the money whenyou consider all the jobs you can complete with it.Most of the bits in this group are carbide-tipped,which makes them more durable than high-speedsteel bits but less expensive than solid carbide bits.Also, most have 1 ⁄2-in. shanks, which are less prone tobreaking than bits with 1 ⁄4-in. shanks. I don’t claim thatthese bits will be the only ones you’ll ever need, butthey will create a rock-solid, versatile foundation forrouting that can be expanded as your woodworkingrepertoire expands. Gary Rogowski, a contributing editor, runs The NorthwestWoodworking Studio in Portland, Ore.Operating: handheld vs. table mountedFor safety, Rogowski doesmost of his routing on atable, because it providesa stable worksurface. Heuses a handheld routerwhen a workpiece is toounwieldy to handle on atable or when the tasksimply is more suited tohandheld routing, suchas chopping mortises orrunning dadoes across acase side. When using ahandheld router, work leftto right. When routing on atable, work right to left.62F I N E w o o d w o r k i n gPhotos, except where noted: Thomas McKenna; individual bits and boards: Kelly J. DuntonCOPYRIGHT 2006 by The Taunton Press, Inc. Copying and distribution of this article is not permitted.
A B A S I C B I T K I T• 1 ⁄4-in. straight bit• 1 ⁄2-in. straight bit• 3 ⁄8-in. spiral-flutedstraight bit• Rabbeting bit with fourbearings• 1 ⁄2-in. dovetail bit• 1 ⁄4-in. roundover bit• 3 ⁄8-in.-radius cove bit• 45° chamfer bit• Three-wing slot cutter• 1 ⁄2-in. flush-trimming bitS e p t e m b e r / O c t o b e r 2 0 0 6 63COPYRIGHT 2006 by The Taunton Press, Inc. Copying and distribution of this article is not permitted.
Straight bitsG R O O V E S A N D DA D O E SStraight bits do the yeoman’swork in a router-bit kit.Designed for square, uniformcuts such as grooves and dadoes,they also can be usedto clean up edges and to cutmortises, tenons, and rabbets.Straight bits have straight orspiral flutes. Two useful sizesof straight-fluted bits are1⁄4 in. and 1 ⁄2 in. (Choose a1⁄4-in. shank for the 1 ⁄4-in. bit;a 1 ⁄2-in. shank will limit thedepth of cut.) A 3 ⁄8-in.-dia.spiral-fluted up-cutting bit isperfect for chopping mortises.A groove is cut along the long grain of a board,while a dado is cut across the grain. A sharpstraight bit makes quick work of both tasks andgives you grooves and dadoes of uniform size.Generally, grooves are easier to cut on a routertable, but it’s possible to cut them with a handheldrouter. Use a plunge router for stopped grooves. Foraccuracy, you’ll need to employ the router’s edgeguide or secure a straightedge to the workpiece toguide the router.Dadoes often are cut in multiples and on longer,wider stock for case goods, so it makes sense tocut them with a handheld router. For speed andaccuracy, it’s a good idea to use a right-angle jigthat clamps to the workbench and across the stock(see photos, below). Fed properly, the router basewill be pushed by the cutting action against thefence of the jig, ensuring a straight cut.Make the jig out of 3 ⁄4-in.-thick plywood: Screw afence to the base (both about 4 in. wide) at a precise90° angle. Place the router base against thefence, then rout a dado in the base of the jig. Usethat dado to align the jig with layout lines on theworkpiece.Grooves are best cut on the router table.For smooth cuts with little burning, take lightpasses, gradually raising the bit to full height.Right-angle jig ensures straight dadoes.Align the dado in the jig with the layout lineson the workpiece, then clamp the jig in place.Work on this side of thefence. Then the bit’s rotationwill pull the router baseagainst the jig’s fence, ensuringan accurate cut.64 F I N E W o o D W o R K I N gPhotos, this page: Michael Pekovich (bottom two); drawings: christopher R. MillsCOPYRIGHT 2006 by The Taunton Press, Inc. Copying and distribution of this article is not permitted.
E D G E T R I M M I N GYou can use straight bits tomake edge cuts just like ajointer. I often use this techniqueon workpieces such astabletops that are too unwieldyto clean up on a jointer.To ensure a straight cut,make a jig a bit longer thanthe longest edge you needto rout. The jig should have abase of 1 ⁄4-in.-thick mediumdensityfiberboard (MDF) and a3⁄4-in.-thick fence (see drawing,right). Start by using the routerto trim the edge of the base.Then just place that edge onthe line you want to cut. Besure the cutting edge of the bitis long enough to reach pastthe bottom of the workpiece.<strong>Router</strong> as jointer. With the help of ajig, you can clean up rough-sawn edgeson large workpieces such as tabletops.Work from left to right.Fence, 3 ⁄4-in.-thickMDF or plywoodBase,1⁄4-in.-thick MDFWorkpieceBit shouldextend belowworkpiece.U S E A S P I R A L B I T F O R M O R T I S I N GTIPDon’t toss yourloose bits in adrawer. If theyroll around andbump into eachother, the cuttingedges couldget chipped.Instead, holdbits in their originalpackaging,or drill a woodscrap to make asimple holder forthe set.It’s tough to find carbide-tippedspiral bits these days, so I chose asolid carbide bit for the kit. It’s anexpensive piece of tooling, but if youplan to cut mortises with a router,this is the bit to have. The flutesspiral around the bit, similar to theway a drill bit is cut, so it pulls chipsup and out of the mortise. And withspiral flutes, there are always twocutting edges in the work, makingfor a smooth, shearing cut.Mortises in a flash. Mounted in aplunge router, a spiral bit cuts a mortiseeasily. Use a router fence for accuracy.To prevent the router base from wobblingon narrow stock, support it with an extrapiece of stock.www.FineWoodwor k i n g.comS E P T E M B E R / o c T o B E R 2 0 0 6 65COPYRIGHT 2006 by The Taunton Press, Inc. Copying and distribution of this article is not permitted.
Rabbeting bitAs the name implies, a bearing-guided rabbeting bit excels atcutting rabbets of varying sizes. Although a straight bit can dothe job, the bearing-guided bit ensures uniformity, an advantageif you’re cutting a number of identical rabbets.A rabbeting bit with a set of different-diameter bearings allowsyou to change the width ofthe rabbet simply by switchingout the bearings. Rabbetstypically are not muchdeeper than 1 ⁄2 in., so theset I recommend adjusts tocut rabbets from 5 ⁄16 in. to1⁄2 in. wide. You can use thePROFILING THE EDGES OF A FRAMETIPBuy quality bitsfrom reputablesources. Generally,a cheap bitwon’t last aslong as its priciercousin becauseit’s not as wellmade. You couldend up spendingtwice as muchto replace a bitthat dulls prematurely,breaks,or chips.To rout a profile on theoutside edge, move therouter counterclockwise.To rabbet theinside edgeof a pictureframe, movethe routerclockwise.Three-wing slot cutter, 1 ⁄4 in. thickA slot cutter makes grooves to a specific, consistentdepth and width, with a cleaner cutting action than astraight bit. It is used mainly for cutting grooves for aframe-and-panel assembly, but it also can be used torabbet the edges of panels and to carve decorativegrooves in panels or pilasters.Each of these jobs is best doneon a router table.I chose a bit with three wingsthat cuts a 1 ⁄4-in. kerf. Threewings provide more balancethan two. The smaller kerfallows you to cut grooves for1⁄4-in.-thick panels as well as larger oneswith a series of passes. You can change thedepth of cut by changing the bearing.Rabbets made easy. A bearing-guided rabbeting bitallows you to rabbet a glued-up picture frame. You can dialin the depth of the rabbet and prevent tearout by makinga series of shallow passes ( 1 ⁄32 in. to 1 ⁄16 in. deep) until youreach the final depth. You’ll have to clean up the cornerswith a chisel.bit in a router table or in ahandheld router.One advantage of abearing-guided rabbetingbit is that you can cut rabbetsin frames after theyhave been glued together,which ensures perfectalignment. The bearingcontrols the rabbet’s width,so there’s no need for afence to guide the cut. Movethe router clockwise aroundthe inside of the frame(see drawing, left).66 F I N E W o o D W o R K I N gPhotos, facing page: Michael Pekovich (top right, center right)COPYRIGHT 2006 by The Taunton Press, Inc. Copying and distribution of this article is not permitted.
1⁄2-in. dovetail bitDovetail bits are designed tomake dovetails for drawersor carcases as well as slidingdovetails. Most dovetail bitshave angles ranging from 7°to 14°. I prefer the <strong>10</strong>° angle,which works well for both hardand soft woods.Both parts of a sliding dovetailjoint can be cut on a routertable. Dovetail bits are madeto cut full depth. So before youcut a sliding dovetail slot, run a1⁄4-in. straight bit through firstto clean out most of the waste.Follow with the dovetail bit.This will extend the life of thebit and leave a cleaner cut.Cut the slot first, with thestock held flat on the tableand a backer board behind it tokeep the workpiece square tothe fence and prevent blowout.With the bit height unchanged,reset the fence to cut thedovetail on the end of the matingpiece. Make test cuts ina scrap piece the same thicknessas the stock.Sliding dovetail:solid and sturdy.Make the slot first,holding the board flaton the table (above).Leave the height of thebit as-is, and adjust thefence to cut the matingdovetail with the stockheld vertically againstthe fence (right). Again,use a backer board toprevent tearout andto keep the workpiecealigned.45° chamfer bitThe chamfer bit is used to bevelthe edge of a workpiece. The45° model I’ve included in thiskit (1 1 ⁄4 in. dia.) is the most common.It’s faster than a blockplane for creating uniformchamfers on legs, aprons,and tabletops. You also canuse it to achieve great visualeffects (see photo, far right).The bearing on the bottom ofthe bit allows you to make cutswithout a fence. To increasethe depth of the chamfer, raisethe bit.Eased edges. A 45° chamfer bit cansoften the edges of legs, aprons, andtabletops.Thick and thin. Youcan make a beefy toplook thinner by chamferingthe bottom edge (top), and athin top look thicker by chamferingthe top edge.www.FineWoodwor k i n g.comS E P T E M B E R / o c T o B E R 2 0 0 6 67COPYRIGHT 2006 by The Taunton Press, Inc. Copying and distribution of this article is not permitted.
1⁄4-in. roundover bitA bearing-guided roundover bit eases sharpcorners and softens the look of a piece.The 1 ⁄4-in. bit is a good moderate size tostart your collection, because it will cutroundovers with or without a step (fillet)and can be used to create 1 ⁄2-in.-thick loosetenon stock as well as molding profiles(see drawings, below).To help prevent tearout, take lightpasses, gradually raising the bit untilyou’re cutting at full depth. End grain isprone to blowout at the end where thewood fibers are unsupported. The solutionis simple: Round over the end-grain edgesfirst, then rout the long grain. Working thisway removes any blowout that occurs onthe end grain.Two profiles, one bit. Use theroundover bit to create a softedge (bottom) or a roundededge with a step, or fillet, alongthe top of the profile.R O U N D O V E R A N D C O V E B I T SC R E AT E A C L A S S I C P R O F I L E3⁄8-in.-radius cove bitSome router bits are designedsimply to make decorativecuts. One example is thecove bit, which creates asimple concave edge.I use this bit oftento create a hiddenpull in a drawer front.Because the cove bitis designed to make profilecuts, this choice is simplya matter of taste (I like theshape). You might choose adifferent profile, depending onthe work you do. The bonus ofhaving both a cove and a roundoverbit in your kit is that youcan use the bits in tandem tocreate a complex profile (seephoto and drawings, right), or adrop-leaf table edge if both bitsare the same radius.You cancombineroundoverand cove bits tocreate an ogee profilewith a fillet. Makethe first pass with thecove bit, then finish with theroundover cutting full depth.FIRST ROUTTHE COVE<strong>Router</strong>-table fenceTo reduce tearout,gradually raise thebit to full depth.Cove bitTHEN SHAPETHE ROUNDOVERRoundover bitWorkpieceHidden pull. You can use acove bit to carve a drawerpull on the back lower edgeof a drawer front.68 F I N E W o o D W o R K I N gPhotos, facing page: Michael PekovichCOPYRIGHT 2006 by The Taunton Press, Inc. Copying and distribution of this article is not permitted.
1⁄2-in. flush-trimming bitWith a bearing-guided flush-trimmingbit, 1 ⁄2 in. dia. is pretty standard, butyou could choose a different diameterif you’d like. I recommend getting a1 1 ⁄2-in.-long bit, though, because theextra length comes in handy whenworking with thick stock.The flush-trimming bit is indispensablefor trimming face frames flushto carcases, and for trimming edgebandingflush.With the flush-trimming bit, youalso can duplicate pieces easily ona router table (called pattern, ortemplate, routing). The bearing rideseither against the original piece oragainst a pattern or template securedin a jig with hold-down clamps (seedrawing, below). Before mounting theworkpiece in the jig, cut away most ofthe waste on the bandsaw. Be carefulnot to rout uphill (against the grain),which could cause severe tearout.When you reach the point where thegrain changes direction, reverse theworkpiece in the jig.Trim face frames flush to case. The bearing on a flush-trimming bit is thesame diameter as the cutter, allowing you to bring a frame flush to a carcaseusing a handheld router.PATTERN-ROUTING JIGBearingrides againsttemplate.TemplateToggle clampFenceWorkpieceBase, 1 ⁄4 in. thickFineWoodworking.comVisit our Web site for a demonstrationof template routing.Create identical parts on the router table. Cut away most of the wasteon the bandsaw first, then place the workpiece in a jig with the template ontop (see drawing). The bearing will ride against the template, making anexact copy of the original. Cut with the grain, and reverse the workpiece inthe jig (if possible) when the grain changes direction.www.FineWoodwor k i n g.comS E P T E M B E R / o c T o B E R 2 0 0 6 69COPYRIGHT 2006 by The Taunton Press, Inc. Copying and distribution of this article is not permitted.