Handplane Tune-up
Handplane Tune-up
Handplane Tune-up

Create successful ePaper yourself
Turn your PDF publications into a flip-book with our unique Google optimized e-Paper software.
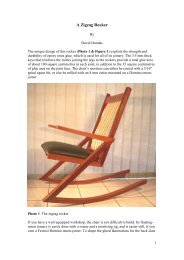
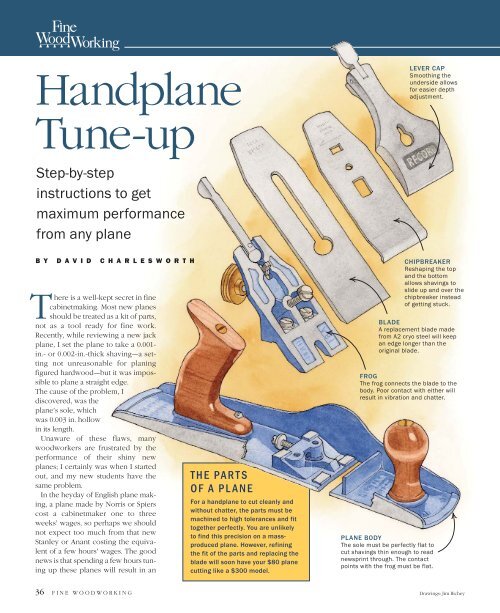
w<strong>Handplane</strong><strong>Tune</strong>-<strong>up</strong>LEVER CAPSmoothing theunderside allowsfor easier depthadjustment.Step-by-stepinstructions to getmaximum performancefrom any planeBY DAV I D C H A R L E S W O R T HThere is a well-kept secret in finecabinetmaking. Most new planesshould be treated as a kit of parts,not as a tool ready for fine work.Recently, while reviewing a new jackplane, I set the plane to take a 0.001-in.- or 0.002-in.-thick shaving—a settingnot unreasonable for planingfigured hardwood—but it was impossibleto plane a straight edge.The cause of the problem, Idiscovered, was theplane’s sole, whichwas 0.003 in. hollowin its length.Unaware of these flaws, manywoodworkers are frustrated by theperformance of their shiny newplanes; I certainly was when I startedout, and my new students have thesame problem.In the heyday of English plane making,a plane made by Norris or Spierscost a cabinetmaker one to threeweeks’ wages, so perhaps we shouldnot expect too much from that newStanley or Anant costing the equivalentof a few hours’ wages. The goodnews is that spending a few hours tuning<strong>up</strong> these planes will result in anTHE PARTSOF A PLANEFor a handplane to cut cleanly andwithout chatter, the parts must bemachined to high tolerances and fittogether perfectly. You are unlikelyto find this precision on a massproducedplane. However, refiningthe fit of the parts and replacing theblade will soon have your $80 planecutting like a $300 model.CHIPBREAKERReshaping the topand the bottomallows shavings toslide <strong>up</strong> and over thechipbreaker insteadof getting stuck.BLADEA replacement blade madefrom A2 cryo steel will keepan edge longer than theoriginal blade.FROGThe frog connects the blade to thebody. Poor contact with either willresult in vibration and chatter.PLANE BODYThe sole must be perfectly flat tocut shavings thin enough to readnewsprint through. The contactpoints with the frog must be flat.36 FINE WOODWORKING Drawings: Jim Richey
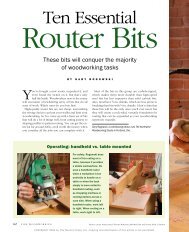
SEPTEMBER/OCTOBER 2004outstanding improvement in their performance.The methods I’ll describe can beapplied to any Bailey-type plane with ametal body, whether old or new.Invest in a replacement bladeThe quickest way to improve a plane is topurchase a high-quality A2 steel replacementblade that has been cryogenicallytreated. These blades are available fromRon Hock and Thomas Lie-Nielsen (seeSources on p. 40), but if you buy from thelatter, be sure to order the 0.095-in.-thickblade because the thicker 0.130-in. blademay not fit in your plane. Even the 0.095-in.-thick blade will be significantly thicker andstiffer than a stock blade, greatly reducingvibration and chatter.Fit the frog to prevent distortionThe first step in the tune-<strong>up</strong> process is todisassemble the plane, remove the frog,and check its seating—the four contactpoints between the body and the undersideof the frog. A badly seated frog screweddown tight will distort the thin area of thesole just behind the throat of the plane.To determine how well the surfaces fit,work the relevant areas of the body castingwith a black felt-tip pen. Remove the foreand-aftadjustment plate, press the frog inplace, and slide it back and forth. The inkwill be scraped off where the surfacesmake good contact. If the frog rocks, onlytwo diagonal points are making contact.Work on the contact points until youachieve about 60% contact on all four surfaces.Although it is slow, I prefer to scraperather than file the contact points of the solecasting. With a file, it’s easy to remove toomuch material and ruin the tool. If you don’thave an engineer’s scraper, you can makeone by grinding a 6-in. file so that the lastinch of the two flat sides is slightly hollow,while the end has a convex profile.To perfect the fit, apply pinches of 180- or220-grit silicon carbide and a drop of waterto each scraped surface. Work the frog toand fro for a few minutes, leaving the surfacesmatte gray. Aim for 90% contact.The top of the frog comes next—Withmany new planes, you may find a pro-1 SCRAPE HIGH POINTSUse an engineer’s scraper toremove the high points andenlarge the areas of contactwhere the frog is seated to theplane body.23FIT THE FROGThe frog connects the blade tothe body of the plane. It isimportant that the frog seatssecurely to the body andprovides a flat mountingsurface for the blade. Aproperly fitted frog goes a longway toward reducing chatter.GRIND THE SURFACEApply a small amount ofsilicon-carbide powder to eachcontact point, add a drop ofwater, and then slide the frogback and forth to give themetal a smooth finish.SMOOTH THE TOPAfter marking the top of thefrog with a felt-tip pen, grind iton 240-grit wet-or-dry paperstuck to a smooth, flat surface.The center felt-tip lines shouldbe removed.Photos: Mark SchofieldSEPTEMBER/OCTOBER 2004 37
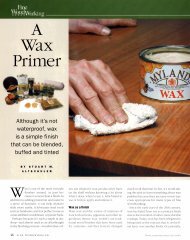
MODIFYTHE THROATFOR CLOG-FREEPLANINGA narrow mouth helpsprevent tearout but in anunmodified plane is likely toalso trap shavings in thethroat. Filing the front edgeof the throat at a 15° angleand refining the shape of thechipbreaker provides moreroom for shavings to escape.UNMODIFIED FACTORY PLANEChips canbecome stuckin the tightthroat.ChipbreakerBladeMODIFICATIONS THAT ALLOWCHIPS TO EXIT A TIGHT MOUTHCurved end of thechipbreaker is reshapedand polished.SoleChips can be forced into aless-than-perfect sealbetween the blade and thechipbreaker.FrogThroat is filed at 15°to maintain a narrowopening at the solewhile providing betterchip clearance.Underside of the chipbreakeris beveled to provide solidcontact at the front tip withthe blade.1ANGLE THE THROATTo prepare the throat forfiling, mark the sole with ablack felt-tip pen, thenscribe a line as close to themouth as possible (above).Then clamp the plane bodyin a vise, angling it 15° fromvertical. Keep the file parallelto the top of the vise andgradually file the throatback 15° (right) until thenew bevel reaches thescribe line.nounced hollow in the critical area on topof the frog that s<strong>up</strong>ports the blade just behindits bevel. This hollow can cause chatterduring planing. A rough surface alsomay impede smooth blade adjustment. It isnot necessary to remove every scratchfrom the top of the frog; just aim for anoverall flatness.Begin by taping 240-grit wet-or-dry paperto a flat surface. Draw lines across the topsurface of the frog with a felt-tip markerand use the marks to gauge your progress.Rub the frog back and forth on the sandpaper,being careful not to rock the casting.You will have to work the top of the slopeby hand with a small block wrapped insandpaper because of the protruding lateraladjuster rivet. Take the opportunity to easeany sharp, ragged edges of the casting witha fine file.I also like to polish the contact pointsof the Y adjustment lever, where theytouch the turned groove of the brass adjustmentwheel. Sometimes the finish onthe Y lever is rough from sand casting,which eats away at the wheel’s soft brass,causing increased backlash over the years.Refine the throatto prevent trapped shavingsBegin by filing the front edge of the throat.Degrease the sole and blacken the areanext to the mouth’s front edge with the felttipmarker. Scribe a light line across thesole as close as possible to the existing38 FINE WOODWORKING
2MODIFY THE CHIPBREAKERSlightly bevel the bottom of the chipbreakeron a diamond stone or other medium-grit honingstone. Maintain the proper angle by restingthe end of the chipbreaker on a scrap ofwood (right). Then shape the top of the chipbreakerby clamping it in a honing guide andworking it on a stone (bottom left). Repositionthe chipbreaker in the jig to create a series offacets that will be honed and polished furtherto form a gentle curve (bottom right).front edge. Use this line as a reference forthe next step, filing the throat.Grip the plane body at 15° in a vise. It isvital that the jaws of the vise squeeze onlywhere the sides of the casting are s<strong>up</strong>portedby the crosswise rib. Pressure in anyother position might snap the brittle, castsides of the plane.Concentrate on keeping the file horizontal,using the top of the vise jaws as a guide.As you file, a bright surface will indicatewhere metal has been removed. Gradually,a minute wire edge is formed on the sole ofthe plane. Check the scribed line as you goto be sure you are keeping the mouth evenand narrow. Take special care not to removemetal from the sides. A fine 00-gradefile will give a smooth finish and crisp,square corners. Next, polish with 600-gritwet-or-dry sandpaper, then rub the mouthwith metal polish and steel wool for a wonderfulresult.Hone the chipbreaker—Chipbreakeredges are one of the areas of a bench planewith the most variable quality. The undersideof the chipbreaker must make perfectcontact with the blade to prevent shavingsfrom getting trapped between the two surfaces.To ensure this, slightly bevel the bottomedge by grinding it on a diamondstone or 240-grit wet-or-dry paper. S<strong>up</strong>portthe chipbreaker on a piece of wood tomaintain the correct angle (see the topphoto above). Examine the result bychecking that no light shows between thechipbreaker and the back of the blade.The top of the chipbreaker also must bereshaped. Remove metal by setting thechipbreaker in a honing guide, at 45°, andworking it on a diamond stone. By extendingthe projection from the guide 3 ⁄32 in.several times, you’ll form a series of flatsthat can be blended by hand using 400-gritpaper. The final step is to polish the surfacewith metal polish so that wood shavingsslide over the surface unimpeded.Work on the lever cap—The undersideof the front edge of the lever cap often hasa rough, sand-cast finish, which can besmoothed by rubbing on 240-grit wet-ordrysandpaper taped to a flat surface. Asmooth lever cap clamps the blade moresecurely and makes adjustments easier.Assemble the plane and adjust the frogBefore reassembling the plane, oil any unpaintedcast surfaces under the frog to preventrust. The fore-and-aft adjustment platesometimes needs a sideways twist to centerthe frog in the body. Tighten the frog’sholding screws gently so that the fore-andaftscrew will drive the frog forward andbackward. To determine the correct positionof the frog, insert the blade and adjustit for a fine even or balanced shaving. Drawinga small piece of wood across the mouthhelps show where the blade is cutting.Now examine the mouth from the undersideof the plane: The edge of the blademust be parallel to the front edge of themouth. If it is not, twist the frog withoutdisturbing the lateral adjustment lever untilthe blade is parallel to the mouth. Last,drive the frog forward to reduce the openingof the mouth. I suggest 0.020 in. or a full1⁄64 in. for beginners. Experienced woodworkerscan set the opening to 0.006 in.for their favorite fine finishing plane. Forsmall adjustments it sometimes is easiest totighten one of the frog’s holding screws sothat the frog pivots on this point. Be pre-SEPTEMBER/OCTOBER 2004 39
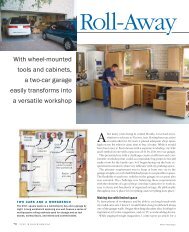
FLATTENTHE SOLEMark the toe, both sides ofthe mouth, and the heel.When these four lines aresanded away at the sametime, the plane is ready touse. On a flat surface suchas float glass, stick down afew different grades of wetor-drysandpaper. With theblade installed but backedoff, flatten the sole bysliding the plane over thesandpaper.pared for a few attempts to get the positionof the frog exactly right.When you are satisfied that the blade isparallel and that the mouth has the correctopening, remove the blade without disturbingthe frog so that the frog’s holdingscrews can be set to final torque. Don’tuse too much force, because it mightcrack the thin sole adjacent to the backedge of the throat. Tighten only to preventmovement.It is best to set <strong>up</strong> all of the working tensionsand retract the blade before flatteningthe sole, as it is possible that thepressure exerted by the lever cap will affectthe shape of the sole. (This is particularlytrue for rabbet, shoulder, and blockplanes.) The lever-cap screw should be setso that the lever action is firm but can beoperated without straining your thumb.The lever-cap screw often fits loosely inthe tapped hole in the frog. As you extendand retract the blade, it rocks forward andbackward, contributing to backlash. Solvethis problem by counting the number ofturns it takes to remove the screw, degreasingit, adding a few drops of Loctite mediumstrengthblue threadlocker to the hole, andthen inserting the screw with the samenumber of turns.Make certain the sole is flatFlattening the sole will improve the plane’sperformance more than any other singlestep. For flattening, I use a piece of 1 ⁄2-in.- or3⁄8-in.-thick perfectly flat glass known asSOURCES OF SUPPLYREPLACEMENT PLANE BLADESHock Toolswww.hocktools.com; 888-282-5233Lie-Nielsen Toolworkswww.lie-nielsen.com; 800-327-2520float glass. The glass is slightly flexible andmay pick <strong>up</strong> errors from the surface it is sittingon, so check it with a precisionstraightedge and shim with sheets of newspaper.It is preferable for the length to beminutely hollow rather than convex, justenough to slip a cigarette paper under themiddle of the straightedge.Apply sheets of wet-or-dry paper to theglass with spray adhesive, leaving a 1 ⁄2-in.gap between adjacent sheets. In most casesstart with 100-grit paper, but for a No. 7 orNo. 8 plane, or even a No. 5 that’s badly outof shape, start with 60 grit. Work <strong>up</strong>through 150- and 180-grit paper, finishingwith 240- or 320-grit paper. Flattening isperfected on the coarsest grit; subsequentfiner grits are purely to polish out the previousgrit’s scratches. The coarser grits maybe used dry and vacuumed during use, butkerosene (known as paraffin in somecountries) is necessary to stop the 240 and320 grits from clogging.To judge flatness and progress, drawlines across the sole with a black felt-tipmarker. The most important areas are thetoe, the heel, and the areas just in front ofand behind the mouth. If these lines disappearat the same rate, the plane is flatenough to perform really well.Remove sharp edges and protect themetal from rust—I create a 1 ⁄64-in. bevelon the edges of the sole on the final sandpaperused and file the front and back to awider 30° bevel. The last area to bevel a littleis the back edge of the throat, which canotherwise scrape the wood.Vacuum <strong>up</strong> any metal particles, then rubthe sole vigorously with 0000 steel wooland metal polish. Finish the sole and thesides of the plane witih several coats of apaste wax that doesn’t contain silicone, asthis gives good protection against corrosion.At the end of every session, before theplane is put away, I rub camellia oil ontothe unpainted sides and sole. Before use, Iremove the oil with a cloth.It is time for some test shavings on tightgrainedwood such as cherry or maple.With a properly sharpened blade (see thefacing page), shavings 0.001 in. thick, thesort you can read newsprint through,should be easily obtainable. David Charlesworth teaches woodworking in hisshop on the north coast of Devon, which is insouthwest England.40 FINE WOODWORKING
Preparing a new plane bladeEven if you have bought a replacement blade, the back still mayneed flattening, and the tip certainly will need sharpening. I preferto use artificial Japanese waterstones. The procedure for flatteningthe back of a plane blade is identical to flattening the back ofa chisel (see FWW #169, pp. 32-33), except for a final polishing onan 8,000-grit stone.FLATTEN AND POLISH THE BACK OF THE BLADEA flat back forms half of a clean, straight, sharp edge and createsa smooth surface for the chipbreaker to seat against.The slurry on the surface of a polishing stone creates apowerful suction against the surface of a plane blade. I mounta piece of wood to the top of the blade with double-faced tapeto act as a handle. Once I am ready to polish the back of the bladeon the 8,000-grit stone, I can see no benefit in polishing moremetal than is necessary for a razor-sharp edge, so I came <strong>up</strong> withwhat I call the ruler trick.Having created a slurry on the surface of the 8,000-grit stonewith a nagura, I stick a 0.5-mm or 1 ⁄32-in.-thick stainless-steel,6-in. ruler on the right-hand, long edge of the stone. After beingslid to and fro a co<strong>up</strong>le of times, the ruler sticks by surface tension.It is important to keep the top surface of the ruler dry. Theplane blade is placed crosswise so that its edge is about 1 ⁄4 in. offthe left-hand edge of the stone with the middle being s<strong>up</strong>portedon the steel ruler.Gentle pressure is applied with three fingers, just behind thetop of the grinding bevel, and the blade is drawn back no morethan about 1 ⁄2 in. from the edge of the stone. I usually use about 12to 15 strokes for a normal resharpening, but a new blade mayneed a few repeats to establish a polish. This is seen as a narrowband, immediately adjacent to the cutting edge. The fact that a 1°bevel has been imposed at the tip of the flat side has no noticeableimpact on a plane blade’s cutting ability, and a great deal oftime and effort has been saved.FLATTEN THE BACKFor better leverage, use doublefacedtape to attach a smallpiece of wood to the planeblade to act as a handle(below). On the finest stone,rest the middle of the blade ona very thin ruler so that onlythe very tip of the blade’s backis polished, saving a great dealof time and effort (right).HONE THE BEVELCreate a curved edge. By concentrating pressure first on one side ofthe blade and then on the other, the cutting edge acquires a slightly convexprofile.SHARPEN THE BEVELI like to sharpen my finishing blades with a very slight convex profileto avoid leaving sharp lines on the wood between adjacentstrokes of the plane. Using a vise-type honing guide with a narrows<strong>up</strong>port wheel, establish the desired angle, and then draw theblade back on an 800-grit stone. Apply pressure first on the leftside of the blade for eight strokes, and repeat with pressure onthe right side. Next, move the pressure point closer to the centerof the blade and use four strokes on each side. With pressure inthe center, use only one stroke. If you highlight the bevel with afelt-tip marker before starting, the resulting curve will show <strong>up</strong> asa shiny steel band.When you are happy with the profile, move to the 8,000-gritstone to polish the bevel, using all of the same pressure points.Finally, remove any wire edge by giving the back a few strokes onthe same stone, employing the ruler trick.Refine the curve. Darkening the blade with a marker makes it easy togauge your progress. When you have achieved the profile you want,move to the finest stone and repeat the process.SEPTEMBER/OCTOBER 2004 41