Handplane Tune-up
Handplane Tune-up
Handplane Tune-up
Create successful ePaper yourself
Turn your PDF publications into a flip-book with our unique Google optimized e-Paper software.
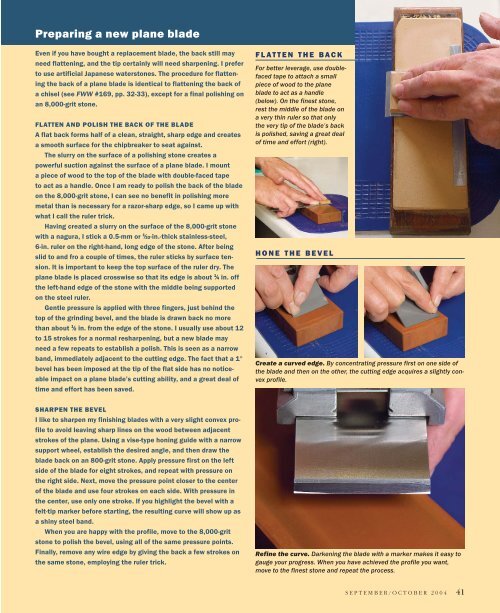
Preparing a new plane bladeEven if you have bought a replacement blade, the back still mayneed flattening, and the tip certainly will need sharpening. I preferto use artificial Japanese waterstones. The procedure for flatteningthe back of a plane blade is identical to flattening the back ofa chisel (see FWW #169, pp. 32-33), except for a final polishing onan 8,000-grit stone.FLATTEN AND POLISH THE BACK OF THE BLADEA flat back forms half of a clean, straight, sharp edge and createsa smooth surface for the chipbreaker to seat against.The slurry on the surface of a polishing stone creates apowerful suction against the surface of a plane blade. I mounta piece of wood to the top of the blade with double-faced tapeto act as a handle. Once I am ready to polish the back of the bladeon the 8,000-grit stone, I can see no benefit in polishing moremetal than is necessary for a razor-sharp edge, so I came <strong>up</strong> withwhat I call the ruler trick.Having created a slurry on the surface of the 8,000-grit stonewith a nagura, I stick a 0.5-mm or 1 ⁄32-in.-thick stainless-steel,6-in. ruler on the right-hand, long edge of the stone. After beingslid to and fro a co<strong>up</strong>le of times, the ruler sticks by surface tension.It is important to keep the top surface of the ruler dry. Theplane blade is placed crosswise so that its edge is about 1 ⁄4 in. offthe left-hand edge of the stone with the middle being s<strong>up</strong>portedon the steel ruler.Gentle pressure is applied with three fingers, just behind thetop of the grinding bevel, and the blade is drawn back no morethan about 1 ⁄2 in. from the edge of the stone. I usually use about 12to 15 strokes for a normal resharpening, but a new blade mayneed a few repeats to establish a polish. This is seen as a narrowband, immediately adjacent to the cutting edge. The fact that a 1°bevel has been imposed at the tip of the flat side has no noticeableimpact on a plane blade’s cutting ability, and a great deal oftime and effort has been saved.FLATTEN THE BACKFor better leverage, use doublefacedtape to attach a smallpiece of wood to the planeblade to act as a handle(below). On the finest stone,rest the middle of the blade ona very thin ruler so that onlythe very tip of the blade’s backis polished, saving a great dealof time and effort (right).HONE THE BEVELCreate a curved edge. By concentrating pressure first on one side ofthe blade and then on the other, the cutting edge acquires a slightly convexprofile.SHARPEN THE BEVELI like to sharpen my finishing blades with a very slight convex profileto avoid leaving sharp lines on the wood between adjacentstrokes of the plane. Using a vise-type honing guide with a narrows<strong>up</strong>port wheel, establish the desired angle, and then draw theblade back on an 800-grit stone. Apply pressure first on the leftside of the blade for eight strokes, and repeat with pressure onthe right side. Next, move the pressure point closer to the centerof the blade and use four strokes on each side. With pressure inthe center, use only one stroke. If you highlight the bevel with afelt-tip marker before starting, the resulting curve will show <strong>up</strong> asa shiny steel band.When you are happy with the profile, move to the 8,000-gritstone to polish the bevel, using all of the same pressure points.Finally, remove any wire edge by giving the back a few strokes onthe same stone, employing the ruler trick.Refine the curve. Darkening the blade with a marker makes it easy togauge your progress. When you have achieved the profile you want,move to the finest stone and repeat the process.SEPTEMBER/OCTOBER 2004 41


