Shopmade Catches and Latches
Shopmade Catches and Latches
Shopmade Catches and Latches
- No tags were found...

Create successful ePaper yourself
Turn your PDF publications into a flip-book with our unique Google optimized e-Paper software.
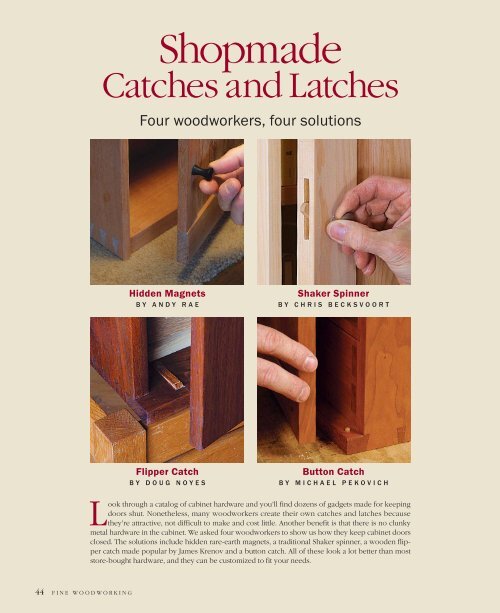
<strong>Shopmade</strong><strong>Catches</strong> <strong>and</strong> <strong>Latches</strong>Four woodworkers, four solutionsHidden MagnetsBY ANDY RAEShaker SpinnerBY CHRIS BECKSVOORTFlipper CatchBY DOUG NOYESButton CatchBY MICHAEL PEKOVICHLook through a catalog of cabinet hardware <strong>and</strong> you’ll find dozens of gadgets made for keepingdoors shut. Nonetheless, many woodworkers create their own catches <strong>and</strong> latches becausethey’re attractive, not difficult to make <strong>and</strong> cost little. Another benefit is that there is no clunkymetal hardware in the cabinet. We asked four woodworkers to show us how they keep cabinet doorsclosed. The solutions include hidden rare-earth magnets, a traditional Shaker spinner, a wooden flippercatch made popular by James Krenov <strong>and</strong> a button catch. All of these look a lot better than moststore-bought hardware, <strong>and</strong> they can be customized to fit your needs.44 FINE WOODWORKING
HiddenMagnetsUse the powerof rare-earth magnetsto keep a door closedBY ANDY RAETo keep cabinet doors closed, I often relyon the magnetic attraction of rare-earthmagnets, which provide a clean, hardwarefreelook.Instead of placing the magnets so thatthey make contact when the door is shut, Iglue them in the top <strong>and</strong> bottom of thedoor <strong>and</strong> the case, leaving them a fractionof an inch apart. The magnets gently pullDoorMagnetWood plugCabinetbasethe door flush to the case once it swingsclosed—a satisfying effect, especially if thedoor has been fitted to close tolerances. Icover the magnets with wood plugs.Keep in mind that this technique worksonly with free-swinging doors. Avoid selfclosingor other spring-loaded hinges.Investigate your magnetsRare-earth magnets are my preferredpullers. Ounce for ounce, these slim, 1 ⁄8-in.-thick discs pack more power than any othermagnet I’ve seen.Be sure to size the magnets so that theyhave the necessary pulling power. I used3⁄8-in.-dia. magnets for the small jewelryboxdoor shown here. Larger 1 ⁄2-in.-dia.magnets work best for typical 3 ⁄4-in.-thickcabinet doors. With bigger doors you needbigger magnets.Make mortises for the magnetsDrill the mortises for the magnets in thecase pieces before assembling them. Offsetthe mortise in the base toward the rear,which will help pull the door closed. Formy cabinet, I drilled 3 ⁄8-in.-dia. mortises inthe case top <strong>and</strong> bottom. Regardless of thediameter of the magnets, make the mortises1 ⁄4 in. deep to allow for the nominal1⁄8-in.-thick magnets <strong>and</strong> the wood plugsthat hide them. To make flat-bottomedmortises, use a Forstner bit.Once you’ve drilled the mortises in thecase parts, assemble the case, then buildthe door. Take your time getting a consistentdoor reveal. Once you’ve installed themagnets <strong>and</strong> covered them with plugs,you’ll have little room for adjustments. Iaim for a reveal of about 1 ⁄32 in. so that thedoor slows on a cushion of air as it is shut,then is quietly drawn in by the magnets.Install the magnetsTo determine the door mortise locationsaccurately, the door must be hung first.Then transfer the centerlines of the mortisesin the cabinet to the bottom <strong>and</strong> top ofthe door. Remove the door from the case<strong>and</strong> drill the mortises for the magnets. Youcan rig up a vertical drilling arrangementDrill mortises before gluing up thecase. One set of magnets is recessed intomortises drilled into both the case top<strong>and</strong> bottom.With the case assembled, transfer themortise location. Use a piece of tape to pullthe door flush with the outer edge of the case.Photos, except where noted: Timothy Sams; facing page (bottom left): Erika MarksMARCH/APRIL 2002 45
MortiseSpinnerMortisefor latchMark the magnetsto ensurethat they areoriented correctly.Glue themagnets inplace, add woodplugs, then pare<strong>and</strong> s<strong>and</strong> theplugs flush.on the drill press to make clean <strong>and</strong> accuratemortises. But precise mortises can bemade with a Forstner bit mounted in ah<strong>and</strong>held drill—as long as the bit is 1 ⁄2 in.dia. or less. Larger-diameter Forstner bitshave a spooky tendency to w<strong>and</strong>er, ruiningthe cut. Make sure to practice on scrapif you opt for h<strong>and</strong> drilling, <strong>and</strong> wrap apiece of masking tape around the bit to flagthe correct depth.Establish the proper polar orientation ofeach pair of magnets <strong>and</strong> mark them with afelt-tipped pen. Use epoxy or cyanoacrylateglue to secure the magnets. Reinstallthe door <strong>and</strong> check that it closes properly.If the mortises have been drilled correctly,the magnets will pull the door flush to theface of the cabinet.Install tapered wood plugs to hide themagnets, carefully matching the grain orientation.Once the glue has dried, pare <strong>and</strong>s<strong>and</strong> the plugs flush. If you’ve carefullyachieved a snug fit, the plugs disappear.And your friends will wonder what kind ofmagic is holding the door in place. Andy Rae is a cabinetmaker, furniture maker,teacher <strong>and</strong> writer. He is the author of TheComplete Illustrated Guide to Furniture &Cabinet Construction (The Taunton Press, 2001).ShakerSpinnerThe simple spinneris refined to becomean elegant latchBY CHRISBECKSVOORTCabinet sideDoorstileSpinners have been used for years tokeep barn doors shut. I’ve redesignedthe spinner for my cabinets from the simplebut effective exterior latch to a refined<strong>and</strong> almost completely hidden mechanismwithin the door stile.The earliest spinners consisted of a smallpiece of wood with a pin through the centermounted on the frame next to the door.When the spinner is in the vertical position,the door can be opened. With the spinnerturned horizontally, the door is locked.A few years back I decided to incorporatethe spinner inside the lock stile of thedoor frame. I make the spinner into anoval. The result is substantially more workin layout, mortising <strong>and</strong> fitting, but it’smuch cleaner looking <strong>and</strong> almost entirelyout of the way.The door knob must be placed on thecenterline of the door stile, <strong>and</strong> the spinnermust extend out of the stile by at least 1 ⁄4 in.Lay out the mortise. With the knob hole drilled in the center of the stile, use a cardboard cutoutto determine the spinner’s placement. Then mark the mortise 1 ⁄16 in. larger than the spinner itself.Pin46 FINE WOODWORKING Drawings: Michael Gellatly
when closed yet fit completely within thedoor stile when in the fully opened position.Begin by drilling the knob holethrough the stile. Then make a cardboardcutout of the spinner, sized so that it won’treach into the door-panel groove. Locatethe mortise by swinging the cutout in a 90°arc around the door-knob hole. The widthof the mortise should be about a third thethickness of the door frame—usually 1 ⁄4 in.for a 3 ⁄4-in.-thick frame.Once the mortise is complete, shape <strong>and</strong>drill the spinner <strong>and</strong> check the fit with theknob attached. If all works well, pin it inplace with a small brad or brass escutcheonpin. The spinner should not beglued, because there’s a great risk of gluegetting onto the knob shaft, which willmuck up the works.I aim for close tolerances between theknob shaft <strong>and</strong> matching hole. For mostcabinet doors I use knobs with 1 ⁄2-in.-dia.shafts ( 3 ⁄8 in. dia. for very small doors). Tomake life easier, I shape all knob tenonswith a plug cutter, chuck them into thelathe <strong>and</strong> turn the knob proper. If you thinkabout it, the knob shaft is the only criticalpart of the process. The 1 ⁄2-in.-dia. shaftmust fit precisely in the matching holebored into the door. The plug cutter eliminatesthe most difficult portion of the task.For a 1 ⁄2-in.-dia. knob shaft, drill a 33 ⁄64-in.-dia. hole through the door stile <strong>and</strong> a 1 ⁄2-in.-dia. hole through the spinner. Now theknob will spin freely in the door frame yethold the spinner securely. Next, with thespinner in the closed position, align thegrain of the knob with the grain of the doorframe. Then turn the spinner into the openposition <strong>and</strong> pin it. This detail makes it easyto tell whether the spinner is in the open orclosed position.After 30 years as a woodworker, I wassome proud of myself for coming up withthis idea of installing the spinner in thedoor frame. Then in 1996, while shootingphotos for The Shaker Legacy (TheTaunton Press, 1998), I came across a smallchest with drawers <strong>and</strong> doors at the ArtComplex Museum in Duxbury, Mass., inwhich the door knob passed through amortise in the edge of the door. Althoughthe spinner itself was missing, it was clearthat the Shakers had the same bright idea160 years ago. Chris Becksvoort is a contributing editor.Chop out the mortise. Becksvoort chiselsout the mortise by h<strong>and</strong>.Predrill for the pin. Toavoid splitting the spinner,drill a hole for the escutcheonpin.The knob should slide in with a little pressure.The spinner must swing freely <strong>and</strong>should be hidden when the latch is open.Secure the spinner <strong>and</strong> knob with a pin. Instead of glue, use a small brad or escutcheon pin<strong>and</strong> drive it in using a nailset.MARCH/APRIL 2002 47
FlipperCatchAn all-wood solutionto keeping doorsclosedBY DOUG NOYESIdiscovered flipper catches in one ofJames Krenov’s books on cabinetmaking.I like these catches because they areeasy to make <strong>and</strong> allow me to utilize exotichardwood scraps. The one I frequentlyuse is basically an L-shaped wood flipperthat is recessed into a mortise in the casebottom. A small spring provides the neces-Cut therampedmortises.Use a plungerouter tomake a slopingmortisefor the catch.WoodscrewFlippercatchSlopedmortiseSpringDoorNotchsary resistance to keep the flipper engagedwith the bottom edge of the door.I make the catch out of a contrastinghardwood, such as ebony, because it resistswear. Although I make the catch to fit,the catch for a 3 ⁄4-in.-thick door typicallymeasures approximately 1 ⁄4 in. thick by3⁄8 in. wide by 1 1 ⁄2 in. long.Sketch the profile on a blank, cut it outwith a h<strong>and</strong>saw, then shape the catch witha file or knife. Drill a slightly oversized holefor the attachment screw to allow the catchto pivot. Countersink the hole so that thescrew is flush with the top of the catch.Next, cut the sloped mortise, which al-lows the catch to recede when the dooris closed. Use a plunge router with a fenceto make the mortise. It is a short mortise(only 1 1 ⁄2 in. long), so be careful not to cuttoo deep too fast.Square up the mortise with a chisel. Drilla hole in the deeper part of the mortise tohold the spring. The hole should be about1⁄8 in. deep <strong>and</strong> the same diameter as thespring. I use 1 ⁄8-in.-dia. springs from ballpointpens trimmed to 1 ⁄4 in. long, but youcan also get springs from a hardware store.Put the catch into the mortise to test thefit. It should be snug but not overly tight. Ifit fits, place the spring in its hole, put thecatch in place <strong>and</strong> secure the assemblywith a small wood screw.I usually make a shallow notch ( 1 ⁄16 in.) inthe bottom of the door to engage the catch.If the door is made of very soft wood, suchas redwood or pine, it’s not a bad idea toinsert a piece of hardwood in the bottomof the door to prevent excessive wear.To determine the location of the notch,first close the door several times on thecatch, which will create a shiny spot wherethe catch is rubbing. At the end of thisshiny spot make the notch for the door tocatch. If this shiny spot does not appear,rub the top of the catch with a pencil <strong>and</strong>then close the door. The pencil mark indicatesthe location of the notch.A variation on this catch is to include apositive stop. By shaping a shoulder ontothe catch itself, I can control the closed positionof the door. I use this variation oninset-door applications or on double doorsthat can be opened individually.A little trimming here <strong>and</strong> filing there,<strong>and</strong> you’ll have a good catch that makes asubtle “click” when the door is closed. Doug Noyes is a furniture designer <strong>and</strong>woodworker in Guilford, Conn.Pare the mortise to the length of the catch using the catch as a guide. Pare less vigorouslyas you come close to the desired width.Assemble the catch. The spring sits in a holebored in the deep end of the mortise.48 FINE WOODWORKING
Shape the button on the drillpress. Use a block with apredrilled hole in it to gauge theright size of the button.ButtonCatchSimple, unobtrusive<strong>and</strong> easy to makeDrill the stepped hole. Markthe bit with tape to indicate thecorrect depth.BY MICHAELPEKOVICHIhad been floundering in art school for acouple of years when I stumbled intoa beginning woodworking class. One ofmy first projects was a simple pencil boxwith a sliding lid. At wits end for a way tosecure the lid short of tying it closed, I approachedmy instructor, John Snidecore,who showed me a simple spring-loadedwood button catch.Twenty years later I’m still working wood<strong>and</strong> still using the button catch on a varietyof projects. But I have since modified thedesign to work as a door catch. The conceptis simple: a stepped button slides upinto a stepped hole from below. A springsupports the button, <strong>and</strong> a wooden plate orplug covers the bottom of the hole.To align the button to the door, I use anapproach that’s almost foolproof. Hang thedoor <strong>and</strong> locate the button about 1 in. fromthe edge of the door, midpoint in its thickness.Transfer this location to the bottom ofthe case. From the bottom, drill a 3 ⁄8-in.-dia.hole, stopping 1 ⁄8 in. shy of the oppositeside. With a 1 ⁄4-in. bit, continue the holethrough the case bottom <strong>and</strong> use a piece ofscrap to prevent blowout. Then wedge thedoor securely in the closed position <strong>and</strong>drill just into its bottom edge. The drilledindent becomes the cup for the button.To make the button, simply chuck a shortDoorButtonWood plugSpringlength of hardwood dowel into a drillpress. With a file in h<strong>and</strong>, it’s quick work tocreate the desired profile. After a test fit, cutthe button to length. Before doing so, I liketo round <strong>and</strong> polish the top of the buttonwhile it’s easy to grab. From this point it’sjust a matter of inserting a spring in thehole <strong>and</strong> capping it.For small projects such as my pencil box,I glue a plug into the hole <strong>and</strong> finish itsmooth. For most case pieces, where longtermmaintenance is an issue, I prefer aplate screwed to the case bottom, which al-Drill the button hole. Usesome scrap stock to preventtearout.Notch the door. The notch is shallow <strong>and</strong>angled so that it will depress the button asthe door closes.lows for easier button replacement, if necessary.One final task is to use a gouge orcarving knife to cut a shallow notch on theinside edge of the door bottom where itstrikes the button. This notch <strong>and</strong> therounded button top combine to make forsmoother door closing.Michael Pekovich is the art director.MARCH/APRIL 2002 49