

DH90 Printhead Startup Summary - Kodak
DH90 Printhead Startup Summary - Kodak
DH90 Printhead Startup Summary - Kodak

Create successful ePaper yourself
Turn your PDF publications into a flip-book with our unique Google optimized e-Paper software.
<strong>DH90</strong> <strong>Printhead</strong> <strong>Startup</strong> <strong>Summary</strong><br />
Use the following procedures to start production and correct any printhead problems with the <strong>DH90</strong> printhead. See “Preventing<br />
<strong>Printhead</strong> Problems” to reduce the need for corrective procedures.<br />
Bring the <strong>Printhead</strong>s to READY<br />
1. Place all printheads to be used in the service position.<br />
2. Select READY for all printheads to be used. (Select PSI,<br />
then select PRINTHEAD → READY for each printhead.)<br />
• If a printhead charge short occurs, select ACK<br />
ERROR on the PSI Details screen and let the<br />
autorecovery cycle complete.<br />
• If the printhead charge shorts again during this<br />
automatic Ready cycle, use “Recovery from a<br />
Charge Short” to correct the problem.<br />
Recovery from a Charge Short<br />
The printhead should be in service position.<br />
1. Wet the catchpan O-ring with replenisher and install the<br />
catchpan.<br />
2. From the PSI <strong>Summary</strong> screen, select PRINTHEAD →<br />
CLEAN, and allow this sequence to complete.<br />
3. Select SERVICE EYELID.<br />
4. Select STEP TO READY.<br />
Wait until the system stops at the Step Forward state<br />
(See the Sequence <strong>Summary</strong> area of the PSI screen).<br />
5. Inspect the jets.<br />
If no inkjet problem exists, select STEP UP, wait two seconds,<br />
and select STEP UP again to bring to Ready. Go to<br />
step 6.<br />
If the ink curtain has inkjet straightness problems or<br />
streakers, go to “Swab the <strong>Printhead</strong>”.<br />
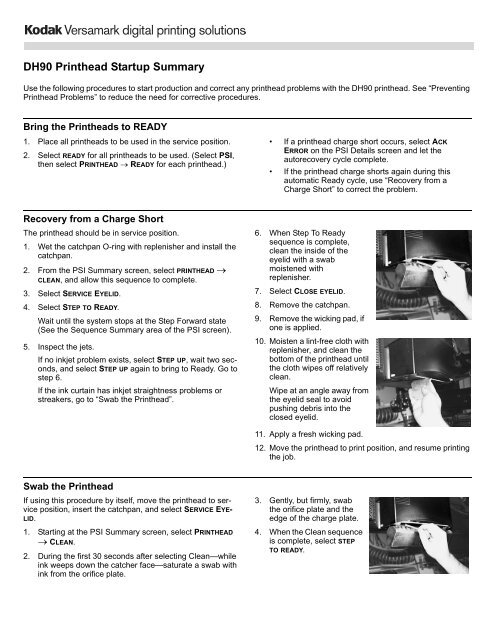
6. When Step To Ready<br />
sequence is complete,<br />
clean the inside of the<br />
eyelid with a swab<br />
moistened with<br />
replenisher.<br />
7. Select CLOSE EYELID.<br />
8. Remove the catchpan.<br />
9. Remove the wicking pad, if<br />
one is applied.<br />
10. Moisten a lint-free cloth with<br />
replenisher, and clean the<br />
bottom of the printhead until<br />
the cloth wipes off relatively<br />
clean.<br />
Wipe at an angle away from<br />
the eyelid seal to avoid<br />
pushing debris into the<br />
closed eyelid.<br />
11. Apply a fresh wicking pad.<br />
12. Move the printhead to print position, and resume printing<br />
the job.<br />
Swab the <strong>Printhead</strong><br />
If using this procedure by itself, move the printhead to service<br />
position, insert the catchpan, and select SERVICE EYE-<br />
LID.<br />
1. Starting at the PSI <strong>Summary</strong> screen, select PRINTHEAD<br />
→ CLEAN.<br />
2. During the first 30 seconds after selecting Clean—while<br />
ink weeps down the catcher face—saturate a swab with<br />
ink from the orifice plate.<br />
3. Gently, but firmly, swab<br />
the orifice plate and the<br />
edge of the charge plate.<br />
4. When the Clean sequence<br />
is complete, select STEP<br />
TO READY.
5. When the printhead reaches the Step Forward state,<br />
inspect the jets, and use one of the following steps:<br />
• If you do not observe any crooked jets, allow<br />
STEPREADY to continue. Go to step 14.<br />
• If you observe crooked jets, repeat step 2 through<br />
step 5.<br />
• If you have repeated the swabbing and you still<br />
observe crooked jets, go to step 6.<br />
6. Saturate a swab with KODAK VERSAMARK FR1042<br />
Replenisher Fluid (part 6091042).<br />
7. Select CLEAN.<br />
8. For the 25 seconds before<br />
the ink weep step, swab at<br />
the area where the crooked<br />
jets were observed.<br />
Note: Never squirt fluid<br />
directly into the<br />
orifice plate or<br />
charge plate area,<br />
but onto the swab.<br />
9. After the <strong>Printhead</strong> Clean<br />
sequence is complete, select STEP TO READY.<br />
10. When the printhead reaches the Step Forward state,<br />
inspect the jets, and use one of the following steps:<br />
• If you do not observe any crooked jets, allow<br />
STEPREADY to continue. Go to step 14.<br />
• If you observe crooked jets, repeat step 6 through<br />
step 10.<br />
• If you observe crooked jets after repeating these<br />
steps and you have time, go to step 11.<br />
11. Select SHUTDOWN, and allow the printhead to complete<br />
the Shutdown sequence.<br />
12. Select STEP TO READY.<br />
13. When the printhead reaches the Step Forward state,<br />
observe the jets, and use one of the following steps:<br />
• If you do not observe any crooked jets, allow<br />
STEPREADY to continue. Go to step 14.<br />
• If you observe crooked jets, replace the printhead.<br />
14. Select STEP UP, wait two seconds, and select STEP UP<br />
again. The sequence will continue bringing the printhead<br />
to READY state.<br />
15. When the <strong>Printhead</strong> status displays "Finished" with a<br />
green background, clean the inside of the eyelid with a<br />
swab moistened with replenisher.<br />
• Saturate the swab with replenisher.<br />
• Use a swab for one wipe across the full length, then<br />
reverse the swab for another wipe.<br />
• Do not reuse a swab for a third wipe.<br />
• Use several swabs until the swab is left relatively<br />
clean.<br />
16. Select CLOSE EYELID.<br />
• If a charge short occurs when closing the eyelid, go<br />
to “Charge Short Recovery During Operations”.<br />
17. Remove the catchpan.<br />
18. Remove the wicking pad, if one is applied.<br />
19. Moisten a lint-free cloth or towel with replenisher, and<br />
clean the bottom of the printhead. Wipe several times,<br />
using a clean area of the towel, until the towel is<br />
relatively clean.<br />
Note: Always wipe across the width, at an angle away<br />
from the eyelid seal. This avoids pushing debris<br />
and fibers into the closed eyelid. Debris in the<br />
eyelid can cause print defects.<br />
20. Apply a fresh wicking pad.<br />
21. Move the printhead to print position, and resume printing<br />
the job.<br />
Charge Short Recovery During Operations<br />
If any printhead develops a charge short when printing is<br />
stopped and the eyelid closes or when the printhead is idle<br />
but in READY state, use the following procedure to swab the<br />
ends of the charge plate.<br />
1. At the PSI details screen, select ACK ERROR. The<br />
autorecovery cycle continues.<br />
• The system begins an autorecovery to bring the<br />
printhead to READY.<br />
• If the autorecovery succeeds, continue with printing<br />
activities.<br />
• If another charge short develops, acknowledge the<br />
error and continue with step 2.<br />
2. If the printhead is in print position, move the printhead to<br />
service position.<br />
3. Wet the catchpan o-ring with replenisher and install the<br />
catchpan.<br />
4. From the work area, select CLEAN, and allow the<br />
sequence to complete. The Time remaining field will<br />
display “Finished.”<br />
5. Select SERVICE EYELID.<br />
6. Select STEP TO READY.<br />
7. Wait until the <strong>Printhead</strong> status field displays “Step<br />
forward,” and the ink jets are flowing into the catchpan.<br />
8. Wet a swab with<br />
replenisher, and swab<br />
the charge plate at the<br />
far left end, outside of<br />
the two-wire connection.<br />
9. Wet a second swab, and<br />
swab the charge plate at<br />
the far right end.
10. Select STEP UP, wait two seconds, and select STEP UP<br />
again. The sequence will continue bringing the printhead<br />
to READY state.<br />
11. Inspect the inside of the eyelid.<br />
• If the eyelid has crystallized ink or other debris,<br />
continue with step 12.<br />
• If the eyelid is clean, continue with step 14.<br />
12. Saturate a swab with replenisher, and swab the inside of<br />
the eyelid.<br />
13. Repeat swabbing with a fresh swab and replenisher until<br />
the swab is relatively clean and the eyelid has no ink<br />
crystals or debris on its inside.<br />
14. Select CLOSE EYELID.<br />
15. Remove the catchpan.<br />
16. Remove the wicking pad, if one is applied.<br />
17. Moisten a lint-free cloth or towel with replenisher, and<br />
clean the bottom of the printhead. Wipe several times,<br />
using a clean area of the towel, until the towel is<br />
relatively clean.<br />
Always wipe across the width, at an angle away from the<br />
eyelid seal. This avoids pushing debris and fibers into<br />
the closed eyelid.<br />
18. If necessary, apply a fresh wicking pad.<br />
19. Move the printhead to print position, and resume printing<br />
the job.<br />
Leaks At Start-Up<br />
A printhead may leak soon after the print station has been<br />
powered on or when the eyelid is closed. Use the following<br />
steps to clean the eyelid quickly.<br />
Note:<br />
If a leaking printhead has just been installed, the<br />
printhead may require removal and installing<br />
again, paying attention to wetting the o-rings and<br />
volcano seal.<br />
1. If the printhead is in print position, move the printhead to<br />
service position.<br />
2. Wet the catchpan o-ring with replenisher and install the<br />
catchpan.<br />
3. From the subsystem bar, select PSI.<br />
4. In the work area, select the appropriate printhead.<br />
5. From the work area, select SERVICE EYELID.<br />
6. From the work area, select CLEAN, and allow the<br />
sequence to complete. The Time remaining field will<br />
display “Finished.”<br />
7. From the work area, select STEP TO READY.<br />
8. Select STEP UP, wait two seconds, and select STEP UP<br />
again. The sequence will continue bringing the printhead<br />
to READY state.<br />
9. Select CLOSE EYELID.<br />
10. Wipe any drops from the bottom of the printhead.<br />
11. Continue printing activities when the printhead has<br />
reached READY.<br />
Preventing <strong>Printhead</strong> Problems<br />
Charge shorts, streakers, missing print, and other<br />
print defects result from ink build-up and foreign matter<br />
on the charge plate, catcher lip, and eyelid. The<br />
defects often develop while the printhead is idle<br />
between four and eight hours. If the printhead is to<br />
be idle, use the following guide.<br />
Idle time from 10 minutes to 1 hour<br />
Normally, leave the printhead in Ready.<br />
Idle time from 1 to 4 hours<br />
Normally, leave the printhead in Ready. Or select<br />
CLEAN to bring the printhead to SERVCLEAN.<br />
You will leave the print station powered on.<br />
Idle time from 4 hours to 88 hours (3 days and 16<br />
hours)<br />
Place the printheads in Wakeup Mode. You will<br />
leave the print station powered on.<br />
If any printhead develops charge shorts during this<br />
idle period, open its eyelid and correct the charge<br />
short (“Charge Short Recovery During Operations”).<br />
After correction, the printhead can remain in READY<br />
state until you resume printing.<br />
Wipe the bottom of each printhead and clean the<br />
eyelid every four hours of printing.<br />
Make sure the phase setting for a new printhead is in<br />
the middle of its phase window.
0114307-602<br />
0114307-603 06/2006 Revision 003 ECN K6186<br />
© Eastman <strong>Kodak</strong> Company, 2006.<br />
<strong>Kodak</strong> and Versamark are trademarks of Eastman <strong>Kodak</strong> Company. Printed in China.


