STEP 2: Attach VESA Bracket to Monitor STEP 3 ... - Humanscale
STEP 2: Attach VESA Bracket to Monitor STEP 3 ... - Humanscale
STEP 2: Attach VESA Bracket to Monitor STEP 3 ... - Humanscale

You also want an ePaper? Increase the reach of your titles
YUMPU automatically turns print PDFs into web optimized ePapers that Google loves.
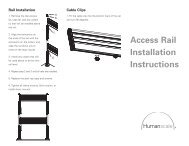
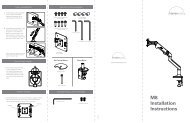
<strong>STEP</strong> 1:<br />
<strong>Attach</strong> Arm <strong>to</strong> Wall<br />
<strong>STEP</strong> 2:<br />
<strong>Attach</strong> <strong>VESA</strong> <strong>Bracket</strong> <strong>to</strong><br />
Moni<strong>to</strong>r<br />
WU MOUNT<br />
Screw (c)<br />
Decorative<br />
Cover<br />
Casting (b)<br />
a. Select 75mm or 100mm <strong>VESA</strong><br />
<strong>Bracket</strong> <strong>to</strong> match hole pattern on<br />
back of moni<strong>to</strong>r.<br />
The M7 can be mounted directly <strong>to</strong><br />
a wood, metal, concrete or other<br />
highly stable wall surface using 4<br />
screws as shown.<br />
a. Remove Wall Plate (a) from Casting<br />
(b) by removing two Screws (c) and<br />
Mounting<br />
Screws<br />
b. Place <strong>VESA</strong> <strong>Bracket</strong> in position on<br />
back of moni<strong>to</strong>r with Cut-out <strong>to</strong>ward<br />
<strong>to</strong>p of moni<strong>to</strong>r (as shown) and attach<br />
using 4 screws provided. For this,<br />
you may also use screws that came<br />
with your moni<strong>to</strong>r.<br />
Cut-out<br />
<strong>VESA</strong><br />
<strong>Bracket</strong><br />
(d) using the provided hex key.<br />
*Note: you will need <strong>to</strong> pry plate out<br />
Cut-out<br />
Lip<br />
of casting using a screw driver or<br />
hex key.*<br />
Screw (d)<br />
Wall Plate (a)<br />
<strong>STEP</strong> 3:<br />
<strong>Attach</strong> Moni<strong>to</strong>r <strong>to</strong> Arm<br />
b. <strong>Attach</strong> Wall Plate <strong>to</strong> wall using 4<br />
Screws. Make sure that the plate is<br />
perfectly plumb.<br />
a. Place Cut-out on <strong>VESA</strong> <strong>Bracket</strong><br />
over Lip at end of Arm. If your Arm<br />
is equipped with a Quick-Release<br />
c. Place Casting on Wall Plate and<br />
secure with two Screws. Make sure<br />
that the long Screw is used in the<br />
<strong>to</strong>p hole and the short Screw in the<br />
bot<strong>to</strong>m hole.<br />
PRY<br />
HERE<br />
Lever (as shown), simply push<br />
bot<strong>to</strong>m of moni<strong>to</strong>r in<strong>to</strong> Arm until<br />
you hear a click. To remove, depress<br />
Quick Release Lever and remove<br />
moni<strong>to</strong>r from Arm.<br />
Quick<br />
Release Lever<br />
d. Snap Decorative Cover in<strong>to</strong> place<br />
covering the <strong>to</strong>p Screw.<br />
b. If your Arm does not have a Quick<br />
Release Lever, secure moni<strong>to</strong>r <strong>to</strong><br />
Arm using two screws, as shown.<br />
Screws
Cable Management<br />
The M7 includes cable<br />
management clips <strong>to</strong> keep<br />
moni<strong>to</strong>r cables neat and<br />
protected. If desired, place<br />
moni<strong>to</strong>r and power cables<br />
through cord clips as shown.<br />
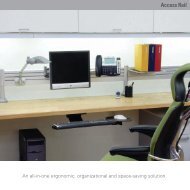
M7 WU Mount<br />
Installation Instructions<br />
For WU mount (standard wall stud mount)<br />
models with no arm or single arm<br />
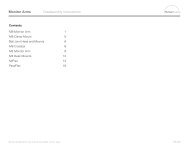
Friction Adjustment<br />
If your moni<strong>to</strong>r is particularly<br />
heavy, or after prolonged use,<br />
the Ball Joint may require<br />
increased friction. This can be<br />
achieved by tightening the 3<br />
Ball Joint Friction Screws.<br />
Ball Joint<br />
Friction<br />
Screws<br />
Package Contents<br />
Moni<strong>to</strong>r Arm: 1<br />
<strong>VESA</strong> <strong>Bracket</strong>s: 1<br />
<strong>VESA</strong> <strong>Bracket</strong> Screws: 4<br />
Front <strong>Bracket</strong> Screws: 2<br />
Direct Wall Mount Screws: 4<br />
Decorative Cap: 1<br />
Hex Key (short): 1<br />
PN 1900455002NL00<br />
Rev. 5/1/08