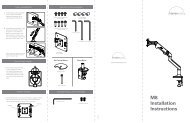
Disassembly Instructions Monitor Arm Monitor Arms - Humanscale
Disassembly Instructions Monitor Arm Monitor Arms - Humanscale
Disassembly Instructions Monitor Arm Monitor Arms - Humanscale

You also want an ePaper? Increase the reach of your titles
YUMPU automatically turns print PDFs into web optimized ePapers that Google loves.
<strong>Monitor</strong> <strong>Arm</strong>s<br />
<strong>Disassembly</strong> <strong>Instructions</strong><br />
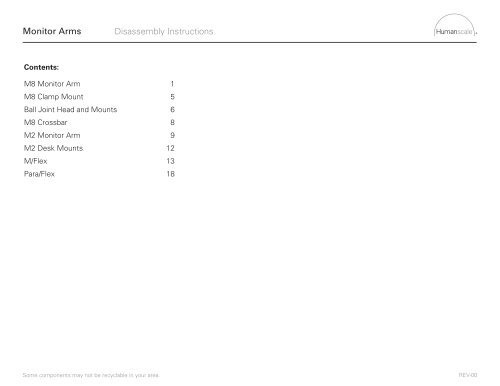
Contents:<br />
M8 <strong>Monitor</strong> <strong>Arm</strong> 1<br />
M8 Clamp Mount<br />
M8 <strong>Monitor</strong> <strong>Arm</strong><br />
5<br />
1<br />
M8<br />
Ball Joint<br />
Clamp<br />
Head<br />
Mount<br />
and Mounts 6<br />
5<br />
Ball M8 Crossbar Joint Head and Mounts 8 6<br />
M8 M2 <strong>Monitor</strong> Crossbar <strong>Arm</strong> 9 8<br />
M2 Desk <strong>Monitor</strong> Mounts <strong>Arm</strong> 12 9<br />
M2 M/Flex Desk Mounts 13 12<br />
M/Flex Para/Flex 18 13<br />
Para/Flex 18<br />
Some components may not be recyclable in your area.<br />
REV-00
M8 <strong>Monitor</strong> <strong>Arm</strong><br />
<strong>Disassembly</strong> <strong>Instructions</strong><br />
Components for Breakdown<br />
Tools Required<br />
M8 Dynamic <strong>Arm</strong><br />
Safety Glasses<br />
Standard Hex Key Set<br />
M8 Non-Dynamic <strong>Arm</strong>s<br />
Pliers<br />
Ball Joint Heads<br />
M8 Mounts<br />
M8 Crossbar<br />
Some components may not be recyclable in your area.<br />
Page 1 of 22<br />
REV-00
M8 <strong>Monitor</strong> <strong>Arm</strong><br />
<strong>Disassembly</strong> <strong>Instructions</strong><br />
Tools Required<br />
Safety Glasses Torx T-20 Driver Knife Flat Screwdriver Pliers Standard Hex Key Set Snap Ring Pliers<br />
1. Assembly Dismanteling<br />
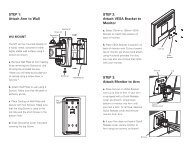
Step 1<br />
Remove ball joint screw<br />
Step 2<br />
Remove screw to release dynamic arm<br />
Step 3<br />
Remove screw to releast non-dynamic arm<br />
1<br />
2<br />
3<br />
Some components may not be recyclable in your area.<br />
Page 2 of 22<br />
REV-00
M8 <strong>Monitor</strong> <strong>Arm</strong><br />
<strong>Disassembly</strong> <strong>Instructions</strong><br />
Tools Required<br />
Safety Glasses Pliers Metric Hex Key Set<br />
2. M8 Dynamic <strong>Arm</strong><br />
Step 1<br />
Remove plastic covers<br />
1<br />
ABS<br />
>ABS<<br />
Aluminum<br />
Step 2<br />
Remove axl screws<br />
6<br />
Step 3<br />
Remove pins using hammer and punch to release<br />
bottom plate<br />
Step 4<br />
Punch out all bushings<br />
3<br />
2<br />
5<br />
4<br />
Steel<br />
Step 5<br />
Punch out pin to remove numatic cylindar<br />
Step 6<br />
Remove set screw to release link pin<br />
Aluminum<br />
Steel<br />
ABS<br />
>ABS<<br />
Some components may not be recyclable in your area.<br />
Page 3 of 22<br />
REV-00
M8 <strong>Monitor</strong> <strong>Arm</strong><br />
<strong>Disassembly</strong> <strong>Instructions</strong><br />
Tools Required<br />
Safety Glasses<br />
Metric Hex Key Set<br />
3. M8 Non-Dynamic <strong>Arm</strong>s<br />
Step 1<br />
Remove set screw to release link pin<br />
Bronze<br />
Step 2<br />
Remove plastic cover<br />
Step 3<br />
Remove screw<br />
3<br />
2<br />
ABS<br />
>ABS<<br />
1<br />
Aluminum<br />
Steel<br />
>POM<<br />
POM<br />
Some components may not be recyclable in your area.<br />
Page 4 of 22<br />
REV-00
M8 <strong>Monitor</strong> <strong>Arm</strong><br />
<strong>Disassembly</strong> <strong>Instructions</strong><br />
Tools Required<br />
Safety Glasses<br />
Metric Hex Key Set<br />
4. M8 Clamp Mount<br />
Steel<br />
Step 1<br />
Remove screws<br />
Step 2<br />
Remove foam<br />
4<br />
2<br />
Step 3<br />
Remove screw to disconnect from base<br />
Step 4<br />
Remove foot from clamping screw by drilling<br />
3<br />
Foam<br />
Aluminum<br />
1<br />
Steel<br />
>ABS<<br />
ABS<br />
Some components may not be recyclable in your area.<br />
Page 5 of 22<br />
REV-00
M8 <strong>Monitor</strong> <strong>Arm</strong><br />
<strong>Disassembly</strong> <strong>Instructions</strong><br />
Tools Required<br />
Safety Glasses<br />
Metric Hex Key Set<br />
5. Ball Joint Head Mounts<br />
Standard<br />
Crossbar Glide<br />
Remove all screws to disassemble<br />
>ABS<<br />
ABS<br />
Aluminum<br />
Zinc Alloy<br />
ParaFlex<br />
>POM<<br />
POM<br />
Zinc Alloy<br />
Steel<br />
Aluminum<br />
Some components may not be recyclable in your area.<br />
Page 6 of 22<br />
REV-00
M8 <strong>Monitor</strong> <strong>Arm</strong><br />
<strong>Disassembly</strong> <strong>Instructions</strong><br />
Tools Required<br />
Safety Glasses<br />
Metric Hex Key Set<br />
5. Ball Joint Head<br />
Remove all screws to disassemble<br />
>ABS<<br />
ABS<br />
Aluminum<br />
Steel<br />
>ABS<<br />
ABS<br />
Aluminum<br />
Aluminum<br />
Some components may not be recyclable in your area.<br />
Page 7 of 22<br />
REV-00
M8 <strong>Monitor</strong> <strong>Arm</strong><br />
<strong>Disassembly</strong> <strong>Instructions</strong><br />
Tools Required<br />
Safety Glasses<br />
Metric Hex Key Set<br />
6. M8 Crossbar<br />
Step 1<br />
Remove screws to release end cap<br />
Step 2<br />
Remove ball joints and cable clips by<br />
sliding off the side<br />
Aluminum<br />
1<br />
2<br />
>ABS<<br />
ABS<br />
Some components may not be recyclable in your area.<br />
Page 8 of 22<br />
REV-00
M2 <strong>Monitor</strong> <strong>Arm</strong><br />
<strong>Disassembly</strong> <strong>Instructions</strong><br />
Components for Breakdown<br />
Tools Required<br />
M2 Dynamic <strong>Arm</strong><br />
Safety Glasses<br />
Metric Hex Key Set<br />
Ball Joint<br />
Hammer<br />
M2 Non-Dynamic <strong>Arm</strong>s<br />
Punch<br />
Pliers<br />
M2 Mount<br />
Some components may not be recyclable in your area.<br />
Page 9 of 22<br />
REV-00
M2 <strong>Monitor</strong> <strong>Arm</strong><br />
<strong>Disassembly</strong> <strong>Instructions</strong><br />
Tools Required<br />
Safety Glasses<br />
Metric Hex Key Set<br />
1. Assembly Dismantling<br />
Step 1<br />
Remove Ball joint screw<br />
Step 2<br />
Remove plastic cover and remove screw to release<br />
dynamic arm<br />
1<br />
Step 3<br />
Remove screw from base to release straight link<br />
arm<br />
2<br />
>ABS<<br />
ABS<br />
POM<br />
>POM<<br />
Aluminum<br />
>POM<<br />
POM<br />
Steel<br />
3<br />
Some components may not be recyclable in your area.<br />
Page 10 of 22<br />
REV-00
M2 <strong>Monitor</strong> <strong>Arm</strong><br />
<strong>Disassembly</strong> <strong>Instructions</strong><br />
Tools Required<br />
Safety Glasses<br />
Metric Hex Key Set<br />
Hammer<br />
Punch<br />
2. M2 Dynamic <strong>Arm</strong><br />
2<br />
Step 1<br />
Remove plastic covers<br />
Step 2<br />
Remove screws<br />
Step 3<br />
Hammer out pins to remove bottom plate<br />
ABS<br />
>ABS<<br />
Aluminum<br />
3<br />
Stainless Steel<br />
1<br />
Aluminum<br />
Steel<br />
Some components may not be recyclable in your area.<br />
Page 11 of 22<br />
REV-00
M2 <strong>Monitor</strong> <strong>Arm</strong><br />
<strong>Disassembly</strong> <strong>Instructions</strong><br />
Tools Required<br />
Safety Glasses<br />
Metric Hex Key Set<br />
Pliers<br />
4. M2 Desk Mounts<br />
Clamp Mount<br />
Bolt Mount<br />
CLAMP MOUNT<br />
Step 1<br />
Remove screw<br />
2<br />
Step 2<br />
Remove clip<br />
Step 3<br />
Remove screw to separate from base<br />
Steel<br />
BOLT MOUNT<br />
Step 1<br />
Remove screw<br />
1<br />
3<br />
1<br />
ABS<br />
>ABS<<br />
Some components may not be recyclable in your area.<br />
Page 12 of 22<br />
REV-00
M/Flex<br />
<strong>Disassembly</strong> <strong>Instructions</strong><br />
Components for Breakdown<br />
Tools Required<br />
B3 Bracket<br />
Safety Glasses<br />
Metric Hex Key Set<br />
B2 Bracket<br />
B1 Bracket<br />
Post<br />
Mount*<br />
Some components may not be recyclable in your area.<br />
Page 13 of 22<br />
REV-00
M/Flex<br />
<strong>Disassembly</strong> <strong>Instructions</strong><br />
Tools Required<br />
2<br />
Safety Glasses<br />
Metric Hex Key Set<br />
>ABS<<br />
ABS<br />
1. M/Flex Post<br />
1<br />
Step 1<br />
Remove all arm brackets<br />
Step 2<br />
Remove post cap<br />
>ABS<<br />
ABS<br />
Aluminum<br />
3<br />
Step 3<br />
Remove cable clips<br />
Step 4<br />
Remove mount screw to release post from base<br />
Aluminum<br />
Steel<br />
Aluminum<br />
>ABS<<br />
ABS<br />
ABS<br />
>ABS<<br />
ABS<br />
>ABS<<br />
4<br />
Some components may not be recyclable in your area.<br />
Page 14 of 22<br />
REV-00
M/Flex<br />
<strong>Disassembly</strong> <strong>Instructions</strong><br />
Tools Required<br />
Safety Glasses<br />
Metric Hex Key Set<br />
2. B3 Bracket<br />
Step 1<br />
Remove all screws<br />
Step 2<br />
Remove plastic ring and insert<br />
>ABS<<br />
ABS<br />
>POM<<br />
POM<br />
Aluminum<br />
Some components may not be recyclable in your area.<br />
Page 15 of 22<br />
REV-00
M/Flex<br />
<strong>Disassembly</strong> <strong>Instructions</strong><br />
Tools Required<br />
Safety Glasses<br />
Metric Hex Key Set<br />
3. B2 Bracket<br />
Step 1<br />
Remove all screws<br />
>POM<<br />
POM<br />
Step 2<br />
Remove plastic insert<br />
Aluminum<br />
>ABS<<br />
ABS<br />
Some components may not be recyclable in your area.<br />
Page 16 of 22<br />
REV-00
M/Flex<br />
<strong>Disassembly</strong> <strong>Instructions</strong><br />
Tools Required<br />
Safety Glasses<br />
Metric Hex Key Set<br />
4. B1 Bracket<br />
Step 1<br />
Unscrew knob completely to remove from bracket<br />
Step 2<br />
Remove screw<br />
Aluminum<br />
>POM<<br />
POM<br />
2<br />
>ABS<<br />
ABS<br />
Some components may not be recyclable in your area.<br />
Page 17 of 22<br />
REV-00
ParaFlex<br />
<strong>Disassembly</strong> <strong>Instructions</strong><br />
Components for Breakdown<br />
Tools Required<br />
Safety Glasses<br />
Metric Hex Key Set<br />
Some components may not be recyclable in your area.<br />
Page 18 of 22<br />
REV-00
ParaFlex<br />
<strong>Disassembly</strong> <strong>Instructions</strong><br />
Tools Required<br />
Safety Glasses<br />
Metric Hex Key Set<br />
1. Main <strong>Disassembly</strong><br />
2<br />
Step 1<br />
Remove screws from rear post brackets to release<br />
crossbar assembly (see section 3)<br />
1<br />
Step 2<br />
Remove wing arms (see section 2)<br />
See M/Flex post disassembly and M8 mount<br />
disassembly for componants other than ParaFlex<br />
crossbars<br />
Some components may not be recyclable in your area.<br />
Page 19 of 22<br />
REV-00
ParaFlex<br />
<strong>Disassembly</strong> <strong>Instructions</strong><br />
Tools Required<br />
Safety Glasses<br />
Metric Hex Key Set<br />
2. Wing <strong>Arm</strong><br />
Step 1<br />
Remove screws to release from main crossbar<br />
Step 2<br />
Remove screws to release wing arm bracket<br />
Step 3<br />
Remove screws to release end cap<br />
3<br />
Aluminum<br />
Step 4<br />
Remove ball joint and cable clip by sliding<br />
off the side<br />
1<br />
2<br />
>ABS<<br />
ABS<br />
Some components may not be recyclable in your area.<br />
Page 20 of 22<br />
REV-00
ParaFlex<br />
<strong>Disassembly</strong> <strong>Instructions</strong><br />
Tools Required<br />
Safety Glasses<br />
Metric Hex Key Set<br />
2. Wing <strong>Arm</strong> Bracket<br />
Step 1<br />
Remove all screws to disassemble<br />
Steel<br />
Aluminum<br />
Aluminum<br />
Some components may not be recyclable in your area.<br />
Page 21 of 22<br />
REV-00
ParaFlex<br />
<strong>Disassembly</strong> <strong>Instructions</strong><br />
Tools Required<br />
Safety Glasses<br />
Metric Hex Key Set<br />
3. Rear Post Brackets<br />
Step 1<br />
Remove screw to release crossbar from post<br />
Step 2<br />
Remove screws to release bracket from crossbar<br />
Step 3<br />
Remove ball joints and cable clips by sliding off<br />
the side<br />
Aluminum<br />
2<br />
1<br />
ABS<br />
>ABS<<br />
Aluminum<br />
Some components may not be recyclable in your area.<br />
Page 22 of 22<br />
REV-00