Access Rail Installation Instructions - Humanscale
Access Rail Installation Instructions - Humanscale
Access Rail Installation Instructions - Humanscale

You also want an ePaper? Increase the reach of your titles
YUMPU automatically turns print PDFs into web optimized ePapers that Google loves.
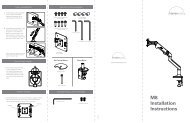
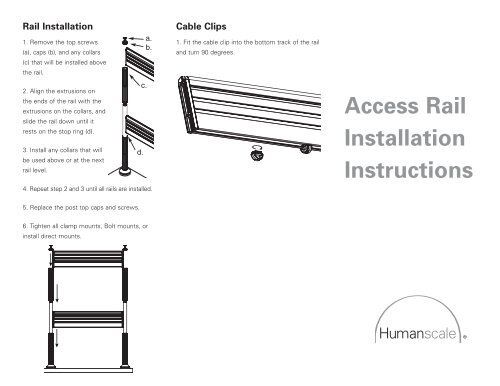
<strong>Rail</strong> <strong>Installation</strong>1. Remove the top screws(a), caps (b), and any collars(c) that will be installed abovethe rail.2. Align the extrusions onthe ends of the rail with theextrusions on the collars, andslide the rail down until itrests on the stop ring (d).3. Install any collars that willbe used above or at the nextrail level.c.4. Repeat step 2 and 3 until all rails are installed.d.a.b.Cable Clips1. Fit the cable clip into the bottom track of the railand turn 90 degrees.<strong>Access</strong> <strong>Rail</strong><strong>Installation</strong><strong>Instructions</strong>5. Replace the post top caps and screws.6. Tighten all clamp mounts, Bolt mounts, orinstall direct mounts.
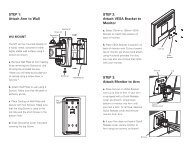
Bolt MountClamp MountDirect Mount<strong>Rail</strong> Length Center to Center Distance Of Holes18” 20.4”24” 26.4”30” 32.4”36” 38.4”42” 44.4”48” 50.4”54” 56.4”60” 62.4”For custom cut rail lengths first measure rail and add2.4” to first measurement to determine hole spacing.1. Drill 1/2" hole through deskin desired location.2. Apply protective foamsheet to bottom of base ifdesired.3. Pass large bolt through holein curved plate (a). Pass boltthrough hole in desk and screwinto vertical assembly (pole).4. Using the table abovemeasure for second oradditional holes andb.c.1. Remove BottomAssembly from Base byloosening screws (a) withhex key.2. Place Vertical Assemblyon Base (b). Make sure thealignment pin/hole areengaged (c).3. Use M12 screw and hexkey to secure the VerticalAssembly to the Base (d).Make sure the screw face isflush with the underside ofthe Base.4. Position Base at deskedge (e).5. From under desk,reattach Bottom Assembly(f). Tighten Screws (a) andClamp Disk Screws (g)to secure.c.e.b.a.d.It may be easier to performthis step after the rails areinstalled.1. Position unit in desiredlocation on work surface.2. Secure using four screwsas shown.Proceed to <strong>Rail</strong> <strong>Installation</strong>Extending Post HeightFor installing Post Extension Kit1. Remove the top screw (a) and cap(b) from the base post2. Remove the top screw, cap,collars (c) and stop rings (d) fromthe stackable post.3. Screw the inner portion of thestackable post (e) into the base post.a.b.c.d.e.repeat steps 1-35. Do Not tighten Bolts untilfull access rail assembly iscompleteProceed to <strong>Rail</strong> <strong>Installation</strong>a.6. Do Not tighten clampsuntil full access rail assemblyis completeProceed to <strong>Rail</strong> <strong>Installation</strong>a.f.g.4. Replace the stop rings and collarson the stackable post* Ensure the locator pins on the stopring align with the notches of the collars.Proceed to <strong>Rail</strong> <strong>Installation</strong>