Giotto 335 LED Surface IS1465 NLNLNLNL D1 ... - Havells-Sylvania
Giotto 335 LED Surface IS1465 NLNLNLNL D1 ... - Havells-Sylvania
Giotto 335 LED Surface IS1465 NLNLNLNL D1 ... - Havells-Sylvania

You also want an ePaper? Increase the reach of your titles
YUMPU automatically turns print PDFs into web optimized ePapers that Google loves.
<strong>Giotto</strong> <strong>335</strong> <strong>LED</strong> <strong>Surface</strong><br />
3032821 3032822 EB<br />
3032851 3032852 DB<br />
3032873 3032874 DALI<br />
3032835 3032836 MW<br />
**<br />
3032887 3032888 DALI MW<br />
See notes overleaf before **<br />
Installation<br />
**<br />
IS2000<br />
Isolate from the mains supply before any maintenance.<br />
Vor Wartungsarbeiten von der Netzspannung trennen.<br />
Veuillez isoler le luminaire du courant avant toute maintenance.<br />
Aislar de la red eléctrica antes de cualquier operación de mantenimiento.<br />
Koppel het toestel af van de netspanning voor elk onderhoud.<br />
Isolera från elnätet innan något underhåll.<br />
<strong>IS1465</strong><br />
Switch Off<br />
Abschalten<br />
Débrancher<br />
Desconectar<br />
Uitschakelen<br />
Stäng av<br />
1 2<br />
3<br />
TOP<br />
TOP EB, DB, DALI<br />
TOP<br />
MW<br />
4<br />
- 230-240V~ 3 x 0.75mm 2 Min. 2 x P/L, N. DIM - 2 x 0.75mm 2 Min. +, -. DALI - 2 x 0.75mm 2 Min <strong>D1</strong>, D2. MW - 2 x 0.75mm 2 Min.<br />
3032821 3032822 EB 3032851 3032852 DB 3032873 3032874 DALI<br />
3032835 3032836 MW 3032887 3032888 DALI MW<br />
N L<br />
N L + -<br />
N L <strong>D1</strong> D2<br />
L N + - LO<br />
L N + - LO<br />
N L N L N L<br />
1-10V<br />
6<br />
! ENSURE DRIVER HAS NOT BEEN POWERED FOR AT LEAST<br />
1(ONE) MINUTE BEFORE CONNECTING <strong>LED</strong> STRING.<br />
EB, DB & DALI<br />
MW & DALI MW<br />
7<br />
CLICK<br />
8<br />
BLUE<br />
BROWN<br />
VIOLET<br />
YELLOW<br />
BROWN<br />
BLUE<br />
VIOLET<br />
YELLOW<br />
ORANGE<br />
N L<br />
CLICK<br />
N L + -<br />
L N + - LO<br />
CLICK
*<br />
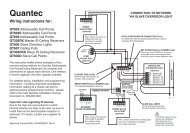
*Microwave Set-up.<br />
Positioning.<br />
The detector should be sited so that the occupants of the room fall inside the detection pattern shown in<br />
Fig. A. Please note that when ceiling mounting, the recommended ceiling height of the sensor head is<br />
2.4m. Note that the lower the sensor is installed the smaller the detection range will be, subject to the<br />
parameters shown on the diagram.<br />
Avoid direct sunlight entering the sensor.<br />
Do not site within 1m of forced air heating or ventilation.<br />
Do not fix to a vibrating surface.<br />
Avoid metallic objects directly in front of the sensor head.<br />
Do not fit to a suspended luminaire.<br />
Fig. A<br />
Please note that when the sensor head is behind a glass/polycarbonate diffuser it will reduce the<br />
detection range by approximately 20%.<br />
2.4m<br />
Settings adjustment:<br />
On initial power up, the factory set default settings are:<br />
Time = 20 minutes.<br />
Lux = Maximum (i.e. lights will switch on in full daylight on detection)<br />
Sensitivity = Maximum.<br />
Time.<br />
All versions - set the time period using the push button adjustment, see Fig.B. The factory default is 20<br />
minutes.<br />
Lux.<br />
MWS5 (Non-dimming) - the switch level on lux setting determines the ambient light level at which the<br />
lights turn on. This can be set using the push button adjustment. See Fig. B. Setting to maximum (level 7)<br />
ensures that lights always come on (this is also the default setting).<br />
Fig. B<br />
Function Button<br />
Adjustment Button<br />
8m<br />
12m<br />
5m<br />
Lens<br />
Green <strong>LED</strong> = Time<br />
Red <strong>LED</strong> = Lux/Presence Setting Indicator<br />
Yellow <strong>LED</strong> = Sensitivity/Absence Setting Indicator<br />
Push button adjustment<br />
Time, Lux and Sensitivity<br />
Press and hold either button for at least 5 seconds then release: one of the <strong>LED</strong>s positioned behind the<br />
lens will flass to show which function has been selected.<br />
The <strong>LED</strong> will flash a number of times (between 1 and 7) to indicate the current setting (minimum = 1<br />
flash, maximum = 7 flashes).<br />
To change between Time (green, Lux (red) and Sensitivity (yellow) press and release the function button<br />
until the required <strong>LED</strong> shows.<br />
When the function has been selected press the adjustment button to increase the setting by 1 step.<br />
Pressing the button after reaching 7 flashes will return the setting to 1 flash.<br />
Time settings are as follows: 1 flash = 1 minute; 2 flashes = 5 minutes; 3 flashes = 10 minutes; 4 flashes<br />
= 15 minutes; 5 flashes = 20 minutes; 6 flashes = 25 minutes; 7 flashes = 30 minutes.<br />
Lux settings<br />
MWS5 - 1 flash turns on when very dark; 7 flashes turns on regardless of ambient light.<br />
Sensitivity: 1 flash minimum; 7 flashes maximum.<br />
After finishing adjustment the <strong>LED</strong> will show the new setting 5 times and then return to operation mode.<br />
Default settings<br />
Press and hold both buttons together: after 3 seconds the green <strong>LED</strong> lights. Release immediately to<br />
restore the factory settings. Then isolate the supply, leave powered down for approximately 10 seconds<br />
and then re-power up the unit - the factory default settings will then be restored.<br />
Master Slave Slave<br />
1 2 3<br />
L N + - Lo L N + - L N + -<br />
10 Max.<br />
Fault Finding<br />
Load does not come on?<br />
Check to see if the live supply to the circuit is good. Strap across the L and LIVE OUT (where used)<br />
terminal to turn the load on.<br />
If the supply and wiring are good, check the LUX level setting. Increase the LUX level setting to allow<br />
the controller to turn on at higher ambient natural light level.<br />
Lights do not go off?<br />
Ensure that the area is left unoccupied for longer than the selected timer setting.<br />
Make sure that the sensor is not adjacent to circulating air, heaters or lamps.<br />
If the unit ‘false triggers’ reduce the sensitivity using the sensitivity settings.<br />
Suitable for use indoors<br />
Geeignet für Innenanwendung<br />
Pour un usage interne<br />
Adecuada para uso en interiores<br />
Geschikt voor gebruik binnen<br />
Lämplig för inomhusbruk<br />
Replace any cracked protective shield.<br />
Dieses symbol bedeutet, dass defekte schutzgläser sofort ersetzt werden müssen.<br />
Ce symbol indique que vous devez remplacer tout verre de protection félé.<br />
Este simpolo indica que hay que 'reemplazar filtros en caso de rotura o desperfectos'.<br />
Dette symbolet indikerer at alle delagte (sprukne) sikkerhetglass m skiftes.<br />
Valaisinta el saa kytt ilman suojalasia vioitunut suojalasi on vaihdettava uuteen ennen valaisimen kyttöön ottoa.<br />
This Electrical Product<br />
MUST be recycled.<br />
Should you have any queries with this product please contact your local Lumiance stockist<br />
11.11