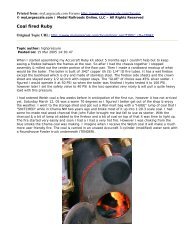
Making a Banjo Fitting - Santa Cruz Lumber Co.
Making a Banjo Fitting - Santa Cruz Lumber Co.
Making a Banjo Fitting - Santa Cruz Lumber Co.

Create successful ePaper yourself
Turn your PDF publications into a flip-book with our unique Google optimized e-Paper software.
Printed from: myLargescale.com Forums<br />
http://www.mylargescale.com/<strong>Co</strong>mmunity/Forums/tabid/56/Default.aspx<br />
© myLargescale.com / Model Railroads Online, LLC – All Rights Reserved<br />
<strong>Making</strong> a <strong>Banjo</strong> <strong>Fitting</strong><br />
Original Topic URL:<br />
http://www.mylargescale.com/<strong>Co</strong>mmunity/Forums/tabid/56/forumid/11/postid/4483/view/topic/Default.aspx<br />
Topic author: cliffordward<br />
Posted on: 11 Jan 2008<br />
I realize this subject may be elementary to experienced live steamers on the forum, but for the sake of<br />
those newer to the hobby I thought I would share my recent experiences adding a steam take off to an<br />
existing boiler.....Hopefully sharing the info will be of assistance to others....<br />
Here's a dilemma most of us have faced at one time or another....I wanted to add a Weltek Whistle to my<br />
Mike Chaney Catatonk Shay. Mike leaves an extra steam port on the boiler in the form of a capped off<br />
bushing in front of steam regulator. Unfortunately on my Shay this is already occupied with a Goodall<br />
valve fitting.<br />
So how do we obtain a steam take off for the whistle?....time to turn to the model engineer's best friend,<br />
the banjo fitting. A banjo fitting looks like a very thick donut like washer and has a tube silver soldered to<br />
the edge with a hole reaching to the inside of the "donut". Equally important is the banjo bolt which is<br />
hollow with a turned down outside section and a hole which provides a route for steam to flow through the<br />
bolt, into the banjo "donut" and out through the tube. This explanation is really better served by looking<br />
at some photos, so let's get on with how I added a banjo fitting on my Shay. This "tutorial" of sorts is not<br />
meant to be a "how to" for every situation, but rather is offered as an example of how a banjo bolt can be<br />
adapted to a variety of situations. <strong>Making</strong> a banjo bolt and donut fitting is extremely easy and can be<br />
done on any lathe...let's get on with the show:<br />
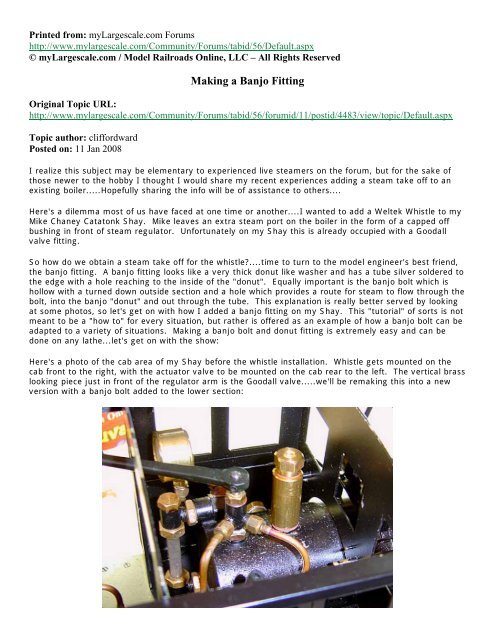
Here's a photo of the cab area of my Shay before the whistle installation. Whistle gets mounted on the<br />
cab front to the right, with the actuator valve to be mounted on the cab rear to the left. The vertical brass<br />
looking piece just in front of the regulator arm is the Goodall valve.....we'll be remaking this into a new<br />
version with a banjo bolt added to the lower section:
Here's the original Goodall Valve. Great for the boiler refilling function it is made for, but we'll be<br />
scrapping the main body and turning up a new piece which incorporates the banjo bolt<br />
This is a typical example of how I do my "drawing work" for a one-off project like this. Scratching out the<br />
needed dimensions quickly on these post it notes allows me to sort out the shape of the needed part and<br />
check clearances. As you can see I didn't hit the numbers the first time and had to scratch through things<br />
a few times. But this sort of figuring goes quickly, and having all the machining dimensions worked out<br />
before going to the lathe makes turning work go more quickly:
Here's the new <strong>Banjo</strong> Bolt after first turning operations. I started with a piece of hex so I could have a<br />
built in means of tightening the bolt on the boiler. Easily seen in this photo (just in front of the cutting<br />
tool) is the turned down section which will provide the passageway for steam to travel from the inner bore<br />
of the bolt out through the banjo fitting:<br />
Now we come to drilling the hole through the <strong>Banjo</strong> bolt. Normally this hole would only extend up to the<br />
turned down area with the upper portionof the bolt remaining solid. In this application, however, I wanted<br />
to keep the Goodall valve function so the bore extends clear though the bolt and we will later add treads<br />
to the top for the Goodall valve to screw into:
Next comes cutting threads on the lower end of the banjo bolt. In this photo I am using a tailstock die<br />
holder....it makes quick work of cutting the threads...I recommend adding this tool to your arsenal of<br />
lathe tooling. Note that up to now we have performed all operations without removing the stock from the<br />
3 jaw chuck. Doing everything in one set up keeps everything lined up properly and makes the project go<br />
quickly. If you look closely you can see that the turned down area on the banjo bolt starts just above the<br />
threads. This will be more clear when we look at the finished product:<br />
Finally the banjo bolt is parted off and now begins to look more like it's finished form:
Now that the banjo bolt has been cut off, it is turned around in the lathe chuck, and in this photo is being<br />
faced off in preparation for boring and internal threading. This is the top of the banjo bolt where the<br />
Goodall valve will screw into. Note also that small pieces of shim stock are being used on the jaws of the<br />
lathe chuck to protect the finished outer surface of the banjo bolt:
Here's the finished banjo bolt showing the Goodall valve and also the banjo fitting with steam tube. The<br />
banjo fitting "donut" is a simple straight turned piece with a bore just large enough to slide over the<br />
shoulder on the banjo bolt. This shoulder is seen just above the cross drilled hole in the turned down area<br />
of the banjo bolt. In use the bolt tighens down on the banjo fitting donut and with the red fiber washers<br />
shown creates a steam tight seal.<br />
The idea behind the banjo bolt is that when installed there is an air gap all around the banjo bolt where<br />
steam flows from the bolt bore out to the banjo fitting. The hole and attached tube of the banjo fitting<br />
donut carries the steam out to whatever accessory is being added. In this case the tube is the steam<br />
supply line for the whistle:
And here's two views of the new banjo bolt and fitting in use with the whistle installed and functioning.<br />
Using the custom made banjo bolt and fitting retains use of the Goodall valve, and makes for a neat and<br />
tidy installation:
For those interested in studying this installation up close, I'll have the Shay at Cabin Fever next week and<br />
will keep it out on the table so it will be easy to look at.<br />
Hopefully this tutorial has provided some food for thought and given some ideas for your next live steam<br />
project.
Replies:<br />
Reply author: rbednarik<br />
Replied on: 11 Jan 2008<br />
Cliff,<br />
Superb! I actually have a few of these to make after Cabin Fever. Tailstock die holders sure do speed up<br />
the threading process. Unfortunately, the Unimat jewelers lathes didn't come with said option...unless<br />
someone makes a 1/2" shank die holder, I'm stuck with doing it by hand....which I don't mind, but it<br />
would be quicker on the parts I have to make multiples of.<br />
Maybe I can snag one at Cabin Fever this next week, maybe.....<br />
Reply author: Chuck K<br />
Replied on: 12 Jan 2008<br />
Cliff, what size and make of lathe are you using? It looks pretty stout. Thanks.<br />
Reply author: Dwight Ennis<br />
Replied on: 12 Jan 2008<br />
Thanks for the tutorial Cliff! Perfect for us budding machinists.<br />
Can anyone recommend a Tailstock die holder for a Sherline lathe?<br />
Reply author: Gary Armitstead<br />
Replied on: 12 Jan 2008<br />
Dwight<br />
I ran across this Sherline tailstock die holder this morning. Don't know if it is what you are looking for.<br />
http://www.sherline.com/1206pg.htm<br />
Reply author: HMeinhold<br />
Replied on: 12 Jan 2008<br />
Cliff,<br />
thanks for the tutorial. Here my (additional?) 2 cents<br />
I found, that the much neglected self centering 4 jaw chuck is ideal for cross-drilling (round/square/hex):
For thread cutting in the lathe I use the drill chuck to steady the die. I learned this trick many years ago<br />
during an internship.<br />
Reply author: modlmkr<br />
Replied on: 12 Jan 2008<br />
Superb! I actually have a few of these to make after Cabin Fever. Tailstock die holders sure do speed up the threading process.<br />
Unfortunately, the Unimat jewelers lathes didn't come with said option...unless someone makes a 1/2" shank die holder, I'm<br />
stuck with doing it by hand....which I don't mind, but it would be quicker on the parts I have to make multiples of.<br />
Find an old taper shank drill. MT2 are easy to find, often thrown out or real cheap. Cut the drill part off,<br />
and if necessary turn the remaining part of the shank to a handy size- I used 1/2". Then turn a simple
cylinder with a 1/2" hole through it, and a larger hole in the end to hold the die. I made mine about 1 1/2"<br />
dia, maybe 3" long. I cut one end to fit a 1" die, the other to fit some other size I had. The taper shank<br />
goes into the tailstock, the cylinder hold the die and simply slides on the 1/2" shank. I didn’t even knurl it,<br />
I figure if the load is so great I cant hold it something is wrong and better to let is slip than break<br />
something.<br />
Reply author: rbednarik<br />
Replied on: 12 Jan 2008<br />
Posted By modlmkr on 01/12/2008 2:12 PM<br />
Find an old taper shank drill. MT2 are easy to find, often thrown out or real cheap. Cut the drill part off, and if necessary turn the<br />
remaining part of the shank to a handy size- I used 1/2". Then turn a simple cylinder with a 1/2" hole through it, and a larger<br />
hole in the end to hold the die. I made mine about 1 1/2" dia, maybe 3" long. I cut one end to fit a 1" die, the other to fit some<br />
other size I had. The taper shank goes into the tailstock, the cylinder hold the die and simply slides on the 1/2" shank. I didn’t<br />
even knurl it, I figure if the load is so great I cant hold it something is wrong and better to let is slip than break something.<br />
Never thought of doing it that way...I'm putting that on the to-do list for after the show. Many thanks for the idea!<br />
See you at CF.<br />
Reply author: Chris Scott<br />
Replied on: 12 Jan 2008<br />
Last summer I was looking for a particular type of tailstock die holder and came across a nyumber of<br />
sources:<br />
Micro Mark:<br />
http://www.aresserver.com/Ares/Ares.asp?MerchantID=RET01229&Action=Catalog&Type=Product&ID=82774<br />
Best but custom made:<br />
Model Engineer's Workshop:<br />
http://homepage.ntlworld.com/v.ford/tsdh.htm
Axminster Power Tool Centre Ltd:<br />
http://www.axminster.co.uk/product-Axminster-Axminster-Tailstock-Die-Holder-453621.htm<br />
Little Machine Shop:<br />
http://www.littlemachineshop.com/products/product_view.php?ProductID=2572&category
Peatol Machine Tools:<br />
http://homepage.ntlworld.com/tony.jeffree/accessories.html<br />
(scroll down page)<br />
Reply author: rbednarik<br />
Replied on: 12 Jan 2008<br />
Well,<br />
Of course my mind would slip on that. All very good sites, but since I have been away from the lathe for<br />
the week, I had forgotten that the tailstock can only accept 1/4" shank fittings. I have the M12 tap/die to<br />
thread a shank nut or insert, so looks like I'll be machining some parts this winter.<br />
Reply author: livesteam5629<br />
Replied on: 13 Jan 2008<br />
The Sherline tailstock is a Morris Taper zero MT0. Sherline has an adaptor for Jacobs chucks etc.<br />
Reply author: clifforddward<br />
Replied on: 13 Jan 2008<br />
Lots of great additonal comments here....just goes to show there must be at least a dozen techniques for<br />
every machining job.<br />
Ryan, since your lathe accepts 1/4" shank tooling in the tailstock it may be easiest to buy the die<br />
holder you like, then adapt the shank. The tool you obtain is unlikely to have a hardened shank, and it is<br />
a quick job to turn it down to the size you need....I can help you out with this if you don't have access to a<br />
bigger lathe. Biggest thing for you to think about is how long overall the body of the dieholder is....the<br />
bed on a unimat is pretty short, so overall length of any diestock holder you obtain is a consideration. You<br />
will want to obtain a die holder as short as possible to avoid using up precious bed length. Since the<br />
Sherline lathe is also fairly short maybe their offering would be a good place to start. After overall length<br />
main thing to think about is having the ability for the dieholder to slide along a shaft...that way everything<br />
stays lined up as the threads are cut.<br />
Here's another photo of my diestock holder showing the separate pieces. Mine holds both 13/16" and 1"<br />
dies...nice as it covers most of the dies I use:
This one would be too long for the Unimat, but others have already posted some photos of diestock<br />
holders that would be sized OK for your needs.<br />
Let's talk at Cabin Fever...I am certain you will be able to locate a die holder to fit your lathe, maybe even<br />
without modification.<br />
Reply author: clifforddward<br />
Replied on: 13 Jan 2008<br />
Hi Chuck:<br />
I have a 9" South Bend lathe in my tiny home shop which occupies a spare room in our home. Even<br />
though I am shoehorned into a tight space the advantage is that the tools are readily availble for use and<br />
I get more projects completed that way. Of course it helps having the most understanding wife on the<br />
planet as she allows me to do machine work in the house....then again she says if my shop was located<br />
elsewhere she would never see me!
Here's the lathe in my workshop:<br />
I started out with a Chinese 7x14 Mini-Lathe....after a year or so of figuring out how to machine parts on<br />
it, I knew what I wanted in a lathe and could shop intelligently. I bought this lathe from the estate of a<br />
model engineer hobbiest....since it had never seen production work it was in like new condition. <strong>Co</strong>st<br />
more than a "rebuild project" but I have never regretted the purchase as holding fine tolerances are just a<br />
matter of a steady hand...the lathe is up to most any task I need.<br />
Even though I used a larger lathe, as I mentioned earlier on this banjo fitting project can be done on any<br />
sized lathe...I made them before on my 7x14 mini-lathe and I am certain Ryan will be able to to the same<br />
on his Unimat.<br />
Printed from: myLargescale.com Forums<br />
http://www.mylargescale.com/<strong>Co</strong>mmunity/Forums/tabid/56/Default.aspx<br />
© myLargescale.com / Model Railroads Online, LLC – All Rights Reserved